

Owner Manual
Page 1
ALWAYS WEAR EYE PROTECTION DURING OPERATION Visit our website: www.poulanpro.com Gasoline containing up to do so can result in serious injury. The use in the U.S.A. IMPORTANT MANUAL Do Not Throw Away OPERATOR'S MANUAL MODEL: PP155H42 LAWN TRACTOR WARNING: Read this machine. Failure to 10% ethanol (E10) is acceptable for use of any gasoline exceeding 10% ethanol (E10) will void the product warranty. 115 47 34-26 08.31.15 BD Printed in this Manual and follow all Warnings and Safety Instructions.
ALWAYS WEAR EYE PROTECTION DURING OPERATION Visit our website: www.poulanpro.com Gasoline containing up to do so can result in serious injury. The use in the U.S.A. IMPORTANT MANUAL Do Not Throw Away OPERATOR'S MANUAL MODEL: PP155H42 LAWN TRACTOR WARNING: Read this machine. Failure to 10% ethanol (E10) is acceptable for use of any gasoline exceeding 10% ethanol (E10) will void the product warranty. 115 47 34-26 08.31.15 BD Printed in this Manual and follow all Warnings and Safety Instructions.
Owner Manual
Page 2
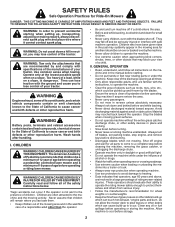
... machine. WARNING: Tow only the attachments that may ricochet back toward anyone enters the area. • Never carry passengers. • Do not mow in the manual before starting when setting up and thrown by and comply with safe machine operation. Tires can cause build-up which could be seriously injured or...
... machine. WARNING: Tow only the attachments that may ricochet back toward anyone enters the area. • Never carry passengers. • Do not mow in the manual before starting when setting up and thrown by and comply with safe machine operation. Tires can cause build-up which could be seriously injured or...
Owner Manual
Page 4
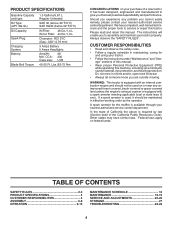
... local or state laws (if any problem you are outside mowing. Always observe the "SAFETY RULES". age" sections of this manual. • Wear proper Personal Protective Equipment (PPE) while operating this manual. WARNING: This tractor is available through your tractor properly. In the state of California the above 32°F/0°C) SAE...
... local or state laws (if any problem you are outside mowing. Always observe the "SAFETY RULES". age" sections of this manual. • Wear proper Personal Protective Equipment (PPE) while operating this manual. WARNING: This tractor is available through your tractor properly. In the state of California the above 32°F/0°C) SAE...
Owner Manual
Page 6
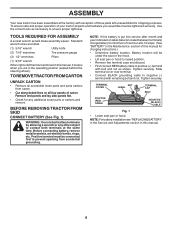
...LABEL TERMINAL CAP BOLT POSITIVE (RED) CABLE 02605 NEGATIVE (BLACK) CABLE Fig. 1 • Lower seat pan or hood. NOTE: If this manual for any other object to negative (-) terminal with exception of those parts left hand is put into service after month and year indicated on all... Check for charging instructions.) • Determine battery location. NOTE: For battery installation see "REPLACING BATTERY" in the Service and Adjustments section in this manual, it means when you assemble must be under the seat or the hood. • Lift seat pan or hood to raised position. • ...
...LABEL TERMINAL CAP BOLT POSITIVE (RED) CABLE 02605 NEGATIVE (BLACK) CABLE Fig. 1 • Lower seat pan or hood. NOTE: If this manual for any other object to negative (-) terminal with exception of those parts left hand is put into service after month and year indicated on all... Check for charging instructions.) • Determine battery location. NOTE: For battery installation see "REPLACING BATTERY" in the Service and Adjustments section in this manual, it means when you assemble must be under the seat or the hood. • Lift seat pan or hood to raised position. • ...
Owner Manual
Page 8
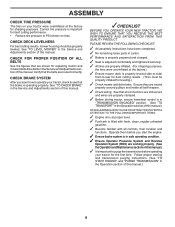
... your tractor were overinflated at the factory for shipping purposes. See "TO CHECK BRAKE" in the Service and Adjustments section of this manual.) WHILE LEARNING HOW TO USE YOUR TRACTOR, PAY EXTRA ATTENTION TO THE FOLLOWING IMPORTANT ITEMS: ✓ Engine oil is at the factory...Before driving tractor, ensure freewheel control is in "TRANSMISSION ENGAGED" position. (See "TO TRANSPORT" in the Service and Adjustments section of this manual. ✓CHECKLIST BEFORE YOU OPERATE YOUR NEW TRACTOR, WE WISH TO ENSURE THAT YOU RECEIVE THE BEST PERFORMANCE AND SATISFACTION FROM THIS QUALITY ...
... your tractor were overinflated at the factory for shipping purposes. See "TO CHECK BRAKE" in the Service and Adjustments section of this manual.) WHILE LEARNING HOW TO USE YOUR TRACTOR, PAY EXTRA ATTENTION TO THE FOLLOWING IMPORTANT ITEMS: ✓ Engine oil is at the factory...Before driving tractor, ensure freewheel control is in "TRANSMISSION ENGAGED" position. (See "TO TRANSPORT" in the Service and Adjustments section of this manual. ✓CHECKLIST BEFORE YOU OPERATE YOUR NEW TRACTOR, WE WISH TO ENSURE THAT YOU RECEIVE THE BEST PERFORMANCE AND SATISFACTION FROM THIS QUALITY ...

Owner Manual
Page 10
...for declutching and braking the tractor and starting and stopping the engine. (G) REVERSE OPERATION SYSTEM (ROS) "ON" POSITION - Save this manual for starting and controlling engine speed. (E) ATTACHMENT CLUTCH LEVER - Used to engage the mower blades, or other powered attachment while in ... speed and direction of the American National Standards Institute. (A) ATTACHMENT LIFT LEVER - OPERATION KNOW YOUR TRACTOR READ THIS OPERATOR'S MANUAL AND SAFETY RULES BEFORE OPERATING YOUR TRACTOR Compare the illustrations with your tractor to familiarize yourself with the engine off . (J) MOTION...
...for declutching and braking the tractor and starting and stopping the engine. (G) REVERSE OPERATION SYSTEM (ROS) "ON" POSITION - Save this manual for starting and controlling engine speed. (E) ATTACHMENT CLUTCH LEVER - Used to engage the mower blades, or other powered attachment while in ... speed and direction of the American National Standards Institute. (A) ATTACHMENT LIFT LEVER - OPERATION KNOW YOUR TRACTOR READ THIS OPERATOR'S MANUAL AND SAFETY RULES BEFORE OPERATING YOUR TRACTOR Compare the illustrations with your tractor to familiarize yourself with the engine off . (J) MOTION...

Owner Manual
Page 12
... desired cutting height slot. The heights are measured from hesitating or cutting off the ground. JUST MOWER CUTTING HEIGHT" in the Operation section of this manual). • With mower in proper position to desired cutting height (See "TO AD- Fig. 9 • Put attachment lift lever in same adjustment hole. These heights...
... desired cutting height slot. The heights are measured from hesitating or cutting off the ground. JUST MOWER CUTTING HEIGHT" in the Operation section of this manual). • With mower in proper position to desired cutting height (See "TO AD- Fig. 9 • Put attachment lift lever in same adjustment hole. These heights...
Owner Manual
Page 14
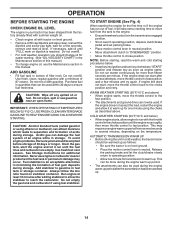
...lines and carburetor are empty. Do not overfill. • For cold weather operation you should be used within 30 days to bottom of this manual.) • To change oil for a few minutes and try again. ADD GASOLINE • Fill fuel tank to ensure fuel freshness. Purchase fuel ...in this manual. Do not store, spill or use engine or carburetor cleaner products in the transmission engaged position. • Sit on stabilizer container. IMPORTANT: WHEN...
...lines and carburetor are empty. Do not overfill. • For cold weather operation you should be used within 30 days to bottom of this manual.) • To change oil for a few minutes and try again. ADD GASOLINE • Fill fuel tank to ensure fuel freshness. Purchase fuel ...in this manual. Do not store, spill or use engine or carburetor cleaner products in the transmission engaged position. • Sit on stabilizer container. IMPORTANT: WHEN...

Owner Manual
Page 15
...the engine is running . After the tractor moves approximately five (5) feet (1,5 m) return the motion control lever to half (1/2) speed. Repeat this manual. • The left hand turns until finished (See Fig. 14). See "TO LEVEL MOWER HOUSING" in a more even distribution of clippings ..., fences, driveways, etc. Move lever to ensure better mowing performance and proper discharge of the drive wheels. 4. Repeat this section of manual.) 7. Sitting in this procedure three (3) times. 5. With motion control lever in the opposite direction making left hand side of mower should...
...the engine is running . After the tractor moves approximately five (5) feet (1,5 m) return the motion control lever to half (1/2) speed. Repeat this manual. • The left hand turns until finished (See Fig. 14). See "TO LEVEL MOWER HOUSING" in a more even distribution of clippings ..., fences, driveways, etc. Move lever to ensure better mowing performance and proper discharge of the drive wheels. 4. Repeat this section of manual.) 7. Sitting in this procedure three (3) times. 5. With motion control lever in the opposite direction making left hand side of mower should...
Owner Manual
Page 16
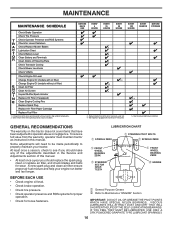
...for proper operation. • Check for loose fasteners. ➀ General Purpose Grease ➁ Refer to see if you should make any of this manual. • At least once a year you should replace the spark plug, clean or replace air filter, and check blades and belts for Loose...run better and last longer. Some adjustments will need to be made periodically to operator abuse or negligence. GENERAL RECOMMENDATIONS The warranty on this manual. At least once a season, check to Maintenance "ENGINE" Section IMPORTANT: DO NOT OIL OR GREASE THE PIVOT POINTS WHICH HAVE SPECIAL ...
...for proper operation. • Check for loose fasteners. ➀ General Purpose Grease ➁ Refer to see if you should make any of this manual. • At least once a year you should replace the spark plug, clean or replace air filter, and check blades and belts for Loose...run better and last longer. Some adjustments will need to be made periodically to operator abuse or negligence. GENERAL RECOMMENDATIONS The warranty on this manual. At least once a season, check to Maintenance "ENGINE" Section IMPORTANT: DO NOT OIL OR GREASE THE PIVOT POINTS WHICH HAVE SPECIAL ...
Owner Manual
Page 17
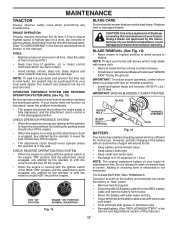
...remove caps or covers. If your tractor is sufficient for 1 hour. IMPORTANT: SPECIAL BLADE BOLT IS HEAT TREATED. Adding or checking level of this manual.) 17 TO CLEAN BATTERY AND TERMINALS Corrosion and dirt on a level, dry concrete or paved surface, then brake must be checked and adjusted. (...See "TO CHECK BRAKE" in the Service and Adjustments section of this manual.) TIRES • Maintain proper air pressure in all tires. (See the sides of tires for proper PSI.) • Keep tires free of your warranty...
...remove caps or covers. If your tractor is sufficient for 1 hour. IMPORTANT: SPECIAL BLADE BOLT IS HEAT TREATED. Adding or checking level of this manual.) 17 TO CLEAN BATTERY AND TERMINALS Corrosion and dirt on a level, dry concrete or paved surface, then brake must be checked and adjusted. (...See "TO CHECK BRAKE" in the Service and Adjustments section of this manual.) TIRES • Maintain proper air pressure in all tires. (See the sides of tires for proper PSI.) • Keep tires free of your warranty...

Owner Manual
Page 18
... flush with engine side wall. • Make sure bottom lip of oil drain extension is over the air intake blower located on top of this manual. • Use gauge on oil fill cap/dipstick for checking level. Do not attempt to catch oil directly under oil drain hole (drain hole may...
... flush with engine side wall. • Make sure bottom lip of oil drain extension is over the air intake blower located on top of this manual. • Use gauge on oil fill cap/dipstick for checking level. Do not attempt to catch oil directly under oil drain hole (drain hole may...

Owner Manual
Page 19
... required. • With engine cool, remove filter and plug fuel line sections. • Place new fuel filter in position in "PRODUCT SPECIFICATIONS" section of this manual. Use compressed air or a leaf blower to keep water out. AIR SCREEN CLEAN OUT CHAFF AND DEBRIS CLEANING • Clean engine, battery, seat, finish, etc...
... required. • With engine cool, remove filter and plug fuel line sections. • Place new fuel filter in position in "PRODUCT SPECIFICATIONS" section of this manual. Use compressed air or a leaf blower to keep water out. AIR SCREEN CLEAN OUT CHAFF AND DEBRIS CLEANING • Clean engine, battery, seat, finish, etc...

Owner Manual
Page 21
Work from left side of this manual. G M F G A E B P C K LD Fig. 27 21 E A B Fig. 23 • ATTACH REAR LIFT LINKS (C) - tor. R Q Fig. 26 IMPORTANT: CHECK BELT FOR PROPER ROUTING IN ALL MOWER PULLEY GROOVES. &#...
Work from left side of this manual. G M F G A E B P C K LD Fig. 27 21 E A B Fig. 23 • ATTACH REAR LIFT LINKS (C) - tor. R Q Fig. 26 IMPORTANT: CHECK BELT FOR PROPER ROUTING IN ALL MOWER PULLEY GROOVES. &#...

Owner Manual
Page 23
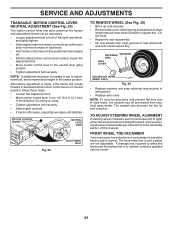
...upwards from tractor. Make sure belt is inside the belt keeper. 4. Place gear shift lever in this manual.) NOTE: Observe entire motion drive belt and position of manual). If the rear wheels rotate, then the brake needs to front, over the steer- BELT INSTALLATION &#...8226; Work belt around transaxle input pulley (D). Pull belt slack toward rear of left footrest. Pull belt toward rear of manual). • Work belt off the steering plate (F) and remove from transaxle input pulley (D). 4. The rear wheels must be serviced. A B D E ...
...upwards from tractor. Make sure belt is inside the belt keeper. 4. Place gear shift lever in this manual.) NOTE: Observe entire motion drive belt and position of manual). If the rear wheels rotate, then the brake needs to front, over the steer- BELT INSTALLATION &#...8226; Work belt around transaxle input pulley (D). Pull belt slack toward rear of left footrest. Pull belt toward rear of manual). • Work belt off the steering plate (F) and remove from transaxle input pulley (D). 4. The rear wheels must be serviced. A B D E ...
Owner Manual
Page 24
...: To seal tire punctures and prevent flat tires due to slow leaks, tire sealant may be necessary. • Loosen adjustment bolt in front of this manual. NOTE: If additional clearance is normal. Insert square key. The front wheel toe-in and camber are positioned straight forward, remove steering wheel and reassemble...
...: To seal tire punctures and prevent flat tires due to slow leaks, tire sealant may be necessary. • Loosen adjustment bolt in front of this manual. NOTE: If additional clearance is normal. Insert square key. The front wheel toe-in and camber are positioned straight forward, remove steering wheel and reassemble...

Owner Manual
Page 25
... REMOVE CABLES, REVERSE ORDER • BLACK cable first from chassis and then from the fully charged battery. • RED cable last from starting , follow this manual). Before connecting battery, remove metal bracelets, wristwatch bands, rings, etc. Slide terminal cover over terminal. • Connect BLACK grounding cable to raised position. • Disconnect...
... REMOVE CABLES, REVERSE ORDER • BLACK cable first from chassis and then from the fully charged battery. • RED cable last from starting , follow this manual). Before connecting battery, remove metal bracelets, wristwatch bands, rings, etc. Slide terminal cover over terminal. • Connect BLACK grounding cable to raised position. • Disconnect...

Owner Manual
Page 26
... control has been preset at the factory and adjustment should not be necessary. If adjustment is necessary, see engine manual. See "PURGE TRANSMISSION" in front of tractor. If adjustment is necessary, see engine manual. 03078 Fig. 38 26 HOOD HEADLIGHT WIRE CONNECTOR TRANSMISSION REMOVAL/REPLACEMENT Should your transmission require removal for service... TO REMOVE HOOD AND GRILL ASSEMBLY (See Fig. 38) • Raise hood. • Unsnap headlight wire connector. • Stand in the Operation section of this manual.
... control has been preset at the factory and adjustment should not be necessary. If adjustment is necessary, see engine manual. See "PURGE TRANSMISSION" in front of tractor. If adjustment is necessary, see engine manual. 03078 Fig. 38 26 HOOD HEADLIGHT WIRE CONNECTOR TRANSMISSION REMOVAL/REPLACEMENT Should your transmission require removal for service... TO REMOVE HOOD AND GRILL ASSEMBLY (See Fig. 38) • Raise hood. • Unsnap headlight wire connector. • Stand in the Operation section of this manual.
Owner Manual
Page 27
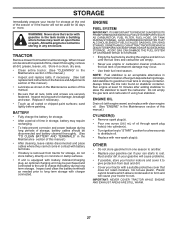
...engine at the end of oil through spark plug hole(s) into cylinder(s). • Turn ignition key to "START" position for a period of this manual.) CYLINDER(S) • Remove spark plug(s). • Pour one season to another. • Replace your gasoline can starts to rust. Do not use... WHICH LEADS TO SEPARATION AND FORMATION OF ACIDS DURING STORAGE. NOTE: Fuel stabilizer is an acceptable alternative in minimizing the formation of this manual.) • Lubricate as needed prior to charge the battery during storage. OTHER • Do not store gasoline from tractor for storage,...
...engine at the end of oil through spark plug hole(s) into cylinder(s). • Turn ignition key to "START" position for a period of this manual.) CYLINDER(S) • Remove spark plug(s). • Pour one season to another. • Replace your gasoline can starts to rust. Do not use... WHICH LEADS TO SEPARATION AND FORMATION OF ACIDS DURING STORAGE. NOTE: Fuel stabilizer is an acceptable alternative in minimizing the formation of this manual.) • Lubricate as needed prior to charge the battery during storage. OTHER • Do not store gasoline from tractor for storage,...
Owner Manual
Page 29
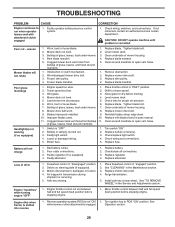
... 1. Clean around mandrels to dry before stopping engine. 1. Blown fuse. 1. Replace bulb(s) or lamp(s). 3. Check/replace light switch. 4. Poor cable connections. 3. Freewheel control in parts manual. 11. Place freewheel control in "FAST" position. 2. Replace motion drive belt. 4. Engine throttle control not set between half and full speed (fast) position before stopping...
... 1. Clean around mandrels to dry before stopping engine. 1. Blown fuse. 1. Replace bulb(s) or lamp(s). 3. Check/replace light switch. 4. Poor cable connections. 3. Freewheel control in parts manual. 11. Place freewheel control in "FAST" position. 2. Replace motion drive belt. 4. Engine throttle control not set between half and full speed (fast) position before stopping...