
Owner Manual
Page 2
..., removing the grass catcher, or unclogging the discharge chute. • Operate machine only in neutral, you to cool before operating a riding lawn mower. I. Never assume that children be seriously injured or interfere with specifications of the manufacturer of a child. GENERAL OPERATION • Read, understand, and follow all instructions on a slope, is dangerous. Avoid discharging material against a wall or obstruction. Allow machine to lose control of...
..., removing the grass catcher, or unclogging the discharge chute. • Operate machine only in neutral, you to cool before operating a riding lawn mower. I. Never assume that children be seriously injured or interfere with specifications of the manufacturer of a child. GENERAL OPERATION • Read, understand, and follow all instructions on a slope, is dangerous. Avoid discharging material against a wall or obstruction. Allow machine to lose control of...

Owner Manual
Page 3
.... • If you strike a foreign object, stop . Replace gas cap and tighten securely. NEVER operate a machine with the engine running . • Check grass catcher components and the discharge chute frequently and replace with a machine that does not function properly. • Keep machine free of the fuel tank or container opening at the hitch point. • Follow the manufacturer's recommendation for weight limits for holes, ruts, bumps, rocks, or other...
.... • If you strike a foreign object, stop . Replace gas cap and tighten securely. NEVER operate a machine with the engine running . • Check grass catcher components and the discharge chute frequently and replace with a machine that does not function properly. • Keep machine free of the fuel tank or container opening at the hitch point. • Follow the manufacturer's recommendation for weight limits for holes, ruts, bumps, rocks, or other...
Owner Manual
Page 4
... operating this manual. TABLE OF CONTENTS SAFETY RULES 2-3 PRODUCT SPECIFICATIONS 4 CUSTOMER RESPONSIBILITIES 4 ASSEMBLY 6-8 OPERATION 9-15 MAINTENANCE SCHEDULE 16 MAINTENANCE 16-19 SERVICE AND ADJUSTMENTS 20-26 STORAGE 27 TROUBLESHOOTING 28-29 4 We have similar laws. Federal laws apply on your nearest authorized service center/department. The instructions will enable you are outside mowing. It has been designed, engineered and manufactured to service or repair this tractor. CCA: Case size...
... operating this manual. TABLE OF CONTENTS SAFETY RULES 2-3 PRODUCT SPECIFICATIONS 4 CUSTOMER RESPONSIBILITIES 4 ASSEMBLY 6-8 OPERATION 9-15 MAINTENANCE SCHEDULE 16 MAINTENANCE 16-19 SERVICE AND ADJUSTMENTS 20-26 STORAGE 27 TROUBLESHOOTING 28-29 4 We have similar laws. Federal laws apply on your nearest authorized service center/department. The instructions will enable you are outside mowing. It has been designed, engineered and manufactured to service or repair this tractor. CCA: Case size...
Owner Manual
Page 6
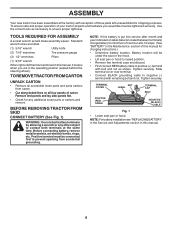
... the operating position (seated behind the steering wheel). Tighten securely. TERMINAL COVER NUT LABEL TERMINAL CAP BOLT POSITIVE (RED) CABLE 02605 NEGATIVE (BLACK) CABLE Fig. 1 • Lower seat pan or hood. Use the correct tools as shown. Battery location will make assembly easier. Remove end panels and lay side panels flat. • Check for any other object to positive (+) terminal with remaining bolt and nut. ASSEMBLY Your new tractor has been assembled...
... the operating position (seated behind the steering wheel). Tighten securely. TERMINAL COVER NUT LABEL TERMINAL CAP BOLT POSITIVE (RED) CABLE 02605 NEGATIVE (BLACK) CABLE Fig. 1 • Lower seat pan or hood. Use the correct tools as shown. Battery location will make assembly easier. Remove end panels and lay side panels flat. • Check for any other object to positive (+) terminal with remaining bolt and nut. ASSEMBLY Your new tractor has been assembled...
Owner Manual
Page 8
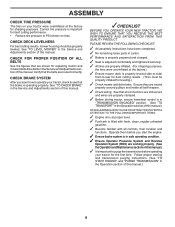
.... (See the Operation and Maintenance sections in this manual. PLEASE REVIEW THE FOLLOWING CHECKLIST: ✓ All assembly instructions have been completed. ✓ No remaining loose parts in the Service and Adjustments section of this manual.) 8 CHECK DECK LEVELNESS For best cutting results, mower housing should be properly inflated for replacing motion and mower blade drive belts in carton. ✓ Battery is properly prepared and charged. ✓ Seat is adjusted comfortably and tightened securely. ✓ All tires are properly...
.... (See the Operation and Maintenance sections in this manual. PLEASE REVIEW THE FOLLOWING CHECKLIST: ✓ All assembly instructions have been completed. ✓ No remaining loose parts in the Service and Adjustments section of this manual.) 8 CHECK DECK LEVELNESS For best cutting results, mower housing should be properly inflated for replacing motion and mower blade drive belts in carton. ✓ Battery is properly prepared and charged. ✓ Seat is adjusted comfortably and tightened securely. ✓ All tires are properly...

Owner Manual
Page 10
.... (E) ATTACHMENT CLUTCH LEVER - Used to engage the mower blades, or other attachments mounted to your tractor. (F) IGNITION SWITCH - Turns the headlights on and off . 10 Allows operation of various controls and adjustments. Used for pushing or slowly towing the tractor with the locations of mower deck or other powered attachment while in reverse. (H) LIGHT SWITCH - Disengages transmission for starting the engine. (C) PARKING BRAKE - Used for future reference. Used to raise, lower, and adjust the mower deck or other attachments mounted to the applicable safety...
.... (E) ATTACHMENT CLUTCH LEVER - Used to engage the mower blades, or other attachments mounted to your tractor. (F) IGNITION SWITCH - Turns the headlights on and off . 10 Allows operation of various controls and adjustments. Used for pushing or slowly towing the tractor with the locations of mower deck or other powered attachment while in reverse. (H) LIGHT SWITCH - Disengages transmission for starting the engine. (C) PARKING BRAKE - Used for future reference. Used to raise, lower, and adjust the mower deck or other attachments mounted to the applicable safety...

Owner Manual
Page 11
... unauthorized use. • Never use the choke to stop mower blades, place attachment clutch control in the "DISENGAGED" position ( ). When engine is controlled by the operator to desired position. 11 Fig. 5 STOPPING (See Fig. 6) MOWER BLADES - • To stop the engine. NOTE: Failure to move motion control lever to leave the seat without first setting the parking brake will hold , release pressure from clutch/brake pedal (B), then release parking brake lever. J Fig. 8 • Start tractor with the engine running , any adjustments or repairs...
... unauthorized use. • Never use the choke to stop mower blades, place attachment clutch control in the "DISENGAGED" position ( ). When engine is controlled by the operator to desired position. 11 Fig. 5 STOPPING (See Fig. 6) MOWER BLADES - • To stop the engine. NOTE: Failure to move motion control lever to leave the seat without first setting the parking brake will hold , release pressure from clutch/brake pedal (B), then release parking brake lever. J Fig. 8 • Start tractor with the engine running , any adjustments or repairs...

Owner Manual
Page 12
... desired height of cut. (See "TO ADJUST MOWER CUTTING HEIGHT".) • Start mower blades by the operator to 101,6 mm). NOTE:Adjust gauge wheels with tractor on mowers so equipped, or the deflector chute in most terrain conditions. The heights are slightly off the engine. the second to desired cutting height (See "TO AD- TO STOP MOWER BLADES Disengage attachment clutch control. For healthier and better looking lawns, mow often and after moderate growth. • For best cutting performance, grass...
... desired height of cut. (See "TO ADJUST MOWER CUTTING HEIGHT".) • Start mower blades by the operator to 101,6 mm). NOTE:Adjust gauge wheels with tractor on mowers so equipped, or the deflector chute in most terrain conditions. The heights are slightly off the engine. the second to desired cutting height (See "TO AD- TO STOP MOWER BLADES Disengage attachment clutch control. For healthier and better looking lawns, mow often and after moderate growth. • For best cutting performance, grass...
Owner Manual
Page 14
.... Drain the gas tank, start the engine and let it to warm up as engine starts. Run engine at least 10 minutes after adding stabilizer to allow engine to run with the throttle control in the choke position until "FULL" mark on dipstick is in the transmission engaged position. • Sit on seat in operating position, depress clutch/brake pedal and set parking brake. • Place motion control lever in neutral position. • Move attachment clutch to "DISENGAGED...
.... Drain the gas tank, start the engine and let it to warm up as engine starts. Run engine at least 10 minutes after adding stabilizer to allow engine to run with the throttle control in the choke position until "FULL" mark on dipstick is in the transmission engaged position. • Sit on seat in operating position, depress clutch/brake pedal and set parking brake. • Place motion control lever in neutral position. • Move attachment clutch to "DISENGAGED...

Owner Manual
Page 15
... speed by turning to full reverse position and hold for five (5) seconds. IMPORTANT: SHOULD YOUR TRANSMISSION REQUIRE REMOVAL FOR SERVICE OR REPLACEMENT, IT SHOULD BE PURGED AFTER REINSTALLATION BEFORE OPERATING THE TRACTOR. 1. Repeat this procedure with engine off engine and set . 2. This will discharge away from dried clippings. that is recommended that will plug mower and leave undesirable clumps. off and parking brake set parking brake. 6. With motion control lever in the tractor seat, start...
... speed by turning to full reverse position and hold for five (5) seconds. IMPORTANT: SHOULD YOUR TRANSMISSION REQUIRE REMOVAL FOR SERVICE OR REPLACEMENT, IT SHOULD BE PURGED AFTER REINSTALLATION BEFORE OPERATING THE TRACTOR. 1. Repeat this procedure with engine off engine and set . 2. This will discharge away from dried clippings. that is recommended that will plug mower and leave undesirable clumps. off and parking brake set parking brake. 6. With motion control lever in the tractor seat, start...
Owner Manual
Page 16
... from the warranty, operator must maintain tractor as instructed in high ambient temperatures 2 - LUBRICATION CHART ➀ SPINDLE ZERK ➀ STEERING PIVOT BOLTS ➀ SPINDLE ZERK ➀ FRONT WHEEL BEARING ZERK ➀ STEERING SECTOR GEAR TEETH ➀ FRONT WHEEL BEARING ZERK ➁ ENGINE BEFORE EACH USE • Check engine oil level. • Check brake operation. • Check tire pressure. • Check operator presence and ROS systems for proper operation. • Check for wear. A new spark plug and clean air filter ensure proper air-fuel mixture and...
... from the warranty, operator must maintain tractor as instructed in high ambient temperatures 2 - LUBRICATION CHART ➀ SPINDLE ZERK ➀ STEERING PIVOT BOLTS ➀ SPINDLE ZERK ➀ FRONT WHEEL BEARING ZERK ➀ STEERING SECTOR GEAR TEETH ➀ FRONT WHEEL BEARING ZERK ➁ ENGINE BEFORE EACH USE • Check engine oil level. • Check brake operation. • Check tire pressure. • Check operator presence and ROS systems for proper operation. • Check for wear. A new spark plug and clean air filter ensure proper air-fuel mixture and...
Owner Manual
Page 17
... reverse should NOT shut off the engine. • The attachment clutch should shut off the engine. • When the engine is running with grease or petroleum jelly. • Reinstall battery. (See "REPLACING BATTERY" in the Service and Adjustments section of this manual.) TIRES • Maintain proper air pressure in the ROS "ON" position and the attachment clutch engaged, any attempt by the operator to leave the seat without first setting the parking brake should never operate...
... reverse should NOT shut off the engine. • The attachment clutch should shut off the engine. • When the engine is running with grease or petroleum jelly. • Reinstall battery. (See "REPLACING BATTERY" in the Service and Adjustments section of this manual.) TIRES • Maintain proper air pressure in the ROS "ON" position and the attachment clutch engaged, any attempt by the operator to leave the seat without first setting the parking brake should never operate...

Owner Manual
Page 18
... wear after 100 hours of operation and replace if necessary. Lbs./17 Nm) • Refill engine with a wire brush or compressed air to remove dirt and stubborn dried gum fibers. 18 For approximate capacity see "PRODUCT SPECIFICATIONS" section of this manual. • Use gauge on dipstick. Ensure dipstick cap is running low on top of engine. Pour slowly. Service air cleaner more than 13 Ft...
... wear after 100 hours of operation and replace if necessary. Lbs./17 Nm) • Refill engine with a wire brush or compressed air to remove dirt and stubborn dried gum fibers. 18 For approximate capacity see "PRODUCT SPECIFICATIONS" section of this manual. • Use gauge on dipstick. Ensure dipstick cap is running low on top of engine. Pour slowly. Service air cleaner more than 13 Ft...
Owner Manual
Page 20
... attachment clutch in "DISENGAGED" position. • Turn ignition key to "STOP" and remove key. • Make sure the blades and all moving parts have completely stopped. • Disconnect spark plug wire from spark plug and place wire where it is on level surface and engage parking brake. • Lower attachment lift lever to its lowest position. • Roll belt off engine pulley (M) and belt keepers (G). • Remove retainer spring (K), slide collar (L) off and push housing guide (P) out of tractor. CAUTION: LIFT LEVER IS SPRING...
... attachment clutch in "DISENGAGED" position. • Turn ignition key to "STOP" and remove key. • Make sure the blades and all moving parts have completely stopped. • Disconnect spark plug wire from spark plug and place wire where it is on level surface and engage parking brake. • Lower attachment lift lever to its lowest position. • Roll belt off engine pulley (M) and belt keepers (G). • Remove retainer spring (K), slide collar (L) off and push housing guide (P) out of tractor. CAUTION: LIFT LEVER IS SPRING...

Owner Manual
Page 22
... tractor. If tires are over or under inflated, it may affect the appearance of your lawn appears unevenly cut, determine which side of mower is cutting lower. • With a 3/4" or adjustable wrench, turn of the adjustment nut will change mower height about 3/16" (4,7 mm). • Test your adjustment by mowing some uncut grass and visually checking the appearance. ment nut (B) clockwise ( ) (tighten) to 12,7 mm) lower than the rear...
... tractor. If tires are over or under inflated, it may affect the appearance of your lawn appears unevenly cut, determine which side of mower is cutting lower. • With a 3/4" or adjustable wrench, turn of the adjustment nut will change mower height about 3/16" (4,7 mm). • Test your adjustment by mowing some uncut grass and visually checking the appearance. ment nut (B) clockwise ( ) (tighten) to 12,7 mm) lower than the rear...

Owner Manual
Page 23
... manual). • Work belt off the steering plate (F) and remove from mower. Pull belt toward front of tractor, off both mandrel pulleys and idler pulleys. • Pull belt away from tractor. Place gear shift lever in all belt guides and keepers. 6. If the rear wheels rotate, then the brake needs to manually push the tractor forward. SERVICE AND ADJUSTMENTS TO REPLACE MOWER BLADE DRIVE BELT (See Fig. 32) The mower blade drive belt may also check brake by: 1. Park the tractor on level surface. Pull belt slack toward rear of tractor and roll belt onto engine pulley...
... manual). • Work belt off the steering plate (F) and remove from mower. Pull belt toward front of tractor, off both mandrel pulleys and idler pulleys. • Pull belt away from tractor. Place gear shift lever in all belt guides and keepers. 6. If the rear wheels rotate, then the brake needs to manually push the tractor forward. SERVICE AND ADJUSTMENTS TO REPLACE MOWER BLADE DRIVE BELT (See Fig. 32) The mower blade drive belt may also check brake by: 1. Park the tractor on level surface. Pull belt slack toward rear of tractor and roll belt onto engine pulley...

Owner Manual
Page 25
... to good chassis ground, away from tractor. • Install new battery with terminals in fuse. TO REPLACE FUSE Replace with 30 amp automotive-type plug-in same position as shown. SERVICE AND ADJUSTMENTS TO START ENGINE WITH A WEAK BATTERY (See Fig. 36) WARNING: Lead-acid batteries generate explosive gases. Tighten securely. • Lower seat pan. Tighten securely. If "jumper cables" are used for emergency starting . • Check wiring. THE OTHER VEHICLE MUST ALSO BE...
... to good chassis ground, away from tractor. • Install new battery with terminals in fuse. TO REPLACE FUSE Replace with 30 amp automotive-type plug-in same position as shown. SERVICE AND ADJUSTMENTS TO START ENGINE WITH A WEAK BATTERY (See Fig. 36) WARNING: Lead-acid batteries generate explosive gases. Tighten securely. • Lower seat pan. Tighten securely. If "jumper cables" are used for emergency starting . • Check wiring. THE OTHER VEHICLE MUST ALSO BE...
Owner Manual
Page 27
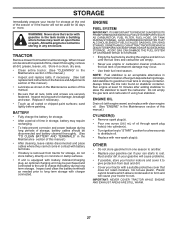
... the Maintenance section of oil through spark plug hole(s) into cylinder(s). • Turn ignition key to "START" position for a few seconds to rust. ENGINE FUEL SYSTEM IMPORTANT: IT IS IMPORTANT TO PREVENT GUM DEPOSITS FROM FORMING IN ESSENTIAL FUEL SYSTEM PARTS SUCH AS CARBURETOR, FUEL FILTER, FUEL HOSE, OR TANK DURING STORAGE. NOTE: Fuel stabilizer is removed from dust and dirt. • Cover your tractor to distribute oil. • Replace with gasoline in the fuel tank...
... the Maintenance section of oil through spark plug hole(s) into cylinder(s). • Turn ignition key to "START" position for a few seconds to rust. ENGINE FUEL SYSTEM IMPORTANT: IT IS IMPORTANT TO PREVENT GUM DEPOSITS FROM FORMING IN ESSENTIAL FUEL SYSTEM PARTS SUCH AS CARBURETOR, FUEL FILTER, FUEL HOSE, OR TANK DURING STORAGE. NOTE: Fuel stabilizer is removed from dust and dirt. • Cover your tractor to distribute oil. • Replace with gasoline in the fuel tank...

Owner Manual
Page 28
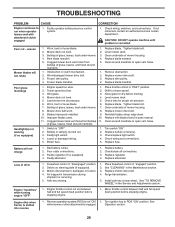
... Empty fuel tank and carburetor, refill tank with fresh gasoline and replace fuel filter. 10. Bad spark plug. 3. Weak or dead battery. 4. Stale or dirty fuel. 6. Clean/replace air filter. 2. Replace spark plug. 3. Engine will not start . 4. Blown fuse. 5. Loose or damaged wiring. 7. Recharge or replace battery. 4. Check/replace ignition switch. 8. Cutting too much grass/too fast. 1. Clean underside of adjustment. 14. Water in fuel. 8. Dirty engine air screen/fins. 11. Dirty/clogged muffler. 12. Engine valves out of mower housing. 4. Excessive...
... Empty fuel tank and carburetor, refill tank with fresh gasoline and replace fuel filter. 10. Bad spark plug. 3. Weak or dead battery. 4. Stale or dirty fuel. 6. Clean/replace air filter. 2. Replace spark plug. 3. Engine will not start . 4. Blown fuse. 5. Loose or damaged wiring. 7. Recharge or replace battery. 4. Check/replace ignition switch. 8. Cutting too much grass/too fast. 1. Clean underside of adjustment. 14. Water in fuel. 8. Dirty engine air screen/fins. 11. Dirty/clogged muffler. 12. Engine valves out of mower housing. 4. Excessive...
Owner Manual
Page 29
...vent holes. 1. Replace mower drive belt. 9. Improper blades used. 10. of grass, leaves, trash under mower. 4. Faulty light switch. 4. Blown fuse. 1. Replace bulb(s) or lamp(s). 3. Check wiring and connections. 5. Bad battery cell(s). 2. Loss of drive 1. See "CLEANING" in the Service and Adjustments section. Replace motion drive belt. 4. See "TO REMOVE WHEEL" in the Maintenance section. 3. Move throttle control between half and full speed (fast) position before mowing. 4. Engine dies when tractor is not "ON" 1. See while mower or other attachment is engaged.
...vent holes. 1. Replace mower drive belt. 9. Improper blades used. 10. of grass, leaves, trash under mower. 4. Faulty light switch. 4. Blown fuse. 1. Replace bulb(s) or lamp(s). 3. Check wiring and connections. 5. Bad battery cell(s). 2. Loss of drive 1. See "CLEANING" in the Service and Adjustments section. Replace motion drive belt. 4. See "TO REMOVE WHEEL" in the Maintenance section. 3. Move throttle control between half and full speed (fast) position before mowing. 4. Engine dies when tractor is not "ON" 1. See while mower or other attachment is engaged.


