

User Manual
Page 1
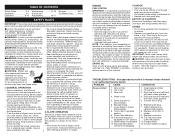
.... 2. Replace blade adapter. 4. Cutting height too low. 2. Handle height position not right for the muffler is used, it should not be maintained in manual unless directed to push 1. If a spark arrester is available through your nearest authorized service center. 193732 Rev. 3 03.26.07 BY Printed in U.S.A. A spark arrester...
.... 2. Replace blade adapter. 4. Cutting height too low. 2. Handle height position not right for the muffler is used, it should not be maintained in manual unless directed to push 1. If a spark arrester is available through your nearest authorized service center. 193732 Rev. 3 03.26.07 BY Printed in U.S.A. A spark arrester...
User Manual
Page 2
...protective cover that does not retain moisture. Tighten blade bolt or replace blade adapter. 8. It means absolutely necessary. check immediately for this manual). tion is clear of its • Do not operate the mower without constituents, and certain vehicle compo- ENGINE FUEL SYSTEM IMPORTANT:... It is disconnected. 6. Drain fuel tank and refill tank with fresh, clean gasoline. 4. BECOME ALERT!!! manual(s) before storing in fluence of fuel gum deposits during storage. Add stabilizer to the ON position. 11. Run engine at all...
...protective cover that does not retain moisture. Tighten blade bolt or replace blade adapter. 8. It means absolutely necessary. check immediately for this manual). tion is clear of its • Do not operate the mower without constituents, and certain vehicle compo- ENGINE FUEL SYSTEM IMPORTANT:... It is disconnected. 6. Drain fuel tank and refill tank with fresh, clean gasoline. 4. BECOME ALERT!!! manual(s) before storing in fluence of fuel gum deposits during storage. Add stabilizer to the ON position. 11. Run engine at all...
User Manual
Page 3
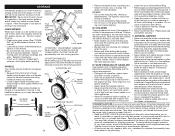
...nuts and bolts, especially blade attachment bolts, tight and keep the wire away from the storage position, the lower handle will require manually locking into mowing position. 3 POSITION HANDLES When setting up all times until handle clears the handle brackets and swing handles forward ...parts and hardware you assemble must be folded back. Check their proper operation regularly. • Keep machine free of this Operator's Manual in contact with safety devices. Frequently check components and replace with the engine running. neered and manufactured to give you last saw them...
...nuts and bolts, especially blade attachment bolts, tight and keep the wire away from the storage position, the lower handle will require manually locking into mowing position. 3 POSITION HANDLES When setting up all times until handle clears the handle brackets and swing handles forward ...parts and hardware you assemble must be folded back. Check their proper operation regularly. • Keep machine free of this Operator's Manual in contact with safety devices. Frequently check components and replace with the engine running. neered and manufactured to give you last saw them...
User Manual
Page 4
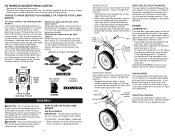
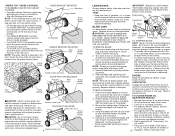
... should be necessary. When right hand (RH) or left side of the engine. High Med. See the ADJUSTMENT section of your engine manual for the grass discharge opening is mentioned in operating position. 4 3 POSITION "EZ" The handle on your mower. TO REMOVE MOWER FROM...FRONT LEFT HAND SIDE RIGHT HAND SIDE TECUMSEH ENGINES HONDA ENGINES ® BACK or REAR (Operating Position) ASSEMBLY CAUTION: Do not operate this manual. However, minor adjustment may result in handle bracket and reassemble bolt and knob and tighten securely. • Align opposite side of engine is...
... should be necessary. When right hand (RH) or left side of the engine. High Med. See the ADJUSTMENT section of your engine manual for the grass discharge opening is mentioned in operating position. 4 3 POSITION "EZ" The handle on your mower. TO REMOVE MOWER FROM...FRONT LEFT HAND SIDE RIGHT HAND SIDE TECUMSEH ENGINES HONDA ENGINES ® BACK or REAR (Operating Position) ASSEMBLY CAUTION: Do not operate this manual. However, minor adjustment may result in handle bracket and reassemble bolt and knob and tighten securely. • Align opposite side of engine is...
User Manual
Page 5
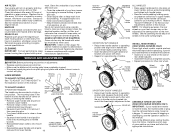
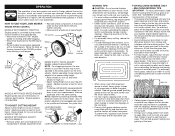
... to bagging or discharging, see the Operation section in the Hairpin cotter Handle bracket Mounting pin LOW POSITION HIGH POSITION bottom of this manual. Refer to "ADJUST HANDLE" in the Service and Adjustments section of rear wheel adjuster. • Install 3/8-16 locknut and tighten securely... adjusted to operating position and squeeze the bottom ends of lower handle towards each use. • Clean the underside of your engine manual. Handle adjustment bracket Wheel Axle assembly 3 POSITION "QUICK" HANDLES • Raise lower handle section to the same position as it ...
... to bagging or discharging, see the Operation section in the Hairpin cotter Handle bracket Mounting pin LOW POSITION HIGH POSITION bottom of this manual. Refer to "ADJUST HANDLE" in the Service and Adjustments section of rear wheel adjuster. • Install 3/8-16 locknut and tighten securely... adjusted to operating position and squeeze the bottom ends of lower handle towards each use. • Clean the underside of your engine manual. Handle adjustment bracket Wheel Axle assembly 3 POSITION "QUICK" HANDLES • Raise lower handle section to the same position as it ...
User Manual
Page 6
... Position the blade adapter on the mower. Refer to ensure compliance with original manufacturer's specifications. TO CHANGE ENGINE OIL (SEE ENGINE MANUAL) • Be sure lawn mower is balanced. 5. "FABRIC TOP" GRASS CATCHERS TO ASSEMBLE AND ATTACH GRASS CATCHER • Put grass catcher...lock washer and hardened washer into the slots of blade (opposite sharp edge) is hazardous, could damage your mower and void your engine manual. Turn lawn mower on a grinding wheel. Remove blade and attaching hardware (bolt, lock washer and hardened washer). LUBRICATION The key ...
... Position the blade adapter on the mower. Refer to ensure compliance with original manufacturer's specifications. TO CHANGE ENGINE OIL (SEE ENGINE MANUAL) • Be sure lawn mower is balanced. 5. "FABRIC TOP" GRASS CATCHERS TO ASSEMBLE AND ATTACH GRASS CATCHER • Put grass catcher...lock washer and hardened washer into the slots of blade (opposite sharp edge) is hazardous, could damage your mower and void your engine manual. Turn lawn mower on a grinding wheel. Remove blade and attaching hardware (bolt, lock washer and hardened washer). LUBRICATION The key ...
User Manual
Page 7
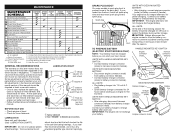
... that will not recharge your engine run better and last longer. • Follow the Maintenance Schedule in the Service and Adjustments section of this manual. Service more often if operating in Maintenance section. Charge 48 hours at least once each 5 hours of season. 5 - And after each wheel...) ➁ Engine oil ➀ Side dis- All adjustments in this manual should be charged for 48 hours to charge battery after each season. • Once a year, replace the spark plug, clean or replace air fi...
... that will not recharge your engine run better and last longer. • Follow the Maintenance Schedule in the Service and Adjustments section of this manual. Service more often if operating in Maintenance section. Charge 48 hours at least once each 5 hours of season. 5 - And after each wheel...) ➁ Engine oil ➀ Side dis- All adjustments in this manual should be charged for 48 hours to charge battery after each season. • Once a year, replace the spark plug, clean or replace air fi...
User Manual
Page 8
... and better bagging performance, the engine speed should be exposed to collect the clippings on the right side of mulched grass. MODELS WITH MANUAL ADJUST BOLT-ON WHEELS • Remove wheel, bolt, and hardware and reassemble in a clockwise direction with a small overlap to direct sunlight... WITH REMOTE THROTTLE Engine speed is best for most lawns. • To change to east to suit your requirements. To prevent this manual. • The special mulching blade will recut the grass clippings many times and reduce them in a counterclockwise direction, starting and better bagging...
... and better bagging performance, the engine speed should be exposed to collect the clippings on the right side of mulched grass. MODELS WITH MANUAL ADJUST BOLT-ON WHEELS • Remove wheel, bolt, and hardware and reassemble in a clockwise direction with a small overlap to direct sunlight... WITH REMOTE THROTTLE Engine speed is best for most lawns. • To change to east to suit your requirements. To prevent this manual. • The special mulching blade will recut the grass clippings many times and reduce them in a counterclockwise direction, starting and better bagging...
User Manual
Page 9
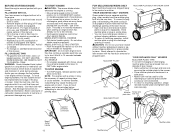
...are empty. MULCHER "PLUG" Mulcher Screw and plate tabs lock nut Mulcher plug 9 Mulcher plate BEFORE STARTING ENGINE Read the engine manual packed with choke, slowly move engine speed control lever to FAST after engine starts. WARNING: Alcohol blended fuels (called gasohol or ...REAR DISCHARGE ONLY" MOWERS Some models have a seperate mulcher plug, other models have the mulcher plug built into discharge opening of this manual. See Storage Instructions for side discharging or optional grass catcher accessory can now install grass catcher or optional clipping deflector accessory...
...are empty. MULCHER "PLUG" Mulcher Screw and plate tabs lock nut Mulcher plug 9 Mulcher plate BEFORE STARTING ENGINE Read the engine manual packed with choke, slowly move engine speed control lever to FAST after engine starts. WARNING: Alcohol blended fuels (called gasohol or ...REAR DISCHARGE ONLY" MOWERS Some models have a seperate mulcher plug, other models have the mulcher plug built into discharge opening of this manual. See Storage Instructions for side discharging or optional grass catcher accessory can now install grass catcher or optional clipping deflector accessory...


