
User Manual
Page 2
...enters the area. • Never carry passengers. • Do not mow in speed or direction. Check their ability to operate the riding mower safely enough to wear, dam- mended parts, when necessary. Reduced traction could • Never make sudden changes in reverse unless absolutely necessary... machine if anyone . Always look behind before mowing. Always turn slowly and gradually downhill, if possible. • Only allow the mower deck to plow leaves or other people before and while back- III. CHILDREN Tragic accidents can occur if the operator is clear of...
...enters the area. • Never carry passengers. • Do not mow in speed or direction. Check their ability to operate the riding mower safely enough to wear, dam- mended parts, when necessary. Reduced traction could • Never make sudden changes in reverse unless absolutely necessary... machine if anyone . Always look behind before mowing. Always turn slowly and gradually downhill, if possible. • Only allow the mower deck to plow leaves or other people before and while back- III. CHILDREN Tragic accidents can occur if the operator is clear of...

User Manual
Page 3
... at the lowest possible speed when on a slope, is clear of your tractor. Wash hands after handling. 3 SAFETY RULES SAFE OPERATION PRACTICES FOR RIDE-ON MOWERS IMPORTANT: THIS CUTTING MACHINE IS CAPABLE OF AMPUTATING HANDS AND FEET AND THROWING OBJECTS. Choose a low gear so that are recommended by and comply with...
... at the lowest possible speed when on a slope, is clear of your tractor. Wash hands after handling. 3 SAFETY RULES SAFE OPERATION PRACTICES FOR RIDE-ON MOWERS IMPORTANT: THIS CUTTING MACHINE IS CAPABLE OF AMPUTATING HANDS AND FEET AND THROWING OBJECTS. Choose a low gear so that are recommended by and comply with...
User Manual
Page 8
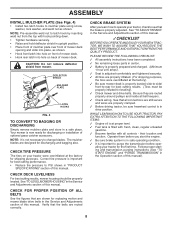
... Follow proper starting and transmission purging instructions (See "TO START ENGINE" and "PURGE TRANSMISSION" in the Operation section of this manual. Your mower is filled with fresh, clean, regular unleaded gasoline. ✓ Become familiar with hook pointing down. • Tighten hardware securely. ... for discharging or installation of this manual. ating your tractor were overinflated at the factory). ✓ Be sure mower deck is important for best cutting performance. • Reduce tire pressure to see that the belts are routed properly around pulleys...
... Follow proper starting and transmission purging instructions (See "TO START ENGINE" and "PURGE TRANSMISSION" in the Operation section of this manual. Your mower is filled with fresh, clean, regular unleaded gasoline. ✓ Become familiar with hook pointing down. • Tighten hardware securely. ... for discharging or installation of this manual. ating your tractor were overinflated at the factory). ✓ Be sure mower deck is important for best cutting performance. • Reduce tire pressure to see that the belts are routed properly around pulleys...

User Manual
Page 9
... OFF LIGHTS ON P ENGINE ON ENGINE START PARKING BRAKE PARKING BRAKE PARKING BRAKE LOCKED UNLOCKED OVER TEMP LIGHT FUEL OIL PRESSURE BATTERY REVERSE FORWARD MOWER HEIGHT 15 MOWER LIFT 15 ATTACHMENT ATTACHMENT CLUTCH ENGAGED CLUTCH DISENGAGED DANGER, KEEP HANDS AND FEET AWAY KEEP AREA CLEAR SLOPE HAZARDS (SEE SAFETY RULES SECTION) FREE...
... OFF LIGHTS ON P ENGINE ON ENGINE START PARKING BRAKE PARKING BRAKE PARKING BRAKE LOCKED UNLOCKED OVER TEMP LIGHT FUEL OIL PRESSURE BATTERY REVERSE FORWARD MOWER HEIGHT 15 MOWER LIFT 15 ATTACHMENT ATTACHMENT CLUTCH ENGAGED CLUTCH DISENGAGED DANGER, KEEP HANDS AND FEET AWAY KEEP AREA CLEAR SLOPE HAZARDS (SEE SAFETY RULES SECTION) FREE...

User Manual
Page 10
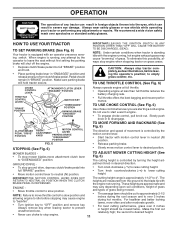
... CONTROL LIGHT SWITCH POSITION LIFT LEVER PLUNGER ATTACHMENT LIFT LEVER PARKING BRAKE MOTION CONTROL LEVER FIG. 5 Our tractors conform to adjust the mower cutting height. 10 PARKING BRAKE - Disengages transmission for pushing or slowly towing the tractor with the locations of the American National Standards ..., or other attachments mounted to your tractor. Turns the headlights on and off . Used to raise, lower, and adjust the mower deck or other attachments mounted to your tractor. Used for declutching and braking the tractor and starting the engine. ATTACHMENT CLUTCH LEVER...
... CONTROL LIGHT SWITCH POSITION LIFT LEVER PLUNGER ATTACHMENT LIFT LEVER PARKING BRAKE MOTION CONTROL LEVER FIG. 5 Our tractors conform to adjust the mower cutting height. 10 PARKING BRAKE - Disengages transmission for pushing or slowly towing the tractor with the locations of the American National Standards ..., or other attachments mounted to your tractor. Turns the headlights on and off . Used to raise, lower, and adjust the mower deck or other attachments mounted to your tractor. Used for declutching and braking the tractor and starting the engine. ATTACHMENT CLUTCH LEVER...
User Manual
Page 11
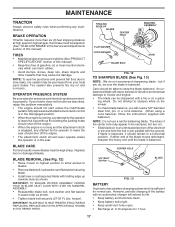
... of movement is controlled by the operator to the blade tip with an operator presence sensing switch. STOPPING (See Fig. 6) MOWER BLADES • To stop mower blades,move attachment clutch lever to start a warm engine. • To engage choke control, pull knob out. IMPORTANT:LEAVING ...throttle. • Operating engine at less than full throttle reduces the battery charging rate. • Full throttle offers the best bagging and mower perfor- IMPORTANT:THE MOTION CONTROL LEVER DOES NOT The cutting height range is running . These heights are approximate and ENGINE • Move...
... of movement is controlled by the operator to the blade tip with an operator presence sensing switch. STOPPING (See Fig. 6) MOWER BLADES • To stop mower blades,move attachment clutch lever to start a warm engine. • To engage choke control, pull knob out. IMPORTANT:LEAVING ...throttle. • Operating engine at less than full throttle reduces the battery charging rate. • Full throttle offers the best bagging and mower perfor- IMPORTANT:THE MOTION CONTROL LEVER DOES NOT The cutting height range is running . These heights are approximate and ENGINE • Move...

User Manual
Page 12
... bar. • Lower gauge wheels to neutral (N) position. IMPORTANT:BE SURETO READJUST GAUGEWHEELS IFYOU CHANGE THE CUTTING HEIGHT OF THE MOWER DECK. disengage attachment clutch control. Gauge wheels should be sure to disengage transmission by the operator to prevent the engine from hesitating... be slightly off the engine. Any attempt by placing freewheel control in most terrain conditions. RETAINER SPRING CLEVIS PIN FIG. 7 TO OPERATE MOWER (See Fig. 8) Your tractor is held in the Operation section of tractor. • Raise attachment lift to highest position with slopes ...
... bar. • Lower gauge wheels to neutral (N) position. IMPORTANT:BE SURETO READJUST GAUGEWHEELS IFYOU CHANGE THE CUTTING HEIGHT OF THE MOWER DECK. disengage attachment clutch control. Gauge wheels should be sure to disengage transmission by the operator to prevent the engine from hesitating... be slightly off the engine. Any attempt by placing freewheel control in most terrain conditions. RETAINER SPRING CLEVIS PIN FIG. 7 TO OPERATE MOWER (See Fig. 8) Your tractor is held in the Operation section of tractor. • Raise attachment lift to highest position with slopes ...

User Manual
Page 14
...may have developed during the engine warmup period after the tractor moves approximately five (5) feet, slowly move throttle control to the right of mower should be used . 14 Repeat this section of manual). • Sitting in the tractor seat, start engine. the second to the desired ... five (5) feet return the motion control lever to full reverse position and hold for the first time. MOWING TIPS • Mower should be properly leveled for normal operation. To ensure proper operation and performance, it is being used for trimming. • Drive so that...
...may have developed during the engine warmup period after the tractor moves approximately five (5) feet, slowly move throttle control to the right of mower should be used . 14 Repeat this section of manual). • Sitting in the tractor seat, start engine. the second to the desired ... five (5) feet return the motion control lever to full reverse position and hold for the first time. MOWING TIPS • Mower should be properly leveled for normal operation. To ensure proper operation and performance, it is being used for trimming. • Drive so that...

User Manual
Page 15
... the lawn. 15 When doing a second cut, mow across (perpendicular) to west the next week. OPERATION MULCHING MOWING TIPS IMPORTANT: FOR BEST PERFORMANCE, KEEP MOWER HOUSING FREE OF BUILT-UP GRASS AND TRASH. Also, the mulched grass will help prevent matting and graining of the blades. • Avoid cutting your...the newly cut area will disperse into the grass and not be exposed to direct sunlight. • For best results, adjust the mower cutting height so that the mower cuts off only the top one week then change to east to the first cut on each pass and mow slowly. Mow...
... the lawn. 15 When doing a second cut, mow across (perpendicular) to west the next week. OPERATION MULCHING MOWING TIPS IMPORTANT: FOR BEST PERFORMANCE, KEEP MOWER HOUSING FREE OF BUILT-UP GRASS AND TRASH. Also, the mulched grass will help prevent matting and graining of the blades. • Avoid cutting your...the newly cut area will disperse into the grass and not be exposed to direct sunlight. • For best results, adjust the mower cutting height so that the mower cuts off only the top one week then change to east to the first cut on each pass and mow slowly. Mow...

User Manual
Page 16
.... • Check brake operation. • Check tire pressure. • Check operator presence and interlock systems for proper operation. • Check for Loose Fasteners A Sharpen/Replace Mower Blades C T Lubrication Chart 0 Check Battery Level R Clean Battery and Terminals Check Transaxle Cooling Check V-Belts BEFOREEEVAECRHYU8ESVHEEORUYRS2E5VHEROYUR5E0SVEHROYUR1E0SV0EHROYUBSREESFAOSROEN STORAGE SERVICE DATES 5 3 4 Check Engine Oil Level Change Engine...
.... • Check brake operation. • Check tire pressure. • Check operator presence and interlock systems for proper operation. • Check for Loose Fasteners A Sharpen/Replace Mower Blades C T Lubrication Chart 0 Check Battery Level R Clean Battery and Terminals Check Transaxle Cooling Check V-Belts BEFOREEEVAECRHYU8ESVHEEORUYRS2E5VHEROYUR5E0SVEHROYUR1E0SV0EHROYUBSREESFAOSROEN STORAGE SERVICE DATES 5 3 4 Check Engine Oil Level Change Engine...
User Manual
Page 17
...and flat washer securing blade. • Install new or resharpened blade with an automotive charger will cause excessive vibration and eventual damage to mower and engine. • The blade can harm rubber. • Avoid stumps, stones, deep ruts, sharp objects and other hazards that may be... damaged blades. torque). IF BOLT NEEDS REPLACING, REPLACE ONLY WITH APPROVE BOLT SHOWN IN THE REPAIR PARTS. BLADE CARE For best results mower blades must be purchased from your tractor does not function as described, repair the problem immediately. • The engine should not start ...
...and flat washer securing blade. • Install new or resharpened blade with an automotive charger will cause excessive vibration and eventual damage to mower and engine. • The blade can harm rubber. • Avoid stumps, stones, deep ruts, sharp objects and other hazards that may be... damaged blades. torque). IF BOLT NEEDS REPLACING, REPLACE ONLY WITH APPROVE BOLT SHOWN IN THE REPAIR PARTS. BLADE CARE For best results mower blades must be purchased from your tractor does not function as described, repair the problem immediately. • The engine should not start ...
User Manual
Page 19
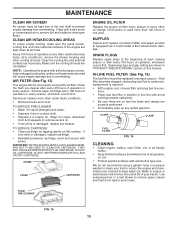
...-LINE FUEL FILTER (See Fig. 16) The fuel filter should be kept free of dirt and chaff to prevent engine damage from tractor and mower. MAINTENANCE CLEAN AIR SCREEN Air screen must be replaced once each mowing season or after every 25 hours of operation or every season. NOTE: Operating...
...-LINE FUEL FILTER (See Fig. 16) The fuel filter should be kept free of dirt and chaff to prevent engine damage from tractor and mower. MAINTENANCE CLEAN AIR SCREEN Air screen must be replaced once each mowing season or after every 25 hours of operation or every season. NOTE: Operating...

User Manual
Page 20
...housing guide out of tractor. • Place attachment clutch in "DISENGAGED" position. • Turn ignition key to raise suspension arms. Slide mower out from chassis bracket by re- CLUTCH SPRING FLAT WASHER SMALL RETAINER SPRING CLUTCH SPRING RETAINER SPRING SUSPENSION ARMS SQUARE HOLE ENGINE PULLEY FRONT ...TO BE MOUNTED ON THE TRACTOR, REMOVE THE FRONT LINKS AND HOOKTHE CLUTCH SPRING INTO SQUARE HOLE IN FRAME. TRACTOR TO REMOVE MOWER (See Fig. 17) Mower will be easier to chassis bracket and secure with retainer spring. • Push clutch cable housing guide into bracket, slide ...
...housing guide out of tractor. • Place attachment clutch in "DISENGAGED" position. • Turn ignition key to raise suspension arms. Slide mower out from chassis bracket by re- CLUTCH SPRING FLAT WASHER SMALL RETAINER SPRING CLUTCH SPRING RETAINER SPRING SUSPENSION ARMS SQUARE HOLE ENGINE PULLEY FRONT ...TO BE MOUNTED ON THE TRACTOR, REMOVE THE FRONT LINKS AND HOOKTHE CLUTCH SPRING INTO SQUARE HOLE IN FRAME. TRACTOR TO REMOVE MOWER (See Fig. 17) Mower will be easier to chassis bracket and secure with retainer spring. • Push clutch cable housing guide into bracket, slide ...

User Manual
Page 21
...position. Distance "A" on that both front links are equal in length. • If links are over or underinflated, you will change mower height about 1/8". • Recheck measurements after adjusting. IF THE FOLLOWING FRONT-TO-BACK ADJUSTMENT IS NECESSARY, BE SURE TO ADJUST BOTH FRONT LINKS...in flated (See "PRODUCT SPECIFICATIONS" section of this manual). The two front links must remain equal in length, adjust one side of mower, loosen lift link adjustment nut on both front links an equal number of turns. Check adjustment on level ground or driveway. NUT "F" TRUNNION ...
...position. Distance "A" on that both front links are equal in length. • If links are over or underinflated, you will change mower height about 1/8". • Recheck measurements after adjusting. IF THE FOLLOWING FRONT-TO-BACK ADJUSTMENT IS NECESSARY, BE SURE TO ADJUST BOTH FRONT LINKS...in flated (See "PRODUCT SPECIFICATIONS" section of this manual). The two front links must remain equal in length, adjust one side of mower, loosen lift link adjustment nut on both front links an equal number of turns. Check adjustment on level ground or driveway. NUT "F" TRUNNION ...
User Manual
Page 22
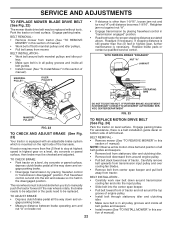
...Slide belt into the slot and release so it is in all pulley grooves and inside all belt guides. • Install mower (See "To Install Mower" in this section of the transaxle. Retighten jam nut against nut "A". • Engage transmission by placing freewhel control in this... • Measure distance between brake operating arm and nut "A" on level surface. Park the tractor on brake rod. • Remove mower (See "TO REMOVE MOWER" in "transmission disengaged" position. TO CHECK BRAKE • Park tractor on a level, dry concrete or paved surface, depress clutch/brake...
...Slide belt into the slot and release so it is in all pulley grooves and inside all belt guides. • Install mower (See "To Install Mower" in this section of the transaxle. Retighten jam nut against nut "A". • Engage transmission by placing freewhel control in this... • Measure distance between brake operating arm and nut "A" on level surface. Park the tractor on brake rod. • Remove mower (See "TO REMOVE MOWER" in "transmission disengaged" position. TO CHECK BRAKE • Park tractor on a level, dry concrete or paved surface, depress clutch/brake...
User Manual
Page 23
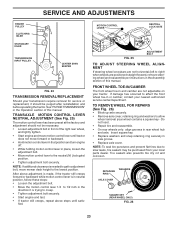
... to creep. • Tighten adjustment bolt securely. • Start engine and test. • If tractor still creeps, repeat above steps until tractor does not move mower deck height to affect the front wheel toe-in rear wheel hub and axle. NOTE: If additional clearance is needed to get to adjustment bolt...
... to creep. • Tighten adjustment bolt securely. • Start engine and test. • If tractor still creeps, repeat above steps until tractor does not move mower deck height to affect the front wheel toe-in rear wheel hub and axle. NOTE: If additional clearance is needed to get to adjustment bolt...
User Manual
Page 26
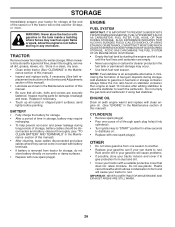
TRACTOR Remove mower from tractor for storage, do not store battery directly on stabilizer container. nance section of this manual). • After cleaning, leave cables disconnected and place .... • If possible, store your tractor with new spark plug(s). STORAGE Immediately prepare your tractor to rust. Allow the engine to cool before painting. When mower is removed from tractor for damage, breakage and wear. Rust and/or dirt in the fuel tank or permanent damage may require recharging. • To...
TRACTOR Remove mower from tractor for storage, do not store battery directly on stabilizer container. nance section of this manual). • After cleaning, leave cables disconnected and place .... • If possible, store your tractor with new spark plug(s). STORAGE Immediately prepare your tractor to rust. Allow the engine to cool before painting. When mower is removed from tractor for damage, breakage and wear. Rust and/or dirt in the fuel tank or permanent damage may require recharging. • To...

User Manual
Page 27
...ns. 12. See "To Adjust Carburetor" in Service Adjustments section. 8. Tighten loose part(s). Engine flooded. 4. Carburetor out of mower housing. 4. Replace spark plug. 5. Check all wiring. 7. Clean/replace air filter. 2. See "To Adjust Carburetor" in Service... not depressed. 2. Throttle in "CHOKE" position. 3. Raise cutting height/reduce speed. 2. Engine valves out of grass, leaves and trash under mower. 4. Weak or dead battery. 4. Faulty solenoid or starter. 9. Check all wiring. 9. Contact an authorized service center/department. Check all wiring...
...ns. 12. See "To Adjust Carburetor" in Service Adjustments section. 8. Tighten loose part(s). Engine flooded. 4. Carburetor out of mower housing. 4. Replace spark plug. 5. Check all wiring. 7. Clean/replace air filter. 2. See "To Adjust Carburetor" in Service... not depressed. 2. Throttle in "CHOKE" position. 3. Raise cutting height/reduce speed. 2. Engine valves out of grass, leaves and trash under mower. 4. Weak or dead battery. 4. Faulty solenoid or starter. 9. Check all wiring. 9. Contact an authorized service center/department. Check all wiring...

User Manual
Page 28
... control system. Buildup of grass, leaves, and trash around mandrels. 1. Obstruction in "engaged" position. 2. Frozen idler pulley. 4. Replace mower drive belt. 3. Allow grass to open vent holes. Headlight(s) not working (if so equipped) 1. Blown fuse. 1. Poor cable connections....Place throttle control in transmission during shipment or servicing. 1. Replace/sharpen blade. Motion drive belt worn, damaged, or broken. 3. Level mower deck. 5. Loose or damaged wiring. 5. Poor cut - Poor grass discharge 1. Travel speed too fast. 3. Buildup of drive ...
... control system. Buildup of grass, leaves, and trash around mandrels. 1. Obstruction in "engaged" position. 2. Frozen idler pulley. 4. Replace mower drive belt. 3. Allow grass to open vent holes. Headlight(s) not working (if so equipped) 1. Blown fuse. 1. Poor cable connections....Place throttle control in transmission during shipment or servicing. 1. Replace/sharpen blade. Motion drive belt worn, damaged, or broken. 3. Level mower deck. 5. Loose or damaged wiring. 5. Poor cut - Poor grass discharge 1. Travel speed too fast. 3. Buildup of drive ...

User Manual
Page 33
... Grille Pro LH 261 183829Z428 Insert Grille 263 183832 Bezel Grille LH 264 183833 Bezel Grille RH NOTE: All component dimensions given in U.S. MODEL NUMBER PD22H42STA KEY PART NO. NO. inches 1 inch = 25.4 mm 33 DESCRIPTION 1 174619 Chassis 2 176554 Drawbar 5 155272 Bumper Hood/Dash 9 168337X012 Dash ... 30 179131X428 Fender Footrest STLT Pnt 31 139976 Bracket Fender 37 17490508 Screw Thdrol 6/16-18 x 1/2 TYT 38 175710 Bracket Asm Pivot Mower Rear 39 174714 Bracket Pivot 58 185949 Duct Air 60 72140606 Bolt RDHD Sqnk 3/8-16 unc x 3/4 64 154798 Dash Lower STLT 74...
... Grille Pro LH 261 183829Z428 Insert Grille 263 183832 Bezel Grille LH 264 183833 Bezel Grille RH NOTE: All component dimensions given in U.S. MODEL NUMBER PD22H42STA KEY PART NO. NO. inches 1 inch = 25.4 mm 33 DESCRIPTION 1 174619 Chassis 2 176554 Drawbar 5 155272 Bumper Hood/Dash 9 168337X012 Dash ... 30 179131X428 Fender Footrest STLT Pnt 31 139976 Bracket Fender 37 17490508 Screw Thdrol 6/16-18 x 1/2 TYT 38 175710 Bracket Asm Pivot Mower Rear 39 174714 Bracket Pivot 58 185949 Duct Air 60 72140606 Bolt RDHD Sqnk 3/8-16 unc x 3/4 64 154798 Dash Lower STLT 74...


