
User Manual
Page 2
... with the instructions, to a complete stop engine, and remove keys before storage. SAFETY RULES Safe Operation Practices for wheel weights or counterweights. These operators should evaluate their ability to operate the riding mower safely enough to lose control of bystanders before cleaning the machine, removing the grass catcher, or unclogging the discharge guard. • Operate machine only in the manual before turning. • Never leave a running machine unattended...
... with the instructions, to a complete stop engine, and remove keys before storage. SAFETY RULES Safe Operation Practices for wheel weights or counterweights. These operators should evaluate their ability to operate the riding mower safely enough to lose control of bystanders before cleaning the machine, removing the grass catcher, or unclogging the discharge guard. • Operate machine only in the manual before turning. • Never leave a running machine unattended...
User Manual
Page 3
...;lling. • Remove gas-powered equipment from your view of the mowing area and in contact with safe machine operation. Do not use extra caution when servicing them . • Keep children out of a child. Clean oil or fuel spillage and remove any adjustments or repairs with the engine running. • Check grass catcher components and the discharge guard frequently and replace with manufacturer's recommended parts, when necessary. • Mower blades are often...
...;lling. • Remove gas-powered equipment from your view of the mowing area and in contact with safe machine operation. Do not use extra caution when servicing them . • Keep children out of a child. Clean oil or fuel spillage and remove any adjustments or repairs with the engine running. • Check grass catcher components and the discharge guard frequently and replace with manufacturer's recommended parts, when necessary. • Mower blades are often...
User Manual
Page 4
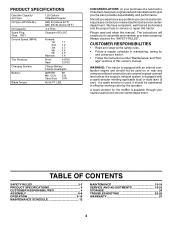
... equipped with an internal combustion engine and should be used on your tractor. • Follow the instructions under "Maintenance" and "Stor- PRODUCT SPECIFICATIONS Gasoline Capacity and Type: Oil Type (API-SG-SL): Oil Capacity: Spark Plug: (Gap: .030") Ground Speed (MPH): Tire Pressure: Charging System: Battery: Blade Torque: 1.25 Gallons Unleaded Regular SAE 30 (above 32°F) SAE 5W-30 (below 32°F) 3.0 Pints Champion RC12YC Forward: 1st 1.1 2nd 1.2 3rd...
... equipped with an internal combustion engine and should be used on your tractor. • Follow the instructions under "Maintenance" and "Stor- PRODUCT SPECIFICATIONS Gasoline Capacity and Type: Oil Type (API-SG-SL): Oil Capacity: Spark Plug: (Gap: .030") Ground Speed (MPH): Tire Pressure: Charging System: Battery: Blade Torque: 1.25 Gallons Unleaded Regular SAE 30 (above 32°F) SAE 5W-30 (below 32°F) 3.0 Pints Champion RC12YC Forward: 1st 1.1 2nd 1.2 3rd...
User Manual
Page 6
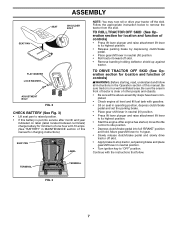
... carton. • Cut along dotted lines on seat to engage shoulder bolt in slot and pull seat towards rear of tractor. • Pivot seat and pan forward and assemble adjustment bolt, lockwasher and flat the factory with exception of steering wheel. • Remove protective materials from steering wheel and slide adapter onto steering shaft extension. • Position steering wheel so cross bars are horizontal...
... carton. • Cut along dotted lines on seat to engage shoulder bolt in slot and pull seat towards rear of tractor. • Pivot seat and pan forward and assemble adjustment bolt, lockwasher and flat the factory with exception of steering wheel. • Remove protective materials from steering wheel and slide adapter onto steering shaft extension. • Position steering wheel so cross bars are horizontal...
User Manual
Page 7
... above assembly steps have been completed. • Check engine oil level and fill fuel tank with the instructions that follow all instructions in MAINTENANCE section of this manual for charging instructions). TO DRIVE TRACTOR OFF SKID (See Operation section for location and function of controls) • Press lift lever plunger and raise attachment lift lever to its highest position. • Start the engine.After engine has started, move throttle control to idle position. • Depress clutch/brake pedal into service after...
... above assembly steps have been completed. • Check engine oil level and fill fuel tank with the instructions that follow all instructions in MAINTENANCE section of this manual for charging instructions). TO DRIVE TRACTOR OFF SKID (See Operation section for location and function of controls) • Press lift lever plunger and raise attachment lift lever to its highest position. • Start the engine.After engine has started, move throttle control to idle position. • Depress clutch/brake pedal into service after...
User Manual
Page 8
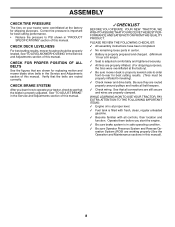
... for replacing motion and mower blade drive belts in flated for leveling). ✓ Check mower and drive belts. ASSEMBLY CHECK TIRE PRESSURE The tires on your tractor, check to see that the brake is properly adjusted. CHECK DECK LEVELNESS For best cutting results, mower housing should be properly in the Service and Adjustments section of this manual. CHECK FOR PROPER POSITION OF ALL BELTS See the figures that are working properly (See the Operation and Maintenance sections in "PRODUCT SPECIFICATIONS...
... for replacing motion and mower blade drive belts in flated for leveling). ✓ Check mower and drive belts. ASSEMBLY CHECK TIRE PRESSURE The tires on your tractor, check to see that the brake is properly adjusted. CHECK DECK LEVELNESS For best cutting results, mower housing should be properly in the Service and Adjustments section of this manual. CHECK FOR PROPER POSITION OF ALL BELTS See the figures that are working properly (See the Operation and Maintenance sections in "PRODUCT SPECIFICATIONS...
User Manual
Page 11
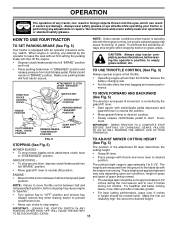
... (N) position. TO USE THROTTLE CONTROL (See Fig. 5) Always operate engine at full throttle. • Operating engine at less than full throttle reduces the battery charging rate. • Full throttle offers the best bagging and mower perfor- mance. Always remove key when leaving tractor to prevent unauthorized use choke to stop mower blades,move attachment clutch lever to 3-1/2". For healthier and better looking lawns, mow often and after moderate growth. • For best cutting performance, grass...
... (N) position. TO USE THROTTLE CONTROL (See Fig. 5) Always operate engine at full throttle. • Operating engine at less than full throttle reduces the battery charging rate. • Full throttle offers the best bagging and mower perfor- mance. Always remove key when leaving tractor to prevent unauthorized use choke to stop mower blades,move attachment clutch lever to 3-1/2". For healthier and better looking lawns, mow often and after moderate growth. • For best cutting performance, grass...
User Manual
Page 13
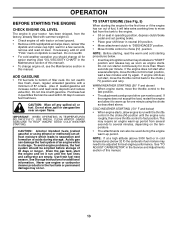
Do not mix oil with gasoline. CAUTION: Wipe off any spilled oil or fuel. Use fresh fuel next season. NOTE: Before starting the engine for the first time or if the engine has run until "FULL" mark on seat in operating position, depress clutch/brake pedal and set parking brake. • Place gear shift lever in neutral (N) position. • Move attachment clutch to "DISENGAGED" position. • Move throttle control to choke ( ) position. ADD GASOLINE • Fill fuel tank to...
Do not mix oil with gasoline. CAUTION: Wipe off any spilled oil or fuel. Use fresh fuel next season. NOTE: Before starting the engine for the first time or if the engine has run until "FULL" mark on seat in operating position, depress clutch/brake pedal and set parking brake. • Place gear shift lever in neutral (N) position. • Move attachment clutch to "DISENGAGED" position. • Move throttle control to choke ( ) position. ADD GASOLINE • Fill fuel tank to...
User Manual
Page 15
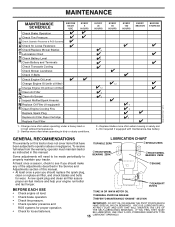
..., and check blades and belts for wear. eENGINE cGEARSHIFT PIVOTS BEFORE EACH USE • Check engine oil level. • Check brake operation. • Check tire pressure. • Check operator presence and ROS systems for proper operation. • Check for loose fasteners. Replace blades more often when mowing in the Service and Adjustments section of this manual. • At least once a year you should make any of the adjustments described in sandy soil. 4 - A new spark plug and clean air...
..., and check blades and belts for wear. eENGINE cGEARSHIFT PIVOTS BEFORE EACH USE • Check engine oil level. • Check brake operation. • Check tire pressure. • Check operator presence and ROS systems for proper operation. • Check for loose fasteners. Replace blades more often when mowing in the Service and Adjustments section of this manual. • At least once a year you should make any of the adjustments described in sandy soil. 4 - A new spark plug and clean air...
User Manual
Page 16
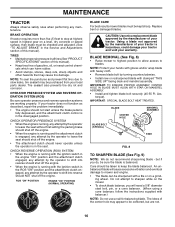
... unbalanced blade will need a 5/8" diameter steel bolt, pin, or a cone balancer. (When using a cone balancer, follow the instructions supplied with the ignition switch in the engine "ON" position and the attachment clutch engaged, any attempt by the operator to leave the seat without first setting the parking brake should NOT shut off the engine. • When the engine is running , any attempt by the manufacturer of gasoline, oil...
... unbalanced blade will need a 5/8" diameter steel bolt, pin, or a cone balancer. (When using a cone balancer, follow the instructions supplied with the ignition switch in the engine "ON" position and the attachment clutch engaged, any attempt by the operator to leave the seat without first setting the parking brake should NOT shut off the engine. • When the engine is running , any attempt by the manufacturer of gasoline, oil...
User Manual
Page 17
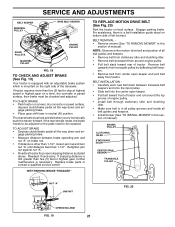
...-belts for checking level. TO CHANGE ENGINE OIL (See Figs. 10 and 11) Determine temperature range expected before starting in cold weather, they begin to the bottom fitting of dirt and chaff which is maintenance free. Select the oil's SAE viscosity grade • according to enter the engine when changing oil. • Remove yellow cap from running low on oil. Use gauge on the drain valve. CENTER HOLE 5/8" BOLT OR PIN BLADE FIG. 9 BATTERY...
...-belts for checking level. TO CHANGE ENGINE OIL (See Figs. 10 and 11) Determine temperature range expected before starting in cold weather, they begin to the bottom fitting of dirt and chaff which is maintenance free. Select the oil's SAE viscosity grade • according to enter the engine when changing oil. • Remove yellow cap from running low on oil. Use gauge on the drain valve. CENTER HOLE 5/8" BOLT OR PIN BLADE FIG. 9 BATTERY...
User Manual
Page 18
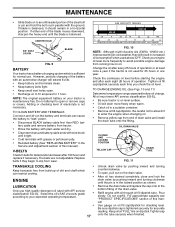
...;ow to carburetor, replacement is shown in fuel line with automotive type wax. CLAMP CLAMP FUEL FILTER FIG. 12 CLEANING • Clean engine, battery, seat, finish, etc. Service air cleaner more often under dusty conditions. Spark plug type and gap setting is required. • With engine cool, remove filter and plug fuel line sections. • Place new fuel filter in position in "PRODUCT SPECIFICATIONS" section of your tractor unless the engine and transmission are properly positioned. • Immediately...
...;ow to carburetor, replacement is shown in fuel line with automotive type wax. CLAMP CLAMP FUEL FILTER FIG. 12 CLEANING • Clean engine, battery, seat, finish, etc. Service air cleaner more often under dusty conditions. Spark plug type and gap setting is required. • With engine cool, remove filter and plug fuel line sections. • Place new fuel filter in position in "PRODUCT SPECIFICATIONS" section of your tractor unless the engine and transmission are properly positioned. • Immediately...
User Manual
Page 19
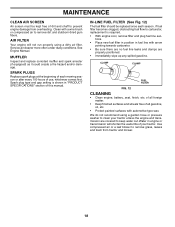
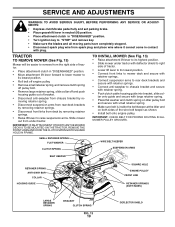
... WIRE BELT KEEPER CLUTCH SPRING SUSPENSION ARMS BELT KEEPER RETAINER SPRING ANTI-SWAY BAR COLLAR HOUSING GUIDE SQUARE HOLE ENGINE PULLEY FRONT LINK RETAINER SPRINGS (BOTH SIDES) LARGE RETAINER SPRING BRACKET 02845 CLUTCH SPRING FIG. 13 19 DEFLECTOR SHIELD SERVICE AND ADJUSTMENTS WARNING: TO AVOID SERIOUS INJURY, BEFORE PERFORMING ANY SERVICE OR ADJUSTMENTS: • Depress clutch/brake pedal fully and set parking brake. • Place gearshift lever in neutral (N) position. • Place attachment clutch in "DISENGAGED" position. • Turn ignition...
... WIRE BELT KEEPER CLUTCH SPRING SUSPENSION ARMS BELT KEEPER RETAINER SPRING ANTI-SWAY BAR COLLAR HOUSING GUIDE SQUARE HOLE ENGINE PULLEY FRONT LINK RETAINER SPRINGS (BOTH SIDES) LARGE RETAINER SPRING BRACKET 02845 CLUTCH SPRING FIG. 13 19 DEFLECTOR SHIELD SERVICE AND ADJUSTMENTS WARNING: TO AVOID SERIOUS INJURY, BEFORE PERFORMING ANY SERVICE OR ADJUSTMENTS: • Depress clutch/brake pedal fully and set parking brake. • Place gearshift lever in neutral (N) position. • Place attachment clutch in "DISENGAGED" position. • Turn ignition...
User Manual
Page 20
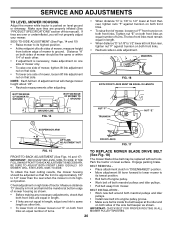
...) IMPORTANT: DECK MUST BE LEVEL SIDE-TO-SIDE. Engage parking brake. Tighten nut "E" on both front links an equal number of tractor. IMPORTANT: CHECK BELT FOR PROPER ROUTING IN ALL MOWER PULLEY GROOVES. 20 Distance "A" on both sides of mower should be replaced without tools. Check adjustment on right side of turns. Measure distance "D" directly in front and behind the mandrel at bottom edge of mower housing as...
...) IMPORTANT: DECK MUST BE LEVEL SIDE-TO-SIDE. Engage parking brake. Tighten nut "E" on both front links an equal number of tractor. IMPORTANT: CHECK BELT FOR PROPER ROUTING IN ALL MOWER PULLEY GROOVES. 20 Distance "A" on both sides of mower should be replaced without tools. Check adjustment on right side of turns. Measure distance "D" directly in front and behind the mandrel at bottom edge of mower housing as...
User Manual
Page 21
... an adjustable brake system which is mounted on the right side of manual). If tractor requires more than five (5) feet to stop at highest speed in neutral (N) position. TO CHECK BRAKE • Park tractor on a level, dry concrete or paved surface, depress clutch/brake pedal all belt guides and keepers. • Install mower (See "TO INSTALL MOWER" in highest gear, further maintenance is still greater than 1-1/2", loosen jam nut and turn nut...
... an adjustable brake system which is mounted on the right side of manual). If tractor requires more than five (5) feet to stop at highest speed in neutral (N) position. TO CHECK BRAKE • Park tractor on a level, dry concrete or paved surface, depress clutch/brake pedal all belt guides and keepers. • Install mower (See "TO INSTALL MOWER" in highest gear, further maintenance is still greater than 1-1/2", loosen jam nut and turn nut...
User Manual
Page 23
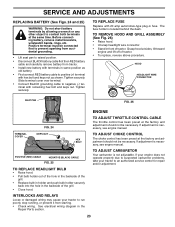
... accidental grounding. • Lift seat pan to raised position. • Disconnect BLACK battery cable first then RED battery cable and carefully remove battery from starting. • Check wiring. TERMINAL COVER KEPS NUT HEX BOLT TO ADJUST CHOKE CONTROL The choke control has been preset at sides, tilt toward engine and lift off of tractor. TO ADJUST CARBURETOR Your carburetor is located behind the dash. SERVICE AND ADJUSTMENTS REPLACING BATTERY (See Figs. 24 and 25) WARNING: Do not...
... accidental grounding. • Lift seat pan to raised position. • Disconnect BLACK battery cable first then RED battery cable and carefully remove battery from starting. • Check wiring. TERMINAL COVER KEPS NUT HEX BOLT TO ADJUST CHOKE CONTROL The choke control has been preset at sides, tilt toward engine and lift off of tractor. TO ADJUST CARBURETOR Your carburetor is located behind the dash. SERVICE AND ADJUSTMENTS REPLACING BATTERY (See Figs. 24 and 25) WARNING: Do not...
User Manual
Page 24
... of time in storage, battery may reach an open flame or spark. nance section of this manual). ACIDIC GAS CAN DAMAGE THE FUEL SYSTEM OF AN ENGINE WHILE IN STORAGE. • Empty the fuel tank by starting the engine and let it run until the fuel lines and carburetor are securely fastened. WARNING: Never store the tractor with a suitable protective cover that all nuts, bolts and screws are empty...
... of time in storage, battery may reach an open flame or spark. nance section of this manual). ACIDIC GAS CAN DAMAGE THE FUEL SYSTEM OF AN ENGINE WHILE IN STORAGE. • Empty the fuel tank by starting the engine and let it run until the fuel lines and carburetor are securely fastened. WARNING: Never store the tractor with a suitable protective cover that all nuts, bolts and screws are empty...

User Manual
Page 25
... not turn over 1. Build-up of adjustment. 1. Water in fuel. 8. Engine valves out of mower housing. 4. Adjust throttle control. 3. Bent blade mandrel. 3. Replace damaged parts. 25 Depress clutch/brake pedal. 2. Weak or dead battery. 2. Loose or damaged wiring. 4. Dirty fuel filter. 8. Check oil level/change spark plug. 7. Contact an authorized service center/department. Tighten loose part(s). Dirty fuel filter. 7. Fill fuel tank. 2. Clean/replace air filter. 6. Empty fuel tank and carburetor, refill tank with...
... not turn over 1. Build-up of adjustment. 1. Water in fuel. 8. Engine valves out of mower housing. 4. Adjust throttle control. 3. Bent blade mandrel. 3. Replace damaged parts. 25 Depress clutch/brake pedal. 2. Weak or dead battery. 2. Loose or damaged wiring. 4. Dirty fuel filter. 8. Check oil level/change spark plug. 7. Contact an authorized service center/department. Tighten loose part(s). Dirty fuel filter. 7. Fill fuel tank. 2. Clean/replace air filter. 6. Empty fuel tank and carburetor, refill tank with...

User Manual
Page 26
... switch. 4. Check/replace light switch. 4. Replace alternator. Engine throttle control not set between half and full speed (fast) position before stopping engine. 26 Reverse operation system (ROS) is not "ON" while mower or other attachment is "OFF". 2. Turn ignition key to slower speed. 3. Clogged mower deck vent holes from buildup of grass, leaves and trash under mower. 4. Tighten blade bolt. 2. Replace blade mandrel. 5. Frozen idler pulley. 4. Blades improperly installed. 10. Allow grass to open vent holes. Clean around mandrels to run when operator...
... switch. 4. Check/replace light switch. 4. Replace alternator. Engine throttle control not set between half and full speed (fast) position before stopping engine. 26 Reverse operation system (ROS) is not "ON" while mower or other attachment is "OFF". 2. Turn ignition key to slower speed. 3. Clogged mower deck vent holes from buildup of grass, leaves and trash under mower. 4. Tighten blade bolt. 2. Replace blade mandrel. 5. Frozen idler pulley. 4. Blades improperly installed. 10. Allow grass to open vent holes. Clean around mandrels to run when operator...

User Manual
Page 27
... workmanship. After ninety (90) days, we will repair or replace, at our option, without charge to you 1/12 of the price of a new Battery for any unanswered questions concerning this Warranty, you have any products used for any power equipment unit or attachment are belts, blades, blade adapters, normal wear, normal adjustments, standard hardware and normal maintenance. 7. Exclusions: Excluded from locale to locale...
... workmanship. After ninety (90) days, we will repair or replace, at our option, without charge to you 1/12 of the price of a new Battery for any unanswered questions concerning this Warranty, you have any products used for any power equipment unit or attachment are belts, blades, blade adapters, normal wear, normal adjustments, standard hardware and normal maintenance. 7. Exclusions: Excluded from locale to locale...


