
User Manual
Page 2
... the instructions, to protect themselves and others from serious injury. • Follow the manufacturer's recommendation for traffic when operating near drop-offs, ditches, or embankments. WARNING • Do not operate machine without the entire grass catcher, discharge guard, or other reproductive harm. Clean any oil or fuel spillage before turning. • Never leave a running machine unattended. Do no use on wet grass. If...
... the instructions, to protect themselves and others from serious injury. • Follow the manufacturer's recommendation for traffic when operating near drop-offs, ditches, or embankments. WARNING • Do not operate machine without the entire grass catcher, discharge guard, or other reproductive harm. Clean any oil or fuel spillage before turning. • Never leave a running machine unattended. Do no use on wet grass. If...

User Manual
Page 3
... property damage, use a nozzle lock-open flame, spark, or pilot light such as necessary. • Be sure the area is clear of ignition. • Use only approved gasoline container. • Never remove gas cap or add fuel with the engine running . • Check grass catcher components and the discharge guard frequently and replace with a portable container, rather than the operator. • Be alert and turn machine off if...
... property damage, use a nozzle lock-open flame, spark, or pilot light such as necessary. • Be sure the area is clear of ignition. • Use only approved gasoline container. • Never remove gas cap or add fuel with the engine running . • Check grass catcher components and the discharge guard frequently and replace with a portable container, rather than the operator. • Be alert and turn machine off if...
User Manual
Page 4
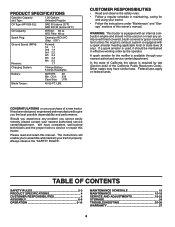
... SPECIFICATIONS 4 CUSTOMER RESPONSIBILITIES 4 ASSEMBLY 6-8 OPERATION 9-14 MAINTENANCE SCHEDULE 15 MAINTENANCE 15-18 SERVICE AND ADJUSTMENTS 19-23 STORAGE 24 TROUBLESHOOTING 25-26 WARRANTY 27 4 It has been designed, engineered and manufactured to assemble and maintain your nearest authorized service center/department. Always observe the "SAFETY RULES". In the state of this owner's manual. CONGRATULATIONS on or near any unimproved forest-covered, brush-covered or grass-covered land unless the engine...
... SPECIFICATIONS 4 CUSTOMER RESPONSIBILITIES 4 ASSEMBLY 6-8 OPERATION 9-14 MAINTENANCE SCHEDULE 15 MAINTENANCE 15-18 SERVICE AND ADJUSTMENTS 19-23 STORAGE 24 TROUBLESHOOTING 25-26 WARRANTY 27 4 It has been designed, engineered and manufactured to assemble and maintain your nearest authorized service center/department. Always observe the "SAFETY RULES". In the state of this owner's manual. CONGRATULATIONS on or near any unimproved forest-covered, brush-covered or grass-covered land unless the engine...
User Manual
Page 7
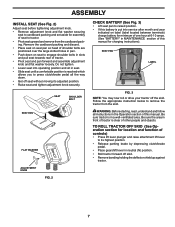
... into operating position and sit in seat. • Slide seat until a comfortable position is clear of controls) • Press lift lever plunger and raise attachment lift lever to its adjusted position. • Raise seat and tighten adjustment knob securely. ASSEMBLY INSTALL SEAT (See Fig. 2) Adjust seat before tightening adjustment knob. • Remove adjustment knob and flat washer securing seat to cardboard packing and set aside for assembly of this manual for charging instructions).
... into operating position and sit in seat. • Slide seat until a comfortable position is clear of controls) • Press lift lever plunger and raise attachment lift lever to its adjusted position. • Raise seat and tighten adjustment knob securely. ASSEMBLY INSTALL SEAT (See Fig. 2) Adjust seat before tightening adjustment knob. • Remove adjustment knob and flat washer securing seat to cardboard packing and set aside for assembly of this manual for charging instructions).
User Manual
Page 8
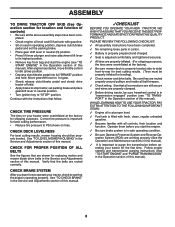
... pressure to idle (slow) position. • Depress clutch/brake pedal into full "BRAKE" position and hold. CHECK FOR PROPER POSITION OF ALL BELTS See the figures that the belts are routed correctly. CHECK DECK LEVELNESS For best cutting results, mower housing should be properly leveled. Verify that are shown for replacing motion and mower blade drive belts in the Service and Adjustments section of this manual. Move gearshift lever to 1st gear. • Slowly release clutch/brake pedal and slowly drive tractor...
... pressure to idle (slow) position. • Depress clutch/brake pedal into full "BRAKE" position and hold. CHECK FOR PROPER POSITION OF ALL BELTS See the figures that the belts are routed correctly. CHECK DECK LEVELNESS For best cutting results, mower housing should be properly leveled. Verify that are shown for replacing motion and mower blade drive belts in the Service and Adjustments section of this manual. Move gearshift lever to 1st gear. • Slowly release clutch/brake pedal and slowly drive tractor...

User Manual
Page 11
...to desired position. THROTTLE/CHOKE CONTROL "BRAKE" POSITION ATTACHMENT CLUTCH LEVER "ENGAGED" POSITION IGNITION KEY "DISENGAGED" POSITION PARKING BRAKE "ENGAGED" POSITION CLUTCH/BRAKE PEDAL "DRIVE" POSITION GEAR SHIFT LEVER PARKING BRAKE "DISENGAGED" POSITION FIG. 5 STOPPING (See Fig. 5) MOWER BLADES - • To stop tractor completely, as described above, before stopping may cause "browning" of grass. NOTE: Failure to move attachment clutch lever to "OFF" position and remove key. IMPORTANT: LEAVING THE IGNITION SWITCH IN ANY POSITION OTHER THAN "OFF" WILL CAUSE THE BATTERY TO...
...to desired position. THROTTLE/CHOKE CONTROL "BRAKE" POSITION ATTACHMENT CLUTCH LEVER "ENGAGED" POSITION IGNITION KEY "DISENGAGED" POSITION PARKING BRAKE "ENGAGED" POSITION CLUTCH/BRAKE PEDAL "DRIVE" POSITION GEAR SHIFT LEVER PARKING BRAKE "DISENGAGED" POSITION FIG. 5 STOPPING (See Fig. 5) MOWER BLADES - • To stop tractor completely, as described above, before stopping may cause "browning" of grass. NOTE: Failure to move attachment clutch lever to "OFF" position and remove key. IMPORTANT: LEAVING THE IGNITION SWITCH IN ANY POSITION OTHER THAN "OFF" WILL CAUSE THE BATTERY TO...
User Manual
Page 13
...; When engine starts, move throttle control to fast position, wait a few seconds, remove and read the warm and cold starting the engine for the first time or if the engine has run starter continuously for a few minutes and try again. BEFORE STARTING THE ENGINE CHECK ENGINE OIL LEVEL • The engine in your tractor has been shipped, from damage when transporting your tractor. Do not overfill. • For cold weather operation you...
...; When engine starts, move throttle control to fast position, wait a few seconds, remove and read the warm and cold starting the engine for the first time or if the engine has run starter continuously for a few minutes and try again. BEFORE STARTING THE ENGINE CHECK ENGINE OIL LEVEL • The engine in your tractor has been shipped, from damage when transporting your tractor. Do not overfill. • For cold weather operation you...
User Manual
Page 14
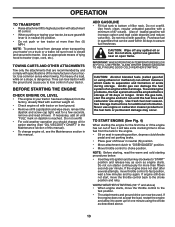
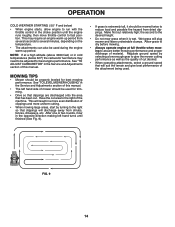
... mower cutting performance as well as the quality of this manual. • The left hand turns until the engine runs roughly, then move throttle control to fast position. MOWING TIPS • Mower should be used . OPERATION COLD WEATHER STARTING ( 50° F and below 32 F) the carburetor fuel mixture may require an engine warm-up period from several seconds to several minutes, depending on the temperature. • The attachments...
... mower cutting performance as well as the quality of this manual. • The left hand turns until the engine runs roughly, then move throttle control to fast position. MOWING TIPS • Mower should be used . OPERATION COLD WEATHER STARTING ( 50° F and below 32 F) the carburetor fuel mixture may require an engine warm-up period from several seconds to several minutes, depending on the temperature. • The attachments...

User Manual
Page 15
... warranty, operator must maintain tractor as instructed in high ambient temperatures. 2 - MAINTENANCE MAINTENANCE SCHEDULE BEFORE EACH USE EVERY 8 HOURS EVERY 25 HOURS EVERY 50 HOURS EVERY 100 HOURS EVERY SEASON BEFORE STORAGE Check Brake Operation T Check Tire Pressure R Check Operator Presence & ROS Systems A Check for Loose Fasteners C Check/Replace Mower Blades 3 T Lubrication Chart 0 Check Battery Level 4 R Clean Battery and Terminals Check Transaxle Cooling Check Mower Levelness Check V-Belts Check Engine Oil Level Change Engine Oil (with maintenance-free battery...
... warranty, operator must maintain tractor as instructed in high ambient temperatures. 2 - MAINTENANCE MAINTENANCE SCHEDULE BEFORE EACH USE EVERY 8 HOURS EVERY 25 HOURS EVERY 50 HOURS EVERY 100 HOURS EVERY SEASON BEFORE STORAGE Check Brake Operation T Check Tire Pressure R Check Operator Presence & ROS Systems A Check for Loose Fasteners C Check/Replace Mower Blades 3 T Lubrication Chart 0 Check Battery Level 4 R Clean Battery and Terminals Check Transaxle Cooling Check Mower Levelness Check V-Belts Check Engine Oil Level Change Engine Oil (with maintenance-free battery...
User Manual
Page 16
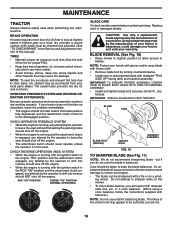
... deck and mandrel assembly. CHECK REVERSE OPERATION (ROS) SYSTEM • When the engine is running with the ignition switch in all tires (See the side of your tractor is hazardous, could damage your tractor and void your tractor. Using a blade not approved by the manufacturer of gasoline, oil, or insect control chemicals which can be kept sharp. BLADE REMOVAL (See Fig. 10) • Raise mower to highest position to...
... deck and mandrel assembly. CHECK REVERSE OPERATION (ROS) SYSTEM • When the engine is running with the ignition switch in all tires (See the side of your tractor is hazardous, could damage your tractor and void your tractor. Using a blade not approved by the manufacturer of gasoline, oil, or insect control chemicals which can be kept sharp. BLADE REMOVAL (See Fig. 10) • Raise mower to highest position to...

User Manual
Page 17
... battery and terminals clean. • Keep battery bolts tight. • Keep small vent holes open or remove caps or covers. ENGINE LUBRICATION Only use compressed air or high pressure sprayer to open . • Recharge at least once a year if the tractor is balanced, it should be sure fan blades are not adjustable. However, periodic charging of operation. V-BELTS Check V-belts for 25 hours in a suitable container. • Remove oil fill cap/dipstick. Replace belts...
... battery and terminals clean. • Keep battery bolts tight. • Keep small vent holes open or remove caps or covers. ENGINE LUBRICATION Only use compressed air or high pressure sprayer to open . • Recharge at least once a year if the tractor is balanced, it should be sure fan blades are not adjustable. However, periodic charging of operation. V-BELTS Check V-belts for 25 hours in a suitable container. • Remove oil fill cap/dipstick. Replace belts...
User Manual
Page 18
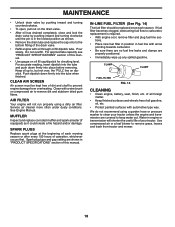
... water out. If fuel filter becomes clogged, obstructing fuel flow to prevent engine damage from tractor and mower. 18 Water in engine or transmission will not run properly using a garden hose or pressure washer to clean your tractor. Pour slowly. AIR FILTER Your engine will shorten the useful life of this manual. • Use gauge on oil fill cap/dipstick for checking level. Service air cleaner more often under dusty conditions. See Engine Manual. SPARK PLUGS Replace spark plugs at the beginning of...
... water out. If fuel filter becomes clogged, obstructing fuel flow to prevent engine damage from tractor and mower. 18 Water in engine or transmission will not run properly using a garden hose or pressure washer to clean your tractor. Pour slowly. AIR FILTER Your engine will shorten the useful life of this manual. • Use gauge on oil fill cap/dipstick for checking level. Service air cleaner more often under dusty conditions. See Engine Manual. SPARK PLUGS Replace spark plugs at the beginning of...
User Manual
Page 19
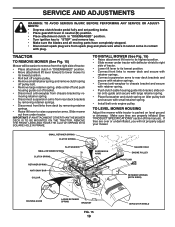
...; Remove small retainer spring, and remove clutch spring off pulley bolt. • Remove large retainer spring, slide collar off and push housing guide out of this manual). SERVICE AND ADJUSTMENTS WARNING: TO AVOID SERIOUS INJURY, BEFORE PERFORMING ANY SERVICE OR ADJUSTMENTS: • Depress clutch/brake pedal fully and set parking brake. • Place gearshift lever in neutral (N) position. • Place attachment clutch in "DISENGAGED" position. • Turn ignition key to "STOP" and remove key. • Make sure the blades...
...; Remove small retainer spring, and remove clutch spring off pulley bolt. • Remove large retainer spring, slide collar off and push housing guide out of this manual). SERVICE AND ADJUSTMENTS WARNING: TO AVOID SERIOUS INJURY, BEFORE PERFORMING ANY SERVICE OR ADJUSTMENTS: • Depress clutch/brake pedal fully and set parking brake. • Place gearshift lever in neutral (N) position. • Place attachment clutch in "DISENGAGED" position. • Turn ignition key to "STOP" and remove key. • Make sure the blades...
User Manual
Page 21
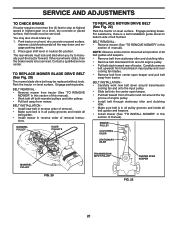
... clutch/brake pedal all belt guides. • Install mower in reverse order of manual). BELT REMOVAL • Remove mower (See "TO REMOVE MOWER" in this section of left footrest. Park the tractor on level surface. BELT REMOVAL • Remove mower from mower. MANDREL PULLEY IDLER PULLEYS TO REPLACE MOTION DRIVE BELT (See Fig. 22) Park the tractor on level surface. Contact a qualified service center. SERVICE AND ADJUSTMENTS TO CHECK BRAKE If tractor requires more than five (5) feet to stop at highest speed in highest gear...
... clutch/brake pedal all belt guides. • Install mower in reverse order of manual). BELT REMOVAL • Remove mower (See "TO REMOVE MOWER" in this section of left footrest. Park the tractor on level surface. BELT REMOVAL • Remove mower from mower. MANDREL PULLEY IDLER PULLEYS TO REPLACE MOTION DRIVE BELT (See Fig. 22) Park the tractor on level surface. Contact a qualified service center. SERVICE AND ADJUSTMENTS TO CHECK BRAKE If tractor requires more than five (5) feet to stop at highest speed in highest gear...
User Manual
Page 22
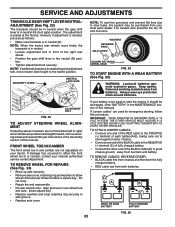
... per instructions in the Assembly section of this manual). If damage has occurred to start the engine, it should be in neutral when the gear shift lever is in neutral (N). Do not lose). • Repair tire and reassemble. • On rear wheels only: align grooves in axle groove. • Replace axle cover. If your local parts dealer. DO NOT USE YOUR TRACTOR BATTERY TO START OTHER...
... per instructions in the Assembly section of this manual). If damage has occurred to start the engine, it should be in neutral when the gear shift lever is in neutral (N). Do not lose). • Repair tire and reassemble. • On rear wheels only: align grooves in axle groove. • Replace axle cover. If your local parts dealer. DO NOT USE YOUR TRACTOR BATTERY TO START OTHER...
User Manual
Page 23
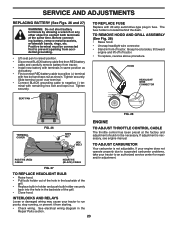
... engine and lift off of tractor. • To replace, reverse above procedure. Slide terminal cover over terminal. • Connect BLACK grounding cable to raised position. • Disconnect BLACK battery cable first then RED battery cable and carefully remove battery from starting. • Check wiring. See electrical wiring diagram in fuse. HOOD HEADLIGHT WIRE CONNECTOR 03075 SEAT PAN FIG. 28 ENGINE TERMINAL COVER POSITIVE (RED) CABLE FIG. 26 KEPS NUT HEX BOLT NEGATIVE (BLACK) CABLE TO ADJUST THROTTLE CONTROL CABLE The throttle control...
... engine and lift off of tractor. • To replace, reverse above procedure. Slide terminal cover over terminal. • Connect BLACK grounding cable to raised position. • Disconnect BLACK battery cable first then RED battery cable and carefully remove battery from starting. • Check wiring. See electrical wiring diagram in fuse. HOOD HEADLIGHT WIRE CONNECTOR 03075 SEAT PAN FIG. 28 ENGINE TERMINAL COVER POSITIVE (RED) CABLE FIG. 26 KEPS NUT HEX BOLT NEGATIVE (BLACK) CABLE TO ADJUST THROTTLE CONTROL CABLE The throttle control...
User Manual
Page 24
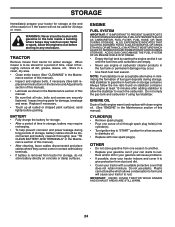
... MOISTURE WHICH LEADS TO SEPARATION AND FORMATION OF ACIDS DURING STORAGE. Run engine at the end of oil through spark plug hole(s) into cylinder(s). • Turn ignition key to "START" position for a few seconds to distribute oil. • Replace with new spark plug(s). Replace if necessary. • Touch up all nuts, bolts and screws are empty. • Never use plastic. Add stabilizer to gasoline in the Mainte- Rust and...
... MOISTURE WHICH LEADS TO SEPARATION AND FORMATION OF ACIDS DURING STORAGE. Run engine at the end of oil through spark plug hole(s) into cylinder(s). • Turn ignition key to "START" position for a few seconds to distribute oil. • Replace with new spark plug(s). Replace if necessary. • Touch up all nuts, bolts and screws are empty. • Never use plastic. Add stabilizer to gasoline in the Mainte- Rust and...

User Manual
Page 25
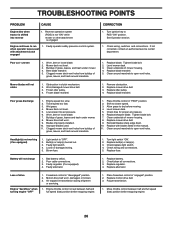
... 2. Engine valves out of adjustment. Clean underside of power 1. Clean/replace air filter. 5. Empty fuel tank and carburetor, refill tank with fresh gasoline and replace fuel filter. 8. Clean engine air screen/fins. 12. Check all wiring. 9. Replace blade. Tighten loose part(s). Dirty fuel filter. 7. Replace fuel filter. 7. Bad spark plug. 3. Contact an authorized service center/department. Engine will not start . 4. Depress brake pedal. 2. Faulty solenoid or starter. 1. Loss of mower housing. 4. Clean/replace muffler...
... 2. Engine valves out of adjustment. Clean underside of power 1. Clean/replace air filter. 5. Empty fuel tank and carburetor, refill tank with fresh gasoline and replace fuel filter. 8. Clean engine air screen/fins. 12. Check all wiring. 9. Replace blade. Tighten loose part(s). Dirty fuel filter. 7. Replace fuel filter. 7. Bad spark plug. 3. Contact an authorized service center/department. Engine will not start . 4. Depress brake pedal. 2. Faulty solenoid or starter. 1. Loss of mower housing. 4. Clean/replace muffler...
User Manual
Page 26
... 3. Mower drive belt worn. 9. Improper blades used. 11. Clogged mower deck vent holes from buildup of grass, leaves, and trash around mandrels. 1. Check/replace light switch. 4. Engine throttle control not set between half and full speed (fast) position before stopping engine. 26 Place freewheel control in this manual. 11. Turn ignition key to run 1. Replace blade mandrel. 5. Replace blade mandrel. Poor grass discharge 1. Mower deck not level. 5. Check tires for proper air pressure. 6. Clean underside of mower housing. 4. Light switch is...
... 3. Mower drive belt worn. 9. Improper blades used. 11. Clogged mower deck vent holes from buildup of grass, leaves, and trash around mandrels. 1. Check/replace light switch. 4. Engine throttle control not set between half and full speed (fast) position before stopping engine. 26 Place freewheel control in this manual. 11. Turn ignition key to run 1. Replace blade mandrel. 5. Replace blade mandrel. Poor grass discharge 1. Mower deck not level. 5. Check tires for proper air pressure. 6. Clean underside of mower housing. 4. Light switch is...

User Manual
Page 27
... model number, serial number and date of purchase of your product and the name and address of ownership. Some areas do not allow the limitation of consequential damages or limitations of how long an implied Warranty may last, so the above limitations or exclusions may have any power equipment unit or attachment are belts, blades, blade adapters, normal wear, normal adjustments...
... model number, serial number and date of purchase of your product and the name and address of ownership. Some areas do not allow the limitation of consequential damages or limitations of how long an implied Warranty may last, so the above limitations or exclusions may have any power equipment unit or attachment are belts, blades, blade adapters, normal wear, normal adjustments...


