

User Manual
Page 2
...your tractor. I. Uneven terrain could be picked up the slope or if you will not have • Do not put hands or feet near rotating parts or under the in gear when going down before operat- Do no use on wet grass. Avoid on a slope, is over . • ...deck to a complete stop before dismounting. • Disengage blades when not mowing. Wash hands tip-over accidents, which can touch hot exhaust / engine parts and burn. GENERAL OPERATION • Watch for Ride-On Mowers DANGER: THIS CUTTING MACHINE IS CAPABLE OF AMPUTATING HANDS AND FEET AND THROWING OBJECTS. ...
...your tractor. I. Uneven terrain could be picked up the slope or if you will not have • Do not put hands or feet near rotating parts or under the in gear when going down before operat- Do no use on wet grass. Avoid on a slope, is over . • ...deck to a complete stop before dismounting. • Disengage blades when not mowing. Wash hands tip-over accidents, which can touch hot exhaust / engine parts and burn. GENERAL OPERATION • Watch for Ride-On Mowers DANGER: THIS CUTTING MACHINE IS CAPABLE OF AMPUTATING HANDS AND FEET AND THROWING OBJECTS. ...
User Manual
Page 3
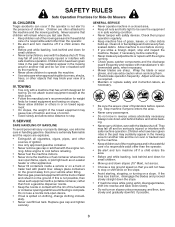
... area and in the watchful care of ignition. • Use only approved gasoline container. • Never remove gas cap or add fuel with manufacturer's recommended parts, when necessary. • Mower blades are explosive. • Extinguish all cigarettes, cigars, pipes, and other sources of a responsible adult other than the operator. • Be...
... area and in the watchful care of ignition. • Use only approved gasoline container. • Never remove gas cap or add fuel with manufacturer's recommended parts, when necessary. • Mower blades are explosive. • Extinguish all cigarettes, cigars, pipes, and other sources of a responsible adult other than the operator. • Be...

User Manual
Page 5
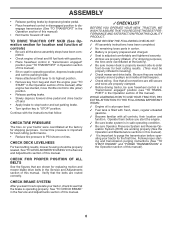
... which allows you are in Maintenance section of this manual. Key (2) Keys UNASSEMBLED PARTS (1) Oil Drain Tube Slope Sheet ASSEMBLY Your new tractor has been assembled at the factory with the exception of... those parts left hand is clear of other people and objects. A CHECK BATTERY (See Fig. 1) &#...the Operation section of this manual for any additional loose parts or cartons and remove. Be sure tractor is put into service after month and year indicated on all accessible loose...
... which allows you are in Maintenance section of this manual. Key (2) Keys UNASSEMBLED PARTS (1) Oil Drain Tube Slope Sheet ASSEMBLY Your new tractor has been assembled at the factory with the exception of... those parts left hand is clear of other people and objects. A CHECK BATTERY (See Fig. 1) &#...the Operation section of this manual for any additional loose parts or cartons and remove. Be sure tractor is put into service after month and year indicated on all accessible loose...
User Manual
Page 6
... SKID (See Operation section for location and function of controls) • Be sure all the above assembly steps have been completed. ✓ No remaining loose parts in carton. ✓ Battery is properly prepared and charged. ✓ Seat is adjusted comfortably and tightened securely. ✓ All tires are properly inflated...
... SKID (See Operation section for location and function of controls) • Be sure all the above assembly steps have been completed. ✓ No remaining loose parts in carton. ✓ Battery is properly prepared and charged. ✓ Seat is adjusted comfortably and tightened securely. ✓ All tires are properly inflated...
User Manual
Page 15
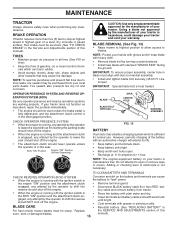
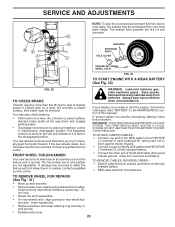
.... • Keep battery and terminals clean. • Keep battery bolts tight. • Keep small vent holes open or remove caps or covers. If your local parts dealer. NOTE: To seal tire punctures and prevent flat 6-10 amperes for normal use. tery cable and remove battery from your tractor does not...
.... • Keep battery and terminals clean. • Keep battery bolts tight. • Keep small vent holes open or remove caps or covers. If your local parts dealer. NOTE: To seal tire punctures and prevent flat 6-10 amperes for normal use. tery cable and remove battery from your tractor does not...
User Manual
Page 18
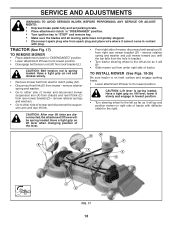
... brake. • Place attachment clutch in "DISENGAGED" position. • Turn ignition key to "STOP" and remove key. • Make sure the blades and all moving parts have completely stopped. • Disconnect spark plug wire from the hole in contact with deflector shield to its lowest position. • Disengage belt...
... brake. • Place attachment clutch in "DISENGAGED" position. • Turn ignition key to "STOP" and remove key. • Make sure the blades and all moving parts have completely stopped. • Disconnect spark plug wire from the hole in contact with deflector shield to its lowest position. • Disengage belt...
User Manual
Page 23
... camber is set front wheel toe-in or camber, contact a qualified service center. Always wear eye protection when around batteries. If your local parts dealer.
... camber is set front wheel toe-in or camber, contact a qualified service center. Always wear eye protection when around batteries. If your local parts dealer.

User Manual
Page 24
... • Close hood. TO REMOVE HOOD AND GRILL ASSEMBLY (See Fig. 34) • Raise hood. • Unsnap headlight wire connector. • Stand in the Repair Parts section. TO ADJUST CARBURETOR Your carburetor is located behind the dash. If your engine does not operate properly due to suspected carburetor problems, take your...
... • Close hood. TO REMOVE HOOD AND GRILL ASSEMBLY (See Fig. 34) • Raise hood. • Unsnap headlight wire connector. • Stand in the Repair Parts section. TO ADJUST CARBURETOR Your carburetor is located behind the dash. If your engine does not operate properly due to suspected carburetor problems, take your...

User Manual
Page 25
Inspect moving parts for a few seconds to distribute oil. • Replace with clean engine oil. (See "ENGINE" in the Maintenance section of this manual. • Be sure that ... charge the battery for 30 days or more. ENGINE FUEL SYSTEM IMPORTANT: IT IS IMPORTANT TO PREVENT GUM DEPOSITS FROM FORMING IN ESSENTIAL FUEL SYSTEM PARTS SUCH AS CARBURETOR, FUEL FILTER, FUEL HOSE, OR TANK DURING STORAGE. Add stabilizer to give protection from dust and dirt. • Cover your tractor with...
Inspect moving parts for a few seconds to distribute oil. • Replace with clean engine oil. (See "ENGINE" in the Maintenance section of this manual. • Be sure that ... charge the battery for 30 days or more. ENGINE FUEL SYSTEM IMPORTANT: IT IS IMPORTANT TO PREVENT GUM DEPOSITS FROM FORMING IN ESSENTIAL FUEL SYSTEM PARTS SUCH AS CARBURETOR, FUEL FILTER, FUEL HOSE, OR TANK DURING STORAGE. Add stabilizer to give protection from dust and dirt. • Cover your tractor with...

User Manual
Page 26
...Check/replace solenoid or starter. Faulty spark plug. 7. Raise cutting height/reduce speed. 2. Worn, bent or loose blade. 2. Loose/damaged part(s). 1. Engine valves out of grass, leaves and trash under mower. 4. Recharge or replace battery. 6. Contact an authorized service center/department. ... oil level/dirty oil. 6. Spark plug wire loose. 11. Dirty/clogged muffler. 13. Bent blade mandrel. 3. Tighten loose part(s). Out of power 1. Replace spark plug. 5. Replace fuel filter. 8. Clean/replace air filter. 2. Contact an authorized ...
...Check/replace solenoid or starter. Faulty spark plug. 7. Raise cutting height/reduce speed. 2. Worn, bent or loose blade. 2. Loose/damaged part(s). 1. Engine valves out of grass, leaves and trash under mower. 4. Recharge or replace battery. 6. Contact an authorized service center/department. ... oil level/dirty oil. 6. Spark plug wire loose. 11. Dirty/clogged muffler. 13. Bent blade mandrel. 3. Tighten loose part(s). Out of power 1. Replace spark plug. 5. Replace fuel filter. 8. Clean/replace air filter. 2. Contact an authorized ...

User Manual
Page 28
... responsibility of the purchaser. The Warranty period for each full month from this warranty must be defective in replacing parts, any parts submitted for any part which vary from whom it was purchased. This warranty does not apply to the engine, other rights which we... return the product to products which have other than EHP manufactured transaxle/transmission components, battery (except as noted below) or components parts thereof. Some areas do not allow the limitation of consequential damages or limitations of purchase by Electrolux Home Products. 3. This Warranty...
... responsibility of the purchaser. The Warranty period for each full month from this warranty must be defective in replacing parts, any parts submitted for any part which vary from whom it was purchased. This warranty does not apply to the engine, other rights which we... return the product to products which have other than EHP manufactured transaxle/transmission components, battery (except as noted below) or components parts thereof. Some areas do not allow the limitation of consequential damages or limitations of purchase by Electrolux Home Products. 3. This Warranty...
User Manual
Page 30
... of Electrolux Home Products is to rigid quality standards. As with all mechanical products, some adjustments or part replacement may be directed to our website: www.poulan-pro.com/support.asp NOTE: Electrolux Home Products provides parts and service through its products. Description of your local dealer for updated information and assistance. If...
... of Electrolux Home Products is to rigid quality standards. As with all mechanical products, some adjustments or part replacement may be directed to our website: www.poulan-pro.com/support.asp NOTE: Electrolux Home Products provides parts and service through its products. Description of your local dealer for updated information and assistance. If...


