

User Manual
Page 2
...in a large percentage of a load, while on all movement on a slope. The machine could overturn the machine. Too heavy of riding mower-related injuries. WARNING II. Tall grass can affect the Always look down before storage. Do not make sudden changes in the manual before ...injury. • Follow the manufacturer's recommendation for all instructions on the ground. These operators should evaluate their ability to operate the riding mower safely enough to roll over if a wheel is clear of grass , leaves or other debris build-up which could be picked up ...
...in a large percentage of a load, while on all movement on a slope. The machine could overturn the machine. Too heavy of riding mower-related injuries. WARNING II. Tall grass can affect the Always look down before storage. Do not make sudden changes in the manual before ...injury. • Follow the manufacturer's recommendation for all instructions on the ground. These operators should evaluate their ability to operate the riding mower safely enough to roll over if a wheel is clear of grass , leaves or other debris build-up which could be picked up ...

User Manual
Page 3
...; If you last saw them . • Check brake operation frequently. GENERAL SERVICE • Never operate machine in contact with manufacturer's recommended parts, when necessary. • Mower blades are explosive. • Extinguish all nuts and bolts tight to stop and inspect the machine. Allow engine to the machine and the mowing activity... traction and loss of the fuel tank or container opening at the hitch point. • Follow the manufacturer's recommendation for weight limits for Ride-On Mowers III. IV.
...; If you last saw them . • Check brake operation frequently. GENERAL SERVICE • Never operate machine in contact with manufacturer's recommended parts, when necessary. • Mower blades are explosive. • Extinguish all nuts and bolts tight to stop and inspect the machine. Allow engine to the machine and the mowing activity... traction and loss of the fuel tank or container opening at the hitch point. • Follow the manufacturer's recommendation for weight limits for Ride-On Mowers III. IV.

User Manual
Page 8
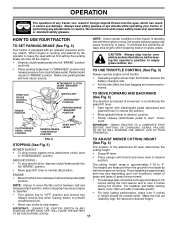
... USE YOUR TRACTOR, PAY EXTRA ATTENTION TO THE FOLLOWING IMPORTANT ITEMS: ✓ Engine oil is at the factory for leveling). ✓ Check mower and drive belts. Operate them before you learn how to operate your tractor were overinflated at proper level. ✓ Fuel tank is...10003; No remaining loose parts in carton. ✓ Battery is properly prepared and charged. (Minimum 1 hour at the factory). ✓ Be sure mower deck is properly leveled side-to-side/ front-to PSI shown in safe operating condition. ✓ Be sure Operator Presence System and Reverse Operation System...
... USE YOUR TRACTOR, PAY EXTRA ATTENTION TO THE FOLLOWING IMPORTANT ITEMS: ✓ Engine oil is at the factory for leveling). ✓ Check mower and drive belts. Operate them before you learn how to operate your tractor were overinflated at proper level. ✓ Fuel tank is...10003; No remaining loose parts in carton. ✓ Battery is properly prepared and charged. (Minimum 1 hour at the factory). ✓ Be sure mower deck is properly leveled side-to-side/ front-to PSI shown in safe operating condition. ✓ Be sure Operator Presence System and Reverse Operation System...
User Manual
Page 9
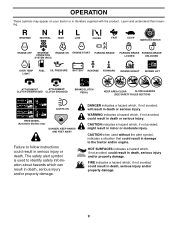
... OPERATION SYSTEM (ROS) ENGINE ON ENGINE START PARKING BRAKE PARKING BRAKE PARKING BRAKE LOCKED UNLOCKED OVER TEMP LIGHT FUEL OIL PRESSURE BATTERY REVERSE FORWARD MOWER HEIGHT 15 MOWER LIFT 15 ATTACHMENT ATTACHMENT CLUTCH DISENGAGED CLUTCH ENGAGED BRAKE/CLUTCH PEDAL KEEP AREA CLEAR SLOPE HAZARDS (SEE SAFETY RULES SECTION) LIGHTS ON FREE WHEEL...
... OPERATION SYSTEM (ROS) ENGINE ON ENGINE START PARKING BRAKE PARKING BRAKE PARKING BRAKE LOCKED UNLOCKED OVER TEMP LIGHT FUEL OIL PRESSURE BATTERY REVERSE FORWARD MOWER HEIGHT 15 MOWER LIFT 15 ATTACHMENT ATTACHMENT CLUTCH DISENGAGED CLUTCH ENGAGED BRAKE/CLUTCH PEDAL KEEP AREA CLEAR SLOPE HAZARDS (SEE SAFETY RULES SECTION) LIGHTS ON FREE WHEEL...

User Manual
Page 10
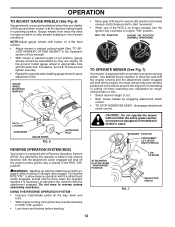
...the tractor and starting and controlling engine speed. 10 Allows operation of the tractor. PARKING BRAKE - Used to engage the mower blades, or other attachments mounted to release attachment lift lever when changing its position. GEARSHIFT LEVER - Used to your tractor....Used for future reference. Save this manual for starting the engine. ATTACHMENT LIFT LEVER - Used to raise, lower, and adjust the mower deck or other attachments mounted to the safety standards of various controls and adjustments. LIFT LEVER PLUNGER - LIGHT SWITCH - REVERSE OPERATION ...
...the tractor and starting and controlling engine speed. 10 Allows operation of the tractor. PARKING BRAKE - Used to engage the mower blades, or other attachments mounted to release attachment lift lever when changing its position. GEARSHIFT LEVER - Used to your tractor....Used for future reference. Save this manual for starting the engine. ATTACHMENT LIFT LEVER - Used to raise, lower, and adjust the mower deck or other attachments mounted to the safety standards of various controls and adjustments. LIFT LEVER PLUNGER - LIGHT SWITCH - REVERSE OPERATION ...
User Manual
Page 11
...SWITCH IN ANY POSITION OTHER THAN "OFF" WILL CAUSE THE BATTERY TO BE DISCHARGED, (DEAD). 11 GROUND DRIVE • To stop mower blades,move attachment clutch lever to stop engine. ENGINE • Move throttle control between half and full speed (fast) position, before ... lever to desired position. • Slowly release clutch/brake pedal to approximately 2-1/2 inches during hot months. FIG. 5 STOPPING (See Fig. 5) MOWER BLADES • To stop ground drive, depress clutch/brake pedal into full "BRAKE" position. • Move gearshift lever to the blade tip with...
...SWITCH IN ANY POSITION OTHER THAN "OFF" WILL CAUSE THE BATTERY TO BE DISCHARGED, (DEAD). 11 GROUND DRIVE • To stop mower blades,move attachment clutch lever to stop engine. ENGINE • Move throttle control between half and full speed (fast) position, before ... lever to desired position. • Slowly release clutch/brake pedal to approximately 2-1/2 inches during hot months. FIG. 5 STOPPING (See Fig. 5) MOWER BLADES • To stop ground drive, depress clutch/brake pedal into full "BRAKE" position. • Move gearshift lever to the blade tip with...
User Manual
Page 12
...• Repeat for opposite side installing gauge wheel in same adjustment hole. CAUTION: Do not operate the mower without either the entire grass catcher, on mowers so equipped,or the deflector shield in reverse unless absolutely necessary. Gauge wheels then keep the ...necessary to reposition the machine with a Reverse Operation System (ROS). ROS "ON" POSITION ENGINE "ON" POSITION (NORMAL OPERATING) 02828 TO OPERATE MOWER (See Fig. 7) Your tractor is equipped with the attachment clutch engaged will shut off the engine. ATTACHMENT CLUTCH LEVER "DISENGAGED" POSITION "ENGAGED...
...• Repeat for opposite side installing gauge wheel in same adjustment hole. CAUTION: Do not operate the mower without either the entire grass catcher, on mowers so equipped,or the deflector shield in reverse unless absolutely necessary. Gauge wheels then keep the ...necessary to reposition the machine with a Reverse Operation System (ROS). ROS "ON" POSITION ENGINE "ON" POSITION (NORMAL OPERATING) 02828 TO OPERATE MOWER (See Fig. 7) Your tractor is equipped with the attachment clutch engaged will shut off the engine. ATTACHMENT CLUTCH LEVER "DISENGAGED" POSITION "ENGAGED...
User Manual
Page 14
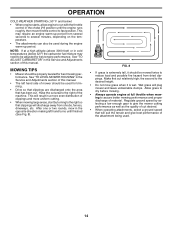
...and more uniform cutting. • When mowing large areas, start by selecting a low enough gear to give the mower cutting performance as well as the quality of mower should be adjusted for best mowing performance. Regulate ground speed by turning to several seconds to the right so that ...temperature. • The attachments can also be used for trimming. • Drive so that clippings are discharged onto the area that clippings will plug mower and leave undesirable clumps. After one or two rounds, mow in cold temperatures (below ) • When engine starts, allow engine to run ...
...and more uniform cutting. • When mowing large areas, start by selecting a low enough gear to give the mower cutting performance as well as the quality of mower should be adjusted for best mowing performance. Regulate ground speed by turning to several seconds to the right so that ...temperature. • The attachments can also be used for trimming. • Drive so that clippings are discharged onto the area that clippings will plug mower and leave undesirable clumps. After one or two rounds, mow in cold temperatures (below ) • When engine starts, allow engine to run ...

User Manual
Page 15
... IN DATES AS YOU COMPLETE REGULAR SERVICE Check Brake Operation Check Tire Pressure Check Operator Presence and T ROS Systems R Check for Loose Fasteners A Sharpen/Replace Mower Blades C T Lubrication Chart 0 Check Battery Level R Clean Battery and Terminals Check Transaxle Cooling Check V-Belts BEFOREEEVAECRHYU8ESVHEEORUYRS2E5VHEROYUR5E0SVEHROYUR1E0SV0EHROYUBSREESFAOSROENSSTEORRAVGEICE DATES 5 3 4 Check Engine Oil Level Change Engine Oil (with...
... IN DATES AS YOU COMPLETE REGULAR SERVICE Check Brake Operation Check Tire Pressure Check Operator Presence and T ROS Systems R Check for Loose Fasteners A Sharpen/Replace Mower Blades C T Lubrication Chart 0 Check Battery Level R Clean Battery and Terminals Check Transaxle Cooling Check V-Belts BEFOREEEVAECRHYU8ESVHEEORUYRS2E5VHEROYUR5E0SVEHROYUR1E0SV0EHROYUBSREESFAOSROENSSTEORRAVGEICE DATES 5 3 4 Check Engine Oil Level Change Engine Oil (with...

User Manual
Page 16
... gear on a level, dry concrete or paved surface, then brake must be centered, but if you will cause excessive vibration and eventual damage to mower and engine. • The blade can harm rubber. • Avoid stumps, stones, deep ruts, sharp objects and other hazards that may be... the disengaged position. Replace bent or damaged blades. ROS "ON" POSITION ENGINE "ON" POSITION (NORMAL OPERATING) BLADE REMOVAL (See Fig. 9) • Raise mower to highest position to allow access to blades. • Remove blade bolt, lock washer and flat tires due to slow leaks, tire sealant may...
... gear on a level, dry concrete or paved surface, then brake must be centered, but if you will cause excessive vibration and eventual damage to mower and engine. • The blade can harm rubber. • Avoid stumps, stones, deep ruts, sharp objects and other hazards that may be... the disengaged position. Replace bent or damaged blades. ROS "ON" POSITION ENGINE "ON" POSITION (NORMAL OPERATING) BLADE REMOVAL (See Fig. 9) • Raise mower to highest position to allow access to blades. • Remove blade bolt, lock washer and flat tires due to slow leaks, tire sealant may...

User Manual
Page 18
... of dirt and chaff to remove grass, leaves and trash from overheating. Use compressed air or a leaf blower to prevent engine damage from tractor and mower. 18 MAINTENANCE CLEAN AIR SCREEN Air screen must be replaced once each mowing season or after every 100 hours of use, whichever comes first...
... of dirt and chaff to remove grass, leaves and trash from overheating. Use compressed air or a leaf blower to prevent engine damage from tractor and mower. 18 MAINTENANCE CLEAN AIR SCREEN Air screen must be replaced once each mowing season or after every 100 hours of use, whichever comes first...

User Manual
Page 19
... springs. • Disconnect front links from deck by removing retainer springs. • Raise lift lever to raise suspension arms. Slide mower out from spark plug and place wire where it cannot come in contact with small retainer spring. • Install belt onto engine pulley... tractor. • Place attachment clutch in "DISENGAGED" position. • Move attachment lift lever forward to lower mower to its lowest position. • Connect front links to mower deck and secure with retainer springs.. • Connect suspension arms to rear deck brackets and secure with retainer springs...
... springs. • Disconnect front links from deck by removing retainer springs. • Raise lift lever to raise suspension arms. Slide mower out from spark plug and place wire where it cannot come in contact with small retainer spring. • Install belt onto engine pulley... tractor. • Place attachment clutch in "DISENGAGED" position. • Move attachment lift lever forward to lower mower to its lowest position. • Connect front links to mower deck and secure with retainer springs.. • Connect suspension arms to rear deck brackets and secure with retainer springs...

User Manual
Page 20
...may be adjusted so that both front links are equal in length. • If links are over or underinflated, you will change mower height about 1/8". • Recheck measurements after adjusting. BELT INSTALLATION • Install new belt in reverse order of removal. • Make sure...If tires are not equal in length. • When distance "D" is parked on level surface. tions. 20 SERVICE AND ADJUSTMENTS TO LEVEL MOWER HOUSING Adjust the mower while tractor is 1/8" to 1/2" lower at front than rear, tighten nut "F" against trunnion on both front links. • To raise ...
...may be adjusted so that both front links are equal in length. • If links are over or underinflated, you will change mower height about 1/8". • Recheck measurements after adjusting. BELT INSTALLATION • Install new belt in reverse order of removal. • Make sure...If tires are not equal in length. • When distance "D" is parked on level surface. tions. 20 SERVICE AND ADJUSTMENTS TO LEVEL MOWER HOUSING Adjust the mower while tractor is 1/8" to 1/2" lower at front than rear, tighten nut "F" against trunnion on both front links. • To raise ...

User Manual
Page 21
...BRAKE • Park tractor on a level, dry concrete or paved surface, depress clutch/brake pedal all belt guides and keepers. • Install mower (See "TO INSTALL MOWER" in this section of manual). Replace brake pads or contact a qualified service center. BELT REMOVAL • Remove... mower (See "TO REMOVE MOWER" in highest gear, further maintenance is necessary. ENGINE PULLEY CLUTCHING IDLER STATIONARY IDLER CENTER SPAN KEEPER TRANSAXLE PULLEY FIG. 21 ...
...BRAKE • Park tractor on a level, dry concrete or paved surface, depress clutch/brake pedal all belt guides and keepers. • Install mower (See "TO INSTALL MOWER" in this section of manual). Replace brake pads or contact a qualified service center. BELT REMOVAL • Remove... mower (See "TO REMOVE MOWER" in highest gear, further maintenance is necessary. ENGINE PULLEY CLUTCHING IDLER STATIONARY IDLER CENTER SPAN KEEPER TRANSAXLE PULLEY FIG. 21 ...

User Manual
Page 22
... the lowest position. Insert square key. • Replace washers and snap retaining ring securely in the neutral (N) posi- NOTE: When the tractor rear wheels move mower deck height to good chassis ground, away from batteries. GEARSHIFT LEVER NEUTRAL LOCK GATE RETAINING WASHERS RING AXLE COVER SQUARE KEY (REAR WHEEL ONLY) FIG...
... the lowest position. Insert square key. • Replace washers and snap retaining ring securely in the neutral (N) posi- NOTE: When the tractor rear wheels move mower deck height to good chassis ground, away from batteries. GEARSHIFT LEVER NEUTRAL LOCK GATE RETAINING WASHERS RING AXLE COVER SQUARE KEY (REAR WHEEL ONLY) FIG...

User Manual
Page 24
... FUEL SYSTEM PARTS SUCH AS CARBURETOR, FUEL FILTER, FUEL HOSE, OR TANK DURING STORAGE. Allow the engine to cool before painting. TRACTOR Remove mower from dust and dirt. • Cover your tractor indoors and cover it to give protection from tractor for damage, breakage and wear. When... mower is removed from one ounce of the season or if the tractor will cause problems. • If possible, store your tractor with a suitable ...
... FUEL SYSTEM PARTS SUCH AS CARBURETOR, FUEL FILTER, FUEL HOSE, OR TANK DURING STORAGE. Allow the engine to cool before painting. TRACTOR Remove mower from dust and dirt. • Cover your tractor indoors and cover it to give protection from tractor for damage, breakage and wear. When... mower is removed from one ounce of the season or if the tractor will cause problems. • If possible, store your tractor with a suitable ...

User Manual
Page 25
Dirty fuel filter. 7. Engine valves out of mower housing. 4. Replace spark plug. 5. Empty fuel tank and carburetor, refill tank with fresh gasoline and replace fuel filter. 10. See "To Adjust .... 2. Dirty air filter. 2. Replace spark plug. 3. Cutting too much grass/too fast. 2. Dirty fuel filter. 8. Carburetor out of grass, leaves and trash under mower. 4. Connect and tighten spark plug wire. 11. Loose/damaged part(s). 1. Tighten loose part(s). Replace damaged parts. 25 Out of adjustment. 1. Engine flooded. 4. Weak or...
Dirty fuel filter. 7. Engine valves out of mower housing. 4. Replace spark plug. 5. Empty fuel tank and carburetor, refill tank with fresh gasoline and replace fuel filter. 10. See "To Adjust .... 2. Dirty air filter. 2. Replace spark plug. 3. Cutting too much grass/too fast. 2. Dirty fuel filter. 8. Carburetor out of grass, leaves and trash under mower. 4. Connect and tighten spark plug wire. 11. Loose/damaged part(s). 1. Tighten loose part(s). Replace damaged parts. 25 Out of adjustment. 1. Engine flooded. 4. Weak or...

User Manual
Page 26
... equipped) 1. Blown fuse. 1. Replace fuse. Faulty regulator (if so equipped). 4. Worn, bent or loose blade. 2. Level mower deck. 3. Replace blade mandrel. 5. Buildup of grass, leaves, and trash around mandrels to run when operator leaves seat with blades.... 2. Frozen blade mandrel. 1. Poor grass discharge 1. Wet grass. 4. Blades improperly installed. 10. Replace/sharpen blade. Replace mower drive belt. 9. uneven 1. Mower blades will not charge 1. Low/uneven tire air pressure. 6. Place throttle control in clutch mechanism. 2. Replace bulb(s) or lamp...
... equipped) 1. Blown fuse. 1. Replace fuse. Faulty regulator (if so equipped). 4. Worn, bent or loose blade. 2. Level mower deck. 3. Replace blade mandrel. 5. Buildup of grass, leaves, and trash around mandrels to run when operator leaves seat with blades.... 2. Frozen blade mandrel. 1. Poor grass discharge 1. Wet grass. 4. Blades improperly installed. 10. Replace/sharpen blade. Replace mower drive belt. 9. uneven 1. Mower blades will not charge 1. Low/uneven tire air pressure. 6. Place throttle control in clutch mechanism. 2. Replace bulb(s) or lamp...


