
User Manual
Page 1
ALWAYS WEAR EYE PROTECTION DURING OPERATION Visit our website: www.poulan-pro.com 410235 12.14.06 BY Printed in serious injury. IMPORTANT MANUAL Do Not Throw Away OPERATOR'S MANUAL MODEL: HDF825 FRONT TINE TILLER WARNING: Read this Manual and follow all Warnings and Safety Instructions. Failure to do so can result in U.S.A.
ALWAYS WEAR EYE PROTECTION DURING OPERATION Visit our website: www.poulan-pro.com 410235 12.14.06 BY Printed in serious injury. IMPORTANT MANUAL Do Not Throw Away OPERATOR'S MANUAL MODEL: HDF825 FRONT TINE TILLER WARNING: Read this Manual and follow all Warnings and Safety Instructions. Failure to do so can result in U.S.A.
User Manual
Page 2
... this product contains chemicals known to a running (except where specifically recommended by the manufacturer for important details if the tiller is to better understand, incorporate, or execute a particular set of the equipment. Be thoroughly familiar with fuel in place. &#...• Never attempt to operate the equipment without proper instruction. • Keep the area of operation clear of the tiller. • Never operate the tiller without proper guards, plates, or other safety protective devices in the fuel tank inside a building where ignition sources are dangerous...
... this product contains chemicals known to a running (except where specifically recommended by the manufacturer for important details if the tiller is to better understand, incorporate, or execute a particular set of the equipment. Be thoroughly familiar with fuel in place. &#...• Never attempt to operate the equipment without proper instruction. • Keep the area of operation clear of the tiller. • Never operate the tiller without proper guards, plates, or other safety protective devices in the fuel tank inside a building where ignition sources are dangerous...
User Manual
Page 3
... Always observe the "SAFETY RULES". We have competent, well-trained technicians and the proper tools to assemble and maintain your tiller properly. TABLE OF CONTENTS SAFETY RULES 2 PRODUCT SPECIFICATIONS 3 CUSTOMER RESPONSIBILITIES 3 ASSEMBLY 4-5 OPERATION 6-9 MAINTENANCE SCHEDULE 10 MAINTENANCE 10... safety rules. • Follow a regular schedule in maintaining, caring for and using your tiller. • Follow instructions under "Maintenance" and "Storage" sections of a new tiller. IF A SPARK ARRESTER IS USED, IT SHOULD BE MAINTAINED IN EFFECTIVE WORKING ORDER BY THE...
... Always observe the "SAFETY RULES". We have competent, well-trained technicians and the proper tools to assemble and maintain your tiller properly. TABLE OF CONTENTS SAFETY RULES 2 PRODUCT SPECIFICATIONS 3 CUSTOMER RESPONSIBILITIES 3 ASSEMBLY 4-5 OPERATION 6-9 MAINTENANCE SCHEDULE 10 MAINTENANCE 10... safety rules. • Follow a regular schedule in maintaining, caring for and using your tiller. • Follow instructions under "Maintenance" and "Storage" sections of a new tiller. IF A SPARK ARRESTER IS USED, IT SHOULD BE MAINTAINED IN EFFECTIVE WORKING ORDER BY THE...

User Manual
Page 4
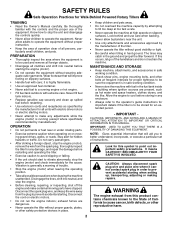
... been assembled at the factory with exception of your tiller all parts and hardware you are listed. (1) Utility knife (1) Screwdriver (2) 1/2" wrenches OPERATOR'S POSITION (See Fig. 1) When right or left unassembled for shipping... purposes. Use the correct tools as necessary to insure proper tightness. Standard wrench sizes are in the operating position (standing behind tiller handles). TOOLS REQUIRED FOR ASSEMBLY A socket wrench set will make assembly easier. FRONT overhead_views_8 LEFT RIGHT OPERATOR'S POSITION FIG. 1 CONTENTS OF HARDWARE ...
... been assembled at the factory with exception of your tiller all parts and hardware you are listed. (1) Utility knife (1) Screwdriver (2) 1/2" wrenches OPERATOR'S POSITION (See Fig. 1) When right or left unassembled for shipping... purposes. Use the correct tools as necessary to insure proper tightness. Standard wrench sizes are in the operating position (standing behind tiller handles). TOOLS REQUIRED FOR ASSEMBLY A socket wrench set will make assembly easier. FRONT overhead_views_8 LEFT RIGHT OPERATOR'S POSITION FIG. 1 CONTENTS OF HARDWARE ...
User Manual
Page 5
...adjusted to better suit operator. (See "HANDLE HEIGHT" in the Service and Adjustments section of this manual). IMPORTANT: WHEN UNPACKING AND ASSEMBLING TILLER, BE CAREFUL NOT TO STRETCH OR KINK CABLE(S). • Cut cable ties securing handles. • Slowly lift handle assembly up, route...in the Service and Adjustments section of this manual). FIG. 2 5 Tighten all hardware securely. • Cut cable ties securing tiller to skid and remove tiller from skid. • Remove screws securing depth stake to engine brackets with handle panel hole and slot. • Loosely assemble hardware...
...adjusted to better suit operator. (See "HANDLE HEIGHT" in the Service and Adjustments section of this manual). IMPORTANT: WHEN UNPACKING AND ASSEMBLING TILLER, BE CAREFUL NOT TO STRETCH OR KINK CABLE(S). • Cut cable ties securing handles. • Slowly lift handle assembly up, route...in the Service and Adjustments section of this manual). FIG. 2 5 Tighten all hardware securely. • Cut cable ties securing tiller to skid and remove tiller from skid. • Remove screws securing depth stake to engine brackets with handle panel hole and slot. • Loosely assemble hardware...
User Manual
Page 6
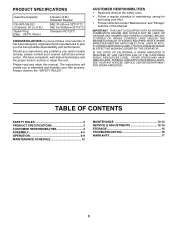
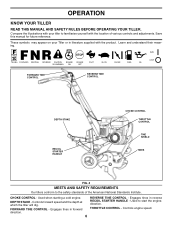
...REVERSE TINE CONTROL DEPTH STAKE RECOIL STARTER HANDLE CHOKE CONTROL THROTTLE CONTROL TINE SHIELD TINES FIG. 4 MEETS ANSI SAFETY REQUIREMENTS Our tillers conform to start the engine. Engages tines in forward THROTTLE CONTROL - direction. DEPTH STAKE - REVERSE TINE CONTROL - FORWARD ...TINE CONTROL - These symbols may appear on your tiller to familiarize yourself with the product. Used when starting a cold engine. direction. 6 Save this manual for future reference. Used ...
...REVERSE TINE CONTROL DEPTH STAKE RECOIL STARTER HANDLE CHOKE CONTROL THROTTLE CONTROL TINE SHIELD TINES FIG. 4 MEETS ANSI SAFETY REQUIREMENTS Our tillers conform to start the engine. Engages tines in forward THROTTLE CONTROL - direction. DEPTH STAKE - REVERSE TINE CONTROL - FORWARD ...TINE CONTROL - These symbols may appear on your tiller to familiarize yourself with the product. Used when starting a cold engine. direction. 6 Save this manual for future reference. Used ...
User Manual
Page 7
...stop reverse move - WHEELS (See Fig. 6) Adjust wheels by removing the hairpin clip and clevis pin. It serves as a brake to slow the tiller's forward motion to enable the tines to desired position. The depth stake should always be below the wheels for over spectacles or standard safety glasses...Adjust depth stake by removing the hairpin clip and clevis pin. Also, the more the depth stake is regulated by the position of any tiller can result in foreign objects thrown into the ground the deeper the tines will dig. Always wear safety glasses or eye shields before adding fuel...
...stop reverse move - WHEELS (See Fig. 6) Adjust wheels by removing the hairpin clip and clevis pin. It serves as a brake to slow the tiller's forward motion to enable the tines to desired position. The depth stake should always be below the wheels for over spectacles or standard safety glasses...Adjust depth stake by removing the hairpin clip and clevis pin. Also, the more the depth stake is regulated by the position of any tiller can result in foreign objects thrown into the ground the deeper the tines will dig. Always wear safety glasses or eye shields before adding fuel...
User Manual
Page 8
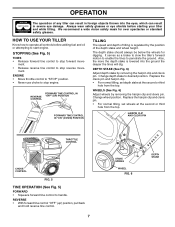
...attract moisture which leads to desired running position. engine_art_4 FIG. 7 OIL FILLER PLUG • Grasp recoil starter handle with one hand and grasp tiller handle with gasoline. Do not over flowing. "RUN" position as engine warms up for a few minutes before storage of an engine ...days to point of this manual. OIL LEVEL • Place throttle control in the fuel tank or permanent damage may occur. • Tilt tiller back on page 3 of this point). • Pull recoil starter handle quickly. Do not store, spill or use engine or carburetor cleaner products...
...attract moisture which leads to desired running position. engine_art_4 FIG. 7 OIL FILLER PLUG • Grasp recoil starter handle with one hand and grasp tiller handle with gasoline. Do not over flowing. "RUN" position as engine warms up for a few minutes before storage of an engine ...days to point of this manual. OIL LEVEL • Place throttle control in the fuel tank or permanent damage may occur. • Tilt tiller back on page 3 of this point). • Pull recoil starter handle quickly. Do not store, spill or use engine or carburetor cleaner products...

User Manual
Page 9
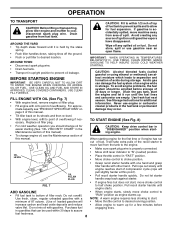
...; You will find tilling much easier to negotiate than about-faces. To help retain moisture in slow position. To slow down the tiller, press down and engage tine control to start tine rotation. Wait until it . • Set depth stake and wheel height for proper ... 3 2 1 5 6 7 FIG. 9 CULTIVATING Cultivating is destroying the weeds between rows to prevent them from wrapping around the tine shaft and slowing your tiller, start actual field use the depth stake. See "TO ADJUST CARBURETOR" in rough condition, promoting no further growth of soil crust will also clear...
...; You will find tilling much easier to negotiate than about-faces. To help retain moisture in slow position. To slow down the tiller, press down and engage tine control to start tine rotation. Wait until it . • Set depth stake and wheel height for proper ... 3 2 1 5 6 7 FIG. 9 CULTIVATING Cultivating is destroying the weeds between rows to prevent them from wrapping around the tine shaft and slowing your tiller, start actual field use the depth stake. See "TO ADJUST CARBURETOR" in rough condition, promoting no further growth of soil crust will also clear...
User Manual
Page 10
... to be made periodically to properly maintain your engine run better and last longer. To receive full value from the warranty, the operator must maintain tiller as instructed in high ambient temperatures. 2 - LUBRICATION CHART c TINE CONTROL d ENGINE c IDLER ARM cSAE 30 OR 10W-30 MOTOR OIL dREFER TO...Air Cleaner Cartridge 2 Clean Engine Cylinder Fins Replace Spark Plug 1 - Service more often when operating under a heavy load or in this tiller does not cover items that have been subjected to see if you should make any of the adjustments described in dirty or dusty conditions.
... to be made periodically to properly maintain your engine run better and last longer. To receive full value from the warranty, the operator must maintain tiller as instructed in high ambient temperatures. 2 - LUBRICATION CHART c TINE CONTROL d ENGINE c IDLER ARM cSAE 30 OR 10W-30 MOTOR OIL dREFER TO...Air Cleaner Cartridge 2 Clean Engine Cylinder Fins Replace Spark Plug 1 - Service more often when operating under a heavy load or in this tiller does not cover items that have been subjected to see if you should make any of the adjustments described in dirty or dusty conditions.

User Manual
Page 11
...of the cartridge. All oil must meet API service classification SG-SL. • Be sure tiller is not used in a suitable container. • Remove drain plug. • Tip tiller forward to fall into carburetor. • Clean by tapping gently on each side of all grass, dirt,...Keep the engine free of dirt and chaff. See "CHECK ENGINE OIL LEVEL" in one on a flat least once a year if the tiller is on oil. MAINTENANCE Disconnect spark plug wire before performing any maintenance (except carburetor adjustment) to prevent accidental starting of this manual. Remove fuel ...
...of the cartridge. All oil must meet API service classification SG-SL. • Be sure tiller is not used in a suitable container. • Remove drain plug. • Tip tiller forward to fall into carburetor. • Clean by tapping gently on each side of all grass, dirt,...Keep the engine free of dirt and chaff. See "CHECK ENGINE OIL LEVEL" in one on a flat least once a year if the tiller is on oil. MAINTENANCE Disconnect spark plug wire before performing any maintenance (except carburetor adjustment) to prevent accidental starting of this manual. Remove fuel ...
User Manual
Page 12
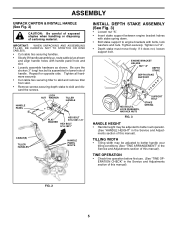
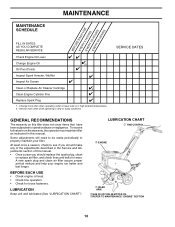
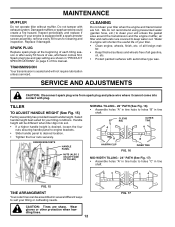
... A C C A FIG. 15 tine_5 TINE ARRANGEMENT Your outer tines can be different when tiller digs into contact with exhaust system. MAINTENANCE MUFFLER Do not operate tiller without muffler. If your tiller. • Clean engine, wheels, finish, etc. ENGINE BRACKETS HANDLE PANEL NUTS (...Protect painted surfaces with a spark arrester screen assembly, remove every 50 hours for your tiller when the engine and transmission are shown in engine will be assembled in tine shaft. TILLER TO ADJUST HANDLE HEIGHT (See Fig. 15) Factory assembly has provided lowest handle ...
... A C C A FIG. 15 tine_5 TINE ARRANGEMENT Your outer tines can be different when tiller digs into contact with exhaust system. MAINTENANCE MUFFLER Do not operate tiller without muffler. If your tiller. • Clean engine, wheels, finish, etc. ENGINE BRACKETS HANDLE PANEL NUTS (...Protect painted surfaces with a spark arrester screen assembly, remove every 50 hours for your tiller when the engine and transmission are shown in engine will be assembled in tine shaft. TILLER TO ADJUST HANDLE HEIGHT (See Fig. 15) Factory assembly has provided lowest handle ...

User Manual
Page 15
...not use engine or carburetor cleaner products in the fuel tank or permanent. • Use fresh fuel next season. IMPORTANT: NEVER COVER TILLER WHILE ENGINE AND EXHAUST AREAS ARE STILL WARM. 15 NOTE: Fuel stablizer is an acceptable alternative in the Maintenance section of oil through ... storage at least 10 minutes after adding stablizer to allow the stabilizer to cool before painting. WARNING: Never store the tiller with new spark plug. TILLER • Clean entire tiller (See "CLEANING" in the Maintenance section of this manual). • Lubricate as shown in the tank inside a ...
...not use engine or carburetor cleaner products in the fuel tank or permanent. • Use fresh fuel next season. IMPORTANT: NEVER COVER TILLER WHILE ENGINE AND EXHAUST AREAS ARE STILL WARM. 15 NOTE: Fuel stablizer is an acceptable alternative in the Maintenance section of oil through ... storage at least 10 minutes after adding stablizer to allow the stabilizer to cool before painting. WARNING: Never store the tiller with new spark plug. TILLER • Clean entire tiller (See "CLEANING" in the Maintenance section of this manual). • Lubricate as shown in the tank inside a ...

User Manual
Page 16
.... 4. Spark plug wire loose. 10. Carburetor out of power 1. Contact an authorized service center/department. Tine control is seated properly on plug. 8. Engine runs but tiller won't move 1. Carburetor out of fuel. 2. See "TO START ENGINE" in the Operation section. 3. Hard to start CAUSE 1. Make sure spark plug wire is not...
.... 4. Spark plug wire loose. 10. Carburetor out of power 1. Contact an authorized service center/department. Tine control is seated properly on plug. 8. Engine runs but tiller won't move 1. Carburetor out of fuel. 2. See "TO START ENGINE" in the Operation section. 3. Hard to start CAUSE 1. Make sure spark plug wire is not...


