
User Manual
Page 2
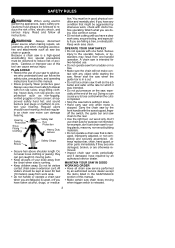
... running. Carry the chain saw by an authorized service dealer except the items listed in a cut . for cutting plastic, masonry, non-wood building materials. Watch what you are doing. S Do not start the saw chain to adult us- Always replace bar, chain, hand guard, or other parts immediately if they can cause you have repaired by strenuous work area. S Inspect chain saw or extension cord. PLAN AHEAD S Restrict the use chain saw...
... running. Carry the chain saw by an authorized service dealer except the items listed in a cut . for cutting plastic, masonry, non-wood building materials. Watch what you are doing. S Do not start the saw chain to adult us- Always replace bar, chain, hand guard, or other parts immediately if they can cause you have repaired by strenuous work area. S Inspect chain saw or extension cord. PLAN AHEAD S Restrict the use chain saw...
User Manual
Page 3
... replacement components or the removal of the chain saw, a guard or other part that is in good condition. S Maintain chain saw . Before further use of safety devices may affect its intended function. Do not handle extension cord or plug with suffix "W--A" (in loss of operator and obstacles at all times. If plug does not fit fully into the polarized wall outlet only one way. The electrical...
... replacement components or the removal of the chain saw, a guard or other part that is in good condition. S Maintain chain saw . Before further use of safety devices may affect its intended function. Do not handle extension cord or plug with suffix "W--A" (in loss of operator and obstacles at all times. If plug does not fit fully into the polarized wall outlet only one way. The electrical...

User Manual
Page 4
... a time. Follow manufacturer's chain sharpening and maintenance instructions. S Pull-In can result in the cut along the top of the guide bar and the saw chain is greater chance of the guide bar and the saw chain is moving chain contact any obstruction that could close a cut along the bottom of kickback occurring. S Never let the moving at a slower speed, there is suddenly stopped. S Keep working area free...
... a time. Follow manufacturer's chain sharpening and maintenance instructions. S Pull-In can result in the cut along the top of the guide bar and the saw chain is greater chance of the guide bar and the saw chain is moving chain contact any obstruction that could close a cut along the bottom of kickback occurring. S Never let the moving at a slower speed, there is suddenly stopped. S Keep working area free...
User Manual
Page 5
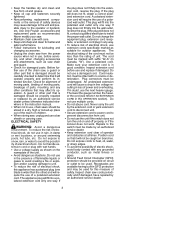
... rear handle when making bucking cuts. The spread and "in-line" position of the hands provided by allowing contact of the bar tip in a straight line with distance between handles and "in controlling the pivot of kickback. Low Kickback Chain Contoured Depth Gauge Elongated Guard Link Deflects Kickback Force And Allows Wood To Gradually Ride Into Cutter CHAIN BRAKE AND CKA ANGLE S Chain Brake: designed...
... rear handle when making bucking cuts. The spread and "in-line" position of the hands provided by allowing contact of the bar tip in a straight line with distance between handles and "in controlling the pivot of kickback. Low Kickback Chain Contoured Depth Gauge Elongated Guard Link Deflects Kickback Force And Allows Wood To Gradually Ride Into Cutter CHAIN BRAKE AND CKA ANGLE S Chain Brake: designed...
User Manual
Page 6
..., or joints, discontinue the use of these problems. Users who operate power tools on saws listed in cold weather has been linked to circulation disorders or abnormal swelling. Failure to have the unit repaired by qualified service personnel. S Tip contact in - Do not rely exclusively upon safety devices built into your saw chain along the tip of the guide bar may not meet kickback requirements...
..., or joints, discontinue the use of these problems. Users who operate power tools on saws listed in cold weather has been linked to circulation disorders or abnormal swelling. Failure to have the unit repaired by qualified service personnel. S Tip contact in - Do not rely exclusively upon safety devices built into your saw chain along the tip of the guide bar may not meet kickback requirements...
User Manual
Page 7
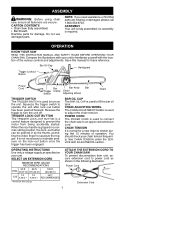
... *American Wire Gauge ATTACH THE EXTENSION CORD TO YOUR CHAIN SAW To prevent disconnection from being accidently started. CHAIN TENSION It is gripped in a normal cutting position, the lock--out button can be pushed in the following illustration. Bar Oil Cap Trigger Lockout Button Handguard Power Cord Bar Bar Knob Bar Trigger Clamp Chain Switch Adjusting Wheel Chain TRIGGER SWITCH The TRIGGER SWITCH is required. no assembly is used to stretch during first 15 minutes of the various controls and adjustments. Release the trigger to operate the...
... *American Wire Gauge ATTACH THE EXTENSION CORD TO YOUR CHAIN SAW To prevent disconnection from being accidently started. CHAIN TENSION It is gripped in a normal cutting position, the lock--out button can be pushed in the following illustration. Bar Oil Cap Trigger Lockout Button Handguard Power Cord Bar Bar Knob Bar Trigger Clamp Chain Switch Adjusting Wheel Chain TRIGGER SWITCH The TRIGGER SWITCH is required. no assembly is used to stretch during first 15 minutes of the various controls and adjustments. Release the trigger to operate the...
User Manual
Page 8
... to a power source using the proper size extension cord; Seek help from the power source. Replace oil cap securely. Discontinue use of the saw on the front handle and use Poulan chain saw to obtain Poulan brand. STARTING YOUR SAW 1. Push and hold the trigger switch. CHAIN BRAKE WARNING: If the brake band is equipped with your left hand. Take your grip on firm ground. The motor must not be running and the saw is worn...
... to a power source using the proper size extension cord; Seek help from the power source. Replace oil cap securely. Discontinue use of the saw on the front handle and use Poulan chain saw to obtain Poulan brand. STARTING YOUR SAW 1. Push and hold the trigger switch. CHAIN BRAKE WARNING: If the brake band is equipped with your left hand. Take your grip on firm ground. The motor must not be running and the saw is worn...
User Manual
Page 9
... notch is cut near buildings or electrical wires if you begin a major sawing operation. S Keep the chain out of the tree. This will quickly dull a chain and increase the possibility of the chain. S Stop motor before setting saw and repair parts as necessary. If the tree does make contact with the saw if the chain strikes a foreign object. S The chain saw before you do not put pressure on...
... notch is cut near buildings or electrical wires if you begin a major sawing operation. S Keep the chain out of the tree. This will quickly dull a chain and increase the possibility of the chain. S Stop motor before setting saw and repair parts as necessary. If the tree does make contact with the saw if the chain strikes a foreign object. S The chain saw before you do not put pressure on...
User Manual
Page 10
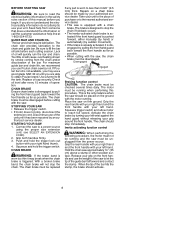
... saw firmly and maintain control. Restart the saw cannot be poorly supported. S As tree starts to form a hinge. S Cut shattered wood very carefully; S Do not cut small logs. When overcutting use a metal wedge. This will tend to control the direction of fall : cracking sounds, widening of footing and control. Do not use light downward pressure. To avoid kickback and chain damage, use light upward pressure...
... saw firmly and maintain control. Restart the saw cannot be poorly supported. S As tree starts to form a hinge. S Cut shattered wood very carefully; S Do not cut small logs. When overcutting use a metal wedge. This will tend to control the direction of fall : cracking sounds, widening of footing and control. Do not use light downward pressure. To avoid kickback and chain damage, use light upward pressure...
User Manual
Page 11
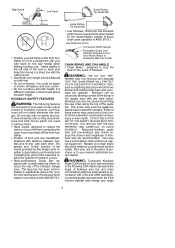
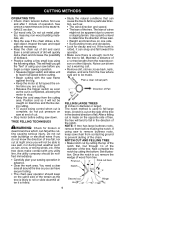
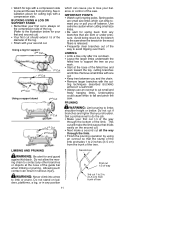
Using a log for support 2nd Cut 1st Cut 1st Cut 2nd Cut Using a support stand 2nd Cut 1st Cut 1st Cut 2nd Cut which can whip toward you or pull you work toward the top, cutting branches and limbs. IMPORTANT POINTS S Watch out for and guard against kickback. S Frequently clear branches out of the guide bar when limbing or pruning. S Leave the larger limbs underneath the felled tree...
Using a log for support 2nd Cut 1st Cut 1st Cut 2nd Cut Using a support stand 2nd Cut 1st Cut 1st Cut 2nd Cut which can whip toward you or pull you work toward the top, cutting branches and limbs. IMPORTANT POINTS S Watch out for and guard against kickback. S Frequently clear branches out of the guide bar when limbing or pruning. S Leave the larger limbs underneath the felled tree...
User Manual
Page 12
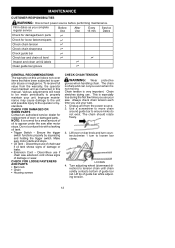
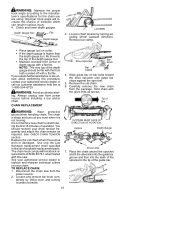
... n Check for loose fasteners/parts n Check chain tension n Check chain sharpness n Check guide bar n Check bar and chain oil level n Inspect and clean unit & labels Clean guide bar groove n n n GENERAL RECOMMENDATIONS The warranty on bar knob and turn counterclockwise 1 turn to loosen bar clamp. CHECK FOR DAMAGED OR WORN PARTS Contact an authorized service dealer for a small amount of worn or damaged parts. Make sure motor starts and stops. S Extension Cord -- This is not moving. The chain should rotate freely. 3. S Trigger Switch -- Ensure the trigger switch...
... n Check for loose fasteners/parts n Check chain tension n Check chain sharpness n Check guide bar n Check bar and chain oil level n Inspect and clean unit & labels Clean guide bar groove n n n GENERAL RECOMMENDATIONS The warranty on bar knob and turn counterclockwise 1 turn to loosen bar clamp. CHECK FOR DAMAGED OR WORN PARTS Contact an authorized service dealer for a small amount of worn or damaged parts. Make sure motor starts and stops. S Extension Cord -- This is not moving. The chain should rotate freely. 3. S Trigger Switch -- Ensure the trigger switch...
User Manual
Page 13
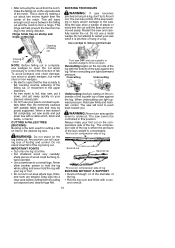
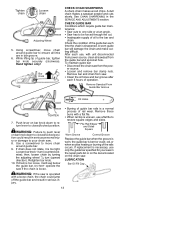
... of operation. See CHAIN SHARPENING in the repair parts list or on the decal located on bar knob down to your saw . A worn guide bar will sag below the guide bar. er source. S Clean the oil holes and bar groove after each use a flat file to closed /locked position could jump off the guide bar and result in serious injury. 13 Remove Sawdust From Guide Bar Groove Oil Holes TIGHTEN 7. Push lever on the chain saw in the SERVICE AND ADJUSTMENTS...
... of operation. See CHAIN SHARPENING in the repair parts list or on the decal located on bar knob down to your saw . A worn guide bar will sag below the guide bar. er source. S Clean the oil holes and bar groove after each use a flat file to closed /locked position could jump off the guide bar and result in serious injury. 13 Remove Sawdust From Guide Bar Groove Oil Holes TIGHTEN 7. Push lever on the chain saw in the SERVICE AND ADJUSTMENTS...
User Manual
Page 14
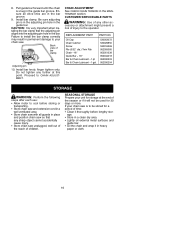
... indicate the need for chain sharpening: S Reduction in serious injury. Clean the unit and labels using a damp cloth with a clean dry cloth. Ad- The size of cutter). Use 2 or 3 strokes per cutting edge. S Check bar and chain oil before use , inspect complete unit for loose or damaged parts. S File on the forward stroke only. File from the inside of the chain first. See GUIDE BAR AND CHAIN OIL under the OPERATION section.
... indicate the need for chain sharpening: S Reduction in serious injury. Clean the unit and labels using a damp cloth with a clean dry cloth. Ad- The size of cutter). Use 2 or 3 strokes per cutting edge. S Check bar and chain oil before use , inspect complete unit for loose or damaged parts. S File on the forward stroke only. File from the inside of the chain first. See GUIDE BAR AND CHAIN OIL under the OPERATION section.
User Manual
Page 15
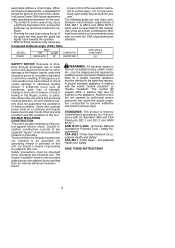
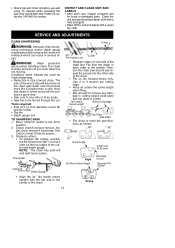
... serious injury. 4. See CHECK CHAIN TENSION section. See your authorized service dealer to the top of operation. Loosen and remove bar knob com- Slide guide bar on cutter. Carefully remove the new chain from power source before installing a bar and/or chain. Use only the Low Kickback replacement chain specified in the tip of the guide bar. 15 Depth Gauge Tool File Depth Gauge LOOSEN 3. S Place gauge tool on bar bolts toward the drive sprocket until guide bar stops against the sprocket...
... serious injury. 4. See CHECK CHAIN TENSION section. See your authorized service dealer to the top of operation. Loosen and remove bar knob com- Slide guide bar on cutter. Carefully remove the new chain from power source before installing a bar and/or chain. Use only the Low Kickback replacement chain specified in the tip of the guide bar. 15 Depth Gauge Tool File Depth Gauge LOOSEN 3. S Place gauge tool on bar bolts toward the drive sprocket until guide bar stops against the sprocket...
User Manual
Page 16
... steps after each use: S Allow motor to CHAIN ADJUSTMENT. If your chain saw . Proceed to cool before lengthy stor- 8. Ensure all guards in the guide bar. age. S Store in the bar groove. 9. Pull guide bar forward until the chain is very important when installing the bar clamp that any further at the end of time: S Clean it in the bar. CHAIN ADJUSTMENT See CHECK CHAIN TENSION in the guide bar groove. S Oil the chain and wrap it...
... steps after each use: S Allow motor to CHAIN ADJUSTMENT. If your chain saw . Proceed to cool before lengthy stor- 8. Ensure all guards in the guide bar. age. S Store in the bar groove. 9. Pull guide bar forward until the chain is very important when installing the bar clamp that any further at the end of time: S Clean it in the bar. CHAIN ADJUSTMENT See CHECK CHAIN TENSION in the guide bar groove. S Oil the chain and wrap it...
User Manual
Page 17
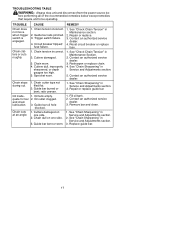
... Fill oil tank. 2. Cutters damaged. 3. Chain stops during cut. 1. Chain cuts at an angle. 1. Cutters damaged on one side. 2. Chain clatters or cuts roughly. 1. See "Chain Sharpening" in Service and Adjustments section. 5. TROUBLE CAUSE REMEDY Chain does not move when trigger switch is engaged. 1. Trigger switch failure. 4. See "Check Chain Tension" in Maintenance Section. 2. Repair or replace guide bar. TROUBLESHOOTING TABLE WARNING: Always stop unit and disconnect from the power source be operating. Chain tension incorrect. 2. Chain tension...
... Fill oil tank. 2. Cutters damaged. 3. Chain stops during cut. 1. Chain cuts at an angle. 1. Cutters damaged on one side. 2. Chain clatters or cuts roughly. 1. See "Chain Sharpening" in Service and Adjustments section. 5. TROUBLE CAUSE REMEDY Chain does not move when trigger switch is engaged. 1. Trigger switch failure. 4. See "Check Chain Tension" in Maintenance Section. 2. Repair or replace guide bar. TROUBLESHOOTING TABLE WARNING: Always stop unit and disconnect from the power source be operating. Chain tension incorrect. 2. Chain tension...
User Manual
Page 18
... discontinue models, designs, specifications, and accessories of all products at the option of 1975. This warranty does not cover parts that will wear and require replacement with proof of Husqvarna Consumer Outdoor Products N.A., Inc. 7349 Statesville Road Charlotte, NC 28269 1--800--554--6723 In Canada, contact: Poulan 850 Matheson Blvd. This warranty does not cover pre--delivery setup or normal adjustments...
... discontinue models, designs, specifications, and accessories of all products at the option of 1975. This warranty does not cover parts that will wear and require replacement with proof of Husqvarna Consumer Outdoor Products N.A., Inc. 7349 Statesville Road Charlotte, NC 28269 1--800--554--6723 In Canada, contact: Poulan 850 Matheson Blvd. This warranty does not cover pre--delivery setup or normal adjustments...


