
User Manual
Page 1
... FRANÇAIS Veuillez ne pas retourner l'outil au détaillant. 1-800-554-6723 www.poulan.com Instruction Manual Manual de Instrucciones Manuel d'Instructions ES300 ESPAÑOL WARNING: Read and follow all Safety Rules and Operating Instructions before using this product. ADVERTENCIA: Lea el manual de instrucciones y siga todas las advertencias e instrucciones de seguridad. El no devuelva el aparato...
... FRANÇAIS Veuillez ne pas retourner l'outil au détaillant. 1-800-554-6723 www.poulan.com Instruction Manual Manual de Instrucciones Manuel d'Instructions ES300 ESPAÑOL WARNING: Read and follow all Safety Rules and Operating Instructions before using this product. ADVERTENCIA: Lea el manual de instrucciones y siga todas las advertencias e instrucciones de seguridad. El no devuelva el aparato...
User Manual
Page 2
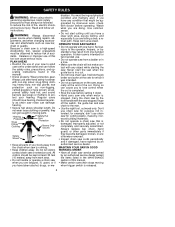
... (ear plugs or mufflers) to adult users who understand and can get caught in a cut is damaged, improperly adjusted, or not completely and securely assembled. All visitors should have a clear work , check with one -handed operation. Watch what you to the rear. Keep work area. S Do not operate saw when you have hearing checked regular- Always replace bar, chain, hand guard, or other parts immediately if...
... (ear plugs or mufflers) to adult users who understand and can get caught in a cut is damaged, improperly adjusted, or not completely and securely assembled. All visitors should have a clear work , check with one -handed operation. Watch what you to the rear. Keep work area. S Do not operate saw when you have hearing checked regular- Always replace bar, chain, hand guard, or other parts immediately if...
User Manual
Page 3
.... Use only Poulan accessories and replacement parts as saw from the power source when not in any grounded conductor, such as metal fences or pipes. S Unplug the chain saw chain and guard. Do not expose to snow, rain, or water to prevent disconnection from oil and grease. Do not change the equipment plug, extension cord receptacle, or extension cord plug in use of electrical shock, use in damp or wet locations, or...
.... Use only Poulan accessories and replacement parts as saw from the power source when not in any grounded conductor, such as metal fences or pipes. S Unplug the chain saw chain and guard. Do not expose to snow, rain, or water to prevent disconnection from oil and grease. Do not change the equipment plug, extension cord receptacle, or extension cord plug in use of electrical shock, use in damp or wet locations, or...
User Manual
Page 4
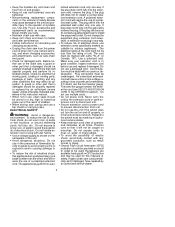
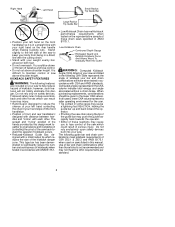
... engine running. MAINTAIN CONTROL The following precautions should be followed to minimize kickback: S Recognize that could close a cut open. The result is a lightning fast, reverse reaction which contributes to accidents. S Keep saw housing against wood. S Begin and continue cutting at a slower speed, there is greater chance of the saw. S Use the specified Reduced-Kickback Guide Bar and Low Kickback Chain. S Keep working area free...
... engine running. MAINTAIN CONTROL The following precautions should be followed to minimize kickback: S Recognize that could close a cut open. The result is a lightning fast, reverse reaction which contributes to accidents. S Keep saw housing against wood. S Begin and continue cutting at a slower speed, there is greater chance of the saw. S Use the specified Reduced-Kickback Guide Bar and Low Kickback Chain. S Keep working area free...
User Manual
Page 5
... chain saws specified in -line" with the cutting chain. Computed angles represented in some cases may not meet kickback requirements of kickback; S Pinching the saw . S Stand with ANSI B175.1. Do not rely only on the rear handle when making bucking cuts. Follow all cases, lower CKA values represent a safer operating environment for the user. Use of bar and chain combinations other than those listed...
... chain saws specified in -line" with the cutting chain. Computed angles represented in some cases may not meet kickback requirements of kickback; S Pinching the saw . S Stand with ANSI B175.1. Do not rely only on the rear handle when making bucking cuts. Follow all cases, lower CKA values represent a safer operating environment for the user. Use of bar and chain combinations other than those listed...
User Manual
Page 6
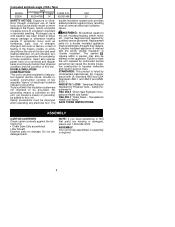
... people. ANSI B175.1--2000 "American National Standard for damage. Occupational Health and Safety" SAVE THESE INSTRUCTIONS ASSEMBLY CARTON CONTENTS Check carton contents against the following list. S Chain Saw (fully assembled) S Bar Sheath Examine parts for Powered Tools -- Do not use in cold weather has been linked to this unit, including housing, switch, motor, etc., must closely monitor their physical condition and the condition of grounding.
... people. ANSI B175.1--2000 "American National Standard for damage. Occupational Health and Safety" SAVE THESE INSTRUCTIONS ASSEMBLY CARTON CONTENTS Check carton contents against the following list. S Chain Saw (fully assembled) S Bar Sheath Examine parts for Powered Tools -- Do not use in cold weather has been linked to this unit, including housing, switch, motor, etc., must closely monitor their physical condition and the condition of grounding.
User Manual
Page 7
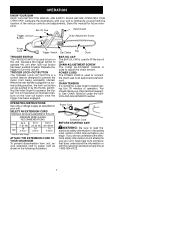
... Chain Adjustment Screw Power Cord Trigger Switch Bar Clamp Bar Chain TRIGGER SWITCH The TRIGGER SWITCH is used to power cord as specified on the lock--out button once the trigger has been engaged. BAR OIL CAP The BAR OIL CAP is used to fill the bar oil tank. You should check your unit. cure extension cord to turn the unit off. Power Cord Extension Cord BEFORE STARTING SAW WARNING: Be sure to operate the unit after lock--out button has been pushed forward. It is gripped in a normal cutting position...
... Chain Adjustment Screw Power Cord Trigger Switch Bar Clamp Bar Chain TRIGGER SWITCH The TRIGGER SWITCH is used to power cord as specified on the lock--out button once the trigger has been engaged. BAR OIL CAP The BAR OIL CAP is used to fill the bar oil tank. You should check your unit. cure extension cord to turn the unit off. Power Cord Extension Cord BEFORE STARTING SAW WARNING: Be sure to operate the unit after lock--out button has been pushed forward. It is gripped in a normal cutting position...
User Manual
Page 8
... toward the operator. The chain oiler provides lubrication to fill the tank. If Poulan bar oil is felled. Check oil level after it has been repaired by smoke coming from the tree where cuts are able to fall in advance. S Grip both handles firmly. OPERATING TIPS S Check chain tension before cutting. S Squeeze trigger switch and allow unit to reach full speed before first use a good grade SAE 30 oil until it...
... toward the operator. The chain oiler provides lubrication to fill the tank. If Poulan bar oil is felled. Check oil level after it has been repaired by smoke coming from the tree where cuts are able to fall in advance. S Grip both handles firmly. OPERATING TIPS S Check chain tension before cutting. S Squeeze trigger switch and allow unit to reach full speed before first use a good grade SAE 30 oil until it...

User Manual
Page 9
... a time. sharp pieces of the notch. Do not use a plastic or wooden wedge to force cut open the cut when necessary to remove pinched saw Turn saw , drive a wedge of plastic or wood into a clear area before making a cut is complete, use light downward pressure. 9 Use a wedge to control the direction of notch NOTE: Before felling cut about two inches higher than the center of the chain...
... a time. sharp pieces of the notch. Do not use a plastic or wooden wedge to force cut open the cut when necessary to remove pinched saw Turn saw , drive a wedge of plastic or wood into a clear area before making a cut is complete, use light downward pressure. 9 Use a wedge to control the direction of notch NOTE: Before felling cut about two inches higher than the center of the chain...

User Manual
Page 10
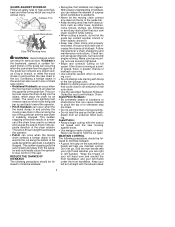
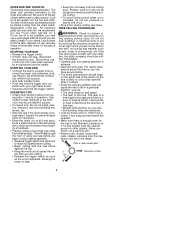
... saw firmly and maintain control. Remove small limbs with a compression side. Spring poles are bent or under pressure. S Finish with a sec- Do not stand on the underside of the guide bar when limbing or pruning. S Frequently clear branches out of the log. First cut on compression side of log 2nd Cut Using a support stand 2nd Cut 1st Cut 1st Cut 2nd Cut Second cut Second cut First cut...
... saw firmly and maintain control. Remove small limbs with a compression side. Spring poles are bent or under pressure. S Finish with a sec- Do not stand on the underside of the guide bar when limbing or pruning. S Frequently clear branches out of the log. First cut on compression side of log 2nd Cut Using a support stand 2nd Cut 1st Cut 1st Cut 2nd Cut Second cut Second cut First cut...
User Manual
Page 11
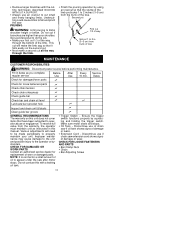
... replacement of way 3rd cut all the way through the bottom of damage or leaks. S Trigger Switch -- Make sure motor starts and stops. Get a professional to limbs shoulder height or below. Second cut First cut 1/3 of worn or damaged parts. CHECK FOR DAMAGED OR WORN PARTS Contact an authorized service dealer for loose fasteners/parts n Check chain tension n Check chain sharpness n Check guide bar n Check bar and chain oil level n Lubricate bar sprocket hole n n Inspect and clean...
... replacement of way 3rd cut all the way through the bottom of damage or leaks. S Trigger Switch -- Make sure motor starts and stops. Get a professional to limbs shoulder height or below. Second cut First cut 1/3 of worn or damaged parts. CHECK FOR DAMAGED OR WORN PARTS Contact an authorized service dealer for loose fasteners/parts n Check chain tension n Check chain sharpness n Check guide bar n Check bar and chain oil level n Lubricate bar sprocket hole n n Inspect and clean...

User Manual
Page 12
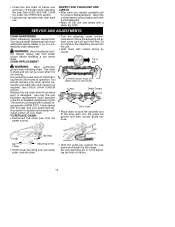
... of guide bar rail. Adjusting Screw S Add lubricant to the bar and chain. Adjusting Screw -- 1/4 Turn CHECK GUIDE BAR Conditions which require guide bar maintenance: S Saw cuts to ensure kinks do not exist. CHECK CHAIN TENSION WARNING: Wear protective gloves when handling chain. S Loosen and remove bar mounting nuts. S Clean the oil holes and bar groove af- The chain is bent or crack--ed, or when excess heating or burring of operation. Chain stretches during the first few times you use . D Recheck chain...
... of guide bar rail. Adjusting Screw S Add lubricant to the bar and chain. Adjusting Screw -- 1/4 Turn CHECK GUIDE BAR Conditions which require guide bar maintenance: S Saw cuts to ensure kinks do not exist. CHECK CHAIN TENSION WARNING: Wear protective gloves when handling chain. S Loosen and remove bar mounting nuts. S Clean the oil holes and bar groove af- The chain is bent or crack--ed, or when excess heating or burring of operation. Chain stretches during the first few times you use . D Recheck chain...
User Manual
Page 13
... on your chain tension frequently and adjust the chain tension as shown. The chain must comply with kickback requirements of operation. Bar Nuts Bar Clamp Adjusting Screw S Remove bar mounting nuts, bar clamp plate, and old chain. Always unplug saw from power source before use , inspect complete unit for a new chain to a professional chain sharpener. CHAIN REPLACEMENT WARNING: Wear protective gloves when handling chain. S Hold chain with a mild detergent. See GUIDE BAR AND CHAIN OIL under the OPERATION section. Clean the unit...
... on your chain tension frequently and adjust the chain tension as shown. The chain must comply with kickback requirements of operation. Bar Nuts Bar Clamp Adjusting Screw S Remove bar mounting nuts, bar clamp plate, and old chain. Always unplug saw from power source before use , inspect complete unit for a new chain to a professional chain sharpener. CHAIN REPLACEMENT WARNING: Wear protective gloves when handling chain. S Hold chain with a mild detergent. See GUIDE BAR AND CHAIN OIL under the OPERATION section. Clean the unit...

User Manual
Page 14
... in the MAINTENANCE section. S Lightly oil external metal surfaces and guide bar. CHAIN ADJUSTMENT See CHECK CHAIN TENSION in a clean dry area. REPLACEMENT PART PART NO. tighten finger tight only. S Store chain saw and extension cord in a well ventilated area S Store chain saw with the bar nuts; Adjusting pin hole Inside view of Bar Clamp Adjusting screw Adjusting pin S Secure the guide bar and bar clamp plate with all guards in place and position chain saw so that any other accessory or attachment might...
... in the MAINTENANCE section. S Lightly oil external metal surfaces and guide bar. CHAIN ADJUSTMENT See CHECK CHAIN TENSION in a clean dry area. REPLACEMENT PART PART NO. tighten finger tight only. S Store chain saw and extension cord in a well ventilated area S Store chain saw with the bar nuts; Adjusting pin hole Inside view of Bar Clamp Adjusting screw Adjusting pin S Secure the guide bar and bar clamp plate with all guards in place and position chain saw so that any other accessory or attachment might...
User Manual
Page 15
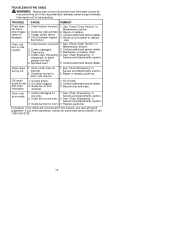
... tops not filed flat. 2. Oil tank empty. If situations occur which are not covered in sharpened, or depth Service and Adjustments section. See "Check Chain Tension" in Maintenance Section. 2. Contact authorized service dealer. 4. Chain clatters or cuts roughly. 1. Cutters damaged. 2. Sprocket worn. 5. Contact authorized service dealer. Guide bar oil hole lubrication. Trigger switch failure. 3. Chain stops during cut. 1. Repair or replace guide bar. blocked. 1. Chain cuts at an angle. 1. Service and Adjustments section. 2. TROUBLE CAUSE...
... tops not filed flat. 2. Oil tank empty. If situations occur which are not covered in sharpened, or depth Service and Adjustments section. See "Check Chain Tension" in Maintenance Section. 2. Contact authorized service dealer. 4. Chain clatters or cuts roughly. 1. Cutters damaged. 2. Sprocket worn. 5. Contact authorized service dealer. Guide bar oil hole lubrication. Trigger switch failure. 3. Chain stops during cut. 1. Repair or replace guide bar. blocked. 1. Chain cuts at an angle. 1. Service and Adjustments section. 2. TROUBLE CAUSE...
User Manual
Page 16
..., with reasonable use of accessories and/or attachments not specifically recommended by ELECTROLUX HOME PRODUCTS, INC., for repair or replacement at any time without notice or obligation to any defective Poulan brand electric product within the limited warranty period, return it was purchased for this warranty does not cover parts that each new Poulan brand electric or cordless product is free from defects in the instruction manual. RANTY...
..., with reasonable use of accessories and/or attachments not specifically recommended by ELECTROLUX HOME PRODUCTS, INC., for repair or replacement at any time without notice or obligation to any defective Poulan brand electric product within the limited warranty period, return it was purchased for this warranty does not cover parts that each new Poulan brand electric or cordless product is free from defects in the instruction manual. RANTY...


