
User Manual
Page 10
... When the keystone adjustment is applied, the correct aspect ratio may not be obtained. • When the keystone adjustment is applied, the resolution lowers. To prevent such symptoms, keep the screen and the projector perpendicular to each other as much as possible. • Though the ... Rotate the adjustment foot (for the vertical position) for the vertical position) 1. Put the adjustment foot (for focus adjustment.) EN-10 Adjustment of the horizontal position of the projector Adjust the horizontal position of the projector For the best projection, project images on the ...
... When the keystone adjustment is applied, the correct aspect ratio may not be obtained. • When the keystone adjustment is applied, the resolution lowers. To prevent such symptoms, keep the screen and the projector perpendicular to each other as much as possible. • Though the ... Rotate the adjustment foot (for the vertical position) for the vertical position) 1. Put the adjustment foot (for focus adjustment.) EN-10 Adjustment of the horizontal position of the projector Adjust the horizontal position of the projector For the best projection, project images on the ...
User Manual
Page 16
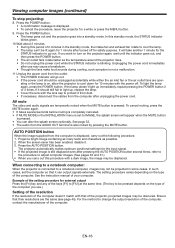
...or 3 times. EN-16 If it from dust. • If necessary, disconnect the cables from the computer after use .) Setting of the resolution If the resolution of the keys [F1] to [F12] at the same time. (The key to IMAGE, the splash screen will go out. The projector ... When connecting to a notebook computer: When the projector is displaced, carry out the following procedure. 1. In this standby mode, the STATUS indicator blinks green. 10.Wait about 2 minutes. • During this procedure with that it . 3. If you want to a notebook computer, images may be lit again for a...
...or 3 times. EN-16 If it from dust. • If necessary, disconnect the cables from the computer after use .) Setting of the resolution If the resolution of the keys [F1] to [F12] at the same time. (The key to IMAGE, the splash screen will go out. The projector ... When connecting to a notebook computer: When the projector is displaced, carry out the following procedure. 1. In this standby mode, the STATUS indicator blinks green. 10.Wait about 2 minutes. • During this procedure with that it . 3. If you want to a notebook computer, images may be lit again for a...

User Manual
Page 21
... signal (or the ratio of width to product malfunctions. • Noise may appear on the installation conditions. • When the keystone adjustment takes effect, the resolution decreases. How to the type of the input video signal. With the FEATURE menu: (See page 23 for front projection): Press the X button. Select your...
... signal (or the ratio of width to product malfunctions. • Noise may appear on the installation conditions. • When the keystone adjustment takes effect, the resolution decreases. How to the type of the input video signal. With the FEATURE menu: (See page 23 for front projection): Press the X button. Select your...
User Manual
Page 22
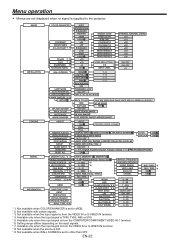
... *3 SETUP SPLASH SCREEN BACK COLOR MUTE MODE IMAGE REVERSE BEIGE LIGHT BLUE LIGHT GREEN PINK BLACK BOARD OFF STANDARD, LOW ON, OFF OFF, 5, 10, 15, 30, 60 min 1 - 5 1 - 5 1 - 5 1 - 5 BACK COLOR GLAY, RED, GREEN, BLUE, BLACK, ... SETUP *2 AUTO, OFF, 3.75%, 7.5% SCART INPUT *5 ON, OFF LANGUAGE , English, Español, Deutsch, Français, Italiano, , , , RESET ALL OK SIGNAL MEMORY CALL *2 *3 RESOLUTION (MEMORIZE HORIZ.POSITION *8 VERT.POSITION *8 FINE SYNC. *3 *8 TRACKING *2 *3 *8 COMPUTER INPUT *3 OVER SCAN *2 HOLD *2 *3 *8 AUTO, MEMORY 1 , MEMORY 2 ) *2 *3 Horizontal Pixels x...
... *3 SETUP SPLASH SCREEN BACK COLOR MUTE MODE IMAGE REVERSE BEIGE LIGHT BLUE LIGHT GREEN PINK BLACK BOARD OFF STANDARD, LOW ON, OFF OFF, 5, 10, 15, 30, 60 min 1 - 5 1 - 5 1 - 5 1 - 5 BACK COLOR GLAY, RED, GREEN, BLUE, BLACK, ... SETUP *2 AUTO, OFF, 3.75%, 7.5% SCART INPUT *5 ON, OFF LANGUAGE , English, Español, Deutsch, Français, Italiano, , , , RESET ALL OK SIGNAL MEMORY CALL *2 *3 RESOLUTION (MEMORIZE HORIZ.POSITION *8 VERT.POSITION *8 FINE SYNC. *3 *8 TRACKING *2 *3 *8 COMPUTER INPUT *3 OVER SCAN *2 HOLD *2 *3 *8 AUTO, MEMORY 1 , MEMORY 2 ) *2 *3 Horizontal Pixels x...

User Manual
Page 26
..., such symptom is displayed. TRACKING COMPUTER RRGGBB INPUT OVER SCAN HOLD USER AUTO 1024x768 0 0 0 0 RGB 100% OFF OK SIGNAL RESOLUTION (MEMORIZE) VERTICAL FREQUENCY HORIZONTAL FREQUENCY 75.04 Hz 60.02 KHz HORIZ. HORIZONTAL FREQUENCY - The adjustment result can set . HORIZ. YCBCR...CALL AUTO / MEMORY 1 / Use to adjust the image when noise appears on the left half of the image. SIGNAL A MEMORY CALL U H RESOLUTION V (MEMORIZE ) HORIZ. HORIZ. FINE SYNC. 0-31 Use to enable the LPF. RGB Select this option when connecting the projector to adjust the ...
..., such symptom is displayed. TRACKING COMPUTER RRGGBB INPUT OVER SCAN HOLD USER AUTO 1024x768 0 0 0 0 RGB 100% OFF OK SIGNAL RESOLUTION (MEMORIZE) VERTICAL FREQUENCY HORIZONTAL FREQUENCY 75.04 Hz 60.02 KHz HORIZ. HORIZONTAL FREQUENCY - The adjustment result can set . HORIZ. YCBCR...CALL AUTO / MEMORY 1 / Use to adjust the image when noise appears on the left half of the image. SIGNAL A MEMORY CALL U H RESOLUTION V (MEMORIZE ) HORIZ. HORIZ. FINE SYNC. 0-31 Use to enable the LPF. RGB Select this option when connecting the projector to adjust the ...

User Manual
Page 27
Indicates the type of the currently projected video signal. EN-27 The lamp operating time exceeding 10 hours is being input. Indicates the resolution of the sync signal for the interval of the currently projected video signal. Indicates the vertical frequency of lamp replacement.) &#...38 for the currently projected video signal. Indicates the name of the currently projected video signal. INFORMATION 0 H LAMP TIME (LOW) INPUT RESOLUTION VERTICAL FREQUENCY HORIZONTAL FREQUENCY R GB H V SYNC. TYPE COMPUTER2 1024x768 75.04 Hz 60.02 KHz 5wire ITEM LAMP TIME (LOW) INPUT...
Indicates the type of the currently projected video signal. EN-27 The lamp operating time exceeding 10 hours is being input. Indicates the resolution of the sync signal for the interval of the currently projected video signal. Indicates the vertical frequency of lamp replacement.) &#...38 for the currently projected video signal. Indicates the name of the currently projected video signal. INFORMATION 0 H LAMP TIME (LOW) INPUT RESOLUTION VERTICAL FREQUENCY HORIZONTAL FREQUENCY R GB H V SYNC. TYPE COMPUTER2 1024x768 75.04 Hz 60.02 KHz 5wire ITEM LAMP TIME (LOW) INPUT...

User Manual
Page 30
...select Properties, and click the Settings tab to display the screen resolution setting.) The screen resolution setting of your computer. (Example: When the screen resolution of the computer is projected correctly. YES Select RESOLUTION (MEMORIZE ) in the SIGNAL menu. For details, see ...the ENTER button. PIXELS and VERT. Image is 1280x800, set HORIZ. In such a case, make adjustment according to the selected resolution. Automatic adjustment starts according to the flowchart below. However, video signals from the computer. Project a bright computer image ...
...select Properties, and click the Settings tab to display the screen resolution setting.) The screen resolution setting of your computer. (Example: When the screen resolution of the computer is projected correctly. YES Select RESOLUTION (MEMORIZE ) in the SIGNAL menu. For details, see ...the ENTER button. PIXELS and VERT. Image is 1280x800, set HORIZ. In such a case, make adjustment according to the selected resolution. Automatic adjustment starts according to the flowchart below. However, video signals from the computer. Project a bright computer image ...
User Manual
Page 43
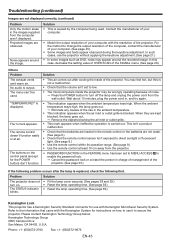
... the lamp and unplug the power cord from the projector. • PASSWORD FUNCTION in the FEATURE menu has been set to change the output resolution of the computer, contact the manufacturer of the rise in the remote control or the batteries are obscured. Phone: +1- (650)572-2700 Fax... following problem occurs after cooling the inside the projector may appear around the image. The remote control doesn't function easily or at least 10 cm away from the wall outlet. J Remove the objects blocking the air inlet or outlet grille. • This mark appears when ineffective...
... the lamp and unplug the power cord from the projector. • PASSWORD FUNCTION in the FEATURE menu has been set to change the output resolution of the computer, contact the manufacturer of the rise in the remote control or the batteries are obscured. Phone: +1- (650)572-2700 Fax... following problem occurs after cooling the inside the projector may appear around the image. The remote control doesn't function easily or at least 10 cm away from the wall outlet. J Remove the objects blocking the air inlet or outlet grille. • This mark appears when ineffective...

User Manual
Page 44
...) with HDCP Audio input 350 mVrms, 10 kΩ or more (each panel) Projection lens Light-source lamp Image size (Projection distance) Maximum Computer signal resolution F 1.7 - 1.9 f= 24 - 29 mm 261 W 40" min. Type Model Display Technology LCD projector WL2650U 0.75-inch LCD panel: 3 pieces (for R,G,B) Pixel:... Component signal Computer/Component video input NTSC/PAL/SECAM/4.43NTSC/PAL-M/PAL-N/PAL-60 480i, 480p, 576i, 576p, 720p, 1080i, 1080p Panel resolution: 1280 x 800 dots [Signal type] [Terminal type] [Line] Analog RGB Mini D-SUB 15-pin 2 Digital RGB DVI-D 1 Video...
...) with HDCP Audio input 350 mVrms, 10 kΩ or more (each panel) Projection lens Light-source lamp Image size (Projection distance) Maximum Computer signal resolution F 1.7 - 1.9 f= 24 - 29 mm 261 W 40" min. Type Model Display Technology LCD projector WL2650U 0.75-inch LCD panel: 3 pieces (for R,G,B) Pixel:... Component signal Computer/Component video input NTSC/PAL/SECAM/4.43NTSC/PAL-M/PAL-N/PAL-60 480i, 480p, 576i, 576p, 720p, 1080i, 1080p Panel resolution: 1280 x 800 dots [Signal type] [Terminal type] [Line] Analog RGB Mini D-SUB 15-pin 2 Digital RGB DVI-D 1 Video...

User Manual
Page 45
... 5 lines (R, G, B, H, V). * : Composite Sync REAL mode When moire patterns or lines of uneven thickness appear on the table, find the compatible resolution and frequency by displaying it in the REAL mode, set ASPECT of the FEATURE menu to the COMPUTER IN/COMPONENT VIDEO IN terminals, the signal... WXGA60c WXGA+60 SXGA60b SXGA75b SXGA60 SXGA75 SXGA+60 WSXGA+60 MAC13 MAC16 MAC19 HP75 HP72 SUN66a SUN76a SUN66 SUN76 SGI72 SGI76 UXGA60 Resolution (H x V) - 640 x 400 640 x 400 640 x 400 640 x 480 640 x 480 640 x 480 640 x 480 800 x 600 800 x 600 800 x 600 800 x 600 800 x 600 800 x 600 1024 ...
... 5 lines (R, G, B, H, V). * : Composite Sync REAL mode When moire patterns or lines of uneven thickness appear on the table, find the compatible resolution and frequency by displaying it in the REAL mode, set ASPECT of the FEATURE menu to the COMPUTER IN/COMPONENT VIDEO IN terminals, the signal... WXGA60c WXGA+60 SXGA60b SXGA75b SXGA60 SXGA75 SXGA+60 WSXGA+60 MAC13 MAC16 MAC19 HP75 HP72 SUN66a SUN76a SUN66 SUN76 SGI72 SGI76 UXGA60 Resolution (H x V) - 640 x 400 640 x 400 640 x 400 640 x 480 640 x 480 640 x 480 640 x 480 800 x 600 800 x 600 800 x 600 800 x 600 800 x 600 800 x 600 1024 ...