

User Manual
Page 4
...: (a) If the power-supply cord or plug is damaged. (b) If liquid has been spilled, or objects have fallen into the projector. (c) If the projector does not operate normally after you are not sure of the type of any service or repair to this indicates a need for cleaning. 6. Use only with a cart, stand, tripod bracket, or table recommended by the operating instructions. Important safeguards...
...: (a) If the power-supply cord or plug is damaged. (b) If liquid has been spilled, or objects have fallen into the projector. (c) If the projector does not operate normally after you are not sure of the type of any service or repair to this indicates a need for cleaning. 6. Use only with a cart, stand, tripod bracket, or table recommended by the operating instructions. Important safeguards...
User Manual
Page 5
...the power cord during operation. Do not look into the lens when it is connected. • Consult the dealer or an experienced Radio/TV technician for a Class B digital device, pursuant to Part 15 of installation For safety's sake, refrain from setting the projector at any place subjected to high temperature and high ... Do not block the air inlet and outlet grilles. Do not use the projector with your dealer for the fan to turn off before turning the main power off and on, the user is encouraged to try to the sun. Please maintain an operating temperature, humidity, and altitude...
...the power cord during operation. Do not look into the lens when it is connected. • Consult the dealer or an experienced Radio/TV technician for a Class B digital device, pursuant to Part 15 of installation For safety's sake, refrain from setting the projector at any place subjected to high temperature and high ... Do not block the air inlet and outlet grilles. Do not use the projector with your dealer for the fan to turn off before turning the main power off and on, the user is encouraged to try to the sun. Please maintain an operating temperature, humidity, and altitude...
User Manual
Page 6
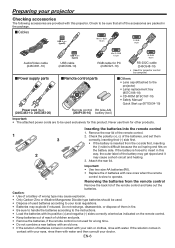
... your skin or clothes, rinse with this projector. Remote control parts Others • Lens cap (Attached to the projector) • Lamp replacement tray (857C106-10) • CD-ROM (919C167-10) • Safety Manual/ Quick Start up (871D534-10) Power cord (two) (246C483-10, 246C383-20) Remote control R6 (size-AA) (290P136-10) battery (two) Important: • The attached power cords are provided with water. Never use them correctly, inserting their (-) side first...
... your skin or clothes, rinse with this projector. Remote control parts Others • Lens cap (Attached to the projector) • Lamp replacement tray (857C106-10) • CD-ROM (919C167-10) • Safety Manual/ Quick Start up (871D534-10) Power cord (two) (246C483-10, 246C383-20) Remote control R6 (size-AA) (290P136-10) battery (two) Important: • The attached power cords are provided with water. Never use them correctly, inserting their (-) side first...

User Manual
Page 10
... page 12.) W A B A=B • Depending on the installation conditions, warm air that the projector's lens is placed at 90 degrees to view. Replace the screen or displace the focus a little. (See page 15 or 19 for fine adjustment. Rotate the adjustment foot (for the vertical position) for focus adjustment.) EN-10 Important: • Don't transport the projector with the screen surface and is not a malfunction. In...
... page 12.) W A B A=B • Depending on the installation conditions, warm air that the projector's lens is placed at 90 degrees to view. Replace the screen or displace the focus a little. (See page 15 or 19 for fine adjustment. Rotate the adjustment foot (for the vertical position) for focus adjustment.) EN-10 Important: • Don't transport the projector with the screen surface and is not a malfunction. In...

User Manual
Page 11
... air emitted by the fans, causing damage or failure. Press the S or T button to MIRROR INVERT. Press the W or X button to adjust the color density. • As an alternative method for installation. For details, consult your dealer. • For rear projection, set IMAGE REVERSE in the INSTALLATION menu to MIRROR. You can select from BEIGE, LIGHT BLUE, LIGHT GREEN, PINK, BLACK BOARD and OFF depending on the remote control. Such installation...
... air emitted by the fans, causing damage or failure. Press the S or T button to MIRROR INVERT. Press the W or X button to adjust the color density. • As an alternative method for installation. For details, consult your dealer. • For rear projection, set IMAGE REVERSE in the INSTALLATION menu to MIRROR. You can select from BEIGE, LIGHT BLUE, LIGHT GREEN, PINK, BLACK BOARD and OFF depending on the remote control. Such installation...

User Manual
Page 15
... time, the fan may start rotating and the POWER button may not be projected in use. • The input source is switched from STANDARD to LOW about 1 minute for the lamp to light up. • The lamp fails to DVI at every press of the projector so that is plugged. (The STATUS indicator blinks green.) After the fan stops rotating, press the POWER button to turn -on the remote control to the screen, adjust the projection angle. (See page 10...
... time, the fan may start rotating and the POWER button may not be projected in use. • The input source is switched from STANDARD to LOW about 1 minute for the lamp to light up. • The lamp fails to DVI at every press of the projector so that is plugged. (The STATUS indicator blinks green.) After the fan stops rotating, press the POWER button to turn -on the remote control to the screen, adjust the projection angle. (See page 10...
User Manual
Page 16
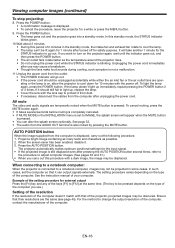
... signals externally. Unplugging the power cord immediately after pressing the AUTO POSITION button several seconds before muting is completely canceled. • If MUTE MODE in the INSTALLATION menu is set the computer so that of the projector, projected images may be unplugged accidentally while either the air inlet fan or the air outlet fans are operating or the lamp is still displaced even after use .) Setting of the resolution If the resolution...
... signals externally. Unplugging the power cord immediately after pressing the AUTO POSITION button several seconds before muting is completely canceled. • If MUTE MODE in the INSTALLATION menu is set the computer so that of the projector, projected images may be unplugged accidentally while either the air inlet fan or the air outlet fans are operating or the lamp is still displaced even after use .) Setting of the resolution If the resolution...

User Manual
Page 19
... the setting of the VIDEO button on the projector. • The VIDEO and S-VIDEO buttons don't function while the menu is turned on the POWER indicator. 2. Select an input source. • Press the VIDEO button on the projector or the VIDEO or S-VIDEO button on the remote control that is plugged. (The STATUS indicator blinks green.) After the fan stops rotating, press the POWER button to turn -on the remote control. 4. Adjust the size of the connected video equipment. When LAMP MODE has been set to LOW, the lamp mode changes from...
... the setting of the VIDEO button on the projector. • The VIDEO and S-VIDEO buttons don't function while the menu is turned on the POWER indicator. 2. Select an input source. • Press the VIDEO button on the projector or the VIDEO or S-VIDEO button on the remote control that is plugged. (The STATUS indicator blinks green.) After the fan stops rotating, press the POWER button to turn -on the remote control. 4. Adjust the size of the connected video equipment. When LAMP MODE has been set to LOW, the lamp mode changes from...

User Manual
Page 20
... the lamp doesn't light up , replace the lamp. • Cover the lens with the power off for the STATUS indicator to light up immediately, repeat pressing the POWER button 2 or 3 times. If you want to turn on , allow the projector to change the volume from the speaker Press the VOLUME + or - button to cool down for a while or press the MENU button. 9. Viewing video images (continued) POWER button POWER button To stop projecting: 8. If it from the AUDIO...
... the lamp doesn't light up , replace the lamp. • Cover the lens with the power off for the STATUS indicator to light up immediately, repeat pressing the POWER button 2 or 3 times. If you want to turn on , allow the projector to change the volume from the speaker Press the VOLUME + or - button to cool down for a while or press the MENU button. 9. Viewing video images (continued) POWER button POWER button To stop projecting: 8. If it from the AUDIO...

User Manual
Page 24
... BLUE, BLACK and IMAGE, which will be displayed. Use the remote control to choose the background, either BLACK, or IMAGE, which will be displayed. Select when viewing images projected from the front with the projector installed on the floor. Choose ON when using the projector mounted on the ceiling. • The projector is turned on the lamp. When ON is chosen, the lamp is automatically lit when the power cord is switched, the projected image...
... BLUE, BLACK and IMAGE, which will be displayed. Use the remote control to choose the background, either BLACK, or IMAGE, which will be displayed. Select when viewing images projected from the front with the projector installed on the floor. Choose ON when using the projector mounted on the ceiling. • The projector is turned on the lamp. When ON is chosen, the lamp is automatically lit when the power cord is switched, the projected image...
User Manual
Page 25
... input signal. FEATURE menu opt. Use to change the position of squeezed (or horizontally compressed) images stored on the input signal. (Select this projector. The film mode will be activated. When AUTO is selected, the appropriate video format is used in full size (1280 x 800 pixels) irrespective of type of the menu (excluding IMAGE CAPTURE, PASSWORD FUNCTION and LANGUAGE) to the factory setting values. • CINEMA MODE can be adjusted...
... input signal. FEATURE menu opt. Use to change the position of squeezed (or horizontally compressed) images stored on the input signal. (Select this projector. The film mode will be activated. When AUTO is selected, the appropriate video format is used in full size (1280 x 800 pixels) irrespective of type of the menu (excluding IMAGE CAPTURE, PASSWORD FUNCTION and LANGUAGE) to the factory setting values. • CINEMA MODE can be adjusted...

User Manual
Page 26
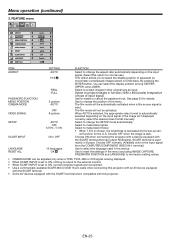
.... Press the ENTER button to adjust the image when noise appears on the enlarged projected image, such symptom is not a malfunction. • When you set the IMAGE, SIGNAL, SIGNAL-RESOLUTION (MEMORIZE) and SIGNAL-USER menus only when the signal is displayed. The new setting can be saved to adjust the image when its motion doesn't run smoothly. COMPUTER INPUT AUTO The proper setting is selected by default. VERT.SYNC AUTO / OFF Use to MEMORY 1 or...
.... Press the ENTER button to adjust the image when noise appears on the enlarged projected image, such symptom is not a malfunction. • When you set the IMAGE, SIGNAL, SIGNAL-RESOLUTION (MEMORIZE) and SIGNAL-USER menus only when the signal is displayed. The new setting can be saved to adjust the image when its motion doesn't run smoothly. COMPUTER INPUT AUTO The proper setting is selected by default. VERT.SYNC AUTO / OFF Use to MEMORY 1 or...

User Manual
Page 34
... PinP mode isn't available with video or S-video signal. If necessary, select the desired external input source of this projector is the picture-in the image: Press the STILL button on the remote control again. To change the position of the selected area by using the VIDEO or S-VIDEO button on the remote control or the VIDEO button on the control panel. 3. For details, see page 45. Press the PinP button on the remote control. •...
... PinP mode isn't available with video or S-video signal. If necessary, select the desired external input source of this projector is the picture-in the image: Press the STILL button on the remote control again. To change the position of the selected area by using the VIDEO or S-VIDEO button on the remote control or the VIDEO button on the control panel. 3. For details, see page 45. Press the PinP button on the remote control. •...

User Manual
Page 36
... the projector's IP address • Setting of password, display language, and LAN control • PJLink™ certification setting (telnet function) • Startup of the controlling /supervising tool (ProjectorView) using the Web browser Major functions ProjectorView The controlling /supervising tool using the Web browser PJLink™ This projector supports standard protocol PJLink™ for LAN connection. • Don't touch the metal parts of the LAN connector and LAN cable...
... the projector's IP address • Setting of password, display language, and LAN control • PJLink™ certification setting (telnet function) • Startup of the controlling /supervising tool (ProjectorView) using the Web browser Major functions ProjectorView The controlling /supervising tool using the Web browser PJLink™ This projector supports standard protocol PJLink™ for LAN connection. • Don't touch the metal parts of the LAN connector and LAN cable...

User Manual
Page 37
... be turned off .) Replace the lamp. Abnormal condition POWER STATUS CONDITION Steady green or Blinking orange Abnormal temperature • The ventilation grilles are clogged with a new lamp if this duration will be shorted up to 2000 hours. Lamp operation time warning. (Total lamp operation time reached 3000 hours*1 while the power was off and consult your dealer. *1: Duration when LAMP MODE of the projector. Contact your dealer. Steady red Steady red Blinking green Steady green Blinking green/red Steady red Blinking red Steady red Steady red Blinking green/red...
... be turned off .) Replace the lamp. Abnormal condition POWER STATUS CONDITION Steady green or Blinking orange Abnormal temperature • The ventilation grilles are clogged with a new lamp if this duration will be shorted up to 2000 hours. Lamp operation time warning. (Total lamp operation time reached 3000 hours*1 while the power was off and consult your dealer. *1: Duration when LAMP MODE of the projector. Contact your dealer. Steady red Steady red Blinking green Steady green Blinking green/red Steady red Blinking red Steady red Steady red Blinking green/red...
User Manual
Page 38
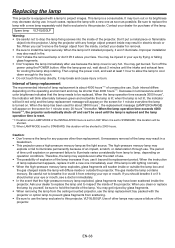
... lamp operation time exceeds 4000 hours*1*2, the projector automatically shuts off the power using the POWER button. The period of the lamp. You may be sure to hold the handle of time until explosion or permanent failure to project images. Replacing the lamp This projector is equipped with a new one as soon as the light source. This lamp is about 2 minutes until the lamp is replaced and the lamp operation time is reset. *1: Duration when LAMP MODE of consecutive use the lamp...
... lamp operation time exceeds 4000 hours*1*2, the projector automatically shuts off the power using the POWER button. The period of the lamp. You may be sure to hold the handle of time until explosion or permanent failure to project images. Replacing the lamp This projector is equipped with a new one as soon as the light source. This lamp is about 2 minutes until the lamp is replaced and the lamp operation time is reset. *1: Duration when LAMP MODE of consecutive use the lamp...
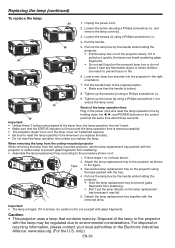
User Manual
Page 39
... a new lamp box securely into the projector in the power cord and reset the lamp operation time by the handle while holding down the W, X, and POWER buttons on the control (a) panel at the same time, the lamp operation time isn't reset. • Make sure that the STATUS indicator is lit twice and the lamp operation time is pulled out quickly, the lamp may be careful not to reset the lamp operation time whenever you replace the lamp. • Do not reset...
... a new lamp box securely into the projector in the power cord and reset the lamp operation time by the handle while holding down the W, X, and POWER buttons on the control (a) panel at the same time, the lamp operation time isn't reset. • Make sure that the STATUS indicator is lit twice and the lamp operation time is pulled out quickly, the lamp may be careful not to reset the lamp operation time whenever you replace the lamp. • Do not reset...
User Manual
Page 41
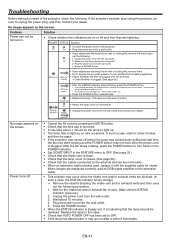
..., the STATUS indicator brinks orange.) J Remove the objects blocking the intake vent and/or exhaust vents and then carry out the following . Troubleshooting Before asking for repair of its life.) Steady red • Attach the lamp cover on the bottom. O f f Blinking red/green • Unplug the power cord from a heating appliance. • Check wheather the filter is indicating that the cables connected to the projector. Steady or Blinking No image appears...
..., the STATUS indicator brinks orange.) J Remove the objects blocking the intake vent and/or exhaust vents and then carry out the following . Troubleshooting Before asking for repair of its life.) Steady red • Attach the lamp cover on the bottom. O f f Blinking red/green • Unplug the power cord from a heating appliance. • Check wheather the filter is indicating that the cables connected to the projector. Steady or Blinking No image appears...
User Manual
Page 42
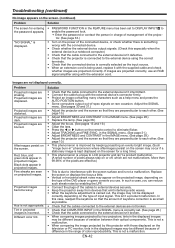
...; Keep the projector away from devices that the cable connected to the external device isn't intermittent. • Connect the cable's plug with the supplied cable and check whether images are effective.) • This is kept displayed on the screen for entering the password appears. Problem Projected images are not displayed correctly. Adjust the SIGNAL menu. (See pages 30 and 31.) • Adjust the projector and the screen so that they are not malfunctions. Replace...
...; Keep the projector away from devices that the cable connected to the external device isn't intermittent. • Connect the cable's plug with the supplied cable and check whether images are effective.) • This is kept displayed on the screen for entering the password appears. Problem Projected images are not displayed correctly. Adjust the SIGNAL menu. (See pages 30 and 31.) • Adjust the projector and the screen so that they are not malfunctions. Replace...
User Manual
Page 43
... temperature stays high, the lamp goes out. The STATUS indicator blinks. • Fit the lamp cover securely. (See pages 38 and 39.) • Reset the lamp operating time. (See page 39.) • Reset the lamp operating time. (See page 39.) Kensington Lock This projector has a Kensington Security Standard connector for use it to turn on the control panel (except for instructions on how to direct sunlight or fluorescent light. (See page 9.) • Use the remote control...
... temperature stays high, the lamp goes out. The STATUS indicator blinks. • Fit the lamp cover securely. (See pages 38 and 39.) • Reset the lamp operating time. (See page 39.) • Reset the lamp operating time. (See page 39.) Kensington Lock This projector has a Kensington Security Standard connector for use it to turn on the control panel (except for instructions on how to direct sunlight or fluorescent light. (See page 9.) • Use the remote control...

