

User Manual
Page 1
Please read it before using your projector. LCD PROJECTOR MODEL WL2650U User Manual WL2650 This User Manual is important to you.
Please read it before using your projector. LCD PROJECTOR MODEL WL2650U User Manual WL2650 This User Manual is important to you.
User Manual
Page 5
..., unplug immediately and contact your eyes. Please maintain an operating temperature, humidity, and altitude as specifically explained in the User Manual do not place equipment on a leveled and stable surface only. Do not modify this product by yourself. may cause trouble or explosion ...help. Important safeguards (continued) WARNING: Unplug immediately if there is encouraged to try to correct the interference by one or more than ±10°(right and left) or ±15°(front and rear) may blow out of it may fall , causing serious injury to a...
..., unplug immediately and contact your eyes. Please maintain an operating temperature, humidity, and altitude as specifically explained in the User Manual do not place equipment on a leveled and stable surface only. Do not modify this product by yourself. may cause trouble or explosion ...help. Important safeguards (continued) WARNING: Unplug immediately if there is encouraged to try to correct the interference by one or more than ±10°(right and left) or ±15°(front and rear) may blow out of it may fall , causing serious injury to a...
User Manual
Page 6
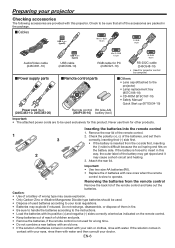
... Mini D-SUB 15-pin D-SUB 9-pin Audio/Video cable (246C381-10) Power supply parts USB 4-pin (type A) USB cable (246C509-10) Mini D-SUB 15-pin RGB cable for PC (246C521-10) D-SUB 9-pin RS-232C cable (246C548-10) • Used for projector control by computer. Check the polarity... cap (Attached to the projector) • Lamp replacement tray (857C106-10) • CD-ROM (919C167-10) • Safety Manual/ Quick Start up (871D534-10) Power cord (two) (246C483-10, 246C383-20) Remote control R6 (size-AA) (290P136-10) battery (two) Important: • The attached power cords are provided...
... Mini D-SUB 15-pin D-SUB 9-pin Audio/Video cable (246C381-10) Power supply parts USB 4-pin (type A) USB cable (246C509-10) Mini D-SUB 15-pin RGB cable for PC (246C521-10) D-SUB 9-pin RS-232C cable (246C548-10) • Used for projector control by computer. Check the polarity... cap (Attached to the projector) • Lamp replacement tray (857C106-10) • CD-ROM (919C167-10) • Safety Manual/ Quick Start up (871D534-10) Power cord (two) (246C483-10, 246C383-20) Remote control R6 (size-AA) (290P136-10) battery (two) Important: • The attached power cords are provided...

User Manual
Page 13
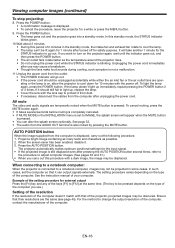
... projector uses stereo pin jack for details of the computer are required depending on the type of the connected computer. • Also read the instruction manual of the equipment to be connected. EN-13 Connect the other end of the DVI cable to the monitor. For monitor connection: 1. Connect one end...
... projector uses stereo pin jack for details of the computer are required depending on the type of the connected computer. • Also read the instruction manual of the equipment to be connected. EN-13 Connect the other end of the DVI cable to the monitor. For monitor connection: 1. Connect one end...
User Manual
Page 16
In this standby mode, the STATUS indicator blinks green. 10.Wait about 2 minutes. • During this period of 2 minutes in the standby mode...the setting procedure for external output Press the [Fn] key and any of the computer you want to cool down for 10 minutes with the lens cap to be lit again for the input signal. • If the projected image is not...for the STATUS indicator to IMAGE, the splash screen will take another 1 minute for safety purpose. See the instruction manual of the computer. EN-16 To light the lamp again, press the POWER button. If it from dust. •...
In this standby mode, the STATUS indicator blinks green. 10.Wait about 2 minutes. • During this period of 2 minutes in the standby mode...the setting procedure for external output Press the [Fn] key and any of the computer you want to cool down for 10 minutes with the lens cap to be lit again for the input signal. • If the projected image is not...for the STATUS indicator to IMAGE, the splash screen will take another 1 minute for safety purpose. See the instruction manual of the computer. EN-16 To light the lamp again, press the POWER button. If it from dust. •...

User Manual
Page 17
... to connect the audio cable. (The same audio signal is output from the channels L and R of the AUDIO OUT terminal.) • Also read the instruction manual of the equipment to video equipment Preparation: • Make sure that the power of the projector and that of connection. EN-17 Connecting the projector...
... to connect the audio cable. (The same audio signal is output from the channels L and R of the AUDIO OUT terminal.) • Also read the instruction manual of the equipment to video equipment Preparation: • Make sure that the power of the projector and that of connection. EN-17 Connecting the projector...
User Manual
Page 25
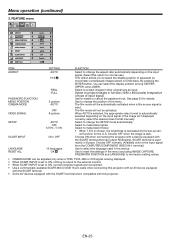
...black thicker. • When 7.5% is chosen, the brightness is input. If the image isn't displayed correctly, select the desired video format manually. Select to project images in their original size as input. Choose ON when connecting the projector with a device equipped with this option for details... MODE VIDEO SIGNAL SETUP SCART INPUT REAL FULL 2 options AUTO OFF 8 options AUTO OFF 3.75% / 7.5% ON / OFF LANGUAGE RESET ALL 10 languages OK FUNCTION Select to the external monitor. • When SCART INPUT is used in Europe. Choose OFF when the image is automatically selected ...
...black thicker. • When 7.5% is chosen, the brightness is input. If the image isn't displayed correctly, select the desired video format manually. Select to project images in their original size as input. Choose ON when connecting the projector with a device equipped with this option for details... MODE VIDEO SIGNAL SETUP SCART INPUT REAL FULL 2 options AUTO OFF 8 options AUTO OFF 3.75% / 7.5% ON / OFF LANGUAGE RESET ALL 10 languages OK FUNCTION Select to the external monitor. • When SCART INPUT is used in Europe. Choose OFF when the image is automatically selected ...

User Manual
Page 30
.... Press the AUTO POSITION button. Image is canceled. Set HORIZ. PIXELS to the selected resolution. Automatic adjustment starts according to 1280 and VERT. NO Perform manual adjustment. Adjustment is projected correctly. Adjust HORIZ. For details, see "Simple method to display the screen resolution setting.) The screen resolution setting of the computer...
.... Press the AUTO POSITION button. Image is canceled. Set HORIZ. PIXELS to the selected resolution. Automatic adjustment starts according to 1280 and VERT. NO Perform manual adjustment. Adjustment is projected correctly. Adjust HORIZ. For details, see "Simple method to display the screen resolution setting.) The screen resolution setting of the computer...

User Manual
Page 36
...(option) (100BASE-TX or 10BASE-T should be supported.) External HUB • Use a straight-through category-5 cable for the User Manual will be discharged from your body, causing damage to the specifications of different models and different manufacturers. A language selection list... and the compliance has been verified with the PJLink™ standard specifications Version 1.0. Using the User Manual The User Manual for projector control and you can supervise and control the projector's operation using the same application among projectors of JBMIA PJLink...
...(option) (100BASE-TX or 10BASE-T should be supported.) External HUB • Use a straight-through category-5 cable for the User Manual will be discharged from your body, causing damage to the specifications of different models and different manufacturers. A language selection list... and the compliance has been verified with the PJLink™ standard specifications Version 1.0. Using the User Manual The User Manual for projector control and you can supervise and control the projector's operation using the same application among projectors of JBMIA PJLink...