User Guide
Page 7
... CONTENTS Federal Communications Commission Statement 1 Warnings and Precautions Important Safety Instructions 2 Antenna Safety Instructions 4 Chapter 1 Introducing the LCD TV Key Features ...6 Package Contents ...7 Setting Your LCD TV...8 Your LCD TV...11 Your Remote Control 13 Chapter 2 Installing the LCD TV Connecting a TV Cable or an Antenna 15 Connecting a VCR ...20 Connecting a Video Camera or Game Console 21 Connecting a DVD Player...
... CONTENTS Federal Communications Commission Statement 1 Warnings and Precautions Important Safety Instructions 2 Antenna Safety Instructions 4 Chapter 1 Introducing the LCD TV Key Features ...6 Package Contents ...7 Setting Your LCD TV...8 Your LCD TV...11 Your Remote Control 13 Chapter 2 Installing the LCD TV Connecting a TV Cable or an Antenna 15 Connecting a VCR ...20 Connecting a Video Camera or Game Console 21 Connecting a DVD Player...
User Guide
Page 9
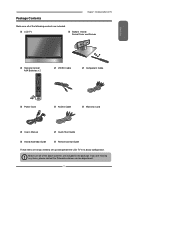
...the above contents are included in its basic configuration. LCD TV Bottom Stand / Screw Driver and Screws ENGLISH Remote Control/ AAA Batteries x 2 SET UP TV CAB/ SAT DVD AUX SLEEP DVD MENU VOL CH PAGE MUTE ASPECT LAST GUIDE LIVE TV PIP MENU OK INFO CC EXIT DVR 1 2 3 ABC ...User's Manual Quick Start Guide Stand Assembly Guide Remote control Guide These items are all of the following contents are missing any items, please contact the Polaroid customer service department. 7 If you need to set up and operate the LCD TV in the package. Make sure all you are...
...the above contents are included in its basic configuration. LCD TV Bottom Stand / Screw Driver and Screws ENGLISH Remote Control/ AAA Batteries x 2 SET UP TV CAB/ SAT DVD AUX SLEEP DVD MENU VOL CH PAGE MUTE ASPECT LAST GUIDE LIVE TV PIP MENU OK INFO CC EXIT DVR 1 2 3 ABC ...User's Manual Quick Start Guide Stand Assembly Guide Remote control Guide These items are all of the following contents are missing any items, please contact the Polaroid customer service department. 7 If you need to set up and operate the LCD TV in the package. Make sure all you are...
User Guide
Page 12
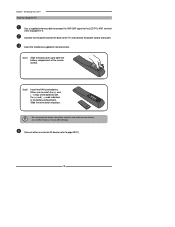
...place. terminal (refer to page19-27). 10 Connect the AC power cord at the back of the remote control. Insert the 2 batteries supplied in the battery compartment. Make sure to the LCD TV's ANT. Step2 Insert two AAA size batteries. Do not use caustic cleaners (porcelain, stainless steel,... toilet, or oven cleaner etc.) on the remote, as it may suffer damage. Connect other an external AV device (refer to page15-17). Chapter 1 Introducing the LCD TV How to setup the TV Use a supplied antenna cable to connect the VHF/UHF signal to match...
...place. terminal (refer to page19-27). 10 Connect the AC power cord at the back of the remote control. Insert the 2 batteries supplied in the battery compartment. Make sure to the LCD TV's ANT. Step2 Insert two AAA size batteries. Do not use caustic cleaners (porcelain, stainless steel,... toilet, or oven cleaner etc.) on the remote, as it may suffer damage. Connect other an external AV device (refer to page15-17). Chapter 1 Introducing the LCD TV How to setup the TV Use a supplied antenna cable to connect the VHF/UHF signal to match...
User Guide
Page 15
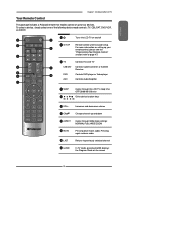
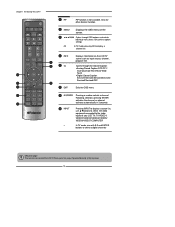
... decreases volume 7 CH▲▼ Change channel up to four devices. ENGLISH Your Remote Control Chapter 1 Introducing the LCD TV This package includes a Polaroid remote that enables control of the following device mode controls: TV, CBL/SAT, DVD/VCR, or AUDIO. 2 SET UP 1 3 TV CAB/ SAT DVD AUX SLEEP 4 DVD MENU 5 6 VOL CH PAGE 7 8 9 MUTE ASPECT LAST...
... decreases volume 7 CH▲▼ Change channel up to four devices. ENGLISH Your Remote Control Chapter 1 Introducing the LCD TV This package includes a Polaroid remote that enables control of the following device mode controls: TV, CBL/SAT, DVD/VCR, or AUDIO. 2 SET UP 1 3 TV CAB/ SAT DVD AUX SLEEP 4 DVD MENU 5 6 VOL CH PAGE 7 8 9 MUTE ASPECT LAST...
User Guide
Page 16
...pressing OK to 5m away, if pointed directly at the receiver. 14 SET UP TV CAB/ SAT DVD AUX SLEEP DVD MENU 13 MENU Displays the OSD menu on the LCD TV MUTE ASPECT LAST LIVE TV 12 screen such as input source, channel, program title. Following selection, pressing ENTER... the video equipment connected to the video inputs of your LCD TV: TV/VIDEO1/ VIDEO2/VIDEO3/VIDEO4/VIDEO5/ VIDEO6/VIDEO7/COMPUTER ▪ In TV mode, use with 0-9 and ENTER buttons to select a digital channels Effective range: The remote can control the LCD TV from up to display a channel list 15 INFO Displays...
...pressing OK to 5m away, if pointed directly at the receiver. 14 SET UP TV CAB/ SAT DVD AUX SLEEP DVD MENU 13 MENU Displays the OSD menu on the LCD TV MUTE ASPECT LAST LIVE TV 12 screen such as input source, channel, program title. Following selection, pressing ENTER... the video equipment connected to the video inputs of your LCD TV: TV/VIDEO1/ VIDEO2/VIDEO3/VIDEO4/VIDEO5/ VIDEO6/VIDEO7/COMPUTER ▪ In TV mode, use with 0-9 and ENTER buttons to select a digital channels Effective range: The remote can control the LCD TV from up to display a channel list 15 INFO Displays...

User Guide
Page 20
... completely disconnect the main voltage, please remove the power plug from the main voltage when the LCD TV will not be used for a long period of the TV and connect the power cord to turn on the LCD TV. Firm Plastic Prying Tool (Using a metal tool may cause shock) Back of an electrical storm or... power outage the safety fuse is equipped with a safety fuse. The POWER button on the remote to wall outlet. Press the button on the front panel is...
... completely disconnect the main voltage, please remove the power plug from the main voltage when the LCD TV will not be used for a long period of the TV and connect the power cord to turn on the LCD TV. Firm Plastic Prying Tool (Using a metal tool may cause shock) Back of an electrical storm or... power outage the safety fuse is equipped with a safety fuse. The POWER button on the remote to wall outlet. Press the button on the front panel is...

User Guide
Page 21
... Scan Tuner Mode Channel Skip Time Zone Cable Eastern Time TV Select Exit Press the MENU button on the remote to select the TV icon. ENGLISH Chapter 2 Installing the LCD TV Press the button on the remote to turn on the LCD TV. (Scroll down using the UP/DOWN buttons to see Computer...-VGA option) Main TV(CABLE/AIR) VIDEO1 (SIDE) VIDEO2 (REAR) VIDEO3 (S-VIDEO) VIDEO4 ...
... Scan Tuner Mode Channel Skip Time Zone Cable Eastern Time TV Select Exit Press the MENU button on the remote to select the TV icon. ENGLISH Chapter 2 Installing the LCD TV Press the button on the remote to turn on the LCD TV. (Scroll down using the UP/DOWN buttons to see Computer...-VGA option) Main TV(CABLE/AIR) VIDEO1 (SIDE) VIDEO2 (REAR) VIDEO3 (S-VIDEO) VIDEO4 ...

User Guide
Page 22
... the VCR's s-video output jack to the LCD TV's VIDEO2 IN jacks. Chapter 2 Installing the LCD TV Connecting a VCR Rear of the LCD TV or other connected equipment. Connect all AC power sources, before turning on the LCD TV. Press the button on the remote to turn on the power switch of TV HDMI 2 IN HDMI 1 IN AUDIO L R VGA IN...
... the VCR's s-video output jack to the LCD TV's VIDEO2 IN jacks. Chapter 2 Installing the LCD TV Connecting a VCR Rear of the LCD TV or other connected equipment. Connect all AC power sources, before turning on the LCD TV. Press the button on the remote to turn on the power switch of TV HDMI 2 IN HDMI 1 IN AUDIO L R VGA IN...

User Guide
Page 23
... B). To watch a video vis camera or game console, press the INPUT button on the remote to a TV. A METHOD A: Use a composite cable to connect the video camera's or game console's composite video/audio jacks to the LCD TV's audio inputs. METHOD B: Use an audio cable to connect the video camera's or game... console's audio output jacks to the LCD TV's VIDEO2 IN jacks or VIDEO1 IN jacks. Press the button on the remote to the LCD TV's S-VIDEO IN input jack. Connect all cameras have the ability to connect to turn on the power...
... B). To watch a video vis camera or game console, press the INPUT button on the remote to a TV. A METHOD A: Use a composite cable to connect the video camera's or game console's composite video/audio jacks to the LCD TV's audio inputs. METHOD B: Use an audio cable to connect the video camera's or game... console's audio output jacks to the LCD TV's VIDEO2 IN jacks or VIDEO1 IN jacks. Press the button on the remote to the LCD TV's S-VIDEO IN input jack. Connect all cameras have the ability to connect to turn on the power...

User Guide
Page 25
For best picture quality, if your equipment has component video output, use a component cable instead of the LCD TV or other connected equipment. Press the button on the remote to select VIDEO2( METHOD A), or VIDEO3 ( METHOD B), or VIDEO4/VIDEO5 (METHOD C). To watch a DVD, press the INPUT button on the remote to turn on the LCD TV. ENGLISH Chapter 2 Installing the LCD TV Connect all AC power sources, before turning on the power switch of a composite video or S-video cable. 23
For best picture quality, if your equipment has component video output, use a component cable instead of the LCD TV or other connected equipment. Press the button on the remote to select VIDEO2( METHOD A), or VIDEO3 ( METHOD B), or VIDEO4/VIDEO5 (METHOD C). To watch a DVD, press the INPUT button on the remote to turn on the LCD TV. ENGLISH Chapter 2 Installing the LCD TV Connect all AC power sources, before turning on the power switch of a composite video or S-video cable. 23
User Guide
Page 26
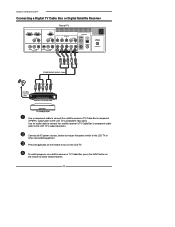
...the LCD TV or other connected equipment. Use an audio cable to connect the satellite receiver's/TV Cable Box's component audio jacks to the LCD TV's component input jacks. To watch programs via satellite receiver or TV Cable Box, press the INPUT button on the remote to turn on the LCD TV. ...Press the button on the power switch of TV HDMI 2 IN HDMI 1...
...the LCD TV or other connected equipment. Use an audio cable to connect the satellite receiver's/TV Cable Box's component audio jacks to the LCD TV's component input jacks. To watch programs via satellite receiver or TV Cable Box, press the INPUT button on the remote to turn on the LCD TV. ...Press the button on the power switch of TV HDMI 2 IN HDMI 1...
User Guide
Page 27
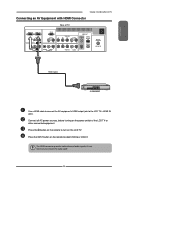
...AV Equipment with HDMI Connector Rear of the LCD TV or other connected equipment. Press the button on the remote to turn on the remote to select VIDEO6 or VIDEO7. The HDMI connector provides both video and audio signals, it's not necessary to the LCD TV's HDMI IN jacks. Connect all AC power ...sources, before turning on the power switch of TV HDMI 2 IN HDMI 1 IN ...
...AV Equipment with HDMI Connector Rear of the LCD TV or other connected equipment. Press the button on the remote to turn on the remote to select VIDEO6 or VIDEO7. The HDMI connector provides both video and audio signals, it's not necessary to the LCD TV's HDMI IN jacks. Connect all AC power ...sources, before turning on the power switch of TV HDMI 2 IN HDMI 1 IN ...

User Guide
Page 28
... INPUT button on the remote to -DVI cable or an HDMI adapter(not suplied) and an audio cable. 26 If the LCD TV is connected to AV equipment's DVI connector, you will need an HDMI-to select VIDEO6 or VIDEO7. Press the button on the LCD TV. Chapter 2 Installing the LCD TV Connecting an AV Equipment with...-DVI Cable AUD IO L R DVI IN AV EQUIPMENT Use a HDMI-to-DVI cable to connect the AV equipment's DVI output jack to turn on the remote to the LCD TV's HDMI IN jacks. Use an audio cable to connect the AV equipment's audio output jacks to...
... INPUT button on the remote to -DVI cable or an HDMI adapter(not suplied) and an audio cable. 26 If the LCD TV is connected to AV equipment's DVI connector, you will need an HDMI-to select VIDEO6 or VIDEO7. Press the button on the LCD TV. Chapter 2 Installing the LCD TV Connecting an AV Equipment with...-DVI Cable AUD IO L R DVI IN AV EQUIPMENT Use a HDMI-to-DVI cable to connect the AV equipment's DVI output jack to turn on the remote to the LCD TV's HDMI IN jacks. Use an audio cable to connect the AV equipment's audio output jacks to...
User Guide
Page 29
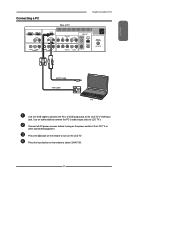
Press the button on the remote to turn on the remote to select COMPUTER. 27 Press the Input button on the LCD TV. Connect all AC power sources, before turning on the power switch of TV Chapter 3 Using the LCD TV HDMI 2 IN HDMI 1 IN AUDIO L R VGA IN AUDIO L R VIDEO L R AUDIO VIDEO2 IN S-...Y Pb Pr L COAXIAL L R R YPbPr2 IN AUDIO HDTV/TV Air/CABLE VHF/UHF IN AUDIO Cable VGA Cable PC Use a D-SUB cable to connect the PC's D-SUB output jack to LCD TV's. ENGLISH Connecting a PC Rear of the LCD TV or other connected equipment. Use an audio cable to connect the ...
Press the button on the remote to turn on the remote to select COMPUTER. 27 Press the Input button on the LCD TV. Connect all AC power sources, before turning on the power switch of TV Chapter 3 Using the LCD TV HDMI 2 IN HDMI 1 IN AUDIO L R VGA IN AUDIO L R VIDEO L R AUDIO VIDEO2 IN S-...Y Pb Pr L COAXIAL L R R YPbPr2 IN AUDIO HDTV/TV Air/CABLE VHF/UHF IN AUDIO Cable VGA Cable PC Use a D-SUB cable to connect the PC's D-SUB output jack to LCD TV's. ENGLISH Connecting a PC Rear of the LCD TV or other connected equipment. Use an audio cable to connect the ...
User Guide
Page 30
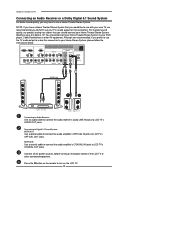
... OUT jacks. METHOD B: Use a coaxial cable to connect the audio amplifier's COAXIAL IN jacks to LCD TV's OPTICAL OUT jacks. Press the button on the remote to LCD TV's AUDIO OUT jacks. I.E. You should connect your Home Theater/Stereo System directly to your A/V device. HDMI 2 IN HDMI 1 IN AUDIO L R VGA IN AUDIO L R VIDEO...
... OUT jacks. METHOD B: Use a coaxial cable to connect the audio amplifier's COAXIAL IN jacks to LCD TV's OPTICAL OUT jacks. Press the button on the remote to LCD TV's AUDIO OUT jacks. I.E. You should connect your Home Theater/Stereo System directly to your A/V device. HDMI 2 IN HDMI 1 IN AUDIO L R VGA IN AUDIO L R VIDEO...

User Guide
Page 32
...▪ If the signal source is VIDEO/S-VIDEO/YPbPr/ HDMI/VGA, the AUDIO MENU appears as: Video Select Exit ▪ If the signal source is TV, the AUDIO MENU appears as: Bass Treble Balance Sound Effect Speaker Surround On 50 Bass 50 50 Treble 50 0 Balance 0 Sound Effect Surround MTS Stereo... SPDIF Type Dolby Digital Audio Language English Speaker On 30 Press the MENU button on the remote control,the on-screen menu will appear on . Chapter 3 Using the LCD TV Operating the Menu Press the button to turn the...
...▪ If the signal source is VIDEO/S-VIDEO/YPbPr/ HDMI/VGA, the AUDIO MENU appears as: Video Select Exit ▪ If the signal source is TV, the AUDIO MENU appears as: Bass Treble Balance Sound Effect Speaker Surround On 50 Bass 50 50 Treble 50 0 Balance 0 Sound Effect Surround MTS Stereo... SPDIF Type Dolby Digital Audio Language English Speaker On 30 Press the MENU button on the remote control,the on-screen menu will appear on . Chapter 3 Using the LCD TV Operating the Menu Press the button to turn the...
User Guide
Page 34
... individual VIDEO option, use the ◄► buttons to see crisp edges in the picture; Chapter 3 Using the LCD TV Customizing the VIDEO Settings Press the button to turn the LCD TV on the remote control to display the Main menu, and use the ◄► buttons to change the setting, and press the... MENU to exit the menu ▪ If the signal source is TV/VIDEO/S-VIDEO/YPbPr/ HDMI, the VIDEO MENU appears...
... individual VIDEO option, use the ◄► buttons to see crisp edges in the picture; Chapter 3 Using the LCD TV Customizing the VIDEO Settings Press the button to turn the LCD TV on the remote control to display the Main menu, and use the ◄► buttons to change the setting, and press the... MENU to exit the menu ▪ If the signal source is TV/VIDEO/S-VIDEO/YPbPr/ HDMI, the VIDEO MENU appears...

User Guide
Page 36
... original program ▪ Mono: Allows mono output (useful when stereo is noisy or inconsistent) 34 Chapter 3 Using the LCD TV Customizing the AUDIO Settings Press the button to turn the LCD TV on the remote control to display the Main menu, and use the ◄► buttons to change the setting, and press the... MENU to exit the menu ▪ If the signal source is VIDEO/S-VIDEO/YPbPr/ HDMI/VGA, the AUDIO MENU appears as: ▪ If the signal source is TV,...
... original program ▪ Mono: Allows mono output (useful when stereo is noisy or inconsistent) 34 Chapter 3 Using the LCD TV Customizing the AUDIO Settings Press the button to turn the LCD TV on the remote control to display the Main menu, and use the ◄► buttons to change the setting, and press the... MENU to exit the menu ▪ If the signal source is VIDEO/S-VIDEO/YPbPr/ HDMI/VGA, the AUDIO MENU appears as: ▪ If the signal source is TV,...
User Guide
Page 38
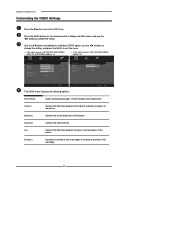
... on the remote control to display the Main menu, and use the ◄► buttons changes the setting, and press the MENU exits the menu. Allows selection between CATV cable and antenna signal sources: ▪ AIR Choose this setting if you are receiving TV channels with ...if you are receiving TV channels with a CATV (cable TV) Allows addition/removal of receivable channels. Chapter 3 Using the LCD TV Customizing the TV Settings Press the button to select the TV. Channel Scan Tuner Mode Channel Skip Time Zone Cable Eastern Time TV Select Exit The TV menu includes the following ...
... on the remote control to display the Main menu, and use the ◄► buttons changes the setting, and press the MENU exits the menu. Allows selection between CATV cable and antenna signal sources: ▪ AIR Choose this setting if you are receiving TV channels with ...if you are receiving TV channels with a CATV (cable TV) Allows addition/removal of receivable channels. Chapter 3 Using the LCD TV Customizing the TV Settings Press the button to select the TV. Channel Scan Tuner Mode Channel Skip Time Zone Cable Eastern Time TV Select Exit The TV menu includes the following ...
User Guide
Page 39
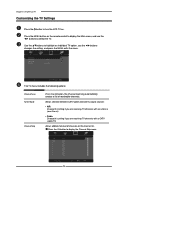
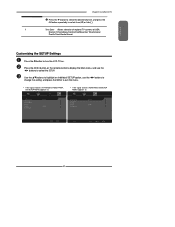
... Caption Parental Gamma Reset Default English Middle OSD Language Time Setup Parental Gamma Reset Default English Middle Setup Select Exit 37 ENGLISH Chapter 3 Using the LCD TV Press the ▼ button to select the desired channel, and press the OK button repeatedly to select show ( ) or hide( ) F... Time/Indiana/Central time/Mountain Time/Arizona/ Pacific Time/Alaska/Hawaii Customizing the SETUP Settings Press the button to turn the LCD TV on the remote control to display the Main menu, and use the ◄► buttons to change the setting, and press the MENU to select...
... Caption Parental Gamma Reset Default English Middle OSD Language Time Setup Parental Gamma Reset Default English Middle Setup Select Exit 37 ENGLISH Chapter 3 Using the LCD TV Press the ▼ button to select the desired channel, and press the OK button repeatedly to select show ( ) or hide( ) F... Time/Indiana/Central time/Mountain Time/Arizona/ Pacific Time/Alaska/Hawaii Customizing the SETUP Settings Press the button to turn the LCD TV on the remote control to display the Main menu, and use the ◄► buttons to change the setting, and press the MENU to select...


