
User Guide
Page 4
... the type of important operating and maintenance instructions in hazardous radiation exposure. WARNING This symbol is intended to alert the user to the presence of power source indicated on the 3-prong plug is intended to alert the user to avoid the risk of this equipment. Use of controls, adjustments or performance...
... the type of important operating and maintenance instructions in hazardous radiation exposure. WARNING This symbol is intended to alert the user to the presence of power source indicated on the 3-prong plug is intended to alert the user to avoid the risk of this equipment. Use of controls, adjustments or performance...
User Guide
Page 5
... into the apparatus, the apparatus has been exposed to rain or moisture, does not operate normally, or has been dropped. ▪ Always remove the power cord from the apparatus. ▪ Do not place the equipment on uneven or unstable carts, stands, tables, shelves etc. Servicing is required when the... on top. ▪ Do not insert anything into the equipment. ▪ Do not expose the equipment to extreme temperature or to direct sunlight, as power-supply cord or plug is sturdy, level, stable and strong enough to support the weight of the equipment. ▪ Do not block any other objects...
... into the apparatus, the apparatus has been exposed to rain or moisture, does not operate normally, or has been dropped. ▪ Always remove the power cord from the apparatus. ▪ Do not place the equipment on uneven or unstable carts, stands, tables, shelves etc. Servicing is required when the... on top. ▪ Do not insert anything into the equipment. ▪ Do not expose the equipment to extreme temperature or to direct sunlight, as power-supply cord or plug is sturdy, level, stable and strong enough to support the weight of the equipment. ▪ Do not block any other objects...
User Guide
Page 6
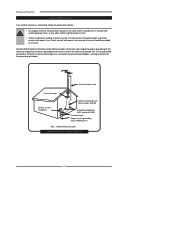
... below: ▪ An outdoor antenna should not be located in any area where it could come in contact with overhead power lines, or any other electric light or power circuits. ▪ When installing an outdoor antenna system, extreme caution should be taken to prevent contact with respect to proper...-in wire Ground clamps Electric service equipment Antenna discharge unit (NEC section 810-20) Grounding conductors (NEC section 810-20) Ground clamps Power service grounding (NEC Art250 part H) NEC : National Electrical code EXAMPLE OF OUTDOOR ANTENNA GROUNDING 4 Direct contact with...
... below: ▪ An outdoor antenna should not be located in any area where it could come in contact with overhead power lines, or any other electric light or power circuits. ▪ When installing an outdoor antenna system, extreme caution should be taken to prevent contact with respect to proper...-in wire Ground clamps Electric service equipment Antenna discharge unit (NEC section 810-20) Grounding conductors (NEC section 810-20) Ground clamps Power service grounding (NEC Art250 part H) NEC : National Electrical code EXAMPLE OF OUTDOOR ANTENNA GROUNDING 4 Direct contact with...
User Guide
Page 9
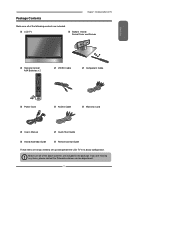
... the LCD TV in the package. LCD TV Bottom Stand / Screw Driver and Screws ENGLISH Remote Control/ AAA Batteries x 2 SET UP TV CAB/ SAT DVD AUX SLEEP DVD MENU VOL CH PAGE MUTE ASPECT LAST GUIDE LIVE TV PIP MENU OK INFO CC EXIT DVR 1 2 3 ABC DEF 4 5 6 GHI JKL MNO 7 8 9 PQRS TUV WXYZ INPUT . 0 ENTER Power Cord...
... the LCD TV in the package. LCD TV Bottom Stand / Screw Driver and Screws ENGLISH Remote Control/ AAA Batteries x 2 SET UP TV CAB/ SAT DVD AUX SLEEP DVD MENU VOL CH PAGE MUTE ASPECT LAST GUIDE LIVE TV PIP MENU OK INFO CC EXIT DVR 1 2 3 ABC DEF 4 5 6 GHI JKL MNO 7 8 9 PQRS TUV WXYZ INPUT . 0 ENTER Power Cord...
User Guide
Page 12
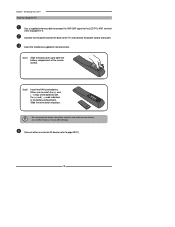
... caustic cleaners (porcelain, stainless steel, toilet, or oven cleaner etc.) on the remote, as it may suffer damage. Chapter 1 Introducing the LCD TV How to setup the TV Use a supplied antenna cable to connect the VHF/UHF signal to page15-17). Step1 Slide the back cover up to wall outlet. Connect... the AC power cord at the back of the TV and connect the power cord to open the battery compartment of the batteries with the (+) and ( - ) ends indicated in remote control. Step2...
... caustic cleaners (porcelain, stainless steel, toilet, or oven cleaner etc.) on the remote, as it may suffer damage. Chapter 1 Introducing the LCD TV How to setup the TV Use a supplied antenna cable to connect the VHF/UHF signal to page15-17). Step1 Slide the back cover up to wall outlet. Connect... the AC power cord at the back of the TV and connect the power cord to open the battery compartment of the batteries with the (+) and ( - ) ends indicated in remote control. Step2...

User Guide
Page 14
VGA IN Connects the PC, or other AV equipment with component(YPbPr) video and audio output jacks. Chapter 1 Introducing the LCD TV Rear View and Jacks VIDEO2 IN Connects to the composite VIDEO and AUDIO(L/R) output jacks on AV equipment. AC IN Connects to receive high/standard .... AUDIO OUT-DIGITAL-OPTICAL/COAXIAL Connects to the AUDIO(L/R) input jacks on external video equipment. HDTV/TV Air/CABLE VHF/UHF IN TV CABLE/AIR Connects RF input from VHF/UHF antenna or cable to the AC power cord. 12 S-VIDEO IN Connects to the DVD player, Digital Set-Top-Box, or other...
VGA IN Connects the PC, or other AV equipment with component(YPbPr) video and audio output jacks. Chapter 1 Introducing the LCD TV Rear View and Jacks VIDEO2 IN Connects to the composite VIDEO and AUDIO(L/R) output jacks on AV equipment. AC IN Connects to receive high/standard .... AUDIO OUT-DIGITAL-OPTICAL/COAXIAL Connects to the AUDIO(L/R) input jacks on external video equipment. HDTV/TV Air/CABLE VHF/UHF IN TV CABLE/AIR Connects RF input from VHF/UHF antenna or cable to the AC power cord. 12 S-VIDEO IN Connects to the DVD player, Digital Set-Top-Box, or other...

User Guide
Page 17
... a brief explanation of the type of any AC power cords to wall outlets until all other connections are more important than those for a black & white TV reception. For this reason, a good quality outdoor antenna is strongly recommended. ENGLISH Chapter 2 Installing the LCD TV Chapter 2 Installing the LCD TV Refer to the owner's manual of connection that...
... a brief explanation of the type of any AC power cords to wall outlets until all other connections are more important than those for a black & white TV reception. For this reason, a good quality outdoor antenna is strongly recommended. ENGLISH Chapter 2 Installing the LCD TV Chapter 2 Installing the LCD TV Refer to the owner's manual of connection that...

User Guide
Page 20
... period of time. Firm Plastic Prying Tool (Using a metal tool may cause shock) Back of the TV and connect the power cord to replace the fuse. Always disconnect the LCD TV from the main voltage when the LCD TV will not be used for a 4A 250V - 5x20mm Time Lag Fuse (Slow Blow) to wall outlet.... The POWER button on the LCD TV. HDTV/TV Air/CABLE VHF/UHF IN This TV is blown, visit your TV. To completely disconnect the main voltage, please remove the power plug from the main voltage. Press the button on the remote to turn on...
... period of time. Firm Plastic Prying Tool (Using a metal tool may cause shock) Back of the TV and connect the power cord to replace the fuse. Always disconnect the LCD TV from the main voltage when the LCD TV will not be used for a 4A 250V - 5x20mm Time Lag Fuse (Slow Blow) to wall outlet.... The POWER button on the LCD TV. HDTV/TV Air/CABLE VHF/UHF IN This TV is blown, visit your TV. To completely disconnect the main voltage, please remove the power plug from the main voltage. Press the button on the remote to turn on...

User Guide
Page 22
... power sources, before turning on the power switch of TV HDMI 2 IN HDMI 1 IN AUDIO L R VGA IN AUDIO L R VIDEO L R AUDIO VIDEO2 IN S-VIDEO L AUDIO R S-VIDEO IN YPbPr1 IN Y Pb Pr AUDIO AUDIO OUT STEREO DIGITAL OPTICAL L R Y Pb Pr L COAXIAL L R R YPbPr2 IN AUDIO HDTV/TV ...jack to the LCD TV's audio inputs. To watch a videotape, press the INPUT button on the LCD TV. METHOD B: Use an audio cable to connect the VCR's audio output jacks to the LCD TV's S-VIDEO IN input jack. Chapter 2 Installing the LCD TV Connecting a VCR Rear of the LCD TV or other connected...
... power sources, before turning on the power switch of TV HDMI 2 IN HDMI 1 IN AUDIO L R VGA IN AUDIO L R VIDEO L R AUDIO VIDEO2 IN S-VIDEO L AUDIO R S-VIDEO IN YPbPr1 IN Y Pb Pr AUDIO AUDIO OUT STEREO DIGITAL OPTICAL L R Y Pb Pr L COAXIAL L R R YPbPr2 IN AUDIO HDTV/TV ...jack to the LCD TV's audio inputs. To watch a videotape, press the INPUT button on the LCD TV. METHOD B: Use an audio cable to connect the VCR's audio output jacks to the LCD TV's S-VIDEO IN input jack. Chapter 2 Installing the LCD TV Connecting a VCR Rear of the LCD TV or other connected...

User Guide
Page 23
... output jacks to select VIDEO2/VIDEO1( METHOD A), or VIDEO3 (METHOD B). To watch a video vis camera or game console, press the INPUT button on the power switch of TV HDMI 2 IN HDMI 1 IN AUDIO L R VGA IN AUDIO L R VIDEO L R AUDIO VIDEO2 IN S-VIDEO L AUDIO R S-VIDEO IN YPbPr1 IN ... jack to turn on the remote to the LCD TV's S-VIDEO IN input jack. Press the button on the LCD TV. A METHOD A: Use a composite cable to connect the video camera's or game console's composite video/audio jacks to a TV. Not all AC power sources, before turning on the remote to the...
... output jacks to select VIDEO2/VIDEO1( METHOD A), or VIDEO3 (METHOD B). To watch a video vis camera or game console, press the INPUT button on the power switch of TV HDMI 2 IN HDMI 1 IN AUDIO L R VGA IN AUDIO L R VIDEO L R AUDIO VIDEO2 IN S-VIDEO L AUDIO R S-VIDEO IN YPbPr1 IN ... jack to turn on the remote to the LCD TV's S-VIDEO IN input jack. Press the button on the LCD TV. A METHOD A: Use a composite cable to connect the video camera's or game console's composite video/audio jacks to a TV. Not all AC power sources, before turning on the remote to the...

User Guide
Page 25
ENGLISH Chapter 2 Installing the LCD TV Connect all AC power sources, before turning on the LCD TV. For best picture quality, if your equipment has component video output, use a component cable instead of the LCD TV or other connected equipment. Press the button on the remote to select VIDEO2( METHOD A), or VIDEO3 ( METHOD B), or VIDEO4/VIDEO5 (METHOD C). To watch a DVD, press the INPUT button on the remote to turn on the power switch of a composite video or S-video cable. 23
ENGLISH Chapter 2 Installing the LCD TV Connect all AC power sources, before turning on the LCD TV. For best picture quality, if your equipment has component video output, use a component cable instead of the LCD TV or other connected equipment. Press the button on the remote to select VIDEO2( METHOD A), or VIDEO3 ( METHOD B), or VIDEO4/VIDEO5 (METHOD C). To watch a DVD, press the INPUT button on the remote to turn on the power switch of a composite video or S-video cable. 23
User Guide
Page 26
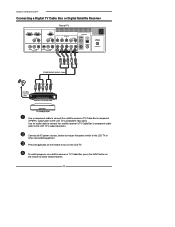
... the satellite receiver's/TV Cable Box's component (YPbPr1) output jacks to select VIDEO4/VIDEO5. 24 Connect all AC power sources, before turning on the remote to the LCD TV's component input jacks. Press the button on the remote to the LCD TV's audio input jacks.... Use an audio cable to connect the satellite receiver's/TV Cable Box's component audio jacks to turn on the LCD TV. Chapter 2 Installing the LCD TV Connecting a Digital TV...
... the satellite receiver's/TV Cable Box's component (YPbPr1) output jacks to select VIDEO4/VIDEO5. 24 Connect all AC power sources, before turning on the remote to the LCD TV's component input jacks. Press the button on the remote to the LCD TV's audio input jacks.... Use an audio cable to connect the satellite receiver's/TV Cable Box's component audio jacks to turn on the LCD TV. Chapter 2 Installing the LCD TV Connecting a Digital TV...
User Guide
Page 27
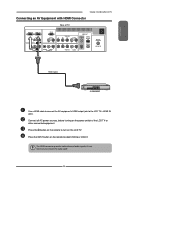
... an AV Equipment with HDMI Connector Rear of the LCD TV or other connected equipment. Press the INPUT button on the remote to connect the audio cable. 25 Connect all AC power sources, before turning on the power switch of TV HDMI 2 IN HDMI 1 IN AUDIO L R VGA IN AUDIO L R VIDEO L R AUDIO VIDEO2 IN S-.../UHF IN HDMI Cable AV EQUIPMENT Use a HDMI cable to connect the AV equipment's HDMI output jack to turn on the remote to the LCD TV's HDMI IN jacks. The HDMI connector provides both video and audio signals, it's not necessary to select VIDEO6 or VIDEO7. Press the button ...
... an AV Equipment with HDMI Connector Rear of the LCD TV or other connected equipment. Press the INPUT button on the remote to connect the audio cable. 25 Connect all AC power sources, before turning on the power switch of TV HDMI 2 IN HDMI 1 IN AUDIO L R VGA IN AUDIO L R VIDEO L R AUDIO VIDEO2 IN S-.../UHF IN HDMI Cable AV EQUIPMENT Use a HDMI cable to connect the AV equipment's HDMI output jack to turn on the remote to the LCD TV's HDMI IN jacks. The HDMI connector provides both video and audio signals, it's not necessary to select VIDEO6 or VIDEO7. Press the button ...

User Guide
Page 28
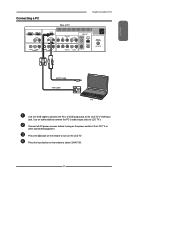
Press the INPUT button on the remote to turn on the LCD TV. Press the button on the power switch of TV HDMI 2 IN HDMI 1 IN AUDIO L R VGA IN AUDIO L R VIDEO L R AUDIO VIDEO2 IN S-VIDEO L AUDIO R S-VIDEO IN YPbPr1 IN Y Pb Pr AUDIO AUDIO OUT STEREO DIGITAL ... to connect the AV equipment's audio output jacks to -DVI cable or an HDMI adapter(not suplied) and an audio cable. 26 Connect all AC power sources, before turning on the remote to select VIDEO6 or VIDEO7. Chapter 2 Installing the LCD TV Connecting an AV Equipment with DVI Connector Rear of the...
Press the INPUT button on the remote to turn on the LCD TV. Press the button on the power switch of TV HDMI 2 IN HDMI 1 IN AUDIO L R VGA IN AUDIO L R VIDEO L R AUDIO VIDEO2 IN S-VIDEO L AUDIO R S-VIDEO IN YPbPr1 IN Y Pb Pr AUDIO AUDIO OUT STEREO DIGITAL ... to connect the AV equipment's audio output jacks to -DVI cable or an HDMI adapter(not suplied) and an audio cable. 26 Connect all AC power sources, before turning on the remote to select VIDEO6 or VIDEO7. Chapter 2 Installing the LCD TV Connecting an AV Equipment with DVI Connector Rear of the...
User Guide
Page 29
Connect all AC power sources, before turning on the LCD TV. Press the button on the remote to turn on the power switch of TV Chapter 3 Using the LCD TV HDMI 2 IN HDMI 1 IN AUDIO L R VGA IN AUDIO L R VIDEO L R AUDIO VIDEO2 IN S-VIDEO L AUDIO R S-VIDEO IN YPbPr1 IN Y Pb Pr AUDIO AUDIO OUT STEREO DIGITAL ...
Connect all AC power sources, before turning on the LCD TV. Press the button on the remote to turn on the power switch of TV Chapter 3 Using the LCD TV HDMI 2 IN HDMI 1 IN AUDIO L R VGA IN AUDIO L R VIDEO L R AUDIO VIDEO2 IN S-VIDEO L AUDIO R S-VIDEO IN YPbPr1 IN Y Pb Pr AUDIO AUDIO OUT STEREO DIGITAL ...
User Guide
Page 30
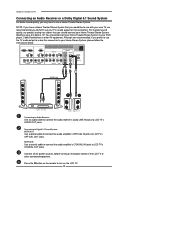
... cable to connect the audio amplifier's COAXIAL IN jacks to LCD TV's OPTICAL OUT jacks. You should connect your Home Theater/Stereo System directly to your A/V device. Connect all AC power sources, before turning on the power switch of the LCD TV or other AV equipment. Connecting to Digital 5.1 Sound System: METHOD A: Use a optical...
... cable to connect the audio amplifier's COAXIAL IN jacks to LCD TV's OPTICAL OUT jacks. You should connect your Home Theater/Stereo System directly to your A/V device. Connect all AC power sources, before turning on the power switch of the LCD TV or other AV equipment. Connecting to Digital 5.1 Sound System: METHOD A: Use a optical...


