User Manual
Page 7
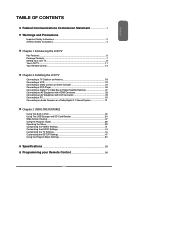
... 1 Introducing the LCD TV Key Features ...6 Package Contents ...7 Setting Your LCD TV...8 Your LCD TV...11 Your Remote Control 14 Chapter 2 Installing the LCD TV Connecting a TV Cable or an Antenna 18 Connecting a VCR ...23 Connecting a Video Camera or Game Console 24 Connecting a DVD Player 26 Connecting a Digital TV Cable Box or ... The Built-in DVD...32 Using The USB Storage and SD Card Reader 34 Wide Screen Viewing...37 Using the Program Guide...38 Operating the Menu...39 Customizing the VIDEO Settings...41 Customizing the AUDIO Settings...43 Customizing the TV Settings...45 Customizing ...
... 1 Introducing the LCD TV Key Features ...6 Package Contents ...7 Setting Your LCD TV...8 Your LCD TV...11 Your Remote Control 14 Chapter 2 Installing the LCD TV Connecting a TV Cable or an Antenna 18 Connecting a VCR ...23 Connecting a Video Camera or Game Console 24 Connecting a DVD Player 26 Connecting a Digital TV Cable Box or ... The Built-in DVD...32 Using The USB Storage and SD Card Reader 34 Wide Screen Viewing...37 Using the Program Guide...38 Operating the Menu...39 Customizing the VIDEO Settings...41 Customizing the AUDIO Settings...43 Customizing the TV Settings...45 Customizing ...
User Manual
Page 8
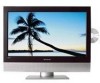
Chapter 1 Introducing the LCD TV Chapter 1 Introducing the LCD TV Key Features Various Audio/Video terminals for DVD (1080i, 720p) and digital set-top-box (1080i, 720p) connections. 3D Digital Noise Reduction ▪ This function can digitally reduce... ▪ 2 sets of Audio(L/R) output terminals ▪ 2 SPDIF output terminals (Optical x 1 /Coaxial x 1) ▪ 1 Headphone terminal Built-In Slot-type DVD Player ▪ Supports DVD/SVCD/VCD/CD compatibility. This system eliminates the cost, complexity and confusion of multiple cables used to 5 Gbps of the moving picture. 6 Built-In...
Chapter 1 Introducing the LCD TV Chapter 1 Introducing the LCD TV Key Features Various Audio/Video terminals for DVD (1080i, 720p) and digital set-top-box (1080i, 720p) connections. 3D Digital Noise Reduction ▪ This function can digitally reduce... ▪ 2 sets of Audio(L/R) output terminals ▪ 2 SPDIF output terminals (Optical x 1 /Coaxial x 1) ▪ 1 Headphone terminal Built-In Slot-type DVD Player ▪ Supports DVD/SVCD/VCD/CD compatibility. This system eliminates the cost, complexity and confusion of multiple cables used to 5 Gbps of the moving picture. 6 Built-In...
User Manual
Page 9
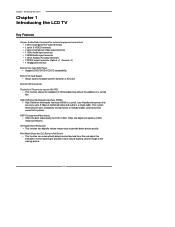
If you need to set up and operate the LCD TV in the package. Package Contents Chapter 1 Introducing the LCD TV Make sure all of the following contents are included. LCD TV Bottom Stand / Screw Driver and Screws (4) ENGLISH Remote Control/ AAA Batteries x 2 SET UP TV CAB/ SAT DVD AUX SLEEP DVD MENU VOL CH PAGE MUTE ASPECT LAST GUIDE... are all you are included in its basic configuration. Make sure all of the above contents are missing any items, please contact the Polaroid customer service department. 7
If you need to set up and operate the LCD TV in the package. Package Contents Chapter 1 Introducing the LCD TV Make sure all of the following contents are included. LCD TV Bottom Stand / Screw Driver and Screws (4) ENGLISH Remote Control/ AAA Batteries x 2 SET UP TV CAB/ SAT DVD AUX SLEEP DVD MENU VOL CH PAGE MUTE ASPECT LAST GUIDE... are all you are included in its basic configuration. Make sure all of the above contents are missing any items, please contact the Polaroid customer service department. 7
User Manual
Page 14
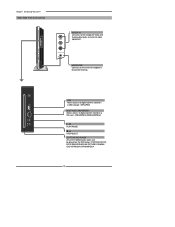
... JPEG/MPEG1/MPEG2/MPEG4 / PLAY/PAUSE / STOP/EJECT SLOT-TYPE DVD PLAYER Any of the following disc types can be played on external video equipment. HEADPHONE Connects to the external headphone for private listening. Chapter 1 Introducing the LCD TV Right Side View and Controls VIDEO L R VIDEO1 IN VIDEO1 IN ...Connects to the composite Video and Audio output jacks on the DVD player: DVD/VCD/CD/CDR/CD-RW/JPEG/KODAK PICTURE CD/WMA...
... JPEG/MPEG1/MPEG2/MPEG4 / PLAY/PAUSE / STOP/EJECT SLOT-TYPE DVD PLAYER Any of the following disc types can be played on external video equipment. HEADPHONE Connects to the external headphone for private listening. Chapter 1 Introducing the LCD TV Right Side View and Controls VIDEO L R VIDEO1 IN VIDEO1 IN ...Connects to the composite Video and Audio output jacks on the DVD player: DVD/VCD/CD/CDR/CD-RW/JPEG/KODAK PICTURE CD/WMA...
User Manual
Page 15
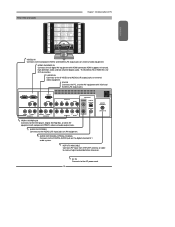
...R Y Pb Pr L COAXIAL L R VIDEO AUDIO VIDEO2 IN S-VIDEO L AUDIO R S-VIDEO IN L R R YPbPr2 IN AUDIO YPbPr1 IN/YPbPr2 IN Connects to the DVD player, Digital Set-Top-Box, or other AV equipment with VGA and AUDIO(L/R) output jacks. VGA IN Connects the PC, or other AV equipment with... television. AC IN Connects to the composite VIDEO and AUDIO(L/R) output jacks on AV equipment. Rear View and Jacks Chapter 1 Introducing the LCD TV ENGLISH VIDEO2 IN Connects to the AC power cord. 13 AUDIO OUT-DIGITAL-OPTICAL/COAXIAL Connects to the S-VIDEO and AUDIO(L/R) output jacks...
...R Y Pb Pr L COAXIAL L R VIDEO AUDIO VIDEO2 IN S-VIDEO L AUDIO R S-VIDEO IN L R R YPbPr2 IN AUDIO YPbPr1 IN/YPbPr2 IN Connects to the DVD player, Digital Set-Top-Box, or other AV equipment with VGA and AUDIO(L/R) output jacks. VGA IN Connects the PC, or other AV equipment with... television. AC IN Connects to the composite VIDEO and AUDIO(L/R) output jacks on AV equipment. Rear View and Jacks Chapter 1 Introducing the LCD TV ENGLISH VIDEO2 IN Connects to the AC power cord. 13 AUDIO OUT-DIGITAL-OPTICAL/COAXIAL Connects to the S-VIDEO and AUDIO(L/R) output jacks...
User Manual
Page 16
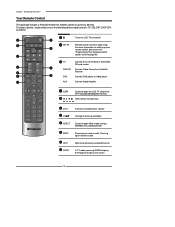
... channel up to page 56) 3 TV CAB/SAT DVD AUX Controls the LCD TV/Built-in DVD/USB / SD card reader. Chapter 1 Introducing the LCD TV Your Remote Control This package includes a Polaroid remote that enables control of the following device mode controls: TV, CBL/SAT, DVD/VCR, or AUDIO. 2 SET UP 1 3 TV CAB/ SAT DVD AUX SLEEP 4 DVD MENU 5 6 VOL CH PAGE...
... channel up to page 56) 3 TV CAB/SAT DVD AUX Controls the LCD TV/Built-in DVD/USB / SD card reader. Chapter 1 Introducing the LCD TV Your Remote Control This package includes a Polaroid remote that enables control of the following device mode controls: TV, CBL/SAT, DVD/VCR, or AUDIO. 2 SET UP 1 3 TV CAB/ SAT DVD AUX SLEEP 4 DVD MENU 5 6 VOL CH PAGE...
User Manual
Page 17
...the video equipment connected to the video inputs of your LCD TV: Input Source TV(CABLE/AIR) VIDEO1 (SIDE) VIDEO2 (REAR) VIDEO3 (S-VIDEO) VIDEO4 (YPbPr1) VIDEO5 (YPbPr2) DVD USB CARD READER VIDEO6 (HDMI1) VIDEO7 (HDMI2) COMPUTER(VGA) ▪ In TV mode, use with 0-9 and ENTER buttons to 5m ...away, if pointed directly at the receiver. 15 Effective range: The remote can control the LCD TV from up to select a digital channels.
...the video equipment connected to the video inputs of your LCD TV: Input Source TV(CABLE/AIR) VIDEO1 (SIDE) VIDEO2 (REAR) VIDEO3 (S-VIDEO) VIDEO4 (YPbPr1) VIDEO5 (YPbPr2) DVD USB CARD READER VIDEO6 (HDMI1) VIDEO7 (HDMI2) COMPUTER(VGA) ▪ In TV mode, use with 0-9 and ENTER buttons to 5m ...away, if pointed directly at the receiver. 15 Effective range: The remote can control the LCD TV from up to select a digital channels.
User Manual
Page 18
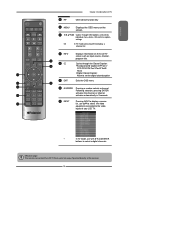
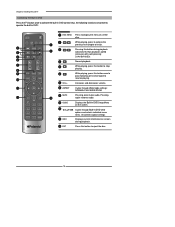
Chapter 2 Installing the LCD TV Controlling The Built-in DVD Press the TV button once to activate the built-in DVD control keys, the following functions are preset to operate the built-in DVD: 1 DVD MENU Press to resume playing. While playing, press this button to eject the disc. 16 ...Pressing this button to the previous/next chapter or track. Increases and decreases volume. 11 OK 8 ASPECT Cycles through Built-in DVD Setup Menu on the screen. 4 5 6 GHI JKL MNO 7 8 9 PQRS TUV WXYZ INPUT . 0 ENTER 11 OK Cycles through Wide mode ...
Chapter 2 Installing the LCD TV Controlling The Built-in DVD Press the TV button once to activate the built-in DVD control keys, the following functions are preset to operate the built-in DVD: 1 DVD MENU Press to resume playing. While playing, press this button to eject the disc. 16 ...Pressing this button to the previous/next chapter or track. Increases and decreases volume. 11 OK 8 ASPECT Cycles through Built-in DVD Setup Menu on the screen. 4 5 6 GHI JKL MNO 7 8 9 PQRS TUV WXYZ INPUT . 0 ENTER 11 OK Cycles through Wide mode ...

User Manual
Page 19
...on setting up your USB storagnd adn card reader, please see the "Using the USB Storage and SD Card Reader" section. SET UP TV CAB/ SAT DVD AUX SLEEP 2 DVD MENU 1 DVD MENU Press to display FILE MENU. 2 1 3 3 4 Press to go to resume playing. Press to display the thumbnail album. ...again to the next or previous image. Increases and decreases volume. Normal playback. ENGLISH Chapter 2 Installing the LCD TV Controlling The USB Storage and SD Card Reader Press the TV button once to activate the built-in a clockwise or counterclockwise. 17 Pressing again restores audio. 9 OK ...
...on setting up your USB storagnd adn card reader, please see the "Using the USB Storage and SD Card Reader" section. SET UP TV CAB/ SAT DVD AUX SLEEP 2 DVD MENU 1 DVD MENU Press to display FILE MENU. 2 1 3 3 4 Press to go to resume playing. Press to display the thumbnail album. ...again to the next or previous image. Increases and decreases volume. Normal playback. ENGLISH Chapter 2 Installing the LCD TV Controlling The USB Storage and SD Card Reader Press the TV button once to activate the built-in a clockwise or counterclockwise. 17 Pressing again restores audio. 9 OK ...
User Manual
Page 24
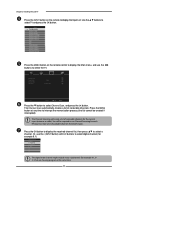
... Scan, and press the OK button. Channel Scan Tuner Mode Channel Skip Time Zone Cable Eastern Time TV Select Exit Press the ▼ button to select a channel. Chapter 2 Installing the LCD TV Press the INPUT button on the remote control to display the Main menu, and use the ▪... (INPUT button) with 0-9 buttons to run Channel Scanning for the current input (antenna or cable). Main TV(CABLE/AIR) VIDEO1 (SIDE) VIDEO2 (REAR) VIDEO3 (S-VIDEO) VIDEO4 (YPbPr1) VIDEO5 (YPbPr2) DVD USB...
... Scan, and press the OK button. Channel Scan Tuner Mode Channel Skip Time Zone Cable Eastern Time TV Select Exit Press the ▼ button to select a channel. Chapter 2 Installing the LCD TV Press the INPUT button on the remote control to display the Main menu, and use the ▪... (INPUT button) with 0-9 buttons to run Channel Scanning for the current input (antenna or cable). Main TV(CABLE/AIR) VIDEO1 (SIDE) VIDEO2 (REAR) VIDEO3 (S-VIDEO) VIDEO4 (YPbPr1) VIDEO5 (YPbPr2) DVD USB...
User Manual
Page 27
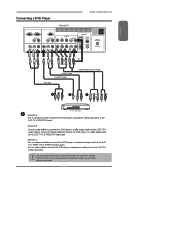
... B: Use an audio cable to connect the DVD player's audio output jacks to the LCD TV's audio input jacks. Use an audio cable to connect the DVD player's component audio jacks to the LCD TV's audio inputs. ENGLISH Connecting a DVD Player Chapter 2 Installing the LCD TV Rear of component video, see your DVD player are sometimes labeled YPbPr, or YCbCr.
... B: Use an audio cable to connect the DVD player's audio output jacks to the LCD TV's audio input jacks. Use an audio cable to connect the DVD player's component audio jacks to the LCD TV's audio inputs. ENGLISH Connecting a DVD Player Chapter 2 Installing the LCD TV Rear of component video, see your DVD player are sometimes labeled YPbPr, or YCbCr.
User Manual
Page 28
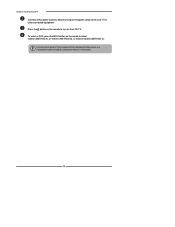
Press the button on the remote to select VIDEO2( METHOD A), or VIDEO3 ( METHOD B), or VIDEO4/VIDEO5 (METHOD C). For best picture quality, if your equipment has component video output, use a component cable instead of the LCD TV or other connected equipment. To watch a DVD, press the INPUT button on the remote to turn on the power switch of a composite video or S-video cable. 26 Chapter 2 Installing the LCD TV Connect all AC power sources, before turning on the LCD TV.
Press the button on the remote to select VIDEO2( METHOD A), or VIDEO3 ( METHOD B), or VIDEO4/VIDEO5 (METHOD C). For best picture quality, if your equipment has component video output, use a component cable instead of the LCD TV or other connected equipment. To watch a DVD, press the INPUT button on the remote to turn on the power switch of a composite video or S-video cable. 26 Chapter 2 Installing the LCD TV Connect all AC power sources, before turning on the LCD TV.
User Manual
Page 33
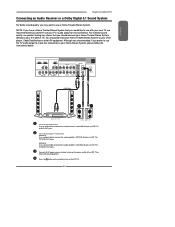
...Stereo System directly to your A/V device. ENGLISH Chapter 3 Using the LCD TV Connecting an Audio Receiver or a Dolby Digital 5.1 Sound System For better sound quality, you should connect your Home Theater/Stereo System to your DVD player, Cable/Satellite box or other connected equipment. HDMI1 IN HDMI2 IN...B A Audio Receievr Audio Amplifier Connecting to Audio Receiver: Use an audio cable to connect the audio receiver's audio LINE IN jacks to LCD TV's OPTICAL OUT jacks. METHOD B: Use a coaxial cable to connect the audio amplifier's COAXIAL IN jacks to your Home Stereo...
...Stereo System directly to your A/V device. ENGLISH Chapter 3 Using the LCD TV Connecting an Audio Receiver or a Dolby Digital 5.1 Sound System For better sound quality, you should connect your Home Theater/Stereo System to your DVD player, Cable/Satellite box or other connected equipment. HDMI1 IN HDMI2 IN...B A Audio Receievr Audio Amplifier Connecting to Audio Receiver: Use an audio cable to connect the audio receiver's audio LINE IN jacks to LCD TV's OPTICAL OUT jacks. METHOD B: Use a coaxial cable to connect the audio amplifier's COAXIAL IN jacks to your Home Stereo...
User Manual
Page 34
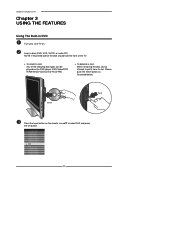
... CARD READER VIDEO6 (HDMI1) VIDEO7 (HDMI2) COMPUTER(VGA) 32 Insert Push Press the Input button on . Insert a disc (DVD, VCD, SVCD, or audio CD). TO INSERT A DISC Any of the TV. Chapter 3 Using the LCD TV Chapter 3 USING THE FEATURES Using The Built-in DVD Turn your LCD TV on the remote, use ▲▼ to pull it...
... CARD READER VIDEO6 (HDMI1) VIDEO7 (HDMI2) COMPUTER(VGA) 32 Insert Push Press the Input button on . Insert a disc (DVD, VCD, SVCD, or audio CD). TO INSERT A DISC Any of the TV. Chapter 3 Using the LCD TV Chapter 3 USING THE FEATURES Using The Built-in DVD Turn your LCD TV on the remote, use ▲▼ to pull it...
User Manual
Page 35
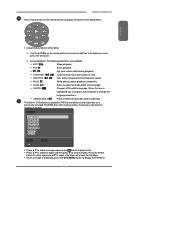
... Get slow motion effect during playback F.FWD/NEXT Jumps to select the desired camera angle disc. When this icon is displayed, press the DVD MENU button to display the File Menu. 33 While an image is highlighted you want, press the OK button. 2. CAMERA ANGLE Press to... playback forward/backward speeds. Press ◄ to play the file. SUBTITLE Changes DVD subtitle language. Chapter 3 Using the LCD TV Press GUIDE button on the remote control to display the Built-in DVD player can playback JPEG format pictures and audio files on the remote control to to...
... Get slow motion effect during playback F.FWD/NEXT Jumps to select the desired camera angle disc. When this icon is displayed, press the DVD MENU button to display the File Menu. 33 While an image is highlighted you want, press the OK button. 2. CAMERA ANGLE Press to... playback forward/backward speeds. Press ◄ to play the file. SUBTITLE Changes DVD subtitle language. Chapter 3 Using the LCD TV Press GUIDE button on the remote control to display the Built-in DVD player can playback JPEG format pictures and audio files on the remote control to to...
User Manual
Page 36
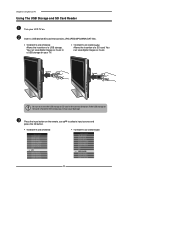
... INSERT A SD CARD Reader Allows the insertion of a USB storage. If the USB storage or SD card is forced in a USB storage on your LCD TV on the remote, use ▲▼ to insert the USB storage or SD card in the correct direction. Press the Input button on . Chapter 3.... Insert Insert Be sure to select a input source and press the OK button. TO INSERT A USB STORAGE Input Source TV(CABLE/AIR) VIDEO1 (SIDE) VIDEO2 (REAR) VIDEO3 (S-VIDEO) VIDEO4 (YPbPr1) VIDEO5 (YPbPr2) DVD USB CARD READER VIDEO6 (HDMI1) VIDEO7 (HDMI2) COMPUTER(VGA) TO INSERT A SD CARD Reader Input Source...
... INSERT A SD CARD Reader Allows the insertion of a USB storage. If the USB storage or SD card is forced in a USB storage on your LCD TV on the remote, use ▲▼ to insert the USB storage or SD card in the correct direction. Press the Input button on . Chapter 3.... Insert Insert Be sure to select a input source and press the OK button. TO INSERT A USB STORAGE Input Source TV(CABLE/AIR) VIDEO1 (SIDE) VIDEO2 (REAR) VIDEO3 (S-VIDEO) VIDEO4 (YPbPr1) VIDEO5 (YPbPr2) DVD USB CARD READER VIDEO6 (HDMI1) VIDEO7 (HDMI2) COMPUTER(VGA) TO INSERT A SD CARD Reader Input Source...
User Manual
Page 37
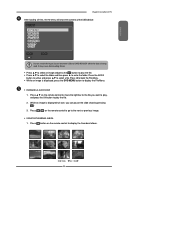
... switch the Input Source between USB and CARD READER while the data is displayed, press the DVD MENU button to play the file. 2. Slide Show ◄Prev Next► 35 ENGLISH Chapter 3 Using the LCD TV After loading all files, the File Menu will show by pressing . 3. Press ▲▼ to...
... switch the Input Source between USB and CARD READER while the data is displayed, press the DVD MENU button to play the file. 2. Slide Show ◄Prev Next► 35 ENGLISH Chapter 3 Using the LCD TV After loading all files, the File Menu will show by pressing . 3. Press ▲▼ to...
User Manual
Page 51
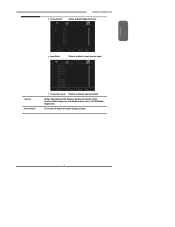
... Channel Block Chapter 3 Using the LCD TV Allows to block digital channels. 2 ABC 3 DISC 4 5 6 7 8 9 10 Analog Analog Analog Analog Analog Analog Analog Analog Analog Channel Block Input Block Set OK Select Exit Selects to block a Input source signal 1 TV(CABLE/AIR) 2 VIDEO1 (AV) 3 VIDEO2 (S-VIDEO) 4 VIDEO3 (YPbPr1) 5 VIDEO4 (YPbPr2) 6 DVD 7 USB 8 CARD READER 6 VIDEO5...
... Channel Block Chapter 3 Using the LCD TV Allows to block digital channels. 2 ABC 3 DISC 4 5 6 7 8 9 10 Analog Analog Analog Analog Analog Analog Analog Analog Analog Channel Block Input Block Set OK Select Exit Selects to block a Input source signal 1 TV(CABLE/AIR) 2 VIDEO1 (AV) 3 VIDEO2 (S-VIDEO) 4 VIDEO3 (YPbPr1) 5 VIDEO4 (YPbPr2) 6 DVD 7 USB 8 CARD READER 6 VIDEO5...
User Manual
Page 58
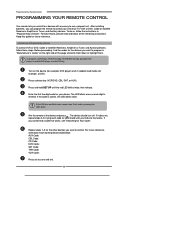
... exit. 56 Programming Your Remote Control PROGRAMMING YOUR REMOTE CONTROL Your remote lets you can program the remote to control your Universal TV, VCR or DVD, Cable or Satellite Receivers, Amplifi er or Tuner, and Auxiliary devices. Enter the first five-digit code ...the LED blinks twice. For best results, please read and follow these steps. A Quick Look at the device and press . To program a DVD Player, TV/DVD Combo, TV/VCR/DVD Combo, portable DVD player, or mobile DVD player, use , compact unit. If you want to 4 and try entering the code again.
... exit. 56 Programming Your Remote Control PROGRAMMING YOUR REMOTE CONTROL Your remote lets you can program the remote to control your Universal TV, VCR or DVD, Cable or Satellite Receivers, Amplifi er or Tuner, and Auxiliary devices. Enter the first five-digit code ...the LED blinks twice. For best results, please read and follow these steps. A Quick Look at the device and press . To program a DVD Player, TV/DVD Combo, TV/VCR/DVD Combo, portable DVD player, or mobile DVD player, use , compact unit. If you want to 4 and try entering the code again.
User Manual
Page 60
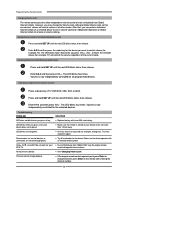
...; Unlocking All Volume Control (Restoring Global Unlock) Press and hold SET UP until the red LED blinks twice; Volume is aimed at your RCA TV. Troubleshooting PROBLEM SOLUTION LED does not blink when you press a key, but device does not respond. An entry error has occurred (for the...LED blinks four times. Press and hold SET UP until the red LED blinks twice; Unlocking a Single Device's Volume Control Press a device key (TV, VCR/DVD, CBL/ SAT, or AUX). After that one long blink. The LED blinks twice. Volume is not more than 15 feet away LED blinks one ...
...; Unlocking All Volume Control (Restoring Global Unlock) Press and hold SET UP until the red LED blinks twice; Volume is aimed at your RCA TV. Troubleshooting PROBLEM SOLUTION LED does not blink when you press a key, but device does not respond. An entry error has occurred (for the...LED blinks four times. Press and hold SET UP until the red LED blinks twice; Unlocking a Single Device's Volume Control Press a device key (TV, VCR/DVD, CBL/ SAT, or AUX). After that one long blink. The LED blinks twice. Volume is not more than 15 feet away LED blinks one ...


