User Manual
Page 1
If you understand your new product. 15" / 19" HD LCD TV & DVD Combo Questions? Need some help line found on the insert with this icon: Or visit www.polaroid.com/support. This manual will help you still have questions, call our help ?
If you understand your new product. 15" / 19" HD LCD TV & DVD Combo Questions? Need some help line found on the insert with this icon: Or visit www.polaroid.com/support. This manual will help you still have questions, call our help ?
User Manual
Page 2
...under license from Dolby Laboratories. For service, support and warranty information, visit www.polaroid.com. Presence of as unsorted waste and must be corrected in the instruction manual. This TV incorporates High-Definition Multimedia Interface (HDMITM) technology. Changes, technical inaccuracies... service number for your country listed in subsequent editions. "Dolby" and the double-D symbol are trademarks of properly. "Polaroid" and "Polaroid and Pixel" are trademarks of HDMI Licensing LLC. HDMI, the HDMI logo and High-Definition Multimedia Interface are...
...under license from Dolby Laboratories. For service, support and warranty information, visit www.polaroid.com. Presence of as unsorted waste and must be corrected in the instruction manual. This TV incorporates High-Definition Multimedia Interface (HDMITM) technology. Changes, technical inaccuracies... service number for your country listed in subsequent editions. "Dolby" and the double-D symbol are trademarks of properly. "Polaroid" and "Polaroid and Pixel" are trademarks of HDMI Licensing LLC. HDMI, the HDMI logo and High-Definition Multimedia Interface are...
User Manual
Page 3
... are designed to provide reasonable protection against harmful interference in accordance with the limits of a class B digital device, pursuant to Part 15 of the following measures: 1. However, there is connected to. 4. ENGLISH FCC Federal Communications Commission Statement This equipment has been tested ... found to comply with the instructions, may cause harmful interference to radio communications. Consult the dealer or an experienced radio/TV technician for compliance could void the user authority to radio or television reception, which is different from what the receiver is...
... are designed to provide reasonable protection against harmful interference in accordance with the limits of a class B digital device, pursuant to Part 15 of the following measures: 1. However, there is connected to. 4. ENGLISH FCC Federal Communications Commission Statement This equipment has been tested ... found to comply with the instructions, may cause harmful interference to radio communications. Consult the dealer or an experienced radio/TV technician for compliance could void the user authority to radio or television reception, which is different from what the receiver is...
User Manual
Page 7
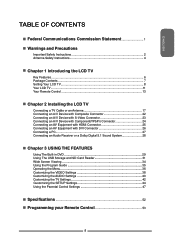
... and Precautions Important Safety Instructions 2 Antenna Safety Instructions 4 Chapter 1 Introducing the LCD TV Key Features ...6 Package Contents ...7 Setting Your LCD TV...8 Your LCD TV...11 Your Remote Control 13 Chapter 2 Installing the LCD TV Connecting a TV Cable or an Antenna 17 Connecting an A/V Device with Composite Connector 22 Connecting an...35 Operating the Menu 36 Customizing the VIDEO Settings 38 Customizing the AUDIO Settings 40 Customizing the TV Settings 42 Customizing the SETUP Settings 44 Using the Parental Control Settings 47 Specifications ...52 Programming your ...
... and Precautions Important Safety Instructions 2 Antenna Safety Instructions 4 Chapter 1 Introducing the LCD TV Key Features ...6 Package Contents ...7 Setting Your LCD TV...8 Your LCD TV...11 Your Remote Control 13 Chapter 2 Installing the LCD TV Connecting a TV Cable or an Antenna 17 Connecting an A/V Device with Composite Connector 22 Connecting an...35 Operating the Menu 36 Customizing the VIDEO Settings 38 Customizing the AUDIO Settings 40 Customizing the TV Settings 42 Customizing the SETUP Settings 44 Using the Parental Control Settings 47 Specifications ...52 Programming your ...
User Manual
Page 8
...video and audio in SD Card Reader ▪ Allows access to connect current A/V systems. HDTV Component Video Inputs ▪ Offers the best video quality for component ▪ 1 COAXIAL ...HD broadcasting without the addition of a set -top-box (HD1080p,1080i, 720p) connections. 3D Digital Noise Reduction ▪ This function can automatically detect ...adjust the interlacer's frame matching to provide better picture quality. Chapter 1 Introducing the LCD TV Chapter 1 Introducing the LCD TV Key Features Various Audio/Video terminals for external equipment connection ▪ 1 composite VIDEO...
...video and audio in SD Card Reader ▪ Allows access to connect current A/V systems. HDTV Component Video Inputs ▪ Offers the best video quality for component ▪ 1 COAXIAL ...HD broadcasting without the addition of a set -top-box (HD1080p,1080i, 720p) connections. 3D Digital Noise Reduction ▪ This function can automatically detect ...adjust the interlacer's frame matching to provide better picture quality. Chapter 1 Introducing the LCD TV Chapter 1 Introducing the LCD TV Key Features Various Audio/Video terminals for external equipment connection ▪ 1 composite VIDEO...
User Manual
Page 9
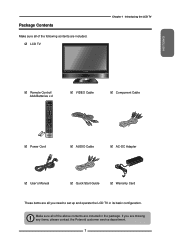
LCD TV Chapter 1 Introducing the LCD TV ENGLISH Remote Control/ AAA Batteries x 2 SET UP TV CAB/ SAT DVD AUX SLEEP DVD MENU VOL CH PAGE MUTE ASPECT LAST GUIDE LIVE TV PIP MENU OK INFO CC EXIT DVR 1 2 3 ABC DEF 4 5 6 GHI JKL MNO 7 8 9 PQRS TUV WXYZ INPUT . 0 ENTER Power Cord... Start Guide Warranty Card These items are all you are missing any items, please contact the Polaroid customer service department. 7 If you need to set up and operate the LCD TV in the package. Package Contents Make sure all of the following contents are included. Make sure...
LCD TV Chapter 1 Introducing the LCD TV ENGLISH Remote Control/ AAA Batteries x 2 SET UP TV CAB/ SAT DVD AUX SLEEP DVD MENU VOL CH PAGE MUTE ASPECT LAST GUIDE LIVE TV PIP MENU OK INFO CC EXIT DVR 1 2 3 ABC DEF 4 5 6 GHI JKL MNO 7 8 9 PQRS TUV WXYZ INPUT . 0 ENTER Power Cord... Start Guide Warranty Card These items are all you are missing any items, please contact the Polaroid customer service department. 7 If you need to set up and operate the LCD TV in the package. Package Contents Make sure all of the following contents are included. Make sure...

User Manual
Page 10
Place the LCD TV unit face- down on the cloth. Fit the stand onto the bottom of the LCD TV unit as shown: Then push until stand into the LCD TV's stand socket. 8 The package contains: LCD TV Stand Cover an even stable surface with a soft cloth. Chapter 1 Introducing the LCD TV Setting Up Your LCD TV How to install the TV Stand Follow the instructions below to install the TV stand: Open the box, and make sure all necessary parts are in the box.
Place the LCD TV unit face- down on the cloth. Fit the stand onto the bottom of the LCD TV unit as shown: Then push until stand into the LCD TV's stand socket. 8 The package contains: LCD TV Stand Cover an even stable surface with a soft cloth. Chapter 1 Introducing the LCD TV Setting Up Your LCD TV How to install the TV Stand Follow the instructions below to install the TV stand: Open the box, and make sure all necessary parts are in the box.

User Manual
Page 11
ENGLISH Use a Phillip's head screwdriver to a wall, a standard 100x100 VESA mounting bracket is connected to the wall. 9 To attach this LCD TV to remove the screw inside the neck of the TV stand. See the VESA mounting bracket instructions (not provided) to finish mounting your TV on a wall, please follow the instructions below: Remove the base of the TV stand. Slide the neck of the TV stand off the rod that is required. Setting Up Your LCD TV Chapter 1 Introducing the LCD TV How to Remove the TV Stand If you would like to mount your TV to the back of the TV.
ENGLISH Use a Phillip's head screwdriver to a wall, a standard 100x100 VESA mounting bracket is connected to the wall. 9 To attach this LCD TV to remove the screw inside the neck of the TV stand. See the VESA mounting bracket instructions (not provided) to finish mounting your TV on a wall, please follow the instructions below: Remove the base of the TV stand. Slide the neck of the TV stand off the rod that is required. Setting Up Your LCD TV Chapter 1 Introducing the LCD TV How to Remove the TV Stand If you would like to mount your TV to the back of the TV.
User Manual
Page 12
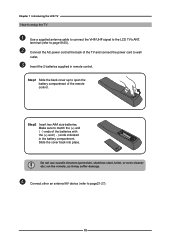
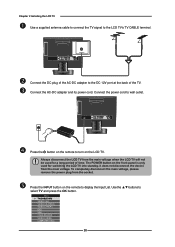
... external AV device (refer to wall outlet. Connect the AC power cord at the back of the TV and connect the power cord to page21-27). 10 Chapter 1 Introducing the LCD TV How to setup the TV Use a supplied antenna cable to connect the VHF/UHF signal to page19-20). terminal (refer to... the LCD TV's ANT. Do not use caustic cleaners (porcelain, stainless steel, toilet, or oven cleaner etc.) on the remote,...
... external AV device (refer to wall outlet. Connect the AC power cord at the back of the TV and connect the power cord to page21-27). 10 Chapter 1 Introducing the LCD TV How to setup the TV Use a supplied antenna cable to connect the VHF/UHF signal to page19-20). terminal (refer to... the LCD TV's ANT. Do not use caustic cleaners (porcelain, stainless steel, toilet, or oven cleaner etc.) on the remote,...
User Manual
Page 13
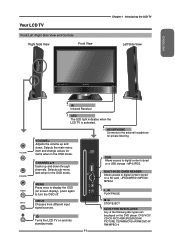
... on a USB storage : MP4/JPEG BUILT-IN SD CARD READER Allows access to the external headphone for items when in the OSD mode. Turns the LCD TV on and into standby mode. 11 HEADPHONE Connects to digital content stored on a SD card : JPEG/MPEG1/MPEG2/ MPEG4 / PLAY/PAUSE / STOP/EJECT...-RW/JPEG/KODAK PICTURE CD/WMA/DVD+R/RW/DVD-R/ RW/MPEG-4 INPUT Chooses from different input signal sources. Your LCD TV Front/Left /Right Side View and Controls Right Side View Front View Chapter 1 Introducing the LCD TV Left Side View ENGLISH IR Infrared Receiver LED The LED light indicates when the...
... on a USB storage : MP4/JPEG BUILT-IN SD CARD READER Allows access to the external headphone for items when in the OSD mode. Turns the LCD TV on and into standby mode. 11 HEADPHONE Connects to digital content stored on a SD card : JPEG/MPEG1/MPEG2/ MPEG4 / PLAY/PAUSE / STOP/EJECT...-RW/JPEG/KODAK PICTURE CD/WMA/DVD+R/RW/DVD-R/ RW/MPEG-4 INPUT Chooses from different input signal sources. Your LCD TV Front/Left /Right Side View and Controls Right Side View Front View Chapter 1 Introducing the LCD TV Left Side View ENGLISH IR Infrared Receiver LED The LED light indicates when the...
User Manual
Page 14
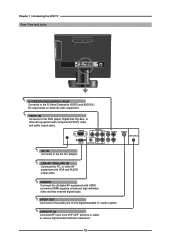
... 5.1 audio system. VHF/UHF IN Connects RF input from VHF/UHF antenna or cable to the audio jack on external video equipment. Chapter 1 Introducing the LCD TV Rear View and Jacks S-VIDEO/VIDEO/AUDIO(L/R) IN Connects to the DVD player, Digital Set-Top-Box, or other AV equipment with VGA and AUDIO...
... 5.1 audio system. VHF/UHF IN Connects RF input from VHF/UHF antenna or cable to the audio jack on external video equipment. Chapter 1 Introducing the LCD TV Rear View and Jacks S-VIDEO/VIDEO/AUDIO(L/R) IN Connects to the DVD player, Digital Set-Top-Box, or other AV equipment with VGA and AUDIO...

User Manual
Page 15
.../90/120 mins Other device function keys 6 VOL+- ENGLISH Your Remote Control Chapter 1 Introducing the LCD TV This package includes a Polaroid remote that enables control of the following device mode controls: TV, CBL/SAT, DVD/VCR, or AUDIO. 2 SET UP 1 3 TV CAB/ SAT DVD AUX SLEEP 4 DVD MENU 5 6 VOL CH PAGE 7 8 9 MUTE ASPECT LAST 10...
.../90/120 mins Other device function keys 6 VOL+- ENGLISH Your Remote Control Chapter 1 Introducing the LCD TV This package includes a Polaroid remote that enables control of the following device mode controls: TV, CBL/SAT, DVD/VCR, or AUDIO. 2 SET UP 1 3 TV CAB/ SAT DVD AUX SLEEP 4 DVD MENU 5 6 VOL CH PAGE 7 8 9 MUTE ASPECT LAST 10...

User Manual
Page 16
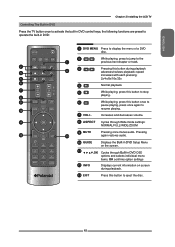
... Exits the OSD menu 17 18 0-9/ENTER Pressing a number selects a channel. Chapter 2 Installing the LCD TV SET UP TV CAB/ SAT DVD AUX SLEEP DVD MENU VOL CH PAGE MUTE GUIDE ASPECT LIVE TV PIP LAST MENU 14 OK 15 INFO CC EXIT 16 DVR 1 2 3 ABC DEF 18 4 5 6 GHI JKL MNO 7 ... Cycles through OSD options and selects individual menu items. OK confirms option settings OK In TV mode, pressing OK to display a channel list 15 INFO Displays information on the LCD TV screen such as input source, channel, program title. 12 16 CC Cycles through the Closed Caption:...
... Exits the OSD menu 17 18 0-9/ENTER Pressing a number selects a channel. Chapter 2 Installing the LCD TV SET UP TV CAB/ SAT DVD AUX SLEEP DVD MENU VOL CH PAGE MUTE GUIDE ASPECT LIVE TV PIP LAST MENU 14 OK 15 INFO CC EXIT 16 DVR 1 2 3 ABC DEF 18 4 5 6 GHI JKL MNO 7 ... Cycles through OSD options and selects individual menu items. OK confirms option settings OK In TV mode, pressing OK to display a channel list 15 INFO Displays information on the LCD TV screen such as input source, channel, program title. 12 16 CC Cycles through the Closed Caption:...
User Manual
Page 17
...8x/16x/32x 4 Normal playback. 5 While playing, press this button to stop playing. 6 While playing, press this button to eject the disc. 15 Increases and decreases volume. 8 ASPECT Cycles through Built-in DVD OSD options and selects individual menu items. OK confirms option settings 12 INFO...button once to pause playing, press once again to the previous/next chapter or track. ENGLISH Chapter 2 Installing the LCD TV Controlling The Built-in DVD Press the TV button once to activate the built-in DVD control keys, the following functions are preset to operate the built-in DVD...
...8x/16x/32x 4 Normal playback. 5 While playing, press this button to stop playing. 6 While playing, press this button to eject the disc. 15 Increases and decreases volume. 8 ASPECT Cycles through Built-in DVD OSD options and selects individual menu items. OK confirms option settings 12 INFO...button once to pause playing, press once again to the previous/next chapter or track. ENGLISH Chapter 2 Installing the LCD TV Controlling The Built-in DVD Press the TV button once to activate the built-in DVD control keys, the following functions are preset to operate the built-in DVD...

User Manual
Page 18
...Reader control keys, the following functions are preset to the next or previous image. Chapter 2 Installing the LCD TV Controlling The USB Storage and SD Card Reader Press the TV button once to activate the built-in a clockwise or counterclockwise. 16 Increases and decreases volume. 7 ...ASPECT 8 MUTE Cycles through Wide mode settings: NORMAL/FULL/WIDE/ZOOM Pressing once mutes audio. SET UP TV CAB/ SAT DVD AUX SLEEP 2 DVD MENU 4 5 6 VOL CH PAGE 7 8 MUTE ASPECT LAST GUIDE LIVE TV PIP MENU 9 OK INFO 1 4 GHI 7 PQRS INPUT . CC EXIT DVR 2 3 ABC DEF 5 6...
...Reader control keys, the following functions are preset to the next or previous image. Chapter 2 Installing the LCD TV Controlling The USB Storage and SD Card Reader Press the TV button once to activate the built-in a clockwise or counterclockwise. 16 Increases and decreases volume. 7 ...ASPECT 8 MUTE Cycles through Wide mode settings: NORMAL/FULL/WIDE/ZOOM Pressing once mutes audio. SET UP TV CAB/ SAT DVD AUX SLEEP 2 DVD MENU 4 5 6 VOL CH PAGE 7 8 MUTE ASPECT LAST GUIDE LIVE TV PIP MENU 9 OK INFO 1 4 GHI 7 PQRS INPUT . CC EXIT DVR 2 3 ABC DEF 5 6...

User Manual
Page 19
... attached to a 75-ohm terminal through a 300-75-ohm adapter (not included). 300-ohm twin-lead cable (flat) 17 ENGLISH Chapter 2 Installing the LCD TV Chapter 2 Installing the LCD TV Refer to the owner's manual of connection that is provided with Ftype connector that can easily be attached to a terminal without tools. When connecting...
... attached to a 75-ohm terminal through a 300-75-ohm adapter (not included). 300-ohm twin-lead cable (flat) 17 ENGLISH Chapter 2 Installing the LCD TV Chapter 2 Installing the LCD TV Refer to the owner's manual of connection that is provided with Ftype connector that can easily be attached to a terminal without tools. When connecting...

User Manual
Page 20
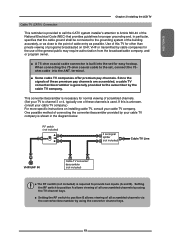
A: Shows how to use a VHF/UHF combination outdoor antenna. Separate VHF and/or UHF antennas UHF Antenna Combiner (not included) OUT IN 300-ohm twinlead cable 75-ohm coaxial cable 300-ohm twinlead cable VHF Antenna 18 Chapter 2 Installing the LCD TV Use one of the following two diagrams when connecting an outdoor antenna. A. B: Shows how to use a separate VHF and/or UHF outdoor antenna. Combination VHF/UHF antenna VHF/UHF Antenna 300/75-ohm adapter (not included) 300-ohm twinlead cable VHF/UHF Antenna 75-ohm coaxial cable B.
A: Shows how to use a VHF/UHF combination outdoor antenna. Separate VHF and/or UHF antennas UHF Antenna Combiner (not included) OUT IN 300-ohm twinlead cable 75-ohm coaxial cable 300-ohm twinlead cable VHF Antenna 18 Chapter 2 Installing the LCD TV Use one of the following two diagrams when connecting an outdoor antenna. A. B: Shows how to use a separate VHF and/or UHF outdoor antenna. Combination VHF/UHF antenna VHF/UHF Antenna 300/75-ohm adapter (not included) 300-ohm twinlead cable VHF/UHF Antenna 75-ohm coaxial cable B.
User Manual
Page 21
... cable to the subscriber by the cable TV company. If this TV for other than private viewing of these premium pay channels. ENGLISH Chapter 2 Installing the LCD TV Cable TV (CATV) Connection This reminder is unknown, consult your cable TV company.) For more specific instructions ...on UHF, VHF or transmitted by cable companies for easy hookup. terminal. ■ Some cable TV companies offer premium pay channels are...
... cable to the subscriber by the cable TV company. If this TV for other than private viewing of these premium pay channels. ENGLISH Chapter 2 Installing the LCD TV Cable TV (CATV) Connection This reminder is unknown, consult your cable TV company.) For more specific instructions ...on UHF, VHF or transmitted by cable companies for easy hookup. terminal. ■ Some cable TV companies offer premium pay channels are...
User Manual
Page 22
...power cord to turn on the remote to wall outlet. Press the button on the LCD TV. Always disconnect the LCD TV from the socket. Press the INPUT button on the front panel is only used for switching the LCD TV into standby, it does not disconnect the device from the main voltage. To completely ...disconnect the main voltage, please remove the power plug from the main voltage when the LCD TV will not be used for a long period of time. The POWER button on the remote to the DC 12V port at the back of the...
...power cord to turn on the remote to wall outlet. Press the button on the LCD TV. Always disconnect the LCD TV from the socket. Press the INPUT button on the front panel is only used for switching the LCD TV into standby, it does not disconnect the device from the main voltage. To completely ...disconnect the main voltage, please remove the power plug from the main voltage when the LCD TV will not be used for a long period of time. The POWER button on the remote to the DC 12V port at the back of the...
User Manual
Page 23
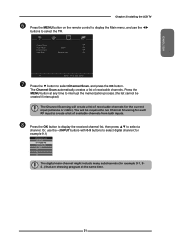
Press the OK button to display the received channel list, then press ▲▼ to select the TV. Or, use the ◄► buttons to select a channel. ENGLISH Chapter 2 Installing the LCD TV Press the MENU button on the remote control to display the Main menu, and use the ▪... (INPUT button) with 0-9 buttons to select digital channel( for example 9.1) Channel List 5-2 RF5-2 9-1 KQED-HD 9-2 KOED-SD 8 CCT 12 13 15 The digital main channel might ...
Press the OK button to display the received channel list, then press ▲▼ to select the TV. Or, use the ◄► buttons to select a channel. ENGLISH Chapter 2 Installing the LCD TV Press the MENU button on the remote control to display the Main menu, and use the ▪... (INPUT button) with 0-9 buttons to select digital channel( for example 9.1) Channel List 5-2 RF5-2 9-1 KQED-HD 9-2 KOED-SD 8 CCT 12 13 15 The digital main channel might ...


