User Manual
Page 2
...polaroid.com and click on "Company" or call the customer service number for ensuring that this label on the environment and human health. HDMI, the HDMI logo and High-Definition Multimedia Interface are trademarks of as unsorted waste and must be corrected in the instruction manual...trademarks of Polaroid Corporation, Waltham, MA, USA. Manufactured under license from Dolby Laboratories. All rights reserved. For service, support and warranty information, visit www.polaroid.com. "Polaroid" and "Polaroid and Pixel" are responsible for your country listed in ...
...polaroid.com and click on "Company" or call the customer service number for ensuring that this label on the environment and human health. HDMI, the HDMI logo and High-Definition Multimedia Interface are trademarks of as unsorted waste and must be corrected in the instruction manual...trademarks of Polaroid Corporation, Waltham, MA, USA. Manufactured under license from Dolby Laboratories. All rights reserved. For service, support and warranty information, visit www.polaroid.com. "Polaroid" and "Polaroid and Pixel" are responsible for your country listed in ...

User Manual
Page 4
... installation, use, servicing and maintenance of fire or electric shock, do not expose this equipment. The equipment may result in the literature accompanying the appliance. Important Safety Instructions This symbol indicates caution points. Before operating this equipment, please read this equipment from the type of power source indicated on the 3-prong plug is intended to alert the user...
... installation, use, servicing and maintenance of fire or electric shock, do not expose this equipment. The equipment may result in the literature accompanying the appliance. Important Safety Instructions This symbol indicates caution points. Before operating this equipment, please read this equipment from the type of power source indicated on the 3-prong plug is intended to alert the user...
User Manual
Page 6
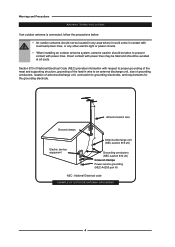
... Power service grounding (NEC Art250 part H) NEC : National Electrical code EXAMPLE OF OUTDOOR ANTENNA GROUNDING 4 Section 810 of National Electrical Code (NEC) provides information with respect to proper grounding of the mast and supporting structure, grounding of antenna discharge unit, connection to grounding electrodes, and requirements for the grounding electrode. Warnings and Precautions Outdoor Antenna Safety Instructions If an outdoor antenna is connected...
... Power service grounding (NEC Art250 part H) NEC : National Electrical code EXAMPLE OF OUTDOOR ANTENNA GROUNDING 4 Section 810 of National Electrical Code (NEC) provides information with respect to proper grounding of the mast and supporting structure, grounding of antenna discharge unit, connection to grounding electrodes, and requirements for the grounding electrode. Warnings and Precautions Outdoor Antenna Safety Instructions If an outdoor antenna is connected...
User Manual
Page 7
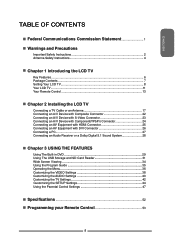
... DVI Connector 26 Connecting a PC...27 Connecting an Audio Receiver or a Dolby Digital 5.1 Sound System 28 Chapter 3 USING THE FEATURES Using The Built-in DVD 29 Using The USB Storage and SD Card Reader 31 Wide Screen Viewing 34 Using the Program Guide 35 Operating the Menu 36 Customizing the VIDEO Settings 38 Customizing the AUDIO Settings 40 Customizing the TV Settings 42 Customizing the SETUP Settings 44 Using the Parental Control Settings 47 Specifications ...52 Programming your Remote Control...
... DVI Connector 26 Connecting a PC...27 Connecting an Audio Receiver or a Dolby Digital 5.1 Sound System 28 Chapter 3 USING THE FEATURES Using The Built-in DVD 29 Using The USB Storage and SD Card Reader 31 Wide Screen Viewing 34 Using the Program Guide 35 Operating the Menu 36 Customizing the VIDEO Settings 38 Customizing the AUDIO Settings 40 Customizing the TV Settings 42 Customizing the SETUP Settings 44 Using the Parental Control Settings 47 Specifications ...52 Programming your Remote Control...
User Manual
Page 8
... a set -top-box (HD1080p,1080i, 720p) connections. 3D Digital Noise Reduction ▪ This function can carry up to connect current A/V systems. HDTV Component Video Inputs ▪ Offers the best video quality for component ▪ 1 COAXIAL output terminal ▪ 1 Headphone terminal Built-In Slot-type DVD Player ▪ Supports DVD/SVCD/VCD/CD compatibility. This system eliminates the cost, complexity and confusion of multiple cables used to 5 Gbps of the moving picture. 6 Chapter 1 Introducing the LCD...
... a set -top-box (HD1080p,1080i, 720p) connections. 3D Digital Noise Reduction ▪ This function can carry up to connect current A/V systems. HDTV Component Video Inputs ▪ Offers the best video quality for component ▪ 1 COAXIAL output terminal ▪ 1 Headphone terminal Built-In Slot-type DVD Player ▪ Supports DVD/SVCD/VCD/CD compatibility. This system eliminates the cost, complexity and confusion of multiple cables used to 5 Gbps of the moving picture. 6 Chapter 1 Introducing the LCD...
User Manual
Page 9
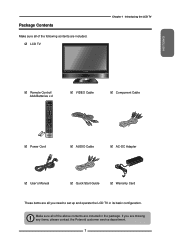
... Polaroid customer service department. 7 If you need to set up and operate the LCD TV in the package. LCD TV Chapter 1 Introducing the LCD TV ENGLISH Remote Control/ AAA Batteries x 2 SET UP TV CAB/ SAT DVD AUX SLEEP DVD MENU VOL CH PAGE MUTE ASPECT LAST GUIDE LIVE TV PIP MENU OK INFO CC EXIT DVR 1 2 3 ABC DEF 4 5 6 GHI JKL MNO 7 8 9 PQRS TUV WXYZ INPUT . 0 ENTER Power Cord VIDEO Cable Component Cable AUDIO Cable AC-DC Adapter User's Manual Quick Start Guide Warranty...
... Polaroid customer service department. 7 If you need to set up and operate the LCD TV in the package. LCD TV Chapter 1 Introducing the LCD TV ENGLISH Remote Control/ AAA Batteries x 2 SET UP TV CAB/ SAT DVD AUX SLEEP DVD MENU VOL CH PAGE MUTE ASPECT LAST GUIDE LIVE TV PIP MENU OK INFO CC EXIT DVR 1 2 3 ABC DEF 4 5 6 GHI JKL MNO 7 8 9 PQRS TUV WXYZ INPUT . 0 ENTER Power Cord VIDEO Cable Component Cable AUDIO Cable AC-DC Adapter User's Manual Quick Start Guide Warranty...

User Manual
Page 11
Slide the neck of the TV stand off the rod that is connected to a wall, a standard 100x100 VESA mounting bracket is required. To attach this LCD TV to the back of the TV. Setting Up Your LCD TV Chapter 1 Introducing the LCD TV How to Remove the TV Stand If you would like to remove the screw inside the neck of the TV stand. ENGLISH Use a Phillip's head screwdriver to mount your TV to the wall. 9 See the VESA mounting bracket instructions (not provided) to finish mounting your TV on a wall, please follow the instructions below: Remove the base of the TV stand.
Slide the neck of the TV stand off the rod that is connected to a wall, a standard 100x100 VESA mounting bracket is required. To attach this LCD TV to the back of the TV. Setting Up Your LCD TV Chapter 1 Introducing the LCD TV How to Remove the TV Stand If you would like to remove the screw inside the neck of the TV stand. ENGLISH Use a Phillip's head screwdriver to mount your TV to the wall. 9 See the VESA mounting bracket instructions (not provided) to finish mounting your TV on a wall, please follow the instructions below: Remove the base of the TV stand.
User Manual
Page 13
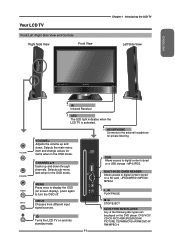
... access to turn the OSD off. Selects sub-menu item when in the OSD mode. USB Allows access to digital content stored on and into standby mode. 11 HEADPHONE Connects to the external headphone for items when in the OSD mode. Your LCD TV Front/Left /Right Side View and Controls Right Side View Front View Chapter 1 Introducing the LCD TV Left Side View ENGLISH IR Infrared Receiver LED The LED light indicates when the LCD...
... access to turn the OSD off. Selects sub-menu item when in the OSD mode. USB Allows access to digital content stored on and into standby mode. 11 HEADPHONE Connects to the external headphone for items when in the OSD mode. Your LCD TV Front/Left /Right Side View and Controls Right Side View Front View Chapter 1 Introducing the LCD TV Left Side View ENGLISH IR Infrared Receiver LED The LED light indicates when the LCD...
User Manual
Page 14
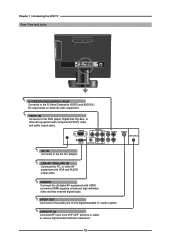
... Connects to the audio jack on external video equipment. VHF/UHF IN Connects RF input from VHF/UHF antenna or cable to the DVD player, Digital Set-Top-Box, or other AV equipment with HDMI connector.HDMI supports enhanced, high-definition video and two-channel digital audio. YPbPr IN Connects to receive high/standard definition television. 12 HDMI IN Connects the all digital AV equipment with VGA and AUDIO output jacks. HDMI IN YPbPr IN Y Pb Pr VIDEO S-VIDEO...
... Connects to the audio jack on external video equipment. VHF/UHF IN Connects RF input from VHF/UHF antenna or cable to the DVD player, Digital Set-Top-Box, or other AV equipment with HDMI connector.HDMI supports enhanced, high-definition video and two-channel digital audio. YPbPr IN Connects to receive high/standard definition television. 12 HDMI IN Connects the all digital AV equipment with VGA and AUDIO output jacks. HDMI IN YPbPr IN Y Pb Pr VIDEO S-VIDEO...

User Manual
Page 15
... previously selected channel 11 GUIDE In TV mode, pressing GUIDE displays the Program Guide on and off 2 SET UP Remote control universal code setup. For more information on setting up to page 56) 3 TV Controls the LCD TV/Built-in DVD/USB / SD card reader. To select a device, simply select one of up your remote control, please see the "Programming Your Remote Control" section (refer to four devices. ENGLISH Your Remote Control Chapter 1 Introducing the LCD TV This package includes a Polaroid remote...
... previously selected channel 11 GUIDE In TV mode, pressing GUIDE displays the Program Guide on and off 2 SET UP Remote control universal code setup. For more information on setting up to page 56) 3 TV Controls the LCD TV/Built-in DVD/USB / SD card reader. To select a device, simply select one of up your remote control, please see the "Programming Your Remote Control" section (refer to four devices. ENGLISH Your Remote Control Chapter 1 Introducing the LCD TV This package includes a Polaroid remote...

User Manual
Page 16
... INPUT ▪ Pressing INPUT to display a source list, use ▲▼ to select the video equipment connected to the video inputs of your LCD TV: Main TV(CABLE/AIR) VIDEO1 (AV) VIDEO2 (S-VIDEO) VIDEO3 (YPbPr) DVD USB CARD READER VIDEO4 (HDMI) COMPUTER(VGA) In TV mode, use with 0-9 and ENTER buttons to set the digital closed caption 17 EXIT Exits the OSD menu 17 18 0-9/ENTER Pressing a number selects a channel. Chapter 2 Installing the LCD TV SET UP TV CAB/ SAT DVD AUX SLEEP DVD MENU...
... INPUT ▪ Pressing INPUT to display a source list, use ▲▼ to select the video equipment connected to the video inputs of your LCD TV: Main TV(CABLE/AIR) VIDEO1 (AV) VIDEO2 (S-VIDEO) VIDEO3 (YPbPr) DVD USB CARD READER VIDEO4 (HDMI) COMPUTER(VGA) In TV mode, use with 0-9 and ENTER buttons to set the digital closed caption 17 EXIT Exits the OSD menu 17 18 0-9/ENTER Pressing a number selects a channel. Chapter 2 Installing the LCD TV SET UP TV CAB/ SAT DVD AUX SLEEP DVD MENU...
User Manual
Page 22
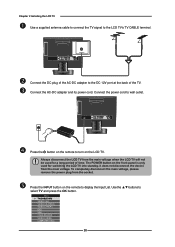
...) VIDEO2 (S-VIDEO) VIDEO3 (YPbPr) DVD USB CARD READER VIDEO4 (HDMI) COMPUTER(VGA) 20 Connect the AC-DC adapter and its power cord. To completely disconnect the main voltage, please remove the power plug from the main voltage when the LCD TV will not be used for a long period of the AC-DC adapter to wall outlet. Chapter 2 Installing the LCD TV Use a supplied antenna cable to connect the TV signal to select TV...
...) VIDEO2 (S-VIDEO) VIDEO3 (YPbPr) DVD USB CARD READER VIDEO4 (HDMI) COMPUTER(VGA) 20 Connect the AC-DC adapter and its power cord. To completely disconnect the main voltage, please remove the power plug from the main voltage when the LCD TV will not be used for a long period of the AC-DC adapter to wall outlet. Chapter 2 Installing the LCD TV Use a supplied antenna cable to connect the TV signal to select TV...
User Manual
Page 26
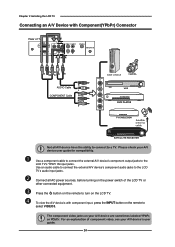
... Component(YPbPr) Connector Rear of TV HDMI IN YPbPr IN Y Pb Pr VIDEO S-VIDEO COAXIAL VHF/UHF IN VGA IN VGA LINE IN L R L R Pb Pr Cb Cr AUDIO Cable COMPONENT Cable Pr/Cr Pb/Pb COMPONENT OUT GAME CONSOLE R L Pb Pr DVD PLAYER Y Not all AC power sources, before turning on the power switch of component video, see your A/V device user guide for compatibility. Use a component cable to connect the external A/V device's component output jacks to the LCD TV's audio input jacks. Press the button on the remote...
... Component(YPbPr) Connector Rear of TV HDMI IN YPbPr IN Y Pb Pr VIDEO S-VIDEO COAXIAL VHF/UHF IN VGA IN VGA LINE IN L R L R Pb Pr Cb Cr AUDIO Cable COMPONENT Cable Pr/Cr Pb/Pb COMPONENT OUT GAME CONSOLE R L Pb Pr DVD PLAYER Y Not all AC power sources, before turning on the power switch of component video, see your A/V device user guide for compatibility. Use a component cable to connect the external A/V device's component output jacks to the LCD TV's audio input jacks. Press the button on the remote...
User Manual
Page 38
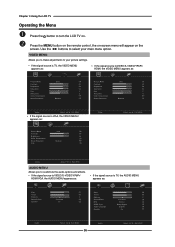
... signal source is VIDEO/S-VIDEO/YPbPr/ HDMI/VGA, the AUDIO MENU appears as: ▪ If the signal source is TV, the AUDIO MENU appears as: Bass Treble Balance Sound Effect Speaker Surround On 50 Bass 50 50 Treble 50 0 Balance 0 Sound Effect Surround MTS Stereo SPDIF Type Dolby Digital Audio Language English Speaker On Audio Select Exit 36 Audio Select Exit Chapter 3 Using the LCD TV Operating the Menu Press the button to turn the LCD TV on the screen...
... signal source is VIDEO/S-VIDEO/YPbPr/ HDMI/VGA, the AUDIO MENU appears as: ▪ If the signal source is TV, the AUDIO MENU appears as: Bass Treble Balance Sound Effect Speaker Surround On 50 Bass 50 50 Treble 50 0 Balance 0 Sound Effect Surround MTS Stereo SPDIF Type Dolby Digital Audio Language English Speaker On Audio Select Exit 36 Audio Select Exit Chapter 3 Using the LCD TV Operating the Menu Press the button to turn the LCD TV on the screen...

User Manual
Page 39
... item. Channel Scan Tuner Mode Channel Skip Time Zone Cable Eastern Time Chapter 3 Using the LCD TV ENGLISH TV Select Exit SETUP MENU: Allows you to highlight the option of the sub-menu, and press the OK button. While in adjustment mode, and use the ◄► buttons to exit the menu. 37 Press the EXIT button to change the value of features: Language, Closed Caption, factory reset, Parental Control, sleep timer. ▪ If the signal source is TV, the SETUP MENU appears as...
... item. Channel Scan Tuner Mode Channel Skip Time Zone Cable Eastern Time Chapter 3 Using the LCD TV ENGLISH TV Select Exit SETUP MENU: Allows you to highlight the option of the sub-menu, and press the OK button. While in adjustment mode, and use the ◄► buttons to exit the menu. 37 Press the EXIT button to change the value of features: Language, Closed Caption, factory reset, Parental Control, sleep timer. ▪ If the signal source is TV, the SETUP MENU appears as...

User Manual
Page 40
... MENU button on . Use the ▲▼buttons to highlight an individual VIDEO option, use the ◄► buttons to turn the LCD TV on the remote control to display the Main menu, and use the ◄► buttons to change the setting, and press the MENU to exit the menu ▪ If the signal source is TV, the VIDEO MENU appears as: ▪ If the signal source isVIDEO/S-VIDEO/YPbPr/ HDMI, the VIDEO MENU appears as: Picture Mode User Picture Mode User...
... MENU button on . Use the ▲▼buttons to highlight an individual VIDEO option, use the ◄► buttons to turn the LCD TV on the remote control to display the Main menu, and use the ◄► buttons to change the setting, and press the MENU to exit the menu ▪ If the signal source is TV, the VIDEO MENU appears as: ▪ If the signal source isVIDEO/S-VIDEO/YPbPr/ HDMI, the VIDEO MENU appears as: Picture Mode User Picture Mode User...

User Manual
Page 46
... the remote control to display the Main menu, and use the ◄► buttons to change the setting, and press the MENU to exit the menu. ▪ If the signal source is TV, the SETUP MENU appears as: ▪ If the signal source is HDMI/VGA, the SETUP MENU appears as: OSD Language Time Setup Closed Caption Parental Gamma Reset Default English Middle OSD Language Time Setup Parental Gamma Reset Default English Middle Setup Select Exit ▪ If the signal source is VIDOE/S-VIDEO/YPbPr, the SETUP MENU...
... the remote control to display the Main menu, and use the ◄► buttons to change the setting, and press the MENU to exit the menu. ▪ If the signal source is TV, the SETUP MENU appears as: ▪ If the signal source is HDMI/VGA, the SETUP MENU appears as: OSD Language Time Setup Closed Caption Parental Gamma Reset Default English Middle OSD Language Time Setup Parental Gamma Reset Default English Middle Setup Select Exit ▪ If the signal source is VIDOE/S-VIDEO/YPbPr, the SETUP MENU...

User Manual
Page 47
... Color Background Opacity Window Color Window Opacity Custom Large White Solid Black Solid Black Translucent Closed Caption Style Select Exit The Parental Control can be set up to the TV to block Channel, Video Source and to select the basic analog closed caption modes and press the OK button. The Closed Captain list appears: Analog Cloaed Caption Off Digital Cloaed Caption Off Digital Caption Style ENGLISH Parental Closed Caption Select Exit Analog Closed Caption: Press the ◄► buttons to change password. 45 For example: Network name, program name, program...
... Color Background Opacity Window Color Window Opacity Custom Large White Solid Black Solid Black Translucent Closed Caption Style Select Exit The Parental Control can be set up to the TV to block Channel, Video Source and to select the basic analog closed caption modes and press the OK button. The Closed Captain list appears: Analog Cloaed Caption Off Digital Cloaed Caption Off Digital Caption Style ENGLISH Parental Closed Caption Select Exit Analog Closed Caption: Press the ◄► buttons to change password. 45 For example: Network name, program name, program...
User Manual
Page 48
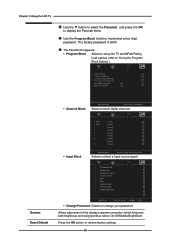
... signal 1 TV(CABLE/AIR) 2 VIDEO1 (AV) 3 VIDEO2 (S-VIDEO) 4 VIDEO3 (YPbPr) 5 DVD 6 USB 7 CARD READER 8 VIDEO4 (HDMI) 9 COMPUTER(VGA) Input Block Set OK Select Exit Change Password Selects to change your password Allows adjustment of the display's gamma correction, which finetunes both brightness and red/green/blue ratios: On/Off/Middle/Bright/Dark Press the OK button to "Using the Program Block Setting"). U.S.TV Ratings U.S. The factory password is 0000 The Parental list appears: Program Block Allows to setup...
... signal 1 TV(CABLE/AIR) 2 VIDEO1 (AV) 3 VIDEO2 (S-VIDEO) 4 VIDEO3 (YPbPr) 5 DVD 6 USB 7 CARD READER 8 VIDEO4 (HDMI) 9 COMPUTER(VGA) Input Block Set OK Select Exit Change Password Selects to change your password Allows adjustment of the display's gamma correction, which finetunes both brightness and red/green/blue ratios: On/Off/Middle/Bright/Dark Press the OK button to "Using the Program Block Setting"). U.S.TV Ratings U.S. The factory password is 0000 The Parental list appears: Program Block Allows to setup...

User Manual
Page 49
... MENU button. • Scroll over to select the TV menu. • Select tuner mode (AIR or CABLE), depending on the insert with V-Chip Parental Control technology. Parental Screen Open V-Chip Screen Questions? Use the simple steps below to program your V-Chip Parental Control settings: SETUP YOUR TV • Connect your desired settings. If you have questions, call our toll-free number found on your home's TV programming with this icon: Or visit www.polaroid.com. 47 ENGLISH...
... MENU button. • Scroll over to select the TV menu. • Select tuner mode (AIR or CABLE), depending on the insert with V-Chip Parental Control technology. Parental Screen Open V-Chip Screen Questions? Use the simple steps below to program your V-Chip Parental Control settings: SETUP YOUR TV • Connect your desired settings. If you have questions, call our toll-free number found on your home's TV programming with this icon: Or visit www.polaroid.com. 47 ENGLISH...


