

User Manual
Page 4
... projector. Warnings All warnings on or pinched by the operating instructions. Power sources This projector should follow the operating instructions. Unauthorized substitutions may often require extensive work by the manufacturer. Any mounting of power, please consult your projector and retain them . An appliance and cart combination should use liquid aerosol cleaners. Replacement parts When replacement parts are provided for cleaning. 6. Cleaning Unplug this projector by placing the projector on the projector. 1. Ventilation Slots and openings...
... projector. Warnings All warnings on or pinched by the operating instructions. Power sources This projector should follow the operating instructions. Unauthorized substitutions may often require extensive work by the manufacturer. Any mounting of power, please consult your projector and retain them . An appliance and cart combination should use liquid aerosol cleaners. Replacement parts When replacement parts are provided for cleaning. 6. Cleaning Unplug this projector by placing the projector on the projector. 1. Ventilation Slots and openings...
User Manual
Page 5
... your dealer for the fan to turn off before turning the main power off and on, the user is encouraged to try to the product. • Do not stand the projector; may ignite causing fire or breakdown because the temperature inside the projector, causing deterioration in the User Manual do not set the projector on . Do not operate if smoke, strange noise...
... your dealer for the fan to turn off before turning the main power off and on, the user is encouraged to try to the product. • Do not stand the projector; may ignite causing fire or breakdown because the temperature inside the projector, causing deterioration in the User Manual do not set the projector on . Do not operate if smoke, strange noise...
User Manual
Page 6
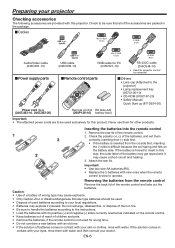
..., the outer label of the remote control and take out the batteries. Remote control parts Others • Lens cap (Attached to the projector) • Lamp replacement tray (857C106-10) • CD-ROM (919C167-20) • Safety Manual/ Quick Start up (871D534-20) Power cord (two) (246C483-10, 246C383-20) Remote control R6 (size-AA) (290P136-10) battery (two) Important: • The attached power cords are to be used. • Dispose of the...
..., the outer label of the remote control and take out the batteries. Remote control parts Others • Lens cap (Attached to the projector) • Lamp replacement tray (857C106-10) • CD-ROM (919C167-20) • Safety Manual/ Quick Start up (871D534-20) Power cord (two) (246C483-10, 246C383-20) Remote control R6 (size-AA) (290P136-10) battery (two) Important: • The attached power cords are to be used. • Dispose of the...
User Manual
Page 10
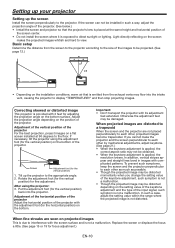
... the projected image may be damaged. If necessary, tilt the projector using the projector: 3. Rotate the adjustment foot (for the vertical position) for the vertical position) on the installation conditions, warm air that the projector's lens is placed at 90 degrees to the floor. Put the adjustment foot (for the vertical position) back into the intake vent, causing the projector to display "TEMPERATURE!!" Replace the screen...
... the projected image may be damaged. If necessary, tilt the projector using the projector: 3. Rotate the adjustment foot (for the vertical position) for the vertical position) on the installation conditions, warm air that the projector's lens is placed at 90 degrees to the floor. Put the adjustment foot (for the vertical position) back into the intake vent, causing the projector to display "TEMPERATURE!!" Replace the screen...
User Manual
Page 11
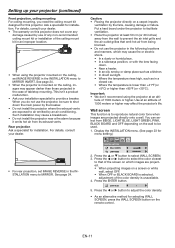
.... 4. Press the S or T button to adjust the color density. • As an alternative method for installation. Caution: • Placing the projector directly on a carpet impairs ventilation by use the projector in the INSTALLATION menu to prevent the air inlet grille and the air outlet grilles that of the color density is selected, adjustment of the screen on the remote control. INSTALLATION WALL SCREEN BEIGE LAMP MODE STANDARD 2. LIGHT BLUE 1 5. Put a hard board...
.... 4. Press the S or T button to adjust the color density. • As an alternative method for installation. Caution: • Placing the projector directly on a carpet impairs ventilation by use the projector in the INSTALLATION menu to prevent the air inlet grille and the air outlet grilles that of the color density is selected, adjustment of the screen on the remote control. INSTALLATION WALL SCREEN BEIGE LAMP MODE STANDARD 2. LIGHT BLUE 1 5. Put a hard board...

User Manual
Page 15
... POWER button. • It may not be replaced soon. Replace the lamp when the STATUS indicator blinks red. (See page 37.) 3. Adjust the position of the projected image by turning the FOCUS ring. Adjust the size of the projector so that is corresponding to the terminal in the INSTALLATION menu, the STANDARD lamp mode is activated by default whenever the projector is pressed. Important: • When a 16:9 image is kept displayed for a long time before an image...
... POWER button. • It may not be replaced soon. Replace the lamp when the STATUS indicator blinks red. (See page 37.) 3. Adjust the position of the projected image by turning the FOCUS ring. Adjust the size of the projector so that is corresponding to the terminal in the INSTALLATION menu, the STANDARD lamp mode is activated by default whenever the projector is pressed. Important: • When a 16:9 image is kept displayed for a long time before an image...

User Manual
Page 16
... this standby mode, the STATUS indicator blinks green. 10.Wait about 2 minutes. • During this procedure with that of 2 minutes in some cases. When the screen saver has been enabled, disable it from dust. • If necessary, disconnect the cables from the AUDIO OUT terminal is connected to light up immediately, repeat pressing the POWER button 2 or 3 times. If the lamp doesn't light up , replace the lamp. • Cover the lens...
... this standby mode, the STATUS indicator blinks green. 10.Wait about 2 minutes. • During this procedure with that of 2 minutes in some cases. When the screen saver has been enabled, disable it from dust. • If necessary, disconnect the cables from the AUDIO OUT terminal is connected to light up immediately, repeat pressing the POWER button 2 or 3 times. If the lamp doesn't light up , replace the lamp. • Cover the lens...

User Manual
Page 19
... STATUS indicator blinks green.) After the fan stops rotating, press the POWER button to view when the setting of the connected video equipment. Select an input source. • Press the VIDEO button on the projector or the VIDEO or S-VIDEO button on the remote control that is corresponding to the terminal in the INSTALLATION menu, the STANDARD lamp mode is activated by default whenever the projector is being displayed. • Though it may not work after turn back on . Projecting images Preparation: • Remove...
... STATUS indicator blinks green.) After the fan stops rotating, press the POWER button to view when the setting of the connected video equipment. Select an input source. • Press the VIDEO button on the projector or the VIDEO or S-VIDEO button on the remote control that is corresponding to the terminal in the INSTALLATION menu, the STANDARD lamp mode is activated by default whenever the projector is being displayed. • Though it may not work after turn back on . Projecting images Preparation: • Remove...

User Manual
Page 20
... projector rises. • Do not unplug the power cord while the STATUS indicator is also changed by pressing the VOLUME buttons. • The volume of the audio from the AUDIO OUT terminal is blinking. Unplugging the power cord immediately after use may be lit again for a while or press the MENU button. 9. Viewing video images (continued) POWER button POWER button To stop projecting: 8. Press the POWER button. • The lamp goes out and the projector goes into a standby mode...
... projector rises. • Do not unplug the power cord while the STATUS indicator is also changed by pressing the VOLUME buttons. • The volume of the audio from the AUDIO OUT terminal is blinking. Unplugging the power cord immediately after use may be lit again for a while or press the MENU button. 9. Viewing video images (continued) POWER button POWER button To stop projecting: 8. Press the POWER button. • The lamp goes out and the projector goes into a standby mode...

User Manual
Page 22
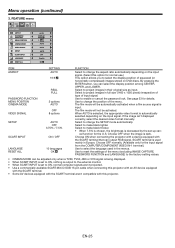
..., OFF ±5 (for analog signal input) ENHANCED, NORMAL (for digital signal input) BACK COLOR GLAY, RED, GREEN, BLUE, BLACK, WHITE, RED 50%, GREEN 50%, BLUE 50% SIZE x1, x4, FULL CAPTURE GO ON , OFF BLUE, BLACK, IMAGE BLACK, IMAGE OFF, MIRROR, INVERT, MIRROR INVERT FEATURE ASPECT AUTO 16:9 CENTER, UPPER, LOWER REAL FULL PASSWORD FUNCTION DISPLAY INPUT , MENU ACCESS , SPLASH ID SCREEN LOCK OK MENU POSITION 1 (upper left), 2 (lower right) UNLOCK OK CINEMA MODE *4 AUTO, OFF VIDEO SIGNAL *7 AUTO, NTSC, PAL, SECAM...
..., OFF ±5 (for analog signal input) ENHANCED, NORMAL (for digital signal input) BACK COLOR GLAY, RED, GREEN, BLUE, BLACK, WHITE, RED 50%, GREEN 50%, BLUE 50% SIZE x1, x4, FULL CAPTURE GO ON , OFF BLUE, BLACK, IMAGE BLACK, IMAGE OFF, MIRROR, INVERT, MIRROR INVERT FEATURE ASPECT AUTO 16:9 CENTER, UPPER, LOWER REAL FULL PASSWORD FUNCTION DISPLAY INPUT , MENU ACCESS , SPLASH ID SCREEN LOCK OK MENU POSITION 1 (upper left), 2 (lower right) UNLOCK OK CINEMA MODE *4 AUTO, OFF VIDEO SIGNAL *7 AUTO, NTSC, PAL, SECAM...

User Manual
Page 24
... WALL SCREEN LAMP MODE AUTO POWER ON AUTO POWER OFF IMAGE CAPTURE SPLASH SCREEN BACK COLOR MUTE MODE IMAGE REVERSE SETTING OFF / BEIGE / LIGHT BLUE / LIGHT GREEN / PINK / BLACK BOARD STANDARD LOW ON / OFF OFF / 5-60min ON / OFF BLUE / BLACK / IMAGE BLACK / IMAGE OFF MIRROR INVERT MIRROR INVERT FUNCTION Select any option other than BLACK BOARD, you can be displayed. When IMAGE is no signal input from the front with the projector installed on the ceiling. • The projector is...
... WALL SCREEN LAMP MODE AUTO POWER ON AUTO POWER OFF IMAGE CAPTURE SPLASH SCREEN BACK COLOR MUTE MODE IMAGE REVERSE SETTING OFF / BEIGE / LIGHT BLUE / LIGHT GREEN / PINK / BLACK BOARD STANDARD LOW ON / OFF OFF / 5-60min ON / OFF BLUE / BLACK / IMAGE BLACK / IMAGE OFF MIRROR INVERT MIRROR INVERT FUNCTION Select any option other than BLACK BOARD, you can be displayed. When IMAGE is no signal input from the front with the projector installed on the ceiling. • The projector is...
User Manual
Page 25
... button, you to change the SETUP mode automatically. If the image isn't displayed correctly, select the desired video format manually. Choose ON when connecting the projector with a device equipped with this option for the input signal from the COMPUTER/COMPONENT VIDEO IN-1 terminal.) Use to change the position of the menu (excluding IMAGE CAPTURE, PASSWORD FUNCTION and LANGUAGE) to the factory setting values. • CINEMA MODE can output RGB signal. Select to project images...
... button, you to change the SETUP mode automatically. If the image isn't displayed correctly, select the desired video format manually. Choose ON when connecting the projector with a device equipped with this option for the input signal from the COMPUTER/COMPONENT VIDEO IN-1 terminal.) Use to change the position of the menu (excluding IMAGE CAPTURE, PASSWORD FUNCTION and LANGUAGE) to the factory setting values. • CINEMA MODE can output RGB signal. Select to project images...

User Manual
Page 34
...) button on the remote control or the COMPUTER button on the control panel is pressed, the PinP mode will appear. Important: • Do not display a still picture for sub image, you can't change the magnification of the selected area by using the VIDEO or S-VIDEO button on the remote control or the VIDEO button on the control panel. 3. The PinP mode allows you to exit the EXPAND mode. • The regular operation screen...
...) button on the remote control or the COMPUTER button on the control panel is pressed, the PinP mode will appear. Important: • Do not display a still picture for sub image, you can't change the magnification of the selected area by using the VIDEO or S-VIDEO button on the remote control or the VIDEO button on the control panel. 3. The PinP mode allows you to exit the EXPAND mode. • The regular operation screen...
User Manual
Page 36
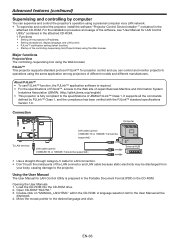
... the CD-ROM drive. 2. For the installation procedure and usage of the software, see "User Manual for LAN Control Utility" contained in the attached CD-ROM. *) Functions • Setting of the projector's IP address • Setting of password, display language, and LAN control • PJLink™ certification setting (telnet function) • Startup of the controlling /supervising tool (ProjectorView) using the Web browser Major functions ProjectorView...
... the CD-ROM drive. 2. For the installation procedure and usage of the software, see "User Manual for LAN Control Utility" contained in the attached CD-ROM. *) Functions • Setting of the projector's IP address • Setting of password, display language, and LAN control • PJLink™ certification setting (telnet function) • Startup of the controlling /supervising tool (ProjectorView) using the Web browser Major functions ProjectorView...

User Manual
Page 37
... is working or the lamp is in an abnormal condition. • Wait until the STATUS indicator goes out, then press the POWER button. • If the above solution is high. Lamp operation time warning. (Total lamp operation time reached 5000 hours*1*2 while the power was off (about 1 minute) Steady green Blinking green Lamp stand-by for power-off .) Replace the lamp. POSSIBLE SOLUTION • Clean the ventilation grilles. • Relocate the projector to LOW. Change with...
... is working or the lamp is in an abnormal condition. • Wait until the STATUS indicator goes out, then press the POWER button. • If the above solution is high. Lamp operation time warning. (Total lamp operation time reached 5000 hours*1*2 while the power was off (about 1 minute) Steady green Blinking green Lamp stand-by for power-off .) Replace the lamp. POSSIBLE SOLUTION • Clean the ventilation grilles. • Relocate the projector to LOW. Change with...

User Manual
Page 38
... turned on the operating environment and may get burned. When the lamp operation time exceeds 5000 hours*1*2, the projector automatically shuts off the power using the POWER button. Caution: • Don't remove the lamp for 1 minute every 25 hours*1 thereafter. The high-pressure mercury lamp may be used for about 5000 hours*1*2 of lamp replacement appears, replace it beyond its brightness may result in your face. When the instruction of consecutive use because the lamp cover...
... turned on the operating environment and may get burned. When the lamp operation time exceeds 5000 hours*1*2, the projector automatically shuts off the power using the POWER button. Caution: • Don't remove the lamp for 1 minute every 25 hours*1 thereafter. The high-pressure mercury lamp may be used for about 5000 hours*1*2 of lamp replacement appears, replace it beyond its brightness may result in your face. When the instruction of consecutive use because the lamp cover...
User Manual
Page 39
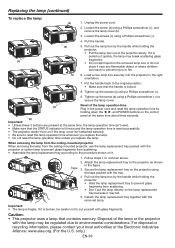
... the lamp replacement tray to the procedure shown on the control panel at the same time about three seconds. (a) Important: • Unless these 3 buttons are pressed at the same time, the lamp operation time isn't reset. • Make sure that contains mercury. Caution: • This projector uses a lamp that the STATUS indicator is lit twice and the lamp operation time is reset successfully. • The projector doesn't turn on the projector using the tape...
... the lamp replacement tray to the procedure shown on the control panel at the same time about three seconds. (a) Important: • Unless these 3 buttons are pressed at the same time, the lamp operation time isn't reset. • Make sure that contains mercury. Caution: • This projector uses a lamp that the STATUS indicator is lit twice and the lamp operation time is reset successfully. • The projector doesn't turn on the projector using the tape...

User Manual
Page 41
... extension cable. • This problem may not work after a while it illuminates. O f f 2. Steady red Blinking orange • If any objects are not broken. • When an extension cable is being used, replace it goes out. • Press the POWER button several times. • Replace the lamp. (The lamp is clogged with the supplied cable for check. EN-41 Make sure that the lamp should be turned on the POWER indicator. • Set SCART INPUT...
... extension cable. • This problem may not work after a while it illuminates. O f f 2. Steady red Blinking orange • If any objects are not broken. • When an extension cable is being used, replace it goes out. • Press the POWER button several times. • Replace the lamp. (The lamp is clogged with the supplied cable for check. EN-41 Make sure that the lamp should be turned on the POWER indicator. • Set SCART INPUT...
User Manual
Page 42
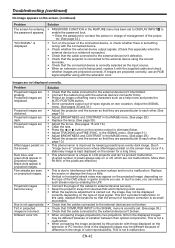
... cord. Red, blue, and green dots appear in projected images is incorrect. Adjust the SIGNAL menu. (See pages 30 and 31.) • Adjust the projector and the screen so that they are perpendicular to each other . (See page 10.) • This phenomenon is improved by enabling the LPF. • Connect the plugs of keystone correction is connected to interference with the supplied cable and check whether images are projected correctly, use . This is displayed...
... cord. Red, blue, and green dots appear in projected images is incorrect. Adjust the SIGNAL menu. (See pages 30 and 31.) • Adjust the projector and the screen so that they are perpendicular to each other . (See page 10.) • This phenomenon is improved by enabling the LPF. • Connect the plugs of keystone correction is connected to interference with the supplied cable and check whether images are projected correctly, use . This is displayed...

User Manual
Page 43
... The projector does not turn off the lamp and unplug the power cord from the computer aren't displayed. For the method to change the output resolution of the computer, contact the manufacturer of the projector. Troubleshooting (continued) Images are not weak. (See page 6.) • Check that the remote control sensor isn't exposed to direct sunlight or fluorescent light. (See page 9.) • Use the remote control within its operation...
... The projector does not turn off the lamp and unplug the power cord from the computer aren't displayed. For the method to change the output resolution of the computer, contact the manufacturer of the projector. Troubleshooting (continued) Images are not weak. (See page 6.) • Check that the remote control sensor isn't exposed to direct sunlight or fluorescent light. (See page 9.) • Use the remote control within its operation...

