
Service Manual
Page 2
...list may vary from the original documentation. If you require additional technical support, please contact our Tech Support line at 1-866-396-6322 Model FLM-3201 Part Number 667-L32K5-05 667-L32K5-09 667-L32K5-16 667-L32K5N-40 667-L32K5N-56 667-L34K5-20 301-DL26K7-01A 615-10464...-06 Description Keypress Board IR Receive Board USB Board Audio/Video Processing Board CPU Board Power Supply Board KAS20 Remote RC-D01-0A Stand Assy Boards 1 1 1 1 1 1 1 1 Please reference the part numbers below when ordering replacement boards of the servicing of the service manual....
...list may vary from the original documentation. If you require additional technical support, please contact our Tech Support line at 1-866-396-6322 Model FLM-3201 Part Number 667-L32K5-05 667-L32K5-09 667-L32K5-16 667-L32K5N-40 667-L32K5N-56 667-L34K5-20 301-DL26K7-01A 615-10464...-06 Description Keypress Board IR Receive Board USB Board Audio/Video Processing Board CPU Board Power Supply Board KAS20 Remote RC-D01-0A Stand Assy Boards 1 1 1 1 1 1 1 1 Please reference the part numbers below when ordering replacement boards of the servicing of the service manual....
Service Manual
Page 8
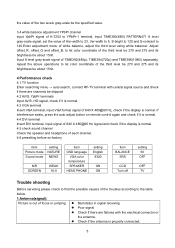
...16:9 item OSD language VGA color temperature SPEAKER HEAD PHONE setting English 9300 ON ON item BALANCE SRS CCD Turn off setting 50 OFF OFF TV Trouble shooting Before servicing please check to find the possible causes of the troubles according to let color coordinate of white balance, adjust the ...are channels be skipped 4.2 AV/S, YpbPr terminals Input AV/S, HD signal, check if it is normal. If interference exists, press the auto adjust button on remote control again and check if it is normal. 4.4 DVI terminal Insert DVI terminal, input signal of 640 X 480@60 Hz signal and check if the...
...16:9 item OSD language VGA color temperature SPEAKER HEAD PHONE setting English 9300 ON ON item BALANCE SRS CCD Turn off setting 50 OFF OFF TV Trouble shooting Before servicing please check to find the possible causes of the troubles according to let color coordinate of white balance, adjust the ...are channels be skipped 4.2 AV/S, YpbPr terminals Input AV/S, HD signal, check if it is normal. If interference exists, press the auto adjust button on remote control again and check if it is normal. 4.4 DVI terminal Insert DVI terminal, input signal of 640 X 480@60 Hz signal and check if the...
Service Manual
Page 10
...Check if the sound volume is set to incorrect display of the liquid crystal TV, In this case please press "auto" key on the remote control so as follows: 1. Check if the antenna cable is disconnected. ...Check if the battery is beyond the specified scope. Check if the remote control signal- Of if it has received the video signal correctly. There appears an indication - .... Check if the cable connection is any obstruct between the remote control and the TV set to recheck the signal and then to strong fluorescence. "outside the receivable scope...
...Check if the sound volume is set to incorrect display of the liquid crystal TV, In this case please press "auto" key on the remote control so as follows: 1. Check if the antenna cable is disconnected. ...Check if the battery is beyond the specified scope. Check if the remote control signal- Of if it has received the video signal correctly. There appears an indication - .... Check if the cable connection is any obstruct between the remote control and the TV set to recheck the signal and then to strong fluorescence. "outside the receivable scope...

Operation Manual
Page 2
Table of Contents Important Information...1 Important Safety Precautions ...2 Preparations ...5 Using the Remote Control...5 Batteries for the Remote Control ...5 Power Connection...5 Antenna Connection ...6 Identification of Controls...7 Main Unit...7 Remote Control...9 Connections...11 Cautions Before Connecting ...11 Connect a VCR ...11 Connect a Camcorder ...Picture ...22 Customizing the Picture ...22 Using the Preset Picture Mode...22 Setting System ...23 Setting System In TV Mode ...23 Adjusting Screen Aspect ...23 Reducing Picture Noise...23 VCR mode...23 Loading Default Values ...23 ...
Table of Contents Important Information...1 Important Safety Precautions ...2 Preparations ...5 Using the Remote Control...5 Batteries for the Remote Control ...5 Power Connection...5 Antenna Connection ...6 Identification of Controls...7 Main Unit...7 Remote Control...9 Connections...11 Cautions Before Connecting ...11 Connect a VCR ...11 Connect a Camcorder ...Picture ...22 Customizing the Picture ...22 Using the Preset Picture Mode...22 Setting System ...23 Setting System In TV Mode ...23 Adjusting Screen Aspect ...23 Reducing Picture Noise...23 VCR mode...23 Loading Default Values ...23 ...

Operation Manual
Page 3
...Frame ...31 Adjusting the Size of TVPC Frame...31 Viewing Picture-by-Picture ...31 Using Hotkeys ...32 Setting Sleep Timer...32 Setting Audio Mode ...32 To pause Picture...32 Viewing Closed Captions...33 Turning Closed Caption On or Off...33 Setting Closed Caption...33 Setting CC When... Turning Child Lock On or Off...36 Changing the Password ...36 Adjusting the Movie Rating...36 Adjusting the TV Rating...36 Adjusting Canadian English Rating...37 Adjusting Canadian French Rating...37 Troubleshooting ...38 Care and Maintenance ...39 Specification ...40 Programming the Universal Remote Control...42
...Frame ...31 Adjusting the Size of TVPC Frame...31 Viewing Picture-by-Picture ...31 Using Hotkeys ...32 Setting Sleep Timer...32 Setting Audio Mode ...32 To pause Picture...32 Viewing Closed Captions...33 Turning Closed Caption On or Off...33 Setting Closed Caption...33 Setting CC When... Turning Child Lock On or Off...36 Changing the Password ...36 Adjusting the Movie Rating...36 Adjusting the TV Rating...36 Adjusting Canadian English Rating...37 Adjusting Canadian French Rating...37 Troubleshooting ...38 Care and Maintenance ...39 Specification ...40 Programming the Universal Remote Control...42
Operation Manual
Page 8
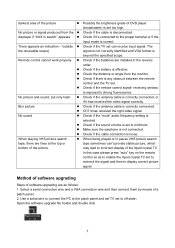
Preparations Using the Remote Control
Preparations Using the Remote Control
Operation Manual
Page 10
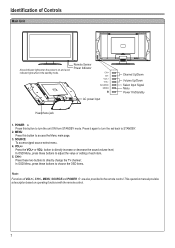
.... POWER Press this button to access the Menu main page. 3. VOL+/Press the VOL+ or VOL- button to directly change the TV channel; Remote Sensor Power Indicator CH+ CHVOL+ VOLSOURCE MENU AC power input Channel Up/Down Volume Up/Down Select Input Signal Menu Power On/Standby Headphone jack 1. ... adjust the value or setting of each item. 5. Identification of Controls Main Unit A blue indicator lights when the power is on operating functions with the remote control. 7
.... POWER Press this button to access the Menu main page. 3. VOL+/Press the VOL+ or VOL- button to directly change the TV channel; Remote Sensor Power Indicator CH+ CHVOL+ VOLSOURCE MENU AC power input Channel Up/Down Volume Up/Down Select Input Signal Menu Power On/Standby Headphone jack 1. ... adjust the value or setting of each item. 5. Identification of Controls Main Unit A blue indicator lights when the power is on operating functions with the remote control. 7

Operation Manual
Page 12
... menu. Use 3/4to adjust selected item; button also can be used to navigate in menus. 9 LAST To quickly jump between the settings of Controls (continued) Remote Control 1. Note: In menu operation, CH+/- and VOL+/- ENTER button Channel enter button 4. POWER Turn the unit on or off 2. 0~9 number buttons Direct channel select...
... menu. Use 3/4to adjust selected item; button also can be used to navigate in menus. 9 LAST To quickly jump between the settings of Controls (continued) Remote Control 1. Note: In menu operation, CH+/- and VOL+/- ENTER button Channel enter button 4. POWER Turn the unit on or off 2. 0~9 number buttons Direct channel select...

Operation Manual
Page 13
Remote Control Identification of SRS Labs,Inc. SRS To turn on /off the SRS sound effect * 16. SLEEP To set Sleep timer 20. SOUND MODE 19 ... To select signal source for TVPC frame 17 23 23. PICTURE MODE Picture mode select 12 18 13 21. TV/PC To activate TVPC function Note: The TVPC function means you may view a TV program from a mini window while the main window is displaying a PC screen. * The SRS symbo is incorporated under...
Remote Control Identification of SRS Labs,Inc. SRS To turn on /off the SRS sound effect * 16. SLEEP To set Sleep timer 20. SOUND MODE 19 ... To select signal source for TVPC frame 17 23 23. PICTURE MODE Picture mode select 12 18 13 21. TV/PC To activate TVPC function Note: The TVPC function means you may view a TV program from a mini window while the main window is displaying a PC screen. * The SRS symbo is incorporated under...
Operation Manual
Page 14
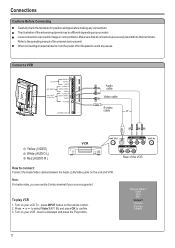
... well. Press 5or6 to select Video1(AV1 IN) and press OK to connect: Connect the Audio/Video cables between the Audio (L/R)/Video jacks on the remote control. 2. To play VCR 1. Connect a VCR AV OUT AV2 INPUT AV1 INPUT/ S-VIDEO IN AUDIO R AUDIO L VIDEO AUDIO R AUDIO L/MONO VIDEO ...OUT S-VIDEO AV OUT VIDEO L AUDIO R ANT IN AV IN VIDEO L AUDIO R Rear of the external equipment may be different depending on your LCD TV , press INPUT button on the unit and VCR. The illustration of the VCR How to confirm. 3. Connections Cautions Before Connecting Carefully check the terminals for...
... well. Press 5or6 to select Video1(AV1 IN) and press OK to connect: Connect the Audio/Video cables between the Audio (L/R)/Video jacks on the remote control. 2. To play VCR 1. Connect a VCR AV OUT AV2 INPUT AV1 INPUT/ S-VIDEO IN AUDIO R AUDIO L VIDEO AUDIO R AUDIO L/MONO VIDEO ...OUT S-VIDEO AV OUT VIDEO L AUDIO R ANT IN AV IN VIDEO L AUDIO R Rear of the external equipment may be different depending on your LCD TV , press INPUT button on the unit and VCR. The illustration of the VCR How to confirm. 3. Connections Cautions Before Connecting Carefully check the terminals for...
Operation Manual
Page 15
... and press OK to connect: Connect the Audio/Video cables between the Audio (L/R)/Video jacks on the remote control. 2. Please read the owner's manual of the camcorder may be different and is dependent on your LCD TV , press INPUT button on the unit and camcorder. Turn on your model. Source Select VGA DVI...
... and press OK to connect: Connect the Audio/Video cables between the Audio (L/R)/Video jacks on the remote control. 2. Please read the owner's manual of the camcorder may be different and is dependent on your LCD TV , press INPUT button on the unit and camcorder. Turn on your model. Source Select VGA DVI...

Operation Manual
Page 16
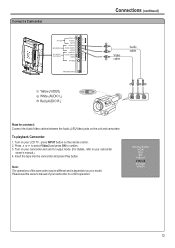
...DVD player are sometimes labeled Y, Cb, Cr or Y, U, V. Source Select VGA DVI RF Video1 Video2 SVideo YPbPr Note: The Y, Pb, Pr outputs on your LCD TV , press INPUT button on the DVD player (or Set-Top Box). Press 5 or 6 to confirm. 3. Turn on your DVD player (or Set-Top Box)... player (or Set-Top Box). Connect the Audio cable between the Y, Pb, Pr input jacks on the unit and Y, Pb, Pr output jacks on the remote control. 2. Connections (continued) Connect a DVD player (or Set-Top Box) Video cable Audio cable W R RB G AUDIO L AUDIO R COMPONENT Pr Pb Y AV OUT R ...
...DVD player are sometimes labeled Y, Cb, Cr or Y, U, V. Source Select VGA DVI RF Video1 Video2 SVideo YPbPr Note: The Y, Pb, Pr outputs on your LCD TV , press INPUT button on the DVD player (or Set-Top Box). Press 5 or 6 to confirm. 3. Turn on your DVD player (or Set-Top Box)... player (or Set-Top Box). Connect the Audio cable between the Y, Pb, Pr input jacks on the unit and Y, Pb, Pr output jacks on the remote control. 2. Connections (continued) Connect a DVD player (or Set-Top Box) Video cable Audio cable W R RB G AUDIO L AUDIO R COMPONENT Pr Pb Y AV OUT R ...

Operation Manual
Page 17
... the DTV receiver. 2. Source Select VGA DVI RF Video1 Video2 SVideo YPbPr 14 To Watch DTV 1. Press OK to the antenna input jack on your LCD TV , press INPUT button on the remote control. 2. Connect the cable or antenna to confirm. 4. Turn on your DTV receiver.
... the DTV receiver. 2. Source Select VGA DVI RF Video1 Video2 SVideo YPbPr 14 To Watch DTV 1. Press OK to the antenna input jack on your LCD TV , press INPUT button on the remote control. 2. Connect the cable or antenna to confirm. 4. Turn on your DTV receiver.
Operation Manual
Page 18
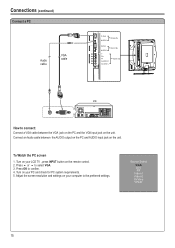
... AUDIO input jack on the unit. Press OK to the preferred settings. Turn on your LCD TV , press INPUT button on your computer to confirm. 4. To Watch the PC screen 1. Adjust the screen resolution and settings on the remote control. 2. Source Select VGA DVI RF Video1 Video2 SVideo YPbPr 15 Turn on the...
... AUDIO input jack on the unit. Press OK to the preferred settings. Turn on your LCD TV , press INPUT button on your computer to confirm. 4. To Watch the PC screen 1. Adjust the screen resolution and settings on the remote control. 2. Source Select VGA DVI RF Video1 Video2 SVideo YPbPr 15 Turn on the...
Operation Manual
Page 20
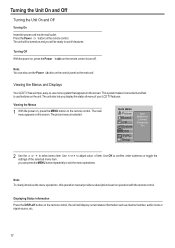
...convenient and fast to -use features on the unit. Displaying Status Information Press the DISPLAY button on the remote control, the unit will be ready to adjust value of your LCD TV features. Turning Off With the power on, press the Power button on and you display the status of...features. The unit also lets you will be turned on the remote control to select menu item. Note: To clearly introduce the menu operations , this operation manual provides a description based on the screen. Viewing the Menus and Displays Your LCD TV has a simple, easy-to use menu system that appears on...
...convenient and fast to -use features on the unit. Displaying Status Information Press the DISPLAY button on the remote control, the unit will be ready to adjust value of your LCD TV features. Turning Off With the power on, press the Power button on and you display the status of...features. The unit also lets you will be turned on the remote control to select menu item. Note: To clearly introduce the menu operations , this operation manual provides a description based on the screen. Viewing the Menus and Displays Your LCD TV has a simple, easy-to use menu system that appears on...

Operation Manual
Page 26
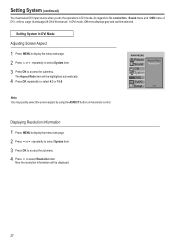
...horizontally and crops the top and bottom black bars of the picture. This function helps to access the submenu. Setting System Setting System In TV Mode Adjusting Screen Aspect 1 Press MENU to display the menu main page. 2 Press 5or6 repeatedly to select System item. 3 Press ...Off, Auto, Strong, Middle or Weak. Panorama -- This mode displays 16:9 aspect ratio picture. Sometimes a noisy picture may appear on the remote control. The Aspect Ratio item will be highlighted automatically. TVPC 4:3 -- In this mode the picture is progressively stretched toward each side of poor signal...
...horizontally and crops the top and bottom black bars of the picture. This function helps to access the submenu. Setting System Setting System In TV Mode Adjusting Screen Aspect 1 Press MENU to display the menu main page. 2 Press 5or6 repeatedly to select System item. 3 Press ...Off, Auto, Strong, Middle or Weak. Panorama -- This mode displays 16:9 aspect ratio picture. Sometimes a noisy picture may appear on the remote control. The Aspect Ratio item will be highlighted automatically. TVPC 4:3 -- In this mode the picture is progressively stretched toward each side of poor signal...

Operation Manual
Page 28
... item. 5 Press OK repeatedly to select 4:3 or 16:9. Loading Default Values You may quickly display the resolution information by using the ASPECT button on the remote control. Displaying Resolution Information You may quickly load default values by using the Resolution item.
... item. 5 Press OK repeatedly to select 4:3 or 16:9. Loading Default Values You may quickly display the resolution information by using the ASPECT button on the remote control. Displaying Resolution Information You may quickly load default values by using the Resolution item.

Operation Manual
Page 29
... Sound CH System OSD TVPC Setup Phase Aspect Ratio N/R Default Auto You may quickly select the screen aspect by using the ASPECT button on the remote control. MAIN MENU Picture Sound CH System Phase Aspect Ratio N/R Default OSD TVPC Setup 16:9 For 480i or 480P signal format, you can select the...
... Sound CH System OSD TVPC Setup Phase Aspect Ratio N/R Default Auto You may quickly select the screen aspect by using the ASPECT button on the remote control. MAIN MENU Picture Sound CH System Phase Aspect Ratio N/R Default OSD TVPC Setup 16:9 For 480i or 480P signal format, you can select the...
Operation Manual
Page 30
... Aspect Ratio Sound Resolution CH System OSD TVPC Setup 16:9 Note: You may quickly select the screen aspect by using the ASPECT button on the remote control. The Aspect Ratio item will be displayed. 27 Displaying Resolution Information 1 Press MENU to display the menu main page. 2 Press 5or6 repeatedly to select...
... Aspect Ratio Sound Resolution CH System OSD TVPC Setup 16:9 Note: You may quickly select the screen aspect by using the ASPECT button on the remote control. The Aspect Ratio item will be displayed. 27 Displaying Resolution Information 1 Press MENU to display the menu main page. 2 Press 5or6 repeatedly to select...

Operation Manual
Page 41
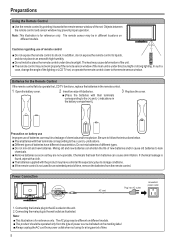
... or cold location. Then re-insert plug into the mains socket. !Unplug the power cord, wait for 60 seconds. Never attempt to remote control !This may improve the picture. Good picture but no sound Good sound but poor color Poor picture !Increase the VOLUME. !Check ... a television yourself. 38 Using a highly directional antenna may be inserted with low temperature, the picture may cause the cabinet to deform and the LCD panel to malfunction. (Storage temperature: 0°C to ON. • Adjust the contrast, color and brightness settings. !Sometimes, poor picture quality occurs...
... or cold location. Then re-insert plug into the mains socket. !Unplug the power cord, wait for 60 seconds. Never attempt to remote control !This may improve the picture. Good picture but no sound Good sound but poor color Poor picture !Increase the VOLUME. !Check ... a television yourself. 38 Using a highly directional antenna may be inserted with low temperature, the picture may cause the cabinet to deform and the LCD panel to malfunction. (Storage temperature: 0°C to ON. • Adjust the contrast, color and brightness settings. !Sometimes, poor picture quality occurs...
