
User Guide
Page 2
... You can provide you are considering returning this user guide. Please refer to assist you for purchasing the Plantronics Discovery® 925 earpiece. Getting Assistance The Plantronics Technical Assistance Centre is 0000. Welcome Thank you . Visit www.plantronics.com/support or call your PIN code, or "Passkey," is ready to the separate "For Your Safety...
... You can provide you are considering returning this user guide. Please refer to assist you for purchasing the Plantronics Discovery® 925 earpiece. Getting Assistance The Plantronics Technical Assistance Centre is 0000. Welcome Thank you . Visit www.plantronics.com/support or call your PIN code, or "Passkey," is ready to the separate "For Your Safety...

User Guide
Page 3
... iv Charging Your Earpiece 1 Using the AC or USB charger 1 Using the Charging Case 2 Checking the Battery Level 2 Recharging the Charging Case 3 Pairing Your Earpiece 4 Plantronics QuickPair™ Technology 4 How to Pair Your Phone With Your Earpiece for the First Time..... 5 Adjusting the Fit 6 How to Install a Different Gel Eartip 6 Earpiece...
... iv Charging Your Earpiece 1 Using the AC or USB charger 1 Using the Charging Case 2 Checking the Battery Level 2 Recharging the Charging Case 3 Pairing Your Earpiece 4 Plantronics QuickPair™ Technology 4 How to Pair Your Phone With Your Earpiece for the First Time..... 5 Adjusting the Fit 6 How to Install a Different Gel Eartip 6 Earpiece...

User Guide
Page 4
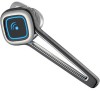
To order, please contact your Plantronics supplier or go to www.plantronics.com iv Package Contents and Features Earpiece Call Control Button Volume Control Button Charging Jack Eartip Stabilizing Eartips (small, medium, and large) Charging Case AC Charger 100 - 240V USB Charging Cable Optional Accessories* Vehicle Power Charger #78583-01 USB Lanyard #79393-01 * Not included.
To order, please contact your Plantronics supplier or go to www.plantronics.com iv Package Contents and Features Earpiece Call Control Button Volume Control Button Charging Jack Eartip Stabilizing Eartips (small, medium, and large) Charging Case AC Charger 100 - 240V USB Charging Cable Optional Accessories* Vehicle Power Charger #78583-01 USB Lanyard #79393-01 * Not included.

User Guide
Page 5
While your earpiece is fully charged, the indicator light turns off. When your earpiece is connected to the charging jack on the earpiece. This applies to all charging options. 1 CHARGING TIME 3 hours .....Full charge using AC or USB 1 hour .......Minimum charge before first use your earpiece while it is charging, the indicator light slowly flashes red. Option B: Using the USB Charger 1 Connect USB charger to the USB 3 port on a computer or laptop. 2 Connect the USB charger to the 1 charging jack on the earpiece. 3 Turn the computer or laptop on. 2 WARNING ...
While your earpiece is fully charged, the indicator light turns off. When your earpiece is connected to the charging jack on the earpiece. This applies to all charging options. 1 CHARGING TIME 3 hours .....Full charge using AC or USB 1 hour .......Minimum charge before first use your earpiece while it is charging, the indicator light slowly flashes red. Option B: Using the USB Charger 1 Connect USB charger to the USB 3 port on a computer or laptop. 2 Connect the USB charger to the 1 charging jack on the earpiece. 3 Turn the computer or laptop on. 2 WARNING ...

User Guide
Page 6
Align the charging jack on , simultaneously press and hold the call control button and the volume button for about 2 seconds. To properly remove the earpiece, use Option C: Using the Charging Case Open the cover of the case. Checking the Battery Level of the earpiece from the micro USB connector. IMPORTANT Incorrect removal of Your Earpiece Call Control Button Volume Button CHARGE INDICATOR LIGHTS Red Flashes 1 Battery Level Full battery 2 1/3 to show the charge level. 2 The indicator light flashes red to 2/3 full 3 Less than 1/3 full With the earpiece on the earpiece ...
Align the charging jack on , simultaneously press and hold the call control button and the volume button for about 2 seconds. To properly remove the earpiece, use Option C: Using the Charging Case Open the cover of the case. Checking the Battery Level of the earpiece from the micro USB connector. IMPORTANT Incorrect removal of Your Earpiece Call Control Button Volume Button CHARGE INDICATOR LIGHTS Red Flashes 1 Battery Level Full battery 2 1/3 to show the charge level. 2 The indicator light flashes red to 2/3 full 3 Less than 1/3 full With the earpiece on the earpiece ...

User Guide
Page 7
When fully charged, the indicator turns off. See the separate "For Your Safety" booklet for more information. 3 If the earpiece does not begin charging mode (indicator light slowly flashes red) then both the earpiece and case need recharging. 2 Plug either the AC charger or the USB charger to power source before connecting to the charging jack on the bottom of the case. Charging Your Earpiece 1 2 Indicator Light Charging Jack CHARGING TIME 9 hours....Full charge using USB 3 hours....Full charge using AC The charging case provides one full charge to your earpiece before ...
When fully charged, the indicator turns off. See the separate "For Your Safety" booklet for more information. 3 If the earpiece does not begin charging mode (indicator light slowly flashes red) then both the earpiece and case need recharging. 2 Plug either the AC charger or the USB charger to power source before connecting to the charging jack on the bottom of the case. Charging Your Earpiece 1 2 Indicator Light Charging Jack CHARGING TIME 9 hours....Full charge using USB 3 hours....Full charge using AC The charging case provides one full charge to your earpiece before ...

User Guide
Page 8
...successfully paired with your earpiece on for 10 minutes. Pairing Your Earpiece Pairing is the process of the pairing process, visit www.plantronics.com/ EasyToPair (only available in English). To see a demo of introducing your earpiece to your phone only once.... Plantronics QuickPair™ Technology Your new earpiece includes Plantronics QuickPair technology to pair your earpiece with your phone. Normally you turn the earpiece on again, it with a Bluetooth phone. 4 If not...
...successfully paired with your earpiece on for 10 minutes. Pairing Your Earpiece Pairing is the process of the pairing process, visit www.plantronics.com/ EasyToPair (only available in English). To see a demo of introducing your earpiece to your phone only once.... Plantronics QuickPair™ Technology Your new earpiece includes Plantronics QuickPair technology to pair your earpiece with your phone. Normally you turn the earpiece on again, it with a Bluetooth phone. 4 If not...

User Guide
Page 9
Pairing Your Earpiece 1 SETTINGS Time and Date Phone Settings Bluetooth Sound Settings Network Serv ces Security Reset Settings 3 4 BLUETOOTH 2 9XXPlantronics BLUETOOTH 9XXPlantronics PASSKEY 0000 PASSKEY 0000 How to Pair Your Phone with Your Earpiece for the First Time 1 Turn on the Bluetooth feature on . See your phone's user guide for the PIN code or Passkey, enter 0000. If you see the red/blue flash, press and hold the call control button until the indicator flashes red/blue. For most phones, select Settings/Tools > Connections > Bluetooth > On. Your ...
Pairing Your Earpiece 1 SETTINGS Time and Date Phone Settings Bluetooth Sound Settings Network Serv ces Security Reset Settings 3 4 BLUETOOTH 2 9XXPlantronics BLUETOOTH 9XXPlantronics PASSKEY 0000 PASSKEY 0000 How to Pair Your Phone with Your Earpiece for the First Time 1 Turn on the Bluetooth feature on . See your phone's user guide for the PIN code or Passkey, enter 0000. If you see the red/blue flash, press and hold the call control button until the indicator flashes red/blue. For most phones, select Settings/Tools > Connections > Bluetooth > On. Your ...

User Guide
Page 10
If the earpiece still feels unstable, then remove the earpiece from your ear and change the eartip to a different size. 2 To remove the eartip, hold the stabilizer and gently pull the eartip off the speaker housing. 3 To fit a new eartip, position the eartip over the speaker housing with the optional small or large eartip provided. 1 2 3 Eartip Speaker housing 1 Remove the earpiece from the microphone boom and gently press the eartip onto speaker housing. 6 Rotate the eartip on the earpiece to position the stabilizer to Install a Different Gel Eartip If the earpiece does not ...
If the earpiece still feels unstable, then remove the earpiece from your ear and change the eartip to a different size. 2 To remove the eartip, hold the stabilizer and gently pull the eartip off the speaker housing. 3 To fit a new eartip, position the eartip over the speaker housing with the optional small or large eartip provided. 1 2 3 Eartip Speaker housing 1 Remove the earpiece from the microphone boom and gently press the eartip onto speaker housing. 6 Rotate the eartip on the earpiece to position the stabilizer to Install a Different Gel Eartip If the earpiece does not ...

User Guide
Page 11
you hear the ring in your earpiece to voice mail, press the call When your earpiece. Transfer a call between earpiece and phone During an active call, press and hold the call control button for 2 seconds. You should be recharged. End a call During active call, tap the call When the earpiece is off, indicator stays off . You will hear a single low tone followed by a double low tone. 7 Earpiece Controls Turn on the earpiece Press and hold the call control button for 2 seconds until the indicator glows red. To confirm that your phone and press send. To reject a ...
you hear the ring in your earpiece to voice mail, press the call When your earpiece. Transfer a call between earpiece and phone During an active call, press and hold the call control button for 2 seconds. You should be recharged. End a call During active call, tap the call When the earpiece is off, indicator stays off . You will hear a single low tone followed by a double low tone. 7 Earpiece Controls Turn on the earpiece Press and hold the call control button for 2 seconds until the indicator glows red. To confirm that your phone and press send. To reject a ...

User Guide
Page 12
... and you called Voice activated dialling Tap the call , tap the volume button. Adjust the volume During an active call control button twice. See www.plantronics.com/healthandsafety for 2 seconds until maximum is on, press and hold the volume button for an extended period of time. To turn on feature, see...
... and you called Voice activated dialling Tap the call , tap the volume button. Adjust the volume During an active call control button twice. See www.plantronics.com/healthandsafety for 2 seconds until maximum is on, press and hold the volume button for an extended period of time. To turn on feature, see...

User Guide
Page 13
Indicator Lights and Tones Light Tone Status check 1 blue flash 1 tone Charging 1 red flash every 10 seconds None Fully charged None None Low battery 2 red flashes for 2/3 full battery None Very low battery 3 red flashes every 10 seconds 3 high tones every 10 seconds Pairing Red and blue flashes 1 low tone Paired Blue flashes 1 low tone Turning on the same side of your earpiece and the phone you hear a high tone in range, you move back in the earpiece. Audio quality degrades as you can manually reconnect by pressing the call ...
Indicator Lights and Tones Light Tone Status check 1 blue flash 1 tone Charging 1 red flash every 10 seconds None Fully charged None None Low battery 2 red flashes for 2/3 full battery None Very low battery 3 red flashes every 10 seconds 3 high tones every 10 seconds Pairing Red and blue flashes 1 low tone Paired Blue flashes 1 low tone Turning on the same side of your earpiece and the phone you hear a high tone in range, you move back in the earpiece. Audio quality degrades as you can manually reconnect by pressing the call ...

User Guide
Page 14
To turn off multipoint 1 blue flash None NOTE By default, the online indicator is turned on page 8. 10 Indicator Lights and Tones Light Tone Incoming call 3 blue flashes every 2 seconds 3 rapid low tones every 2 seconds Answer call 1 blue flash 1 low tone Call in progress 1 blue flash every 2 seconds None Volume up or down 1 blue flash for each volume adjustment 1 tone with volume corresponding to volume level 2 low tones to indicate maximum volume level reached End call 1 blue flash 1 low tone Missed call 3 purple flashes every...
To turn off multipoint 1 blue flash None NOTE By default, the online indicator is turned on page 8. 10 Indicator Lights and Tones Light Tone Incoming call 3 blue flashes every 2 seconds 3 rapid low tones every 2 seconds Answer call 1 blue flash 1 low tone Call in progress 1 blue flash every 2 seconds None Volume up or down 1 blue flash for each volume adjustment 1 tone with volume corresponding to volume level 2 low tones to indicate maximum volume level reached End call 1 blue flash 1 low tone Missed call 3 purple flashes every...

User Guide
Page 15
My phone did not Turn both your phone and earpiece off and on, and then repeat the pairing process on , locate the earpiece. Your earpiece is out of the volume button will adjust volume. I cannot hear caller/dial tone. Turn both your phone and earpiece off and on page 4. Press the call control button for adjusting the volume in "Earpiece Controls" on . Make sure that the eartip fits properly. Make sure earpiece is drained. See "Pairing Your Earpiece" on page 6. 11 I could not enter my PIN code. Charge your battery. Incremental tapping of range. See "...
My phone did not Turn both your phone and earpiece off and on, and then repeat the pairing process on , locate the earpiece. Your earpiece is out of the volume button will adjust volume. I cannot hear caller/dial tone. Turn both your phone and earpiece off and on page 4. Press the call control button for adjusting the volume in "Earpiece Controls" on . Make sure that the eartip fits properly. Make sure earpiece is drained. See "Pairing Your Earpiece" on page 6. 11 I could not enter my PIN code. Charge your battery. Incremental tapping of range. See "...

User Guide
Page 16
My earpiece falls out of mouth. See "Adjusting the Fit" on page 6. Troubleshooting Audio quality is out of range. Move the earpiece closer to be cleaned. See "Adjusting the Fit" fit my ear. Remove the eartip from the earpiece and wash it back on your earpiece. 12 Your earpiece is poor. Make sure that earpiece is sitting correctly in ear with boom pointing towards corner of mouth. Callers cannot hear me. The eartips do not Try a different size eartip. on page 6. When the eartip is sitting correctly in warm soapy water and dry thoroughly. See "...
My earpiece falls out of mouth. See "Adjusting the Fit" on page 6. Troubleshooting Audio quality is out of range. Move the earpiece closer to be cleaned. See "Adjusting the Fit" fit my ear. Remove the eartip from the earpiece and wash it back on your earpiece. 12 Your earpiece is poor. Make sure that earpiece is sitting correctly in ear with boom pointing towards corner of mouth. Callers cannot hear me. The eartips do not Try a different size eartip. on page 6. When the eartip is sitting correctly in warm soapy water and dry thoroughly. See "...

User Guide
Page 17
... on and indicator flashes blue 2 times. 2 To pair earpiece to a second phone, see "Pairing Your Earpiece" on page 5. Using More Than One Bluetooth Phone Plantronics Discovery 925 supports multipoint technology, which allows you to use the second phone, initiate the call using the controls on the second phone. To use one Bluetooth...
... on and indicator flashes blue 2 times. 2 To pair earpiece to a second phone, see "Pairing Your Earpiece" on page 5. Using More Than One Bluetooth Phone Plantronics Discovery 925 supports multipoint technology, which allows you to use the second phone, initiate the call using the controls on the second phone. To use one Bluetooth...

User Guide
Page 18
Product Specifications Talk Time* Standby Time* Charge Time Range Earpiece Weight Battery Type Storage/Usage Temperature Version Bluetooth Profiles Battery enables up to 5 hours Battery enables up to 175 hours with multipoint feature OFF Battery enables up to 100 hours with multipoint feature ON Charging earpiece using AC = 3 hours Charging earpiece using USB = 3 hours Charging earpiece using the case = 3 hours Charging the case using AC = 3 hours Charging the case using USB = 9 hours Up to 33 feet (10 metres) 8 grams Earpiece: Lithium ion polymer Charging Case: Nickel-metal ...
Product Specifications Talk Time* Standby Time* Charge Time Range Earpiece Weight Battery Type Storage/Usage Temperature Version Bluetooth Profiles Battery enables up to 5 hours Battery enables up to 175 hours with multipoint feature OFF Battery enables up to 100 hours with multipoint feature ON Charging earpiece using AC = 3 hours Charging earpiece using USB = 3 hours Charging earpiece using the case = 3 hours Charging the case using AC = 3 hours Charging the case using USB = 9 hours Up to 33 feet (10 metres) 8 grams Earpiece: Lithium ion polymer Charging Case: Nickel-metal ...
User Guide
Page 19
...Year Warranty" leaflet or visit www.plantronics.com en Plantronics Ltd Wootton Bassett, UK Tel: 0800 410014 ar Middle East Region www.plantronics.com cs Czech Republic www.plantronics.com da Danmark Tel: 44 35 05 35 de Plantronics GmbH Hürth, Deutschland Kundenservice: Deutschland 0800... 9323 400 Österreich 0800 242 500 Schweiz 0800 932 340 el www.plantronics.com es Plantronics Iberia, S.L. For warranty information, see the separate "For Your Safety" booklet. Hoofddorp, Nederland Tel: (0)0800 Plantronics 0800 7526876 (NL) 00800 75268766 (BE/LUX) no Norge Tel: 80011336 pl...
...Year Warranty" leaflet or visit www.plantronics.com en Plantronics Ltd Wootton Bassett, UK Tel: 0800 410014 ar Middle East Region www.plantronics.com cs Czech Republic www.plantronics.com da Danmark Tel: 44 35 05 35 de Plantronics GmbH Hürth, Deutschland Kundenservice: Deutschland 0800... 9323 400 Österreich 0800 242 500 Schweiz 0800 932 340 el www.plantronics.com es Plantronics Iberia, S.L. For warranty information, see the separate "For Your Safety" booklet. Hoofddorp, Nederland Tel: (0)0800 Plantronics 0800 7526876 (NL) 00800 75268766 (BE/LUX) no Norge Tel: 80011336 pl...

User Guide
Page 20
Plantronics, the logo design, Plantronics Discovery, and Sound Innovation are trademarks or registered trademarks of such marks by the Bluetooth SIG, Inc. is under license. МЛ05 Plantronics, Inc. 345 Encinal Santa Cruz, CA 95060 United States Tel: 800-544-4660 www.plantronics.com ©2008 Plantronics, Inc. All rights reserved. The Bluetooth® word mark and logos are the property of their respective owners. and any use of Plantronics, Inc. US patent 5,210,791 and Patents Pending 78647-03 Rev A All other trademarks are owned by Plantronics, Inc.
Plantronics, the logo design, Plantronics Discovery, and Sound Innovation are trademarks or registered trademarks of such marks by the Bluetooth SIG, Inc. is under license. МЛ05 Plantronics, Inc. 345 Encinal Santa Cruz, CA 95060 United States Tel: 800-544-4660 www.plantronics.com ©2008 Plantronics, Inc. All rights reserved. The Bluetooth® word mark and logos are the property of their respective owners. and any use of Plantronics, Inc. US patent 5,210,791 and Patents Pending 78647-03 Rev A All other trademarks are owned by Plantronics, Inc.
