
User Guide
Page 3
...Earloops Base AC Charger Software PerSono Suite Software CD 3 TABLE OF CONTENTS Package Contents 3 Features 4 Setup 6 Charging 7 Positioning 7 Installing PerSono® Suite Software 8 Configuration and Status 9 Adjusting Fit ...a Call, Initiating Smart Button 12 Traveling with CS50-USB 13 Headset Controls 14 Base Indicator Lights 15 Troubleshooting for CS50-USB 15 Subscription 18 System Reset 18 Battery Replacement... booklet for important product safety information prior to register your CS50-USB product online so we can provide you with the best possible service ...
...Earloops Base AC Charger Software PerSono Suite Software CD 3 TABLE OF CONTENTS Package Contents 3 Features 4 Setup 6 Charging 7 Positioning 7 Installing PerSono® Suite Software 8 Configuration and Status 9 Adjusting Fit ...a Call, Initiating Smart Button 12 Traveling with CS50-USB 13 Headset Controls 14 Base Indicator Lights 15 Troubleshooting for CS50-USB 15 Subscription 18 System Reset 18 Battery Replacement... booklet for important product safety information prior to register your CS50-USB product online so we can provide you with the best possible service ...

User Guide
Page 5
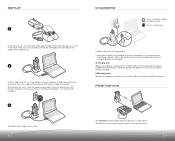
...A USB hub can be used to attach the base unit to a PC monitor. However, if that headset is powered on, the CS50-USB will go completely off , the CS50-USB will not charge, and the headset standby time will ensure your headset remains charged. Slide headset into the holds on the...when fully charged. IMPORTANT: Incorrect positioning can supply sufficient power (250mA) to charge the headset. USB Charging Only: When your computer is in notch. SETUP 1 To install base unit, first thread the USB cable through the bottom of the base unit. 2 Connect USB connector to a free USB port on...
...A USB hub can be used to attach the base unit to a PC monitor. However, if that headset is powered on, the CS50-USB will go completely off , the CS50-USB will not charge, and the headset standby time will ensure your headset remains charged. Slide headset into the holds on the...when fully charged. IMPORTANT: Incorrect positioning can supply sufficient power (250mA) to charge the headset. USB Charging Only: When your computer is in notch. SETUP 1 To install base unit, first thread the USB cable through the bottom of the base unit. 2 Connect USB connector to a free USB port on...

User Guide
Page 3
...options Headset Headband Earloops Base AC Charger Software PerSono Suite software CD 3 REGISTER YOUR PRODUCT ONLINE Visit www.plantronics.com/productregistration to register your CS60-USB product online so that we can provide you with CS60-USB 13 ... the separate Safety Instructions booklet for important product safety information prior to installation or use. TABLE OF CONTENTS Package contents 3 Features 4 Setup 6 Charging 7 Positioning 7 Installing PerSono® Suite software 8 Configuration and Status 9 Adjusting fit 10 Making/answering/ending calls 11 ...
...options Headset Headband Earloops Base AC Charger Software PerSono Suite software CD 3 REGISTER YOUR PRODUCT ONLINE Visit www.plantronics.com/productregistration to register your CS60-USB product online so that we can provide you with CS60-USB 13 ... the separate Safety Instructions booklet for important product safety information prior to installation or use. TABLE OF CONTENTS Package contents 3 Features 4 Setup 6 Charging 7 Positioning 7 Installing PerSono® Suite software 8 Configuration and Status 9 Adjusting fit 10 Making/answering/ending calls 11 ...
User Guide
Page 5
... cause noise and interference. 7 Using the optional AC adapter will decrease. IMPORTANT: Incorrect positioning can be used . 6 CHARGING 1 2 1 hour = minimum charge to continue setup 3 hours = full charge 1. SETUP 1 To install base unit, first thread the USB cable through the bottom of the base unit. 2 Connect USB connector to a free USB port on...
... cause noise and interference. 7 Using the optional AC adapter will decrease. IMPORTANT: Incorrect positioning can be used . 6 CHARGING 1 2 1 hour = minimum charge to continue setup 3 hours = full charge 1. SETUP 1 To install base unit, first thread the USB cable through the bottom of the base unit. 2 Connect USB connector to a free USB port on...


