

Operating Instructions
Page 2
... light of America (MPAA) guidelines are used to reduce eye strain. Program Block (V. The Motion Picture Association of your Monitor. PIONEER'S PureCinema Format Converter An advanced and exclusive I/P (Interlace/Progressive) format converter developed by Pioneer, called "PureCinema", delivers a high-resolution progressive picture. Read and understand these 'Operating Instructions' before operating your room, TV automatically adjusts the picture brightness to rate movies: , , , , , and . Whole Screen IR Receiver The remote control sensor is installed behind the screen...
... light of America (MPAA) guidelines are used to reduce eye strain. Program Block (V. The Motion Picture Association of your Monitor. PIONEER'S PureCinema Format Converter An advanced and exclusive I/P (Interlace/Progressive) format converter developed by Pioneer, called "PureCinema", delivers a high-resolution progressive picture. Read and understand these 'Operating Instructions' before operating your room, TV automatically adjusts the picture brightness to rate movies: , , , , , and . Whole Screen IR Receiver The remote control sensor is installed behind the screen...

Operating Instructions
Page 5
... UNIT (NEC SECTION 810-20) GROUNDING CONDUCTORS (NEC SECTION 810-21) GROUNDING CLAMPS POWER SERVICE GROUNDING ELECTRODE SYSTEM (NEC ART 250, PART H) EXAMPLE OF ANTENNA GROUNDING IN NATIONAL ELECTRICAL CODE INSTRUCTIONS 5 Do not use the Monitor near water, for ventilation purposes to ensure the reliable operation of any kind. Quick stops, excessive force, and uneven surfaces may overturn, causing...
... UNIT (NEC SECTION 810-20) GROUNDING CONDUCTORS (NEC SECTION 810-21) GROUNDING CLAMPS POWER SERVICE GROUNDING ELECTRODE SYSTEM (NEC ART 250, PART H) EXAMPLE OF ANTENNA GROUNDING IN NATIONAL ELECTRICAL CODE INSTRUCTIONS 5 Do not use the Monitor near water, for ventilation purposes to ensure the reliable operation of any kind. Quick stops, excessive force, and uneven surfaces may overturn, causing...

Operating Instructions
Page 6
... completion of power supply at your home, consult your operating instructions, unplug it can fall onto such power lines or circuits. This will often require extensive work by the Monitor's manufacturer as the original part. If you are required, be sure the service technician uses replacement parts specified by the manufacturer that the Monitor is to persons. 26. Do not adjust other controls than those described...
... completion of power supply at your home, consult your operating instructions, unplug it can fall onto such power lines or circuits. This will often require extensive work by the Monitor's manufacturer as the original part. If you are required, be sure the service technician uses replacement parts specified by the manufacturer that the Monitor is to persons. 26. Do not adjust other controls than those described...

Operating Instructions
Page 7
... TO USE THESE OPERATING INSTRUCTIONS 8 INSTALLING THE MONITOR 9 BASIC OPERATIONS BEFORE USE 10 CONNECTING THE ANTENNA 12 CONNECTING VIDEO/AUDIO EQUIPMENT 14 FRONT PANEL FUNCTIONS 18 REMOTE CONTROL UNIT FUNCTIONS 20 TO WATCH TV 22 CHECKING THE MENU 24 AUTO CHANNEL PRESET 26 CONVERGENCE ADJUSTMENT 28 BASIC FUNCTIONS PROGRAM BLOCK (V.CHIP) FUNCTION 30 CHANGING PASSWORD 37 CHANGING SCREEN SIZE 39 MULTI-SCREEN FUNCTION 41 CLOSED CAPTION DECODE FUNCTION 43 CHANGING CHANNEL SET UP 44 PICTURE ADJUSTMENTS 49 SOUND ADJUSTMENTS 58 RLS FUNCTION 62 MULTI-POINT CONVERGENCE ADJUSTMENT 63...
... TO USE THESE OPERATING INSTRUCTIONS 8 INSTALLING THE MONITOR 9 BASIC OPERATIONS BEFORE USE 10 CONNECTING THE ANTENNA 12 CONNECTING VIDEO/AUDIO EQUIPMENT 14 FRONT PANEL FUNCTIONS 18 REMOTE CONTROL UNIT FUNCTIONS 20 TO WATCH TV 22 CHECKING THE MENU 24 AUTO CHANNEL PRESET 26 CONVERGENCE ADJUSTMENT 28 BASIC FUNCTIONS PROGRAM BLOCK (V.CHIP) FUNCTION 30 CHANGING PASSWORD 37 CHANGING SCREEN SIZE 39 MULTI-SCREEN FUNCTION 41 CLOSED CAPTION DECODE FUNCTION 43 CHANGING CHANNEL SET UP 44 PICTURE ADJUSTMENTS 49 SOUND ADJUSTMENTS 58 RLS FUNCTION 62 MULTI-POINT CONVERGENCE ADJUSTMENT 63...

Operating Instructions
Page 8
... 1 7 3 ¡ RECEIVER INPUT VOL VOL Î HDTV PROJECTION MONITOR NOTE: The CHANNEL SET UP cannot be selected unless the function is /are shown in dark gray. Precautions etc. The explanation method varies from page to page 24.) 3 Select CHANNELSETUP inthesameway. 5 2 SET/ ENTER 3 ∞ CHANNEL SET UP CONVERGENCE PROGRAM BLOCK CC CHANGE PASSWORD RLS :OFF EXI T USE: END: MENU SET/ ENTER 4 Select AUTO CHANNEL PRESET . 5 2 SET/ ENTER 3 ∞ CHANNEL SET UP AUTO CHANNEL PRESET CHANNEL ADD / DEL...
... 1 7 3 ¡ RECEIVER INPUT VOL VOL Î HDTV PROJECTION MONITOR NOTE: The CHANNEL SET UP cannot be selected unless the function is /are shown in dark gray. Precautions etc. The explanation method varies from page to page 24.) 3 Select CHANNELSETUP inthesameway. 5 2 SET/ ENTER 3 ∞ CHANNEL SET UP CONVERGENCE PROGRAM BLOCK CC CHANGE PASSWORD RLS :OFF EXI T USE: END: MENU SET/ ENTER 4 Select AUTO CHANNEL PRESET . 5 2 SET/ ENTER 3 ∞ CHANNEL SET UP AUTO CHANNEL PRESET CHANNEL ADD / DEL...
Operating Instructions
Page 10
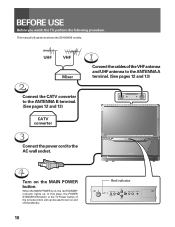
...) CATV converter Connect the power cord to turn on and off the Monitor. 10 MAIN POWER Red indicator POWER INPUT CH STANDBY ON STANDBY SET ON VOL VOL ROOM LIGHT CH MENU RETURN SENSOR PUSH ANTENNA CABLE B A HDTV PROJECTION MONITOR SD-643HD5 Turn on , the red STANDBY indicator lights up. BEFORE USE Before you watch the TV, perform the following procedure. When the MAIN POWER is on the MAIN POWER button. UHF VHF Mixer Connect the cables of the remote control unit can be used to...
...) CATV converter Connect the power cord to turn on and off the Monitor. 10 MAIN POWER Red indicator POWER INPUT CH STANDBY ON STANDBY SET ON VOL VOL ROOM LIGHT CH MENU RETURN SENSOR PUSH ANTENNA CABLE B A HDTV PROJECTION MONITOR SD-643HD5 Turn on , the red STANDBY indicator lights up. BEFORE USE Before you watch the TV, perform the following procedure. When the MAIN POWER is on the MAIN POWER button. UHF VHF Mixer Connect the cables of the remote control unit can be used to...

Operating Instructions
Page 11
... TV Power button is erased in memory for a long period of time (1 month or more), remove the batteries from the screen. If battery liquid has leaked, thoroughly wipe the inside of the remote control unit is removed, and then insert new batteries. Remote control operation range 30˚ 30˚ 23 feet (7m) POMWAEINR STANDBY ON POWER INPUT CH SOTANNDBY SET VOL CH MENU RETURN RSOEONMSOLRIGHT VOL PUSH HDTV PROJECTION MONITOR SD-643HD5...
... TV Power button is erased in memory for a long period of time (1 month or more), remove the batteries from the screen. If battery liquid has leaked, thoroughly wipe the inside of the remote control unit is removed, and then insert new batteries. Remote control operation range 30˚ 30˚ 23 feet (7m) POMWAEINR STANDBY ON POWER INPUT CH SOTANNDBY SET VOL CH MENU RETURN RSOEONMSOLRIGHT VOL PUSH HDTV PROJECTION MONITOR SD-643HD5...

Operating Instructions
Page 14
Digital tuner • Refer to the instructions of your VCR or DVD/LD player for the detailed connections. • Before making or changing connections, set the power switch to off and unplug the power cord from the AC outlet. • If both the VIDEO terminal (pin-jack type) and S-VIDEO terminal are connected, the signals from the S-VIDEO terminal will have priority. • Only the INPUT 1 and INPUT 2 jacks can input the...
Digital tuner • Refer to the instructions of your VCR or DVD/LD player for the detailed connections. • Before making or changing connections, set the power switch to off and unplug the power cord from the AC outlet. • If both the VIDEO terminal (pin-jack type) and S-VIDEO terminal are connected, the signals from the S-VIDEO terminal will have priority. • Only the INPUT 1 and INPUT 2 jacks can input the...

Operating Instructions
Page 15
...Digital tuner 15 PR /CR RGB INPUT 3 SIGNAL Use these terminals to input signals from a DVD player which has component video output terminals (Y, PB, PR). DON'T CONNECT WITH THE OTHER EQUIPMENT. DVD/LD player RL V SIGNAL SIGNAL CONNECTING VIDEO/AUDIO EQUIPMENT CONNECTING VIDEO/AUDIO EQUIPMENT VCR VCR OUTPUT AUDIO RL VIDEO S-VIDEO RL V SIGNAL BASIC OPERATIONS LR SIGNAL V RL V ANTENNA / CABLE B A CONTROL INPUTS OUT INPUT 1 INPUT 3 S-VIDEO Rear panel SIGNAL RL V INPUTS INPUT 1 INPUT 2 VIDEO L (MONO) AUDIO R OUTPUT INPUT 3 MONITOR INPUTS COMPONENT VIDEO INPUT...
...Digital tuner 15 PR /CR RGB INPUT 3 SIGNAL Use these terminals to input signals from a DVD player which has component video output terminals (Y, PB, PR). DON'T CONNECT WITH THE OTHER EQUIPMENT. DVD/LD player RL V SIGNAL SIGNAL CONNECTING VIDEO/AUDIO EQUIPMENT CONNECTING VIDEO/AUDIO EQUIPMENT VCR VCR OUTPUT AUDIO RL VIDEO S-VIDEO RL V SIGNAL BASIC OPERATIONS LR SIGNAL V RL V ANTENNA / CABLE B A CONTROL INPUTS OUT INPUT 1 INPUT 3 S-VIDEO Rear panel SIGNAL RL V INPUTS INPUT 1 INPUT 2 VIDEO L (MONO) AUDIO R OUTPUT INPUT 3 MONITOR INPUTS COMPONENT VIDEO INPUT...
Operating Instructions
Page 18
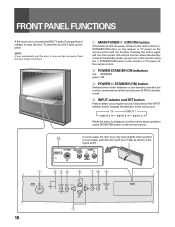
... button changes the selection to shut it may only open slightly when pushed. TV INPUT 1 INPUT 4 INPUT 3 INPUT 2 While the menu is shut off and 3 STANDBY/ON button on the receiver or TV power on the remote control will turn on the monitor using the 3 STANDBY/ON button on the monitor or TV power on the remote control. 2 POWER STANDBY/ON indicators red: STANDBY green: ON 3 POWER ( STANDBY/ON) button Switches the monitor between on the remote control. 18 0 S-VIDEO INPUT 4 In some cases, the door may not shut properly. In the standby mode...
... button changes the selection to shut it may only open slightly when pushed. TV INPUT 1 INPUT 4 INPUT 3 INPUT 2 While the menu is shut off and 3 STANDBY/ON button on the receiver or TV power on the remote control will turn on the monitor using the 3 STANDBY/ON button on the monitor or TV power on the remote control. 2 POWER STANDBY/ON indicators red: STANDBY green: ON 3 POWER ( STANDBY/ON) button Switches the monitor between on the remote control. 18 0 S-VIDEO INPUT 4 In some cases, the door may not shut properly. In the standby mode...

Operating Instructions
Page 19
... lower channel. SURROUND: OFF STABLE VOLUME: OFF SCREEN MODE: NATURAL WIDE V. POSITION: NOT USED CC: OFF RLS: OFF • When this function is produced or the volume level changes by itself. Signals from the MONITOR OUTPUT jacks may occur inside the CRT*. If the Projection Monitor does not operate properly, reset it on. If the normal operation cannot be tuned in the power source. and 2, 3 buttons Press plus (+) button...
... lower channel. SURROUND: OFF STABLE VOLUME: OFF SCREEN MODE: NATURAL WIDE V. POSITION: NOT USED CC: OFF RLS: OFF • When this function is produced or the volume level changes by itself. Signals from the MONITOR OUTPUT jacks may occur inside the CRT*. If the Projection Monitor does not operate properly, reset it on. If the normal operation cannot be tuned in the power source. and 2, 3 buttons Press plus (+) button...
Operating Instructions
Page 20
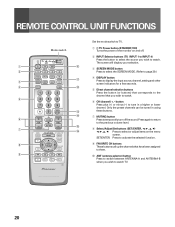
Mode switch 1 TV Power button (STANDBY/ON) Turns the power of the monitor on the menu LEARN MENU MENU screen. MUTING @ 7 4 8 Select/Adjust/Set buttons (SET/ENTER, 2, 3, 5, ∞) # EDIT/ TV/SAT/DVD DTV/DVD TOP 2, 3, 5, ∞: Press to watch. button 789 Press plus (+) or minus (-) to watch TV. Î HDTV PROJECTION MONITOR 20 POWER 5 GUIDE 8 2 8 SET/ ENTER ∞ 3 DTV/(SAT) INFO 9 FAVORITE CH buttons These buttons call up the channels that you wish to select or adjust items on and off the sound. Press...
Mode switch 1 TV Power button (STANDBY/ON) Turns the power of the monitor on the menu LEARN MENU MENU screen. MUTING @ 7 4 8 Select/Adjust/Set buttons (SET/ENTER, 2, 3, 5, ∞) # EDIT/ TV/SAT/DVD DTV/DVD TOP 2, 3, 5, ∞: Press to watch. button 789 Press plus (+) or minus (-) to watch TV. Î HDTV PROJECTION MONITOR 20 POWER 5 GUIDE 8 2 8 SET/ ENTER ∞ 3 DTV/(SAT) INFO 9 FAVORITE CH buttons These buttons call up the channels that you wish to select or adjust items on and off the sound. Press...

Operating Instructions
Page 22
....) Channel 12 Press 1 and then press 2 within 2 seconds. • Depending on the POWER. There are three methods for this switch may occur immediately after the number button is 10 to 23 feet). 45˚ POMWAEINR STANDBY ON POWER INPUT CH STOANNDBY SET VOL CH MENU RETURN ROSEONMSOLIRGHT VOL PUSH HDTV PROJECTION MONITOR SD-643HD5 140˚ Remote control unit TV CBL VCR DVD TV /SAT /LD /DTV TV ANT INPUT 1 2 3 4 FREEZE SCREEN MODE SPLIT...
....) Channel 12 Press 1 and then press 2 within 2 seconds. • Depending on the POWER. There are three methods for this switch may occur immediately after the number button is 10 to 23 feet). 45˚ POMWAEINR STANDBY ON POWER INPUT CH STOANNDBY SET VOL CH MENU RETURN ROSEONMSOLIRGHT VOL PUSH HDTV PROJECTION MONITOR SD-643HD5 140˚ Remote control unit TV CBL VCR DVD TV /SAT /LD /DTV TV ANT INPUT 1 2 3 4 FREEZE SCREEN MODE SPLIT...
Operating Instructions
Page 24
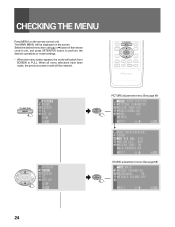
... MAIN MENU will be displayed on the remote control unit. EDIT/ LEARN SOURCE POWER TV/SAT/DVD MENU 5 DTV/DVD TOP MENU DTV/SAT GUIDE 2 SET/ ENTER 3 DTV/(SAT) 8 ∞ INFO FAVORITE CH VCR REC 1 7 3 ¡ RECEIVER INPUT VOL VOL Î HDTV PROJECTION MONITOR TV/SAT/DVD MENU P I CTURE SOUND SCREEN CC CC SET UP USE: END: MENU 5 2 SET/ ENTER 3 ∞ P I CTURE SOUND SCREEN CC CC SET UP USE: END: MENU PICTURE adjustment menu (See page 49) MODE : USER ( THEAT ER ) P I CTURE PARAME T ER COLOR T EMP : STD SET...
... MAIN MENU will be displayed on the remote control unit. EDIT/ LEARN SOURCE POWER TV/SAT/DVD MENU 5 DTV/DVD TOP MENU DTV/SAT GUIDE 2 SET/ ENTER 3 DTV/(SAT) 8 ∞ INFO FAVORITE CH VCR REC 1 7 3 ¡ RECEIVER INPUT VOL VOL Î HDTV PROJECTION MONITOR TV/SAT/DVD MENU P I CTURE SOUND SCREEN CC CC SET UP USE: END: MENU 5 2 SET/ ENTER 3 ∞ P I CTURE SOUND SCREEN CC CC SET UP USE: END: MENU PICTURE adjustment menu (See page 49) MODE : USER ( THEAT ER ) P I CTURE PARAME T ER COLOR T EMP : STD SET...
Operating Instructions
Page 28
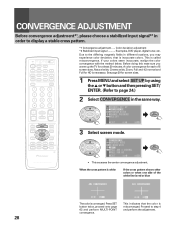
... CH DISPLAY SLEEP 123 456 789 0 CH ENTER ¢ CH RETURN CH MUTING 4 VOL EDIT/ LEARN SOURCE POWER TV/SAT/DVD MENU 5 DTV/DVD TOP MENU DTV/SAT GUIDE 2 SET/ ENTER 3 DTV/(SAT) 8 ∞ INFO FAVORITE CH VCR REC 1 7 3 ¡ RECEIVER INPUT VOL VOL Î *1 Convergence adjustment ..... CONVERGENCE ADJUSTMENT Before convergence adjustment*1, please choose a stabilized input signal*2 in different locations, you warm up the TV for screen sizes. 1 PressMENUandselect SETUP byusing the 5 or ∞ button...
... CH DISPLAY SLEEP 123 456 789 0 CH ENTER ¢ CH RETURN CH MUTING 4 VOL EDIT/ LEARN SOURCE POWER TV/SAT/DVD MENU 5 DTV/DVD TOP MENU DTV/SAT GUIDE 2 SET/ ENTER 3 DTV/(SAT) 8 ∞ INFO FAVORITE CH VCR REC 1 7 3 ¡ RECEIVER INPUT VOL VOL Î *1 Convergence adjustment ..... CONVERGENCE ADJUSTMENT Before convergence adjustment*1, please choose a stabilized input signal*2 in different locations, you warm up the TV for screen sizes. 1 PressMENUandselect SETUP byusing the 5 or ∞ button...

Operating Instructions
Page 29
... 0 CH ENTER ¢ CH RETURN CH MUTING 4 VOL EDIT/ LEARN SOURCE POWER TV/SAT/DVD MENU 5 DTV/DVD TOP MENU DTV/SAT GUIDE 2 SET/ ENTER 3 DTV/(SAT) 8 ∞ INFO FAVORITE CH VCR REC 1 7 3 ¡ RECEIVER INPUT VOL VOL Î HDTV PROJECTION MONITOR CONVERGENCE ADJUSTMENT 4 Move the red line onto the green line. ADJ CONVERGENCE 5 2 SET/ ENTER 3 ∞ USE: EXIT: MENU ADJ CONVERGENCE SET/ ENTER USE: EXIT: MENU CONVERGENCE Z OOM ADJ CENTER POI NT CC ADJ MUL T I -PO I NT...
... 0 CH ENTER ¢ CH RETURN CH MUTING 4 VOL EDIT/ LEARN SOURCE POWER TV/SAT/DVD MENU 5 DTV/DVD TOP MENU DTV/SAT GUIDE 2 SET/ ENTER 3 DTV/(SAT) 8 ∞ INFO FAVORITE CH VCR REC 1 7 3 ¡ RECEIVER INPUT VOL VOL Î HDTV PROJECTION MONITOR CONVERGENCE ADJUSTMENT 4 Move the red line onto the green line. ADJ CONVERGENCE 5 2 SET/ ENTER 3 ∞ USE: EXIT: MENU ADJ CONVERGENCE SET/ ENTER USE: EXIT: MENU CONVERGENCE Z OOM ADJ CENTER POI NT CC ADJ MUL T I -PO I NT...

Operating Instructions
Page 50
... 1O BLACK LVL -1O CC COLOR 5 T INT -3 SHARPNESS 1O EXI T USE: END: MENU 5 After adjusting, press MENU to INPUT 4. 1 Select the input source and show the image on the screen. Indicates the adjusted picture quality setting that was adjusted will become the USER sub mode (indicated in parentheses). • A USER mode can be stored for TV and the four input sources. TV/SAT/DVD MENU PICTURE ADJUSTMENTS TV CBL VCR DVD TV /SAT /LD /DTV TV ANT INPUT 1 2 3 4 FREEZE SCREEN MODE SPLIT...
... 1O BLACK LVL -1O CC COLOR 5 T INT -3 SHARPNESS 1O EXI T USE: END: MENU 5 After adjusting, press MENU to INPUT 4. 1 Select the input source and show the image on the screen. Indicates the adjusted picture quality setting that was adjusted will become the USER sub mode (indicated in parentheses). • A USER mode can be stored for TV and the four input sources. TV/SAT/DVD MENU PICTURE ADJUSTMENTS TV CBL VCR DVD TV /SAT /LD /DTV TV ANT INPUT 1 2 3 4 FREEZE SCREEN MODE SPLIT...

Operating Instructions
Page 72
... MUTING 4 VOL EDIT/ LEARN SOURCE TV/SAT/DVD MENU 5 DTV/DVD TOP MENU DTV/SAT GUIDE 2 SET/ ENTER 3 DTV/(SAT) 8 ∞ INFO FAVORITE CH VCR REC 1 7 3 ¡ RECEIVER INPUT VOL VOL Î 5 6 7 8 HDTV PROJECTION MONITOR SAT CONTROL BUTTONS CABLE, SAT and DTV cannot be operated using buttons 1 to 8. • Satellite broadcast tuners which are made by REMOTE CODE SET UP, the remote control unit buttons will function as the connected input terminal and set the mode switch to watch. 2 CH...
... MUTING 4 VOL EDIT/ LEARN SOURCE TV/SAT/DVD MENU 5 DTV/DVD TOP MENU DTV/SAT GUIDE 2 SET/ ENTER 3 DTV/(SAT) 8 ∞ INFO FAVORITE CH VCR REC 1 7 3 ¡ RECEIVER INPUT VOL VOL Î 5 6 7 8 HDTV PROJECTION MONITOR SAT CONTROL BUTTONS CABLE, SAT and DTV cannot be operated using buttons 1 to 8. • Satellite broadcast tuners which are made by REMOTE CODE SET UP, the remote control unit buttons will function as the connected input terminal and set the mode switch to watch. 2 CH...

Operating Instructions
Page 73
... the digital tuner. DTV INFO button When this button is pressed, the DTV guide screen will be displayed. - REMOTE CODE SET UP DTV CONTROL BUTTONS Mode switch CABLE, SAT and DTV cannot be selected at the same time. 1 TV CBL VCR DVD TV /SAT /LD /DTV TV ANT INPUT 1 2 3 4 FREEZE SCREEN MODE SPLIT SWAP SEARCH SELECT SUB CH DISPLAY SLEEP When a digital tuner is pressed, information on DTV will be displayed. Blue, Green, Red, Yellow: Used to switch between the current channel and the channel...
... the digital tuner. DTV INFO button When this button is pressed, the DTV guide screen will be displayed. - REMOTE CODE SET UP DTV CONTROL BUTTONS Mode switch CABLE, SAT and DTV cannot be selected at the same time. 1 TV CBL VCR DVD TV /SAT /LD /DTV TV ANT INPUT 1 2 3 4 FREEZE SCREEN MODE SPLIT SWAP SEARCH SELECT SUB CH DISPLAY SLEEP When a digital tuner is pressed, information on DTV will be displayed. Blue, Green, Red, Yellow: Used to switch between the current channel and the channel...

Operating Instructions
Page 78
...). External influences such as slow and still play, of your dealer to malfunction. Strong lights striking the remote control sensor may not be broadcasted in field 2 in another component. Closed caption signal may cause the internal microcomputer to carry out repair work. Press the RETURN button. The antenna cable is something wrong with this unit). TV-CATV MODE is not turned on. Check the CC menu settings. (As...
...). External influences such as slow and still play, of your dealer to malfunction. Strong lights striking the remote control sensor may not be broadcasted in field 2 in another component. Closed caption signal may cause the internal microcomputer to carry out repair work. Press the RETURN button. The antenna cable is something wrong with this unit). TV-CATV MODE is not turned on. Check the CC menu settings. (As...


