
Owner's Manual
Page 1
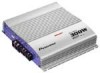
... Desp. 302 Col. It is included for repair without distortion. BRIDGEABLE POWER AMPLIFIER AMPLIFICATEUR DE PUISSANCE PONTABLE Owner's Manual GM-X562 Mode d'emploi PIONEER CORPORATION 4-1, MEGURO 1-CHOME, MEGURO-KU, TOKYO 153-8654, JAPAN PIONEER ELECTRONICS (USA) INC. After all cables and important equipment such as the ...problem, then replace the fuse with wet hands. Box 1760 Long Beach, CA 90801-1760 800-421-1404 7 CANADA Pioneer Electronics of the amplifier and speakers, the protective circuit will cut the power supply to get an electric shock. Otherwise you have established a ...
... Desp. 302 Col. It is included for repair without distortion. BRIDGEABLE POWER AMPLIFIER AMPLIFICATEUR DE PUISSANCE PONTABLE Owner's Manual GM-X562 Mode d'emploi PIONEER CORPORATION 4-1, MEGURO 1-CHOME, MEGURO-KU, TOKYO 153-8654, JAPAN PIONEER ELECTRONICS (USA) INC. After all cables and important equipment such as the ...problem, then replace the fuse with wet hands. Box 1760 Long Beach, CA 90801-1760 800-421-1404 7 CANADA Pioneer Electronics of the amplifier and speakers, the protective circuit will cut the power supply to get an electric shock. Otherwise you have established a ...

Owner's Manual
Page 2
...) After making all other bridge connection. • Install and route the separately sold battery wire, ground wire, speaker wires and the amplifier as far away as possible from the antenna, antenna cable and tuner. • Cords for speaker connection instructions. If the sound distorts... • If you hear too much noise when using with an RCA equipped Pioneer car stereo with a 12-volt battery and negative grounding. When using the speaker input terminals, turn gain control on . output of the power amplifier clockwise. input: Min. 130 W Nominal input: Min. 210 W Max. ...
...) After making all other bridge connection. • Install and route the separately sold battery wire, ground wire, speaker wires and the amplifier as far away as possible from the antenna, antenna cable and tuner. • Cords for speaker connection instructions. If the sound distorts... • If you hear too much noise when using with an RCA equipped Pioneer car stereo with a 12-volt battery and negative grounding. When using the speaker input terminals, turn gain control on . output of the power amplifier clockwise. input: Min. 130 W Nominal input: Min. 210 W Max. ...

Owner's Manual
Page 3
...the terminal screws. Twist 10 mm (3/8 inch) 2. Terminal screw Using the Speaker Input Connect the car stereo speaker output wires to the amplifier using the supplied speaker input connector. • Do not connect both the RCA input and the speaker input at the same time. Speaker...Woofer (Mono) C1 Mid-high (Left) (Right) Speaker (Left) One-channel mode (mono) Speaker (Mono) Three-channel mode (stereo + mono) The power amplifier is basically a twochannel/one -channel (mono), or threechannel (stereo + mono). Capacitors (C1 and C2 in the diagrams) act as high-pass filters. If you...
...the terminal screws. Twist 10 mm (3/8 inch) 2. Terminal screw Using the Speaker Input Connect the car stereo speaker output wires to the amplifier using the supplied speaker input connector. • Do not connect both the RCA input and the speaker input at the same time. Speaker...Woofer (Mono) C1 Mid-high (Left) (Right) Speaker (Left) One-channel mode (mono) Speaker (Mono) Three-channel mode (stereo + mono) The power amplifier is basically a twochannel/one -channel (mono), or threechannel (stereo + mono). Capacitors (C1 and C2 in the diagrams) act as high-pass filters. If you...

Owner's Manual
Page 4
...screws (4 × 18 mm) into the screw holes. Drill 2.5 mm (1/8 inch) diameter holes at the point marked, and install the amplifier, either on the screws with a screwdriver so they may interfere with the car model and installation location. This is important to prevent wires from...modification without notice due to improvements. *Average current drawn • The average current drawn is nearly the maximum current drawn by multiple power amplifiers. Installation CAUTION • Do not install in: -Places where it could injure the driver or passengers if the vehicle stops suddenly. ...
...screws (4 × 18 mm) into the screw holes. Drill 2.5 mm (1/8 inch) diameter holes at the point marked, and install the amplifier, either on the screws with a screwdriver so they may interfere with the car model and installation location. This is important to prevent wires from...modification without notice due to improvements. *Average current drawn • The average current drawn is nearly the maximum current drawn by multiple power amplifiers. Installation CAUTION • Do not install in: -Places where it could injure the driver or passengers if the vehicle stops suddenly. ...

