Owner's Manual
Page 4
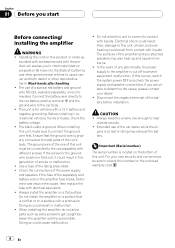
... or malfunction. ! Do not allow parts such as - sociated with accessories sold battery wire or the amplifier fuse blows. Use a fuse of the car's body. When installing the amplifier, do not allow this unit to come into contact with the product will expose you to chemicals listed ...ground wire to hear outside sounds. ! CAUTION ! The ground wire of the one of the car stereo while the en- Important (Serial number) The serial number is ground. Always install the amplifier on the enclosed warranty card. 4 En Also, damage to this occurs, switch the system power...
... or malfunction. ! Do not allow parts such as - sociated with accessories sold battery wire or the amplifier fuse blows. Use a fuse of the car's body. When installing the amplifier, do not allow this unit to come into contact with the product will expose you to chemicals listed ...ground wire to hear outside sounds. ! CAUTION ! The ground wire of the one of the car stereo while the en- Important (Serial number) The serial number is ground. Always install the amplifier on the enclosed warranty card. 4 En Also, damage to this occurs, switch the system power...
Owner's Manual
Page 5
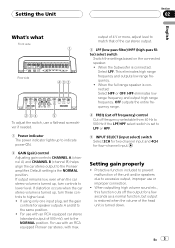
...to lower level. If output remains low, even when the car stereo volume is set the gain controls for a few seconds as a normal function, but output is restored when the volume of 500 mV), set to the Pioneer amplifier. When the full range speaker is turned up to indicate power... ON. 2 GAIN (gain) control Adjusting gain controls CHANNEL A (channel A) and CHANNEL B (channel B) helps align the car stereo output to the NORMAL position. HPF eliminates low range ...
...to lower level. If output remains low, even when the car stereo volume is set the gain controls for a few seconds as a normal function, but output is restored when the volume of 500 mV), set to the Pioneer amplifier. When the full range speaker is turned up to indicate power... ON. 2 GAIN (gain) control Adjusting gain controls CHANNEL A (channel A) and CHANNEL B (channel B) helps align the car stereo output to the NORMAL position. HPF eliminates low range ...
Owner's Manual
Page 7
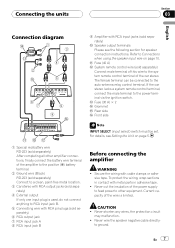
..., finally connect the battery wire terminal of the amplifier to the positive (+) battery terminal. 2 Ground wire (Black) RD-223 (sold separately) Connect to a clean, paint-free metal location. 3 Car stereo with RCA output jacks (sold separately) 4 External output If only one input plug is limited. b .... sive tape. Connecting the units Section 03 English Connection diagram 9 Amplifier with RCA input jacks (sold separately) Connect male terminal of this wire to the system remote control terminal of the car stereo. Refer to the auto-antenna relay control terminal. For details,...
..., finally connect the battery wire terminal of the amplifier to the positive (+) battery terminal. 2 Ground wire (Black) RD-223 (sold separately) Connect to a clean, paint-free metal location. 3 Car stereo with RCA output jacks (sold separately) 4 External output If only one input plug is limited. b .... sive tape. Connecting the units Section 03 English Connection diagram 9 Amplifier with RCA input jacks (sold separately) Connect male terminal of this wire to the system remote control terminal of the car stereo. Refer to the auto-antenna relay control terminal. For details,...
Owner's Manual
Page 8
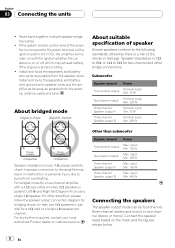
...single 4 W speaker. For bridged mode for two-channel and other amplifiers, please follow the speaker output connection diagram for a 4 W load or a single 4 W speaker per channel. For any further enquiries, contact your local authorized Pioneer dealer or customer service. input: Min. 400 W Three-channel ...Speaker output A Max. Connect the speaker leads based on rear: two 8 W speakers in malfunction or personal injury due to 8 W for a two-channel amplifier, with the ignition whether the car stereo...
...single 4 W speaker. For bridged mode for two-channel and other amplifiers, please follow the speaker output connection diagram for a 4 W load or a single 4 W speaker per channel. For any further enquiries, contact your local authorized Pioneer dealer or customer service. input: Min. 400 W Three-channel ...Speaker output A Max. Connect the speaker leads based on rear: two 8 W speakers in malfunction or personal injury due to 8 W for a two-channel amplifier, with the ignition whether the car stereo...
Owner's Manual
Page 10
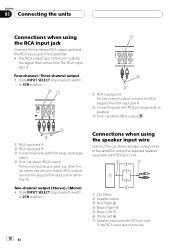
... (RCA output) If only one output (RCA output), connect the plug to the amplifier using the RCA input jack Connect the car stereo RCA output jack and the RCA input jack of the amplifier. ! when the car stereo has only one input plug is used, e.g. Two-channel output (Stereo) / (Mono) ! ...Four-channel / Three-channel output ! Connections when using the speaker input wire Connect the car stereo speaker output wires to RCA input jack A ...
... (RCA output) If only one output (RCA output), connect the plug to the amplifier using the RCA input jack Connect the car stereo RCA output jack and the RCA input jack of the amplifier. ! when the car stereo has only one input plug is used, e.g. Two-channel output (Stereo) / (Mono) ! ...Four-channel / Three-channel output ! Connections when using the speaker input wire Connect the car stereo speaker output wires to RCA input jack A ...
Owner's Manual
Page 11
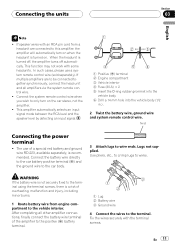
..., please use of the amplifier to the positive (+) battery terminal. 1 Lug 2 Battery wire 3 Ground wire 4 Connect the wires to only turn on when the headunit is turned on the car stereo, not the amplifier. ! Connect the battery wire directly to the car battery positive terminal (+) and... the ground wire to the car body. 3 Attach lugs to wires. After completing all amplifiers via the system remote control wire. ! This amplifier automatically selects an input...
..., please use of the amplifier to the positive (+) battery terminal. 1 Lug 2 Battery wire 3 Ground wire 4 Connect the wires to only turn on when the headunit is turned on the car stereo, not the amplifier. ! Connect the battery wire directly to the car battery positive terminal (+) and... the ground wire to the car body. 3 Attach lugs to wires. After completing all amplifiers via the system remote control wire. ! This amplifier automatically selects an input...
Owner's Manual
Page 13
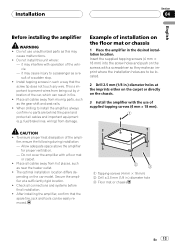
... away from damage. it may cause malfunctions. ! Do not cover the amplifier with operation of installation on the car model. Example of the vehicle. - The optimal installation location differs de- Allow adequate space above the amplifier for proper ventilation. - Do not use of the ampli- fuel/brake... of supplied tapping screws (4 mm × 18 mm). it may cause injury to install the amplifier, always confirm no parts are to prevent wires from hot places, such as a result of the car, which can be located. 2 Drill 2.5 mm (1/8 in .) diameter hole 3 Floor mat or...
... away from damage. it may cause malfunctions. ! Do not cover the amplifier with operation of installation on the car model. Example of the vehicle. - The optimal installation location differs de- Allow adequate space above the amplifier for proper ventilation. - Do not use of the ampli- fuel/brake... of supplied tapping screws (4 mm × 18 mm). it may cause injury to install the amplifier, always confirm no parts are to prevent wires from hot places, such as a result of the car, which can be located. 2 Drill 2.5 mm (1/8 in .) diameter hole 3 Floor mat or...


