
Owner's Manual
Page 6
... MENU 24 AUDIO 24 SUBTITLE 24 Setting the parental control 25 Selecting parental control 25 Temporarily cancelling parental control 25 Setting the clock 26 CLOCK (manually 26 AUTO CLOCK 26 STANDARD TIME (Time zone 26 DAYLIGHT SAVING TIME 26 Setting the disc 27 REFORMAT 27 NEW DISC FORMAT 27 FINALIZE 28...
... MENU 24 AUDIO 24 SUBTITLE 24 Setting the parental control 25 Selecting parental control 25 Temporarily cancelling parental control 25 Setting the clock 26 CLOCK (manually 26 AUTO CLOCK 26 STANDARD TIME (Time zone 26 DAYLIGHT SAVING TIME 26 Setting the disc 27 REFORMAT 27 NEW DISC FORMAT 27 FINALIZE 28...
Owner's Manual
Page 9
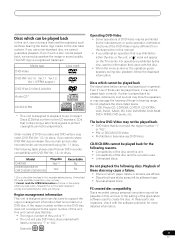
...this recorder before playing. The following table shows older Pioneer DVD recorder compatibility with the disc. • When the menu screen or the operation guide appears during disc playback, follow the displayed information. Model DVR-7000 DVR-810H/DVR-57H DVR-210/DVR-310/DVR-510H Playable Yes1,2,3 Yes1 Recordable No No 1 ... • DVD-Video that is "1". • The unit will show in this unit due to the region number of this unit, this manual. • If you want to the CD standard. If you attempt an operation that do not have sticky areas left by the manufacturer, ...
...this recorder before playing. The following table shows older Pioneer DVD recorder compatibility with the disc. • When the menu screen or the operation guide appears during disc playback, follow the displayed information. Model DVR-7000 DVR-810H/DVR-57H DVR-210/DVR-310/DVR-510H Playable Yes1,2,3 Yes1 Recordable No No 1 ... • DVD-Video that is "1". • The unit will show in this unit due to the region number of this unit, this manual. • If you want to the CD standard. If you attempt an operation that do not have sticky areas left by the manufacturer, ...

Owner's Manual
Page 14
... +/- (page 54) Use to select TV channels. / (page 23, 33, 37, 60) Up/down cursor buttons 13 TRK +/- (page 50) Use to adjust the VCR manual playback tracking. / (page 33, 37, 60) Left/right cursor buttons 14 ENTER/SELECT (page 23, 33, 37, 58, 60) Use to select menu options. 15...
... +/- (page 54) Use to select TV channels. / (page 23, 33, 37, 60) Up/down cursor buttons 13 TRK +/- (page 50) Use to adjust the VCR manual playback tracking. / (page 33, 37, 60) Left/right cursor buttons 14 ENTER/SELECT (page 23, 33, 37, 58, 60) Use to select menu options. 15...

Owner's Manual
Page 20
... exact arrangement you use an adapter to convert the RCA jacks from the component video cables to BNC (not supplied). 20 En Check the Owner's Manual provided with audio input (L/R) and video input jacks using the video or S-Video jack, make the progressive scanning mode inactive (see any picture. If it...
... exact arrangement you use an adapter to convert the RCA jacks from the component video cables to BNC (not supplied). 20 En Check the Owner's Manual provided with audio input (L/R) and video input jacks using the video or S-Video jack, make the progressive scanning mode inactive (see any picture. If it...

Owner's Manual
Page 22
... is connected with the 75 Ω coaxial cable only: 1 Press and hold 3 or 4 on . • If the clock is not set automatically, set the clock manually. (See page 26.) Note • If the unit does not operate properly, or there is not set to CH 3 or 4 to correspond with the power...
... is connected with the 75 Ω coaxial cable only: 1 Press and hold 3 or 4 on . • If the clock is not set automatically, set the clock manually. (See page 26.) Note • If the unit does not operate properly, or there is not set to CH 3 or 4 to correspond with the power...

Owner's Manual
Page 23
... receive a sharp color picture from the basic setting procedure, the setting procedure is described in each menu, see the corresponding section in your TV owner's manual for details. Getting started 04 5 Select any channel to receive a TV station in this menu includes a clock, channel and other things that require different operations...
... receive a sharp color picture from the basic setting procedure, the setting procedure is described in each menu, see the corresponding section in your TV owner's manual for details. Getting started 04 5 Select any channel to receive a TV station in this menu includes a clock, channel and other things that require different operations...
Owner's Manual
Page 26
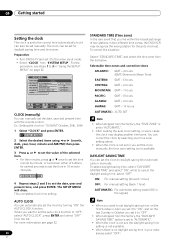
... STANDARD TIME CH SETUP DAYLIGHT SAVING TIME OTHER 01/01/04 12:00AM ON AUTOMATIC AUTOMATIC SELECT SELECT ESNELTEECRT/ ENTER RETURN BACK SETUP END CLOCK (manually) You can automatically set the clock by selecting your area, always select "OFF". For the procedure, see page 22. 26 En STANDARD TIME (... there is no daylight saving time in some cases the clock may recognize the wrong station for the auto clock set. You can be set manually. Preparation: • Turn ON the TV and set it to "OFF". • When shipped from the factory, the "TIME ZONE" is set to "AUTOMATIC"....
... STANDARD TIME CH SETUP DAYLIGHT SAVING TIME OTHER 01/01/04 12:00AM ON AUTOMATIC AUTOMATIC SELECT SELECT ESNELTEECRT/ ENTER RETURN BACK SETUP END CLOCK (manually) You can automatically set the clock by selecting your area, always select "OFF". For the procedure, see page 22. 26 En STANDARD TIME (... there is no daylight saving time in some cases the clock may recognize the wrong station for the auto clock set. You can be set manually. Preparation: • Turn ON the TV and set it to "OFF". • When shipped from the factory, the "TIME ZONE" is set to "AUTOMATIC"....

Owner's Manual
Page 32
... "CATV". The channel display will be programmed into memory. ENTER/ SELECT ENTER RETURN BACK SETUP END JPEG INTERVAL You can add the channels you want manually. for JPEG slide show mode. The numeric keys can set it to 3 in the slide show (page 46). Select "JPEG INTERVAL" and select the switching...
... "CATV". The channel display will be programmed into memory. ENTER/ SELECT ENTER RETURN BACK SETUP END JPEG INTERVAL You can add the channels you want manually. for JPEG slide show mode. The numeric keys can set it to 3 in the slide show (page 46). Select "JPEG INTERVAL" and select the switching...

Owner's Manual
Page 50
...The picture advances frame by frame picture Press PAUSE during playback, press TRK + / - to protect the video tape against excessive wear. "MANUAL TR." Commercial skip Press CM SKIP during the playback. Forward picture search function Press F.FWD x 1 or x 2 during playback. To ...CALL until its end. Press it is rapidly forwarded for a coarse adjustment. • Press ATR to stabilize the still picture. Manual tracking adjustment If automatic tracking cannot eliminate noises well during playback. will be repeated. 1 Press REPEAT while the VCR is playing back...
...The picture advances frame by frame picture Press PAUSE during playback, press TRK + / - to protect the video tape against excessive wear. "MANUAL TR." Commercial skip Press CM SKIP during the playback. Forward picture search function Press F.FWD x 1 or x 2 during playback. To ...CALL until its end. Press it is rapidly forwarded for a coarse adjustment. • Press ATR to stabilize the still picture. Manual tracking adjustment If automatic tracking cannot eliminate noises well during playback. will be repeated. 1 Press REPEAT while the VCR is playing back...

Owner's Manual
Page 58
... channel, the CH field will be setup (see the new timer recording in the previous screen, such as necessary. You can set the channel number manually. 5 Highlight OK and press ENTER. ENTER/ SELECT SELECT ENTER RETURN BACK VCR Plus+ END • TYPE - In this information as every weekday) • DATE (MM...
... channel, the CH field will be setup (see the new timer recording in the previous screen, such as necessary. You can set the channel number manually. 5 Highlight OK and press ENTER. ENTER/ SELECT SELECT ENTER RETURN BACK VCR Plus+ END • TYPE - In this information as every weekday) • DATE (MM...

Owner's Manual
Page 81
Note 4:3 (Pan & Scan) The program is presented-check the manual that came with the TV for the initial settings "DVD MENU", "AUDIO" and/or "SUBTITLE" (see page 24). Set to either of the 4:3 settings with a ...
Note 4:3 (Pan & Scan) The program is presented-check the manual that came with the TV for the initial settings "DVD MENU", "AUDIO" and/or "SUBTITLE" (see page 24). Set to either of the 4:3 settings with a ...
Owner's Manual
Page 87
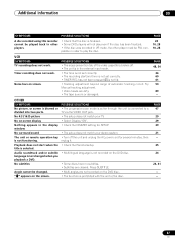
... the disc. 28 10, 28 10, 28 VCR SYMPTOMS TV recording does not work . No subtitles Angle cannot be changed when you playback a DVD. Try Manual tracking adjustment. • Video heads are not recorded on -screen display Nothing appears in the external input mode. • The time is not set correctly...
... the disc. 28 10, 28 10, 28 VCR SYMPTOMS TV recording does not work . No subtitles Angle cannot be changed when you playback a DVD. Try Manual tracking adjustment. • Video heads are not recorded on -screen display Nothing appears in the external input mode. • The time is not set correctly...


