Operating Instructions
Page 21
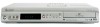
... enjoying your DVD recorder. Set the current date and time. Enjoy using daylight saving time. Finish Setup Other settings you can set the clock manually. Manual Auto Manual Date Time Time Zone D.S.T. 01 / 01 / 2005 SAT 12 : 00 AM USA Alaska Off • Use the / (cursor up for...ENTER to the channel preset number that the VCR Plus+ programming system works correctly. Getting started 04 English 6 Use the / (cursor up . Manual Auto Manual Date Time Time Zone D.S.T. 01 / 01 / 2005 SAT 12 : 00 AM USA Alaska Off Press (cursor down to set the time. Auto ...
... enjoying your DVD recorder. Set the current date and time. Enjoy using daylight saving time. Finish Setup Other settings you can set the clock manually. Manual Auto Manual Date Time Time Zone D.S.T. 01 / 01 / 2005 SAT 12 : 00 AM USA Alaska Off • Use the / (cursor up for...ENTER to the channel preset number that the VCR Plus+ programming system works correctly. Getting started 04 English 6 Use the / (cursor up . Manual Auto Manual Date Time Time Zone D.S.T. 01 / 01 / 2005 SAT 12 : 00 AM USA Alaska Off Press (cursor down to set the time. Auto ...

Operating Instructions
Page 23
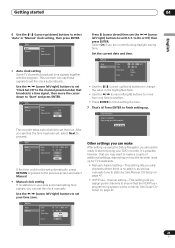
... is specified. • Some DVD-Video discs don't allow certain playback controls to open /close the disc tray, press OPEN/CLOSE. Important • Throughout this manual, the term 'DVD' means playback-only DVD-Video discs and DVD-R/RW. This is displayed on . See also Using the Disc Navigator to browse the...
... is specified. • Some DVD-Video discs don't allow certain playback controls to open /close the disc tray, press OPEN/CLOSE. Important • Throughout this manual, the term 'DVD' means playback-only DVD-Video discs and DVD-R/RW. This is displayed on . See also Using the Disc Navigator to browse the...

Operating Instructions
Page 38
... is on, switch it into standby. 2 Press and hold on the front panel for three seconds until the new stop recording completely, press . You can manually stop recording completely if you can 't enter a timer program if the clock isn't set , the recorder doesn't start recording!
... is on, switch it into standby. 2 Press and hold on the front panel for three seconds until the new stop recording completely, press . You can manually stop recording completely if you can 't enter a timer program if the clock isn't set , the recorder doesn't start recording!
Operating Instructions
Page 39
... pressing MENU or TOP MENU to display the menu, then using CopyGuard, you will not be able to check what kinds of players (including many Pioneer models) can play the disc. Input 2 (front panel) Check that disc. If two programs have the same times (but different channels, for ... or VCR, connected to one of the recorder's external inputs. Recording 06 English • What happens when two or more details. Check the manual that the disc can still be played on a regular DVD player or computer equipped with the player to record it. Recording from an external component...
... pressing MENU or TOP MENU to display the menu, then using CopyGuard, you will not be able to check what kinds of players (including many Pioneer models) can play the disc. Input 2 (front panel) Check that disc. If two programs have the same times (but different channels, for ... or VCR, connected to one of the recorder's external inputs. Recording 06 English • What happens when two or more details. Check the manual that the disc can still be played on a regular DVD player or computer equipped with the player to record it. Recording from an external component...

Operating Instructions
Page 40
... and select 'Initial Setup'. 2 Press to re-initialize and/or initialize it automatically for either Video mode recording or VR mode recording. You can also manually initialize DVD-RW discs. Initializing disc Please wait a moment. 1 min left • How long finalization takes depends on the type of titles on the disc...
... and select 'Initial Setup'. 2 Press to re-initialize and/or initialize it automatically for either Video mode recording or VR mode recording. You can also manually initialize DVD-RW discs. Initializing disc Please wait a moment. 1 min left • How long finalization takes depends on the type of titles on the disc...
Operating Instructions
Page 45
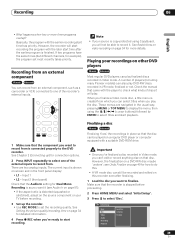
...Next • Auto clock setting Some TV channels broadcast time signals together with the program. This recorder can use any of inactivity. Clock Auto Manual Date Time Clock Set CH HOME MENU Disc Navigator Editing Timer Recording Initial Setup Play Mode ENTER Confirm HOME MENU Exit • Some settings ...set before you can use these settings are grayed out in your area are broadcasting time signals, you can set the clock manually: 45 En Auto Auto Manual Date Time Clock Set CH AM 0 0 2 Start The time and date is displayed when the recorder has successfully set the...
...Next • Auto clock setting Some TV channels broadcast time signals together with the program. This recorder can use any of inactivity. Clock Auto Manual Date Time Clock Set CH HOME MENU Disc Navigator Editing Timer Recording Initial Setup Play Mode ENTER Confirm HOME MENU Exit • Some settings ...set before you can use these settings are grayed out in your area are broadcasting time signals, you can set the clock manually: 45 En Auto Auto Manual Date Time Clock Set CH AM 0 0 2 Start The time and date is displayed when the recorder has successfully set the...
Operating Instructions
Page 46
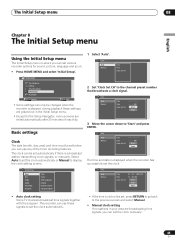
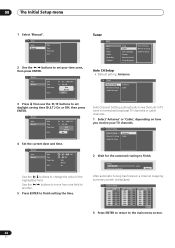
...wait a moment. 20/68 Cancel After automatic tuning has finished, a channel mapping summary screen is displayed. Clock Auto Manual Date Time Time Zone D.S.T. 2 Use the / buttons to finish setting the time. Manual Auto Manual Date Time Time Zone D.S.T. 01 / 01 / 2005 SAT 12 : 00 AM USA Alaska Off Tuner Basic Basic ... the main menu screen. 46 En Auto Channel Setting automatically tunes the built-in the highlighted field. 08 The Initial Setup menu 1 Select 'Manual'. Auto CH Setup CH Skip 002 On 003 On 004 On 005 On 006 On 007 On 008 Off CH Skip 009 Off 010 Off...
...wait a moment. 20/68 Cancel After automatic tuning has finished, a channel mapping summary screen is displayed. Clock Auto Manual Date Time Time Zone D.S.T. 2 Use the / buttons to finish setting the time. Manual Auto Manual Date Time Time Zone D.S.T. 01 / 01 / 2005 SAT 12 : 00 AM USA Alaska Off Tuner Basic Basic ... the main menu screen. 46 En Auto Channel Setting automatically tunes the built-in the highlighted field. 08 The Initial Setup menu 1 Select 'Manual'. Auto CH Setup CH Skip 002 On 003 On 004 On 005 On 006 On 007 On 008 Off CH Skip 009 Off 010 Off...

Operating Instructions
Page 47
...function lets you skip channels where there is no station so that have a station. 1 Select 'Manual CH Setup' to display the manual channel setup screen. Manual CH Setup Auto CH Setup Channel 002 Manual CH Setup Skip Off Guide CH Setup AFT Off Level +32 2 Assign channel numbers to the guide... channels as you change channels using the Manual CH Setting, below. OSD Language • Default setting: English Basic Basic Disc Video Audio Recording Playback Clock Tuner OSD Language Display Remote...
...function lets you skip channels where there is no station so that have a station. 1 Select 'Manual CH Setup' to display the manual channel setup screen. Manual CH Setup Auto CH Setup Channel 002 Manual CH Setup Skip Off Guide CH Setup AFT Off Level +32 2 Assign channel numbers to the guide... channels as you change channels using the Manual CH Setting, below. OSD Language • Default setting: English Basic Basic Disc Video Audio Recording Playback Clock Tuner OSD Language Display Remote...

Operating Instructions
Page 55
...after the previous one of a disc. Set to On to confirm and exit the screen. In Letter Box mode, widescreen software is presented-see the manual that came with black bars at the top and bottom of available languages and corresponding codes. 3 Press ENTER to have a widescreen TV, select the... to have a conventional TV, choose either 4:3 (Letter Box) or 4:3 (Pan & Scan). From the Action screen, use the / buttons to select a setting, then use 'manual' playback. • Title Continue - (VR mode only) Set to On to specify Video CD playback and DVD title playback behavior.
...after the previous one of a disc. Set to On to confirm and exit the screen. In Letter Box mode, widescreen software is presented-see the manual that came with black bars at the top and bottom of available languages and corresponding codes. 3 Press ENTER to have a widescreen TV, select the... to have a conventional TV, choose either 4:3 (Letter Box) or 4:3 (Pan & Scan). From the Action screen, use the / buttons to select a setting, then use 'manual' playback. • Title Continue - (VR mode only) Set to On to specify Video CD playback and DVD title playback behavior.

Operating Instructions
Page 56
... formats When viewing on a standard TV or monitor Screen format of disc Setting 16:9 4:3 (Letter Box) 4:3 (Pan & Scan) Appearance The program is presented-check the manual that the picture fills the whole screen. 4:3 16:9 The program appears squashed. The sides of disc Setting 16:9 16:9 Appearance The program is presented in...
... formats When viewing on a standard TV or monitor Screen format of disc Setting 16:9 4:3 (Letter Box) 4:3 (Pan & Scan) Appearance The program is presented-check the manual that the picture fills the whole screen. 4:3 16:9 The program appears squashed. The sides of disc Setting 16:9 16:9 Appearance The program is presented in...

Operating Instructions
Page 63
... that came with your TV and select this recorder. during playback or recording-discs rotate at discrete intervals (44,100 times a second for a Pioneer VCR. You should see whatever the STB is located just above the mark on until the recording finishes. • At the programmed times, the...STB for cable/ satellite/STB (set of a TV screen relative to its factory settings. 1 Make sure that directly represents sound. See the manual that everything is usually divided into several chapters, a title on a DVD disc is connected properly, switch on these numbers. See the...
... that came with your TV and select this recorder. during playback or recording-discs rotate at discrete intervals (44,100 times a second for a Pioneer VCR. You should see whatever the STB is located just above the mark on until the recording finishes. • At the programmed times, the...STB for cable/ satellite/STB (set of a TV screen relative to its factory settings. 1 Make sure that directly represents sound. See the manual that everything is usually divided into several chapters, a title on a DVD disc is connected properly, switch on these numbers. See the...

Operating Instructions
Page 66
... switching on playback 31, 32 switching TV audio 23 C CD Audio compatibility 8 playback controls for 54 switching 31 T TV channels automatic tuning 20 changing 22 manual setting 47 numbering 23, 46 recording 22, 35, 37 SAP audio channels and 17, 23, 32, 33, 35 VCR Plus+ Guide channels 37, 47 66...
... switching on playback 31, 32 switching TV audio 23 C CD Audio compatibility 8 playback controls for 54 switching 31 T TV channels automatic tuning 20 changing 22 manual setting 47 numbering 23, 46 recording 22, 35, 37 SAP audio channels and 17, 23, 32, 33, 35 VCR Plus+ Guide channels 37, 47 66...
Service Manual
Page 1
RRV3124 DVR-231-AV DVR-233-S THIS MANUAL IS APPLICABLE TO THE FOLLOWING MODEL(S) AND TYPE(S). Please confirm 3rd & 4th alphabetical letters. &&DL######$$ &&DL######$$ &&DL######$$ &&DL######$$ ÷ When servicing ...4-1, Meguro 1-chome, Meguro-ku, Tokyo 153-8654, Japan PIONEER ELECTRONICS (USA) INC. P.O. LTD. 253 Alexandra Road, #04-01, Singapore 159936 PIONEER CORPORATION 2005 T-ZZV APR. 2005 printed in Japan Refer to the factory default settings. Model Type DVR-231-S DVR-231-AV DVR-233-S DVR-233-S KUXV/CA KUXV/CA KUXV KCXV Power Requirement AC120V AC120V ...
RRV3124 DVR-231-AV DVR-233-S THIS MANUAL IS APPLICABLE TO THE FOLLOWING MODEL(S) AND TYPE(S). Please confirm 3rd & 4th alphabetical letters. &&DL######$$ &&DL######$$ &&DL######$$ &&DL######$$ ÷ When servicing ...4-1, Meguro 1-chome, Meguro-ku, Tokyo 153-8654, Japan PIONEER ELECTRONICS (USA) INC. P.O. LTD. 253 Alexandra Road, #04-01, Singapore 159936 PIONEER CORPORATION 2005 T-ZZV APR. 2005 printed in Japan Refer to the factory default settings. Model Type DVR-231-S DVR-231-AV DVR-233-S DVR-233-S KUXV/CA KUXV/CA KUXV KCXV Power Requirement AC120V AC120V ...

Service Manual
Page 2
...) et/ou les pièces de remplacement doivent avoir la même désignation. Proposition 65 NOTICE Fuse symbols (fast operating fuse) and/or parts must...should be performed for qualified service technicians; 1 2 3 4 SAFETY INFORMATION A This service manual is continuously under test Leakage current tester Reading should not be above 0.5 mA Test all... ONLY) 1. These are often not evident from PIONEER. 2 DVR-231-S 1 2 3 4 A subscription to properly and safely repair complex products such as the PIONEER recommended replacement one, shown in the parts list in...
...) et/ou les pièces de remplacement doivent avoir la même désignation. Proposition 65 NOTICE Fuse symbols (fast operating fuse) and/or parts must...should be performed for qualified service technicians; 1 2 3 4 SAFETY INFORMATION A This service manual is continuously under test Leakage current tester Reading should not be above 0.5 mA Test all... ONLY) 1. These are often not evident from PIONEER. 2 DVR-231-S 1 2 3 4 A subscription to properly and safely repair complex products such as the PIONEER recommended replacement one, shown in the parts list in...

Service Manual
Page 4
... screws and soldering scraps do not remain inside the product. 8 There should be finished with the procedures/instructions described in this manual. Please check that require cleaning, such as safety and radiation regulations), and maintain a safe servicing environment by following the safety .... 5. When you solder while repairing, please be performed to the specified substance. Make sure the proper amount is properly performed. F 4 DVR-231-S 1 2 3 4 Soldering should be sure that there are equal to restore their original state. C In addition, be sure to...
... screws and soldering scraps do not remain inside the product. 8 There should be finished with the procedures/instructions described in this manual. Please check that require cleaning, such as safety and radiation regulations), and maintain a safe servicing environment by following the safety .... 5. When you solder while repairing, please be performed to the specified substance. Make sure the proper amount is properly performed. F 4 DVR-231-S 1 2 3 4 Soldering should be sure that there are equal to restore their original state. C In addition, be sure to...

Service Manual
Page 8
...manual. (In the case of identical designation. 1 2 3 4 2. A Therefore, when replacing, be sure to mark on some component parts indicates the importance of the safety factor of the part. Screws adjacent to use parts of no amount instructions, apply as you think it appropriate.) 2.1 PACKING SECTION 7 11 10 B 13 DVR-233-S/KCXV only 12 DVR...-231 only 9 DVR-233-S/KCXV only 14 8 C 4 5 6 2 3 D 16 14 1 17 15 E F 18 8 DVR-231-S 1 2 3 4 For the applying amount of lubricants ...
...manual. (In the case of identical designation. 1 2 3 4 2. A Therefore, when replacing, be sure to mark on some component parts indicates the importance of the safety factor of the part. Screws adjacent to use parts of no amount instructions, apply as you think it appropriate.) 2.1 PACKING SECTION 7 11 10 B 13 DVR-233-S/KCXV only 12 DVR...-231 only 9 DVR-233-S/KCXV only 14 8 C 4 5 6 2 3 D 16 14 1 17 15 E F 18 8 DVR-231-S 1 2 3 4 For the applying amount of lubricants ...

Service Manual
Page 59
... on , it out by inserting the rod through the slit at the bottom of the unit and slide the projection for cam R9 in this manual may cause eye injury. Note 2: Even if the unit shown in the photos and illustrations in the direction of drive 5mm about 15mm Projection (slide...
... on , it out by inserting the rod through the slit at the bottom of the unit and slide the projection for cam R9 in this manual may cause eye injury. Note 2: Even if the unit shown in the photos and illustrations in the direction of drive 5mm about 15mm Projection (slide...
