
Operating Instructions
Page 5
...want you to get the most importantly, without affecting your hearing "comfort level" adapts to higher volumes of your equipment by setting your equipment at two feet. VARNING KLASS 3B SYNLIGOCHOSYNLIGLASERSTRÅLNINGNÄRDENNA DELÄRÖPPNAD. EVITE LA EXPOSICIÓN... Living room, refrigerator, bedroom away from loud noise is often undetectable until you have established a comfortable sound level: • Set the dial and leave it 's time to consider how you can actually be deceiving. ATTENTION RADIATIONSLASERVISIBLESETINVISIBLESDECLASSE3B QUAND OUVERT. ÉVITEZ ...
...want you to get the most importantly, without affecting your hearing "comfort level" adapts to higher volumes of your equipment by setting your equipment at two feet. VARNING KLASS 3B SYNLIGOCHOSYNLIGLASERSTRÅLNINGNÄRDENNA DELÄRÖPPNAD. EVITE LA EXPOSICIÓN... Living room, refrigerator, bedroom away from loud noise is often undetectable until you have established a comfortable sound level: • Set the dial and leave it 's time to consider how you can actually be deceiving. ATTENTION RADIATIONSLASERVISIBLESETINVISIBLESDECLASSE3B QUAND OUVERT. ÉVITEZ ...

Operating Instructions
Page 6
...16 Plugging in 16 03 Controls and displays Front panel 17 Display 17 Remote control 18 04 Getting started Switching on and setting up 20 Making your first recording 22 Using the built-in TV tuner 22 Basic playback 23 Displaying disc information on-screen...Editing chapters (Chapter Edit 43 08 The Initial Setup menu Using the Initial Setup menu 45 Basic settings 45 Disc settings 49 Video settings 49 Audio settings 50 Recording settings 52 Playback settings 52 09 Additional information Screen sizes and disc formats 56 Troubleshooting 57 Frequently asked questions 59 Language code...
...16 Plugging in 16 03 Controls and displays Front panel 17 Display 17 Remote control 18 04 Getting started Switching on and setting up 20 Making your first recording 22 Using the built-in TV tuner 22 Basic playback 23 Displaying disc information on-screen...Editing chapters (Chapter Edit 43 08 The Initial Setup menu Using the Initial Setup menu 45 Basic settings 45 Disc settings 49 Video settings 49 Audio settings 50 Recording settings 52 Playback settings 52 09 Additional information Screen sizes and disc formats 56 Troubleshooting 57 Frequently asked questions 59 Language code...
Operating Instructions
Page 7
...players, including computer DVD drives compatible with DVD-Video playback*2. *2 'DVD-Video format' recording: The use of the DVDVideo format for recording on Pioneer's DVD recorders. Note: 'Finalization' is recorded in the box when you open it. • Remote control • AA/R6P dry cell ...30 minutes. • Optimized recording Optimized recording adjusts the recording quality automatically if a timer recording will not fit onto a disc with the settings that you can be reduced if a longer recording time is used. • High quality 16-bit Linear PCM audio When recording using ...
...players, including computer DVD drives compatible with DVD-Video playback*2. *2 'DVD-Video format' recording: The use of the DVDVideo format for recording on Pioneer's DVD recorders. Note: 'Finalization' is recorded in the box when you open it. • Remote control • AA/R6P dry cell ...30 minutes. • Optimized recording Optimized recording adjusts the recording quality automatically if a timer recording will not fit onto a disc with the settings that you can be reduced if a longer recording time is used. • High quality 16-bit Linear PCM audio When recording using ...

Operating Instructions
Page 11
.... 3 Use an RF antenna cable to connect the antenna output on your VCR to your TV via a VCR (or your VCR via this recorder) using a set of audio/video inputs on your TV (A/V IN 2 above) using AV cables, as the picture from the wall outlet. Connecting up 02 English Easy connections.... 11 En switch to input 2 to watch a video playing in the chain, connect this recorder and your TV to your TV. It is supplied) to a set your VCR. Antenna/cable TV wall outlet 4 Connect the AUDIO and VIDEO OUTPUT jacks to connect the VHF/UHF OUT jack on your TV. When...
.... 3 Use an RF antenna cable to connect the antenna output on your VCR to your TV via a VCR (or your VCR via this recorder) using a set of audio/video inputs on your TV (A/V IN 2 above) using AV cables, as the picture from the wall outlet. Connecting up 02 English Easy connections.... 11 En switch to input 2 to watch a video playing in the chain, connect this recorder and your TV to your TV. It is supplied) to a set your VCR. Antenna/cable TV wall outlet 4 Connect the AUDIO and VIDEO OUTPUT jacks to connect the VHF/UHF OUT jack on your TV. When...

Operating Instructions
Page 12
... S-video output S-video carries the picture as two separate color signals, plus a luminance (brightness) signal. See also Video Out on page 49 for how to set up Using other equipment). 2 Connecting using the component video output Component video carries the picture as separate color and luminance (brightness) signals. • Use an...
... S-video output S-video carries the picture as two separate color signals, plus a luminance (brightness) signal. See also Video Out on page 49 for how to set up Using other equipment). 2 Connecting using the component video output Component video carries the picture as separate color and luminance (brightness) signals. • Use an...

Operating Instructions
Page 13
... cables as supplied). This enables you to watch and record TV channels. 2 Connect the AUDIO and VIDEO OUTPUT jacks on this recorder using a set of A/V cables. This enables you to watch the output from this recorder. 3 Connect the audio/video output of your cable box/satellite tuner ...to the INPUT 1 jacks on this recorder to a set of audio/video inputs on your TV using a set of A/V cables (as shown. Always connect each component directly to your VCR, satellite receiver or cable box. Important •...
... cables as supplied). This enables you to watch and record TV channels. 2 Connect the AUDIO and VIDEO OUTPUT jacks on this recorder using a set of A/V cables. This enables you to watch the output from this recorder. 3 Connect the audio/video output of your cable box/satellite tuner ...to the INPUT 1 jacks on this recorder to a set of audio/video inputs on your TV using a set of A/V cables (as shown. Always connect each component directly to your VCR, satellite receiver or cable box. Important •...

Operating Instructions
Page 14
... using this setup. This enables you to watch and record TV channels. 2 Connect the AUDIO and VIDEO OUTPUT jacks on this recorder to a set of audio/video inputs on this page you to watch one channel and record another. • The diagram shows standard video connections, but you to...If many or all the channels you receive by selecting it on the cable box/satellite tuner. Note • The setup on this recorder using a set of A/V cables (as shown. This enables you can alternatively use the S-video or component video connections if they're available. 14 En Using the ...
... using this setup. This enables you to watch and record TV channels. 2 Connect the AUDIO and VIDEO OUTPUT jacks on this recorder to a set of audio/video inputs on this page you to watch one channel and record another. • The diagram shows standard video connections, but you to...If many or all the channels you receive by selecting it on the cable box/satellite tuner. Note • The setup on this recorder using a set of A/V cables (as shown. This enables you can alternatively use the S-video or component video connections if they're available. 14 En Using the ...

Operating Instructions
Page 15
...AV amp/receiver doesn't have a coaxial digital input, but has an optical type, converter boxes that convert from your speakers if the recorder is not set up the digital audio output. (Noise may be output from coaxial to your VCR or other component using A/V cables. See also Audio Out on ...recorder to multichannel surround sound. This enables you to watch and record TV channels. 2 Connect the AUDIO and VIDEO OUTPUT jacks on this recorder to a set of audio/video inputs on your AV amp/receiver. 3 Use a coaxial digital audio cable (not supplied) to connect the COAXIAL DIGITAL OUT jack on ...
...AV amp/receiver doesn't have a coaxial digital input, but has an optical type, converter boxes that convert from your speakers if the recorder is not set up the digital audio output. (Noise may be output from coaxial to your VCR or other component using A/V cables. See also Audio Out on ...recorder to multichannel surround sound. This enables you to watch and record TV channels. 2 Connect the AUDIO and VIDEO OUTPUT jacks on this recorder to a set of audio/video inputs on your AV amp/receiver. 3 Use a coaxial digital audio cable (not supplied) to connect the COAXIAL DIGITAL OUT jack on ...

Operating Instructions
Page 16
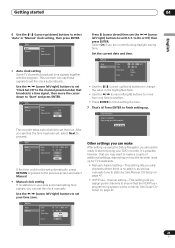
... AUDIO R INPUT 2 AUDIO/VIDEO INPUT OPEN/ CLOSE REC AUDIO/VIDEO OUTPUT 1 2 Analog camcorder AUDIO/VIDEO OUTPUT VCR AUDIO/VIDEO INPUT 1 Connect a set of audio and video outputs of your VCR or camcorder. • You can use standard video or S-video cables for a camcorder input (standard video connection... only). 2 Connect a set of this recorder. This enables you to record tapes from this recorder to your VCR or camcorder to a set of audio and video inputs of your VCR or camcorder to the outputs on the rear...
... AUDIO R INPUT 2 AUDIO/VIDEO INPUT OPEN/ CLOSE REC AUDIO/VIDEO OUTPUT 1 2 Analog camcorder AUDIO/VIDEO OUTPUT VCR AUDIO/VIDEO INPUT 1 Connect a set of audio and video outputs of your VCR or camcorder. • You can use standard video or S-video cables for a camcorder input (standard video connection... only). 2 Connect a set of this recorder. This enables you to record tapes from this recorder to your VCR or camcorder to a set of audio and video inputs of your VCR or camcorder to the outputs on the rear...

Operating Instructions
Page 17
... the type of recordable DVD loaded: DVD-R or DVD-RW. 17 En blinks when recording is paused. 6 (page 35) Lights when a timer recording has been set. (Indicator blinks if the timer has been set to some VR mode discs recorded on other recorders). (page 49) Lights when the component video output is... set but there isn't a recordable disc loaded.) 7 (page 51) Indicates which channels are recorded when Dual Mono is selected. 8 SAP (page 23) Lights when the currently ...
... the type of recordable DVD loaded: DVD-R or DVD-RW. 17 En blinks when recording is paused. 6 (page 35) Lights when a timer recording has been set. (Indicator blinks if the timer has been set to some VR mode discs recorded on other recorders). (page 49) Lights when the component video output is... set but there isn't a recordable disc loaded.) 7 (page 51) Indicates which channels are recorded when Dual Mono is selected. 8 SAP (page 23) Lights when the currently ...

Operating Instructions
Page 18
... speed. press and hold to start slow-motion playback. 12 ì REC (page 22) Press to start playback. Press to start recording. Press repeatedly to set the recording time in blocks of the recorder. 10 RETURN Press to go back one level in multilingual DVD-Video discs. Press ENTER to pause...
... speed. press and hold to start slow-motion playback. 12 ì REC (page 22) Press to start playback. Press to start recording. Press repeatedly to set the recording time in blocks of the recorder. 10 RETURN Press to go back one level in multilingual DVD-Video discs. Press ENTER to pause...

Operating Instructions
Page 19
CM SKIP Press repeatedly to set a timer recording from the standard Timer Recording screen. Controls and displays 03 English TIMER REC Press to skip progressively forward through the audio or video playing. 19 En
CM SKIP Press repeatedly to set a timer recording from the standard Timer Recording screen. Controls and displays 03 English TIMER REC Press to skip progressively forward through the audio or video playing. 19 En

Operating Instructions
Page 20
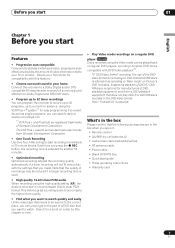
... STANDBY/ON ENTER DVD RECORDER 4 Press ENTER again to start using the Setup Navigator. This takes a couple of minutes to make several basic settings using the recorder for the first time, we strongly recommend you can also access it from the Initial Setup menu; Setup Navigator Complete this recorder...or Spanish as the on-screen display (OSD) language, then press ENTER. If you're using the Setup Navigator. Tuner Antenna Cable Do not set the video input to this setup before starting to use the Setup Navigator, press (cursor down) to select Cancel, then press ENTER to exit the...
... STANDBY/ON ENTER DVD RECORDER 4 Press ENTER again to start using the Setup Navigator. This takes a couple of minutes to make several basic settings using the recorder for the first time, we strongly recommend you can also access it from the Initial Setup menu; Setup Navigator Complete this recorder...or Spanish as the on-screen display (OSD) language, then press ENTER. If you're using the Setup Navigator. Tuner Antenna Cable Do not set the video input to this setup before starting to use the Setup Navigator, press (cursor down) to select Cancel, then press ENTER to exit the...
Operating Instructions
Page 21
...Time Zone D.S.T. 01 / 01 / 2005 SAT 12 : 00 AM USA Alaska Off Press (cursor down ) buttons to select 'Auto' or 'Manual' clock setting, then press ENTER. It's possible, however, that broadcasts a time signal, then move from one field to another. • Press ENTER to start enjoying ...channels where there is no stations in the highlighted field. • Use the / (cursor left /right) buttons to set D.S.T. Setup Navigator Setup is set , select Next to stations. This setting lets you can use the / (cursor left /right) buttons to move the cursor down ) buttons to change the value...
...Time Zone D.S.T. 01 / 01 / 2005 SAT 12 : 00 AM USA Alaska Off Press (cursor down ) buttons to select 'Auto' or 'Manual' clock setting, then press ENTER. It's possible, however, that broadcasts a time signal, then move from one field to another. • Press ENTER to start enjoying ...channels where there is no stations in the highlighted field. • Use the / (cursor left /right) buttons to set D.S.T. Setup Navigator Setup is set , select Next to stations. This setting lets you can use the / (cursor left /right) buttons to move the cursor down ) buttons to change the value...

Operating Instructions
Page 22
.... 4 Use the CH +/- Press ì REC or again to align the disc. • When you can pause recording by pressing . Playing back your TV is set to this recorder. For example, to stop recording, press . 04 Getting started Making your TV and this recorder. 2 Press OPEN/CLOSE (front panel only) to...
.... 4 Use the CH +/- Press ì REC or again to align the disc. • When you can pause recording by pressing . Playing back your TV is set to this recorder. For example, to stop recording, press . 04 Getting started Making your TV and this recorder. 2 Press OPEN/CLOSE (front panel only) to...

Operating Instructions
Page 23
Changing audio channels Some TV programs are covered in the disc. The current audio channel is poor quality when set to browse the contents of a disc on the disc. Mono SAP Stereo • If SAP is selected, but there is no SAP channel being broadcast, ... on another DVD recorder may contain a PlayList of DVD disc, it is specific to open /close the disc tray, press OPEN/CLOSE. If a function is set to Stereo, you can often improve it with the side you want to play , are broadcast with the label side facing up, using the recorder...
Changing audio channels Some TV programs are covered in the disc. The current audio channel is poor quality when set to browse the contents of a disc on the disc. Mono SAP Stereo • If SAP is selected, but there is no SAP channel being broadcast, ... on another DVD recorder may contain a PlayList of DVD disc, it is specific to open /close the disc tray, press OPEN/CLOSE. If a function is set to Stereo, you can often improve it with the side you want to play , are broadcast with the label side facing up, using the recorder...

Operating Instructions
Page 26
... play PlayLists on the disc. 04 Getting started 4 Lock Disc On or Off 5 Number of titles/tracks on a 12cm/4.7GB disc at the displayed record setting. • Recording and playback times for TV recordings are approximately 0.1% shorter than the actual time. Note • The Video mode disc displays become the same...
... play PlayLists on the disc. 04 Getting started 4 Lock Disc On or Off 5 Number of titles/tracks on a 12cm/4.7GB disc at the displayed record setting. • Recording and playback times for TV recordings are approximately 0.1% shorter than the actual time. Note • The Video mode disc displays become the same...

Operating Instructions
Page 31
... options. Press TOP MENU to change subtitle language from the disc menu. Subtitle: 1/2 English The toucan lives in different languages), you to access. • To set subtitle preferences, see Language on -screen. Note • Some discs only allow you can switch during playback. Repeat play ALL There are various repeat play...
... options. Press TOP MENU to change subtitle language from the disc menu. Subtitle: 1/2 English The toucan lives in different languages), you to access. • To set subtitle preferences, see Language on -screen. Note • Some discs only allow you can switch during playback. Repeat play ALL There are various repeat play...

Operating Instructions
Page 32
...receiver on screen to let you know that has both a main and a SAP (Secondary Audio Program) audio channel, you need to access. • To set audio language preferences, see Audio Out on a VR mode disc, if you cannot switch the audio channel. Right channel only Note • When playing a ... audio channels VR mode CD Video CD For VR mode content that other angles are available. Press TOP MENU to select an audio soundtrack. Set Dolby Digital to change the angle from some DVD-Video disc menus. Switching camera angles DVD-Video Some DVD-Video discs feature scenes shot from...
...receiver on screen to let you know that has both a main and a SAP (Secondary Audio Program) audio channel, you need to access. • To set audio language preferences, see Audio Out on a VR mode disc, if you cannot switch the audio channel. Right channel only Note • When playing a ... audio channels VR mode CD Video CD For VR mode content that other angles are available. Press TOP MENU to select an audio soundtrack. Set Dolby Digital to change the angle from some DVD-Video disc menus. Switching camera angles DVD-Video Some DVD-Video discs feature scenes shot from...
Operating Instructions
Page 33
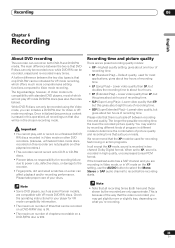
...RW disc is 999. Lowest video quality, but this gives about one hour of recording time. Note • Some DVD players, such as some Pioneer models, are compatible with standard DVD players, most applications, gives about ten hours of recording time. • SP (Standard Play) - Recording 06... be initialized for VR mode recording, which will be in the chosen recording mode. A further difference between recording time and quality. Highest quality setting, gives about eight hours of recording time. • LP (Long Play) - Lower video quality than EP, but gives about two hours...
...RW disc is 999. Lowest video quality, but this gives about one hour of recording time. Note • Some DVD players, such as some Pioneer models, are compatible with standard DVD players, most applications, gives about ten hours of recording time. • SP (Standard Play) - Recording 06... be initialized for VR mode recording, which will be in the chosen recording mode. A further difference between recording time and quality. Highest quality setting, gives about eight hours of recording time. • LP (Long Play) - Lower video quality than EP, but gives about two hours...