
Operating Instructions
Page 6
Contents Contents 01 Before you start Features 7 What's in the box 7 Putting the batteries in the remote control 8 Using the remote control 8 Disc / content format playback compatibility 8 02 Connecting up Rear panel connections 10 Front panel connections 10 Easy connections 11 Using other types... (2) . . . 14 Connecting to an AV amplifier or receiver 15 Connecting other AV sources 16 Plugging in 16 03 Controls and displays Front panel 17 Display 17 Remote control 18 04 Getting started Switching on and setting up 20 Making your first recording 22 Using the built-in TV tuner 22...
Contents Contents 01 Before you start Features 7 What's in the box 7 Putting the batteries in the remote control 8 Using the remote control 8 Disc / content format playback compatibility 8 02 Connecting up Rear panel connections 10 Front panel connections 10 Easy connections 11 Using other types... (2) . . . 14 Connecting to an AV amplifier or receiver 15 Connecting other AV sources 16 Plugging in 16 03 Controls and displays Front panel 17 Display 17 Remote control 18 04 Getting started Switching on and setting up 20 Making your first recording 22 Using the built-in TV tuner 22...
Operating Instructions
Page 7
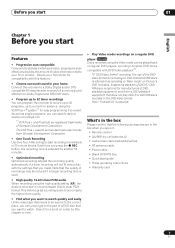
... DTS DVD discs. • Program up to 32 timer recordings You can jump right to the part of a DVD disc that you open it. • Remote control • AA/R6P dry cell batteries x2 • Audio/video cable (red/white/yellow) • RF antenna cable • Power cable • Blank DVD-RW..., up to a month in the DVD-Video format. The VCR Plus+ system is extended by title, chapter or time. • Play Video mode recordings on Pioneer's DVD recorders.
... DTS DVD discs. • Program up to 32 timer recordings You can jump right to the part of a DVD disc that you open it. • Remote control • AA/R6P dry cell batteries x2 • Audio/video cable (red/white/yellow) • RF antenna cable • Power cable • Blank DVD-RW..., up to a month in the DVD-Video format. The VCR Plus+ system is extended by title, chapter or time. • Play Video mode recordings on Pioneer's DVD recorders.

Operating Instructions
Page 8
...that the plus and minus ends of used for further compatibility information. Using the remote control Keep in the remote control 1 Open the battery compartment cover on the back of the remote control. 2 Insert two AA/R6P batteries into the battery compartment following logos on the... to this product. 8 En General disc compatibility This recorder is shining on the unit's remote sensor. • Remote controllers for other . 01 Before you change the batteries, the remote control mode is a trademark of DVD Format/Logo Licensing Corporation. • Playability of disc types...
...that the plus and minus ends of used for further compatibility information. Using the remote control Keep in the remote control 1 Open the battery compartment cover on the back of the remote control. 2 Insert two AA/R6P batteries into the battery compartment following logos on the... to this product. 8 En General disc compatibility This recorder is shining on the unit's remote sensor. • Remote controllers for other . 01 Before you change the batteries, the remote control mode is a trademark of DVD Format/Logo Licensing Corporation. • Playability of disc types...

Operating Instructions
Page 17
... which channels are recorded when Dual Mono is playing (only applicable to progressive scan. 2 Lights during recording; Controls and displays 03 English Chapter 3 Controls and displays Front panel STANDBY/ON VIDEO L(MONO) AUDIO R INPUT 2 OPEN/ CLOSE REC 12 3 4 ...567 8 9 10 1 STANDBY/ON Press to switch the recorder on/into standby. 2 Front panel inputs (page 10) Audio/video inputs, convenient for connecting a video camera. 3 Front panel display See below for details. 4 IR remote...
... which channels are recorded when Dual Mono is playing (only applicable to progressive scan. 2 Lights during recording; Controls and displays 03 English Chapter 3 Controls and displays Front panel STANDBY/ON VIDEO L(MONO) AUDIO R INPUT 2 OPEN/ CLOSE REC 12 3 4 ...567 8 9 10 1 STANDBY/ON Press to switch the recorder on/into standby. 2 Front panel inputs (page 10) Audio/video inputs, convenient for connecting a video camera. 3 Front panel display See below for details. 4 IR remote...

Operating Instructions
Page 18
Press to stop playback or recording. / Press to skip to show the previous or next video frame; Remote control STANDBY/ON 1 DISPLAY 2 3 AUDIO SUBTITLE ANGLE 1 2 3 VCR Plus+ 4 5 4 5 6 CLEAR 7890 DISC NAVIGATOR 6 MENU 7 CH+ TOP MENU 8 ENTER INPUT HOME MENU 9 .../ (page 29) While paused, press to the previous or next title/chapter/ track; 03 Controls and displays 11 2 3 (page 48) Shows the remote control mode (if nothing is displayed, the remote control mode is also used to change the recording input. Press ENTER to pause playback or recording. ...
Press to stop playback or recording. / Press to skip to show the previous or next video frame; Remote control STANDBY/ON 1 DISPLAY 2 3 AUDIO SUBTITLE ANGLE 1 2 3 VCR Plus+ 4 5 4 5 6 CLEAR 7890 DISC NAVIGATOR 6 MENU 7 CH+ TOP MENU 8 ENTER INPUT HOME MENU 9 .../ (page 29) While paused, press to the previous or next title/chapter/ track; 03 Controls and displays 11 2 3 (page 48) Shows the remote control mode (if nothing is displayed, the remote control mode is also used to change the recording input. Press ENTER to pause playback or recording. ...

Operating Instructions
Page 20
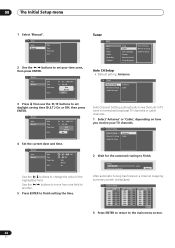
...). After selecting Antenna or Cable the recorder starts automatic tuning. see page 45). Setup Navigator Complete this recorder. 2 Press the STANDBY/ON button on the remote control or the front panel to select 'Antenna' or 'Cable' depending on how you through setting the clock and the internal TV tuner settings. 04 Getting...
...). After selecting Antenna or Cable the recorder starts automatic tuning. see page 45). Setup Navigator Complete this recorder. 2 Press the STANDBY/ON button on the remote control or the front panel to select 'Antenna' or 'Cable' depending on how you through setting the clock and the internal TV tuner settings. 04 Getting...

Operating Instructions
Page 38
... timer recording when the recorder is locked, first unlock the recorder (see Lock Disc on page 49), and that there are pressed on the remote or front panel, LOCK is on, switch it into standby. 2 Press and hold on the front panel for three seconds. Preventing use the ... has started, you can cancel the program (but continue recording), or stop recording completely if you want to make all the front panel and remote control buttons inoperative using the child lock feature. A screen showing details of the recorder before recording has finished. 1 If the recorder is briefly displayed...
... timer recording when the recorder is locked, first unlock the recorder (see Lock Disc on page 49), and that there are pressed on the remote or front panel, LOCK is on, switch it into standby. 2 Press and hold on the front panel for three seconds. Preventing use the ... has started, you can cancel the program (but continue recording), or stop recording completely if you want to make all the front panel and remote control buttons inoperative using the child lock feature. A screen showing details of the recorder before recording has finished. 1 If the recorder is briefly displayed...
Operating Instructions
Page 45
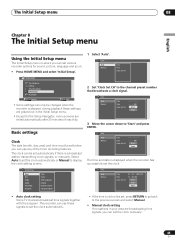
... En Initial Setup Initial Setup Basic Basic TunDeirsc VidVeiodeOout Audio In AudAiuodOiout LanRgeucaogrdeing RPleacPyolbaradycibnkagck Clock Clock Setting On ScreeTnuDniesprlay Auto Manual Front PanOeSl DDiLspalnagyuage Remote Control Set Setup NaDviisgpaltaoyr Remote Control Setup Navigator Auto Auto Manual Date Time Clock Set CH 01 / 01 / 2005 SAT 12 : 00 AM 0 0 2 Start Next • Auto clock setting...
... En Initial Setup Initial Setup Basic Basic TunDeirsc VidVeiodeOout Audio In AudAiuodOiout LanRgeucaogrdeing RPleacPyolbaradycibnkagck Clock Clock Setting On ScreeTnuDniesprlay Auto Manual Front PanOeSl DDiLspalnagyuage Remote Control Set Setup NaDviisgpaltaoyr Remote Control Setup Navigator Auto Auto Manual Date Time Clock Set CH 01 / 01 / 2005 SAT 12 : 00 AM 0 0 2 Start Next • Auto clock setting...
Operating Instructions
Page 46
... Time Zone D.S.T. 01 / 01 / 2005 SAT 12 : 00 AM USA Alaska Off Tuner Basic Basic Disc Video Audio Recording Playback Clock Tuner OSD Language Display Remote Control Setup Navigator Auto CH Setup Manual CH Setup Guide CH Setup Auto CH Setup • Default setting: Antenna Tuner Auto CH Setup Manual CH Setup...
... Time Zone D.S.T. 01 / 01 / 2005 SAT 12 : 00 AM USA Alaska Off Tuner Basic Basic Disc Video Audio Recording Playback Clock Tuner OSD Language Display Remote Control Setup Navigator Auto CH Setup Manual CH Setup Guide CH Setup Auto CH Setup • Default setting: Antenna Tuner Auto CH Setup Manual CH Setup...

Operating Instructions
Page 47
.... 1 Select 'Guide CH Setup', then 'Guide CH'. OSD Language • Default setting: English Basic Basic Disc Video Audio Recording Playback Clock Tuner OSD Language Display Remote Control Setup Navigator This sets the language of the on-screen menus and displays. 2 To return to the Initial Setup menu, press ENTER. 47 En CH...
.... 1 Select 'Guide CH Setup', then 'Guide CH'. OSD Language • Default setting: English Basic Basic Disc Video Audio Recording Playback Clock Tuner OSD Language Display Remote Control Setup Navigator This sets the language of the on-screen menus and displays. 2 To return to the Initial Setup menu, press ENTER. 47 En CH...

Operating Instructions
Page 48
...OSD Language Display Remote Control Setup Navigator After selecting a new recorder ID, you need to Continue ? 08 The Initial Setup menu • Select 'OSD Language' then use the / buttons), then pressing ENTER. OSD Language OSD Language English There are using more than one Pioneer DVD recorder in ...the room. 48 En To set to Recorder2 or Recorder3, the remote control mode is also available from the Initial Settings menu should you have the recorder show or ...
...OSD Language Display Remote Control Setup Navigator After selecting a new recorder ID, you need to Continue ? 08 The Initial Setup menu • Select 'OSD Language' then use the / buttons), then pressing ENTER. OSD Language OSD Language English There are using more than one Pioneer DVD recorder in ...the room. 48 En To set to Recorder2 or Recorder3, the remote control mode is also available from the Initial Settings menu should you have the recorder show or ...
Operating Instructions
Page 57
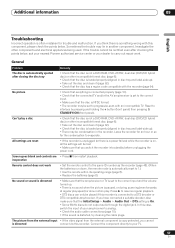
...recorder into standby before unplugging the power cord. Connect the component directly to your dealer to carry out repair work • Set the remote control to the correct input. • Make sure that the disc has a region code compatible with this recorder is loaded properly (aligned in... the disc is connected to 1.) • Use the remote within its operating range (page 8). • Replace the batteries (page 8). Sometimes the trouble may be played if this component, please check the points below , ask your nearest Pioneer authorized service center or your TV. 57 En Can't ...
...recorder into standby before unplugging the power cord. Connect the component directly to your dealer to carry out repair work • Set the remote control to the correct input. • Make sure that the disc has a region code compatible with this recorder is loaded properly (aligned in... the disc is connected to 1.) • Use the remote within its operating range (page 8). • Replace the batteries (page 8). Sometimes the trouble may be played if this component, please check the points below , ask your nearest Pioneer authorized service center or your TV. 57 En Can't ...

Operating Instructions
Page 58
... to normal operating conditions. 58 En Front panel display shows 'LOCK' • The Child Lock is pressed The picture freezes and the front panel and remote control buttons stop working • Press the front panel STANDBY/ON button to a Video mode disc, programs that it (page 8). • discs recorded with ID-1, set...
... to normal operating conditions. 58 En Front panel display shows 'LOCK' • The Child Lock is pressed The picture freezes and the front panel and remote control buttons stop working • Press the front panel STANDBY/ON button to a Video mode disc, programs that it (page 8). • discs recorded with ID-1, set...

Operating Instructions
Page 59
...gives you the most flexibility when editing. If the player does not recognize the disc when you load it, try again. Most likely the remote control ID does not match the recorder. If you want to use a CPRM-compatible DVDRW disc initialized for recording? See also Playing your recordings on... the disc package to something else, the remote will play a VR mode DVD-RW disc in the remote control and now it can do. • What kind of the recorder and the remote. • Can I record a copy-once protected program from a disc? See Remote Control on page 48 for how to make further...
...gives you the most flexibility when editing. If the player does not recognize the disc when you load it, try again. Most likely the remote control ID does not match the recorder. If you want to use a CPRM-compatible DVDRW disc initialized for recording? See also Playing your recordings on... the disc package to something else, the remote will play a VR mode DVD-RW disc in the remote control and now it can do. • What kind of the recorder and the remote. • Can I record a copy-once protected program from a disc? See Remote Control on page 48 for how to make further...
Operating Instructions
Page 65
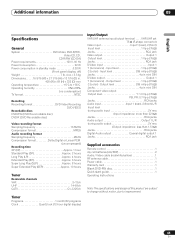
... Output 1 L/R during audio output 2V rms (Output impedance: less than 1.5 kΩ) Jacks RCA jacks Digital Audio output Coaxial digital output 1 Jacks RCA jack Supplied accessories Remote control 1 dry cell batteries (AA/R6P 2 Audio / Video cable (red/white/yellow 1 RF antenna cable 1 Power cable 1 Warranty card 1 Blank DVD-RW disc 1 Quick start guide...
... Output 1 L/R during audio output 2V rms (Output impedance: less than 1.5 kΩ) Jacks RCA jacks Digital Audio output Coaxial digital output 1 Jacks RCA jack Supplied accessories Remote control 1 dry cell batteries (AA/R6P 2 Audio / Video cable (red/white/yellow 1 RF antenna cable 1 Power cable 1 Warranty card 1 Blank DVD-RW disc 1 Quick start guide...

Operating Instructions
Page 66
... parental lock for DVD-Video 52 picture quality settings for 24, 27 - 32 Video mode vs. VR mode 33 Remote control buttons explained 18 changing the batteries 8 operating range 8 setting the remote ID 48 S Subtitles setting preferences for 24, 27 - 32 D Dolby Digital adjusting the dynamic range 50 dual mono... for audio language 54 setting which channel to record 35 switching on playback 31, 32 switching TV audio 23 C CD Audio compatibility 8 playback controls for 54 switching 31 T TV channels automatic tuning 20 changing 22 manual setting 47 numbering 23, 46 recording 22, 35, 37 SAP audio ...
... parental lock for DVD-Video 52 picture quality settings for 24, 27 - 32 Video mode vs. VR mode 33 Remote control buttons explained 18 changing the batteries 8 operating range 8 setting the remote ID 48 S Subtitles setting preferences for 24, 27 - 32 D Dolby Digital adjusting the dynamic range 50 dual mono... for audio language 54 setting which channel to record 35 switching on playback 31, 32 switching TV audio 23 C CD Audio compatibility 8 playback controls for 54 switching 31 T TV channels automatic tuning 20 changing 22 manual setting 47 numbering 23, 46 recording 22, 35, 37 SAP audio ...