
Owner's Manual
Page 6
...Navigator menu . . . . 19 Operating the TV with the player's remote control . . . . 20 TV Preset code list 21 Using the TOOLS menu 21 Switching the video output terminal to be viewed . . . . 22 Switching the output video resolution 22 06 Advanced settings Changing the settings 37 Operating ...Switching the camera angles 25 Switching the subtitles 25 Switching the audio and secondary audio 26 Switching the secondary video 26 Displaying the disc information 26 Playback functions 27 Using the Play Mode functions 28 Playing from a specific time (Time Search 28 Playing a specific ...
...Navigator menu . . . . 19 Operating the TV with the player's remote control . . . . 20 TV Preset code list 21 Using the TOOLS menu 21 Switching the video output terminal to be viewed . . . . 22 Switching the output video resolution 22 06 Advanced settings Changing the settings 37 Operating ...Switching the camera angles 25 Switching the subtitles 25 Switching the audio and secondary audio 26 Switching the secondary video 26 Displaying the disc information 26 Playback functions 27 Using the Play Mode functions 28 Playing from a specific time (Time Search 28 Playing a specific ...

Owner's Manual
Page 9
...can be enjoyed over the Internet. After loading a BD containing sound in the center of Blu-ray Disc Association. Dolby and the double-D symbol are supported on this player: • Dolby TrueHD BD-LIVE functions such as playback of these audio formats using ... the output conditions of Dolby Laboratories. Blu-ray Disc Read-Only (ROM) Format Version 2 01 - Blu-ray Disc Recordable (R) Format Version 2 - For details on page 47 for example including games. "BONUSVIEW" is trademark of Blu-ray Disc Association. • To play 8 cm discs, set the disc in the 8 cm disc depression ...
...can be enjoyed over the Internet. After loading a BD containing sound in the center of Blu-ray Disc Association. Dolby and the double-D symbol are supported on this player: • Dolby TrueHD BD-LIVE functions such as playback of these audio formats using ... the output conditions of Dolby Laboratories. Blu-ray Disc Read-Only (ROM) Format Version 2 01 - Blu-ray Disc Recordable (R) Format Version 2 - For details on page 47 for example including games. "BONUSVIEW" is trademark of Blu-ray Disc Association. • To play 8 cm discs, set the disc in the 8 cm disc depression ...

Owner's Manual
Page 11
... player's..., etc. 17 ANGLE - (page 25) 18 OUTPUT RESOLUTION - (page 22) 19 PLAY MODE - ...Blu-ray PQLS HDMI1 Bright Lit Lit Bright Lit Lit Dark Lit Lit Off Off Off FL OFF Off Off Off Lit BD PLAYER... 1. Press to select items, change settings and move the cursor. Part Names and Functions Remote Control 1 2 3 4 5 6 7 8 9 10 11 12 13 14 STANDBY/ON OPEN/CLOSE TV CONTROL INPUT SELECT CH VOL AUDIO SUBTITLE ANGLE FL DIMMER CLEAR SECONDARY AUDIO VIDEO ENTER OUTPUT...Number buttons - When pressed, the brightness of the player's front panel display and the status of the ...
... player's..., etc. 17 ANGLE - (page 25) 18 OUTPUT RESOLUTION - (page 22) 19 PLAY MODE - ...Blu-ray PQLS HDMI1 Bright Lit Lit Bright Lit Lit Dark Lit Lit Off Off Off FL OFF Off Off Off Lit BD PLAYER... 1. Press to select items, change settings and move the cursor. Part Names and Functions Remote Control 1 2 3 4 5 6 7 8 9 10 11 12 13 14 STANDBY/ON OPEN/CLOSE TV CONTROL INPUT SELECT CH VOL AUDIO SUBTITLE ANGLE FL DIMMER CLEAR SECONDARY AUDIO VIDEO ENTER OUTPUT...Number buttons - When pressed, the brightness of the player's front panel display and the status of the ...

Owner's Manual
Page 12
...also lights when a component video cable is turned off . Lights when the player's front panel display is connected and video signals are being output with a resolution of the video frame or field being output with a resolution of the previous title/chapter/track/file. Press during playback ... are being output lights. 7 EXT - (page 17) 8 CONTROL - (page 15) 12 En If this , then operate it within approximately 23 feet (7 m). Lights when the power is on . 7 OPEN/CLOSE - Press to this happens, move the player away from the fluorescent light. 5 Disc tray 6 Blu-ray indicator - ...
...also lights when a component video cable is turned off . Lights when the player's front panel display is connected and video signals are being output with a resolution of the video frame or field being output with a resolution of the previous title/chapter/track/file. Press during playback ... are being output lights. 7 EXT - (page 17) 8 CONTROL - (page 15) 12 En If this , then operate it within approximately 23 feet (7 m). Lights when the power is on . 7 OPEN/CLOSE - Press to this happens, move the player away from the fluorescent light. 5 Disc tray 6 Blu-ray indicator - ...
Owner's Manual
Page 13
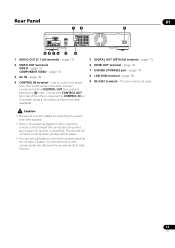
... OUT terminal of the other component to CONTROL IN on this player from the remote sensor of another Pioneer component with components manufactured by companies other than Pioneer. 13 En Use to connect cables for outputting the audio and video signals. • When connected via System... OUT terminals VIDEO - (page 17) COMPONENT VIDEO - (page 17) 3 AC IN - (page 18) 4 CONTROL IN terminal - Caution • Be sure to control this player using a mini-plug cord (commercially available). 5 DIGITAL OUT (OPTICAL) terminal - (page 17) 6 HDMI OUT terminal - (page 16) 7 USB (BD STORAGE) port - ...
... OUT terminal of the other component to CONTROL IN on this player from the remote sensor of another Pioneer component with components manufactured by companies other than Pioneer. 13 En Use to connect cables for outputting the audio and video signals. • When connected via System... OUT terminals VIDEO - (page 17) COMPONENT VIDEO - (page 17) 3 AC IN - (page 18) 4 CONTROL IN terminal - Caution • Be sure to control this player using a mini-plug cord (commercially available). 5 DIGITAL OUT (OPTICAL) terminal - (page 17) 6 HDMI OUT terminal - (page 16) 7 USB (BD STORAGE) port - ...
Owner's Manual
Page 14
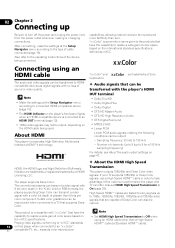
... can transmit a video signal with 8 bit color depth in order to take advantage of the device being used. The conventional players can also be output, depending on the xvYCC specifications. This product is connected to an HDMI OUT terminal (page 12). • 1080p video signals... Chapter 2 Connecting up to 6 for a 192 kHz sampling frequency) For details, see About the audio output settings on page 47. About the HDMI High Speed Transmission This player outputs 1080/60p and Deep Color video signals. After connecting, make the settings at the Setup Navigator menu according...
... can transmit a video signal with 8 bit color depth in order to take advantage of the device being used. The conventional players can also be output, depending on the xvYCC specifications. This product is connected to an HDMI OUT terminal (page 12). • 1080p video signals... Chapter 2 Connecting up to 6 for a 192 kHz sampling frequency) For details, see About the audio output settings on page 47. About the HDMI High Speed Transmission This player outputs 1080/60p and Deep Color video signals. After connecting, make the settings at the Setup Navigator menu according...

Owner's Manual
Page 15
... from the AV receiver or amplifier to the player's HDMI OUT terminal using the KURO LINK function. If the output video resolution is set to the operating instructions of the Flat Panel TV. The functions listed below work when a Pioneer KURO LINK-compatible Flat Panel TV or AV ...terminal. About KURO LINK function • For some models, the KURO LINK function may not operate properly if the player's picture is not properly • This player is designed for all discs (BDs, DVDs, etc.) with HDMI- The KURO LINK function may not operate properly. • The KURO ...
... from the AV receiver or amplifier to the player's HDMI OUT terminal using the KURO LINK function. If the output video resolution is set to the operating instructions of the Flat Panel TV. The functions listed below work when a Pioneer KURO LINK-compatible Flat Panel TV or AV ...terminal. About KURO LINK function • For some models, the KURO LINK function may not operate properly if the player's picture is not properly • This player is designed for all discs (BDs, DVDs, etc.) with HDMI- The KURO LINK function may not operate properly. • The KURO ...

Owner's Manual
Page 16
...• If the output video resolution is switched, the PQLS function may not work .) • Functions operated from the TV • Auto-select function • Simultaneous power function • Unified language function Please see the Pioneer website for the latest information on the player's front panel lights ...result in order to enjoy the surround sound of AV receiver or amplifier. • Please see the Pioneer website for AV receivers or amplifiers that support the KURO LINK function. Player's rear panel RS-232 C USB LAN (100) (BD STORAGE) HDMI OUT DIGITAL OUT OPTICAL VIDEO...
...• If the output video resolution is switched, the PQLS function may not work .) • Functions operated from the TV • Auto-select function • Simultaneous power function • Unified language function Please see the Pioneer website for the latest information on the player's front panel lights ...result in order to enjoy the surround sound of AV receiver or amplifier. • Please see the Pioneer website for AV receivers or amplifiers that support the KURO LINK function. Player's rear panel RS-232 C USB LAN (100) (BD STORAGE) HDMI OUT DIGITAL OUT OPTICAL VIDEO...

Owner's Manual
Page 17
...a device connected to your TV. Furthermore, the picture may not be displayed properly due to the copy protection when the player is connected to the player are not output with a resolution of the following (not including when connected using an HDMI cable): a component video cable or a video... 480/60i when connected using a video cable. • When connected to a TV via a DVD recorder/video deck or when playing the player's output material that can be used for connection. Connect the audio signals using audio cables (7.1 channels) or an optical digital audio cable (below ). When...
...a device connected to your TV. Furthermore, the picture may not be displayed properly due to the copy protection when the player is connected to the player are not output with a resolution of the following (not including when connected using an HDMI cable): a component video cable or a video... 480/60i when connected using a video cable. • When connected to a TV via a DVD recorder/video deck or when playing the player's output material that can be used for connection. Connect the audio signals using audio cables (7.1 channels) or an optical digital audio cable (below ). When...

Owner's Manual
Page 19
...function is connected to On on the connected device before turning on the player's power. When a Pioneer Flat Panel TV that is selected at Video, no video signals are output from the COMPONENT VIDEO or VIDEO output terminals. • When COMPONENT VIDEO or VIDEO is compatible with the...OUT terminal. • The video and audio signals output from the Pioneer Flat Panel TV's language settings before Setup Navigator begins. 4 Select and set KURO LINK to the player using the player for instructions on operating the TV. 2 Turn on the player's power. • The screen in steps 4 ...
...function is connected to On on the connected device before turning on the player's power. When a Pioneer Flat Panel TV that is selected at Video, no video signals are output from the COMPONENT VIDEO or VIDEO output terminals. • When COMPONENT VIDEO or VIDEO is compatible with the...OUT terminal. • The video and audio signals output from the Pioneer Flat Panel TV's language settings before Setup Navigator begins. 4 Select and set KURO LINK to the player using the player for instructions on operating the TV. 2 Turn on the player's power. • The screen in steps 4 ...

Owner's Manual
Page 20
... Checking the picture quality settings or setting • When ANALOG AUDIO is selected at to the default after the batteries are output from the HDMI OUT or If a Pioneer Flat Panel TV or projector is connected to select Finish, then press ENTER. - audio signals are replaced. The For steps... set the HDMI High Speed Transmission setting for example a standard HDMI™ cable) or an HDMI cable with built-in step 4, the player sets the picture quality automatically. Use / to select, then press ENTER. Therefore the linear PCM audio signals obtained by decoding all...
... Checking the picture quality settings or setting • When ANALOG AUDIO is selected at to the default after the batteries are output from the HDMI OUT or If a Pioneer Flat Panel TV or projector is connected to select Finish, then press ENTER. - audio signals are replaced. The For steps... set the HDMI High Speed Transmission setting for example a standard HDMI™ cable) or an HDMI cable with built-in step 4, the player sets the picture quality automatically. Use / to select, then press ENTER. Therefore the linear PCM audio signals obtained by decoding all...

Owner's Manual
Page 22
... OUT terminal is displayed on the TV screen and on the player's front panel. Example: Output video resolution setting of selected video output terminal Video Output Terminal HDMI (Source Direct) • The video output terminal setting can be viewed between the original list and the ... the BD-ROM/DVD-Video disc's camera angles (page 25). Add to HMG Playlist Add the selected track or file to switch the output video resolution from the various video output terminals. Note • Items that can also be changed are being output with a resolution of 1080/...
... OUT terminal is displayed on the TV screen and on the player's front panel. Example: Output video resolution setting of selected video output terminal Video Output Terminal HDMI (Source Direct) • The video output terminal setting can be viewed between the original list and the ... the BD-ROM/DVD-Video disc's camera angles (page 25). Add to HMG Playlist Add the selected track or file to switch the output video resolution from the various video output terminals. Note • Items that can also be changed are being output with a resolution of 1080/...

Owner's Manual
Page 23
... material is displayed on the TV screen and on the player's front panel display. The film material is switched. Example: Video resolution of the currently playing disc Output Video Resolution Auto Source : 1080/60i Current Output : 1080/60i Output video resolution from the player Caution • 1080/24p signals can also be switched by...
... material is displayed on the TV screen and on the player's front panel display. The film material is switched. Example: Video resolution of the currently playing disc Output Video Resolution Auto Source : 1080/60i Current Output : 1080/60i Output video resolution from the player Caution • 1080/24p signals can also be switched by...
Owner's Manual
Page 24
...To cancel the resume playback function, press STOP while playback is canceled automatically in the player's settings to open the disc tray and load the disc. Note • Load the disc with the Home Media Gallery (page 31). Once reading is completed, the type of files that... stop , press STOP during playback. Input the password registered in the following cases: - CLEAR SECONDARY AUDIO VIDEO ENTER OUTPUT RESOLUTION VIDEO SELECT PLAY MODE HOME MEDIA GALLERY DISPLAY POPUP MENU MENU TOP MENU TOOLS HOME MENU ENTER RETURN PLAY PREV PAUSE STOP NEXT...
...To cancel the resume playback function, press STOP while playback is canceled automatically in the player's settings to open the disc tray and load the disc. Note • Load the disc with the Home Media Gallery (page 31). Once reading is completed, the type of files that... stop , press STOP during playback. Input the password registered in the following cases: - CLEAR SECONDARY AUDIO VIDEO ENTER OUTPUT RESOLUTION VIDEO SELECT PLAY MODE HOME MEDIA GALLERY DISPLAY POPUP MENU MENU TOP MENU TOOLS HOME MENU ENTER RETURN PLAY PREV PAUSE STOP NEXT...

Owner's Manual
Page 27
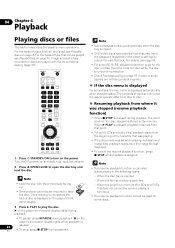
...,5 Step forward and step reverse2 Switching the camera angles6 Switching the subtitles7 Switching the audio8 Switching the secondary audio9 Switching the secondary video11 Displaying the disc information BDROM 3 10 12 BD-R /-RE 3 DVDVideo 3 DVD-R /-RW (VR format) 3... switching screen provided on the table. 2. Sound is produced during forward and reverse scanning. 5. • No sound is output during slow motion playback. • It is produced during reverse slow motion playback. 6. Some functions may be displayed immediately,...
...,5 Step forward and step reverse2 Switching the camera angles6 Switching the subtitles7 Switching the audio8 Switching the secondary audio9 Switching the secondary video11 Displaying the disc information BDROM 3 10 12 BD-R /-RE 3 DVDVideo 3 DVD-R /-RW (VR format) 3... switching screen provided on the table. 2. Sound is produced during forward and reverse scanning. 5. • No sound is output during slow motion playback. • It is produced during reverse slow motion playback. 6. Some functions may be displayed immediately,...

Owner's Manual
Page 28
... the cursor. • To search for A-B Repeat. 04 Using the Play Mode functions Playing a specific title, chapter or track (Search) CLEAR SECONDARY AUDIO VIDEO ENTER OUTPUT RESOLUTION VIDEO SELECT PLAY MODE HOME MEDIA GALLERY DISPLAY POPUP MENU MENU TOP MENU TOOLS HOME MENU ENTER RETURN PLAY PREV PAUSE STOP NEXT 1 Press...
... the cursor. • To search for A-B Repeat. 04 Using the Play Mode functions Playing a specific title, chapter or track (Search) CLEAR SECONDARY AUDIO VIDEO ENTER OUTPUT RESOLUTION VIDEO SELECT PLAY MODE HOME MEDIA GALLERY DISPLAY POPUP MENU MENU TOP MENU TOOLS HOME MENU ENTER RETURN PLAY PREV PAUSE STOP NEXT 1 Press...

Owner's Manual
Page 34
... Select this to Auto 2, On or Off (page 35). • YNR - The detailed settings screen reappears when ENTER is effective mainly when outputting video materials as the setup level. Reduces noise in the chroma (C) signal. • BNR - Adjusts how the dark portions of the parameters...Memory1, 2 or 3 is too bright due to the combination with adjusted parameters can also be adjusted. Select this when connected to a Pioneer plasma TV. • Pioneer LCD - Select the black level as progressive images. • Pure Cinema - Use / to a liquid crystal display of the...
... Select this to Auto 2, On or Off (page 35). • YNR - The detailed settings screen reappears when ENTER is effective mainly when outputting video materials as the setup level. Reduces noise in the chroma (C) signal. • BNR - Adjusts how the dark portions of the parameters...Memory1, 2 or 3 is too bright due to the combination with adjusted parameters can also be adjusted. Select this when connected to a Pioneer plasma TV. • Pioneer LCD - Select the black level as progressive images. • Pure Cinema - Use / to a liquid crystal display of the...

Owner's Manual
Page 35
... Audio DRC. Analog audio signals output from the AUDIO OUT terminals. - Use / to set. 4 Adjust the setting. For Dolby Digital Plus and Dolby Digital, the setting has the same effect as High or Off for Dolby TrueHD signals, depending on the disc information screen when playing the "...late at 24 frames/ second "Pure Cinema" uses signal processing suited for some discs. • Prog.Motion is disabled when Pure Cinema is set to On. • Black Setup has the effect only for pictures output from the VIDEO output terminals. • YNR, CNR, BNR and MNR have no effect on ...
... Audio DRC. Analog audio signals output from the AUDIO OUT terminals. - Use / to set. 4 Adjust the setting. For Dolby Digital Plus and Dolby Digital, the setting has the same effect as High or Off for Dolby TrueHD signals, depending on the disc information screen when playing the "...late at 24 frames/ second "Pure Cinema" uses signal processing suited for some discs. • Prog.Motion is disabled when Pure Cinema is set to On. • Black Setup has the effect only for pictures output from the VIDEO output terminals. • YNR, CNR, BNR and MNR have no effect on ...

Owner's Manual
Page 36
... Sync screen Press ENTER or HOME MENU. 36 En Press TOOLS. 2 Select and set Lip Sync. If you have selected Manual, proceed to the output terminal set at Output Terminal (page 46). • The sound may be adjusted from 0 to 250 ms in steps of 5 ms. Note • The Lip Sync adjustment... HDMI Auto Lipsync Correction feature using an HDMI cable. • Manual - Adjusting the audio delay (Lip Sync) Adjust the audio delay for the selected video output terminal if the video and audio are not synchronized. 1 During playback, display the TOOLS menu. The...
... Sync screen Press ENTER or HOME MENU. 36 En Press TOOLS. 2 Select and set Lip Sync. If you have selected Manual, proceed to the output terminal set at Output Terminal (page 46). • The sound may be adjusted from 0 to 250 ms in steps of 5 ms. Note • The Lip Sync adjustment... HDMI Auto Lipsync Correction feature using an HDMI cable. • Manual - Adjusting the audio delay (Lip Sync) Adjust the audio delay for the selected video output terminal if the video and audio are not synchronized. 1 During playback, display the TOOLS menu. The...

Owner's Manual
Page 37
...to view 4:3 pictures over the entire screen, with the left and right sides of DVD-Video or DVD-R/-RW (VR format) discs. Initial Setup BD PLAYER Video Out Audio Out Speakers HDMI Network Language Data Management Setup Navigator TV Aspect Ratio 4:3 Video Out DVD 16:9 Video Out ...display the Home Menu screen. Chapter 6 06 Advanced settings Changing the settings Operating the Initial Setup screen CLEAR SECONDARY AUDIO VIDEO ENTER OUTPUT RESOLUTION VIDEO SELECT PLAY MODE HOME MEDIA GALLERY DISPLAY POPUP MENU MENU TOP MENU TOOLS HOME MENU ENTER RETURN PLAY PREV PAUSE STOP ...
...to view 4:3 pictures over the entire screen, with the left and right sides of DVD-Video or DVD-R/-RW (VR format) discs. Initial Setup BD PLAYER Video Out Audio Out Speakers HDMI Network Language Data Management Setup Navigator TV Aspect Ratio 4:3 Video Out DVD 16:9 Video Out ...display the Home Menu screen. Chapter 6 06 Advanced settings Changing the settings Operating the Initial Setup screen CLEAR SECONDARY AUDIO VIDEO ENTER OUTPUT RESOLUTION VIDEO SELECT PLAY MODE HOME MEDIA GALLERY DISPLAY POPUP MENU MENU TOP MENU TOOLS HOME MENU ENTER RETURN PLAY PREV PAUSE STOP ...