

User manual
Page 1
Soundbar 7000 Series TAB7908 User manual Register your product and get support at www.philips.com/support
Soundbar 7000 Series TAB7908 User manual Register your product and get support at www.philips.com/support
User manual
Page 2
... 5 Help and support 5 FCC information 6 2 Your Soundbar 7 What's in the box 7 Soundbar 7 Connectors 8 Wireless subwoofer 8 Remote control 9 Prepare the remote control 9 Placement 10 Wall mount 11 3 Connect 12 Dolby Atmos® 12 Connect to HDMI socket 12 Connect to Optical socket 13 Connect to Audio in socket 13 Connect to power 14 Pair up with the subwoofer 14 4 Use your soundbar 15 Turn on and off 15 Select modes 15 Adjust the volume 15 Select surround mode 15 Setup menu 16 Factory reset 18 Play from Bluetooth...
... 5 Help and support 5 FCC information 6 2 Your Soundbar 7 What's in the box 7 Soundbar 7 Connectors 8 Wireless subwoofer 8 Remote control 9 Prepare the remote control 9 Placement 10 Wall mount 11 3 Connect 12 Dolby Atmos® 12 Connect to HDMI socket 12 Connect to Optical socket 13 Connect to Audio in socket 13 Connect to power 14 Pair up with the subwoofer 14 4 Use your soundbar 15 Turn on and off 15 Select modes 15 Adjust the volume 15 Select surround mode 15 Setup menu 16 Factory reset 18 Play from Bluetooth...

User manual
Page 3
.... NO USER-SERVICEABLE PARTS INSIDE. Warning: Risk of injury or damage to this product! • For wall mounting, this product must be exposed to the power outlet, ensure that all instructions before lightning storms. • When you disconnect the power cord, always pull the plug, never the cable. • Use the product in accordance with double insulation, and no protective earth provided...
.... NO USER-SERVICEABLE PARTS INSIDE. Warning: Risk of injury or damage to this product! • For wall mounting, this product must be exposed to the power outlet, ensure that all instructions before lightning storms. • When you disconnect the power cord, always pull the plug, never the cable. • Use the product in accordance with double insulation, and no protective earth provided...

User manual
Page 6
...uses and can be installed and operated with minimum distance 20cm between the equipment and receiver. • Connect the equipment into an outlet on a circuit different from that to which can radiate radio frequency energy and, if not installed and used in accordance with the instructions, may cause undesired operation...appareil est conforme aux CNR d'Innovation, Sciences et Développement économique Canada applicables aux appareils radio exempts de licence. FCC&IC Warning: • This equipment should be determined by turning the equipment off and on, the user is encouraged ...
...uses and can be installed and operated with minimum distance 20cm between the equipment and receiver. • Connect the equipment into an outlet on a circuit different from that to which can radiate radio frequency energy and, if not installed and used in accordance with the instructions, may cause undesired operation...appareil est conforme aux CNR d'Innovation, Sciences et Développement économique Canada applicables aux appareils radio exempts de licence. FCC&IC Warning: • This equipment should be determined by turning the equipment off and on, the user is encouraged ...

User manual
Page 7
.... 4 (Standby-On) button • Switch the soundbar On or to standby. • Long press for reference only, actual product may vary in power on state to enable or disable AutoStandy (15 minutes Auto-Standby). 5 Remote control sensor / Display panel TAB7908/10 TAB7908/37 TAB7908/93 • Power cord quantity and plug type vary by regions. • Images, illustrations and drawings shown on your soundbar at www.philips.com/support. To...
.... 4 (Standby-On) button • Switch the soundbar On or to standby. • Long press for reference only, actual product may vary in power on state to enable or disable AutoStandy (15 minutes Auto-Standby). 5 Remote control sensor / Display panel TAB7908/10 TAB7908/37 TAB7908/93 • Power cord quantity and plug type vary by regions. • Images, illustrations and drawings shown on your soundbar at www.philips.com/support. To...

User manual
Page 8
... subwoofer, which is used for example, an MP3 player (3.5mm jack). 3 Optical in socket Connect to an optical audio output on the TV or a digital device. 4 HDMI out (eARC) socket The port supports the eARC/ARC HDMI feature, connect to the HDMI (eARC/ARC) input on the TV. 5 HDMI in socket Connect to the HDMI source devices, such as a DVD player, Blu-ray Disc™ player, or gaming console. 6 Wall bracket slot 7 AC in pairing mode Constant on the wireless subwoofer...
... subwoofer, which is used for example, an MP3 player (3.5mm jack). 3 Optical in socket Connect to an optical audio output on the TV or a digital device. 4 HDMI out (eARC) socket The port supports the eARC/ARC HDMI feature, connect to the HDMI (eARC/ARC) input on the TV. 5 HDMI in socket Connect to the HDMI source devices, such as a DVD player, Blu-ray Disc™ player, or gaming console. 6 Wall bracket slot 7 AC in pairing mode Constant on the wireless subwoofer...

User manual
Page 9
... Bluetooth pairing mode. 3 (Dolby) Select surround mode (UPMIX, STANDARD, AI). 4 (Mute) Mute or restore volume. 5 Navigation buttons / (Left/Right) • Skip to the previous or next track in USB/BT mode. • Navigate Left/Right in menu structure. / (Up/Down) • Navigate up/down in menu structure. (Center) • Start, pause or resume play in USB/ BT mode. 6 (MENU) Enter setup menu. 7 (Back) Exit menu. 8 +/- (System's volume) Increase / decrease the system's volume. 9 +/- (Subwoofer's Volume...
... Bluetooth pairing mode. 3 (Dolby) Select surround mode (UPMIX, STANDARD, AI). 4 (Mute) Mute or restore volume. 5 Navigation buttons / (Left/Right) • Skip to the previous or next track in USB/BT mode. • Navigate Left/Right in menu structure. / (Up/Down) • Navigate up/down in menu structure. (Center) • Start, pause or resume play in USB/ BT mode. 6 (MENU) Enter setup menu. 7 (Back) Exit menu. 8 +/- (System's volume) Increase / decrease the system's volume. 9 +/- (Subwoofer's Volume...

User manual
Page 12
... experience by using a single HDMI cable. HDMI out (eARC) TV HDMI (eARC/ARC) 1 On your soundbar by delivering sound in HDMI mode. 3 Connect This section helps you connect your soundbar to a TV and other methods (such as a Digital Optical cable) but they are disconnected from the power outlet. For details, see the TV user manual. Connect to HDMI socket Some 4K HDR TVs require the HDMI input or picture settings to support all the...
... experience by using a single HDMI cable. HDMI out (eARC) TV HDMI (eARC/ARC) 1 On your soundbar by delivering sound in HDMI mode. 3 Connect This section helps you connect your soundbar to a TV and other methods (such as a Digital Optical cable) but they are disconnected from the power outlet. For details, see the TV user manual. Connect to HDMI socket Some 4K HDR TVs require the HDMI input or picture settings to support all the...

User manual
Page 13
... must support the HDMI-CEC and ARC function. Option 2: Standard HDMI If your TV is not HDMI ARC-compliant, connect your TV user manual. • Make sure to On. • The setting method of HDMI-CEC and ARC may differ depending on the soundbar. Connect to Optical socket 1 Using an optical cable, connect the Optical in TV Optical out • The digital optical connector might be set to use the HDMI cables can support the ARC function. Optical in connector...
... must support the HDMI-CEC and ARC function. Option 2: Standard HDMI If your TV is not HDMI ARC-compliant, connect your TV user manual. • Make sure to On. • The setting method of HDMI-CEC and ARC may differ depending on the soundbar. Connect to Optical socket 1 Using an optical cable, connect the Optical in TV Optical out • The digital optical connector might be set to use the HDMI cables can support the ARC function. Optical in connector...

User manual
Page 15
... the subwoofer's volume level. Display E-ARC ARC HD I AUX Status HDMI eARC HDMI ARC HDMI IN USB Audio in the quick start • Make the necessary connections described in OPT BT NO BT Optical Bluetooth • Connected • Connection Adjust the volume Adjust the system's volume Press the +/- Select surround mode Experience an immersive audio experience with Dolby sound modes. 1 Press button on the remote control to select surround mode. • UPMIX: 2-ch or 5.1-ch Upmix to 5.1.2-ch • STANDARD: Original sound (Speakers output follow the default channel). •...
... the subwoofer's volume level. Display E-ARC ARC HD I AUX Status HDMI eARC HDMI ARC HDMI IN USB Audio in the quick start • Make the necessary connections described in OPT BT NO BT Optical Bluetooth • Connected • Connection Adjust the volume Adjust the system's volume Press the +/- Select surround mode Experience an immersive audio experience with Dolby sound modes. 1 Press button on the remote control to select surround mode. • UPMIX: 2-ch or 5.1-ch Upmix to 5.1.2-ch • STANDARD: Original sound (Speakers output follow the default channel). •...

User manual
Page 16
Setup menu The unit allows you with Night mode DT VRT X Select DTS Virtual:X effect control AVxxx Set the Audio Delay CTR XX Adjust the center channel volume DI5P Set to turn off display automatically APD Auto-standby ON/OFF DI XX Set display brightness AUR T UPGRADE Restore the default sound effect Update firmware via USB EQ (EQ) Select predefined sound modes to your video and music: MOVIE, MUSIC, VOICE, STADIUM. • MOVIE: Create a surround listening experience. Ideal for watching movies. • MUSIC: Create...
Setup menu The unit allows you with Night mode DT VRT X Select DTS Virtual:X effect control AVxxx Set the Audio Delay CTR XX Adjust the center channel volume DI5P Set to turn off display automatically APD Auto-standby ON/OFF DI XX Set display brightness AUR T UPGRADE Restore the default sound effect Update firmware via USB EQ (EQ) Select predefined sound modes to your video and music: MOVIE, MUSIC, VOICE, STADIUM. • MOVIE: Create a surround listening experience. Ideal for watching movies. • MUSIC: Create...

User manual
Page 17
... the default sound effect Item EQ Master Volume Subwoofer Volume Default settings Movie 10 0 EN 17 Audio Delay feature is designed to process the audio signal. Auto volume (AUVOL) Combine Auto volume with virtual height and virtual surround processing to realize a three-dimensional sound field when the height speakers are not used. • OFF: Do not use "Auto volume" . • ON: Responds in a quite listing environment. This is set to ON. Center (CTR XX) Adjust the center channel volume...
... the default sound effect Item EQ Master Volume Subwoofer Volume Default settings Movie 10 0 EN 17 Audio Delay feature is designed to process the audio signal. Auto volume (AUVOL) Combine Auto volume with virtual height and virtual surround processing to realize a three-dimensional sound field when the height speakers are not used. • OFF: Do not use "Auto volume" . • ON: Responds in a quite listing environment. This is set to ON. Center (CTR XX) Adjust the center channel volume...

User manual
Page 18
... open space without obstructions. BASS 0 TREBLE 0 CH VOL (Center) 0 Top level (Height) 03 DTS Virtual X ON Auto volume (AUVOL) ON Factory reset Reset device to default setting. • Turn on the soundbar, press and hold the button on the remote control to disconnect all Bluetooth devices is displayed on the display panel. 18 EN 4 Select and play audio files or music on your Bluetooth device. • During play, if a call ends. • If your Bluetooth device supports...
... open space without obstructions. BASS 0 TREBLE 0 CH VOL (Center) 0 Top level (Height) 03 DTS Virtual X ON Auto volume (AUVOL) ON Factory reset Reset device to default setting. • Turn on the soundbar, press and hold the button on the remote control to disconnect all Bluetooth devices is displayed on the display panel. 18 EN 4 Select and play audio files or music on your Bluetooth device. • During play, if a call ends. • If your Bluetooth device supports...
User manual
Page 19
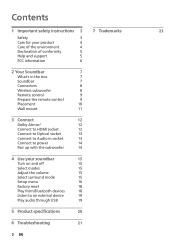
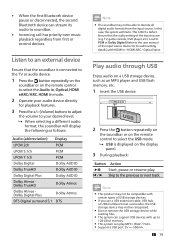
... remote control to decode all digital audio formats from first or second devices. Ensure that the soundbar is set to PCM or Dolby Digital (Refer to the user manual of the input source device for playback features. 3 Press the +/- (Volume) buttons to adjust the volume to select the Audio in, Optical, HDMI eARC/ARC, HDMI in / HDMI ARC / Optical input. Play audio through USB Enjoy audio on a USB storage device, such as follows: Audio (abbreviation) Display LPCM 2ch PCM LPCM 5.1ch PCM LPCM 7.1ch PCM Dolby Digital Dolby AUDIO Dolby...
... remote control to decode all digital audio formats from first or second devices. Ensure that the soundbar is set to PCM or Dolby Digital (Refer to the user manual of the input source device for playback features. 3 Press the +/- (Volume) buttons to adjust the volume to select the Audio in, Optical, HDMI eARC/ARC, HDMI in / HDMI ARC / Optical input. Play audio through USB Enjoy audio on a USB storage device, such as follows: Audio (abbreviation) Display LPCM 2ch PCM LPCM 5.1ch PCM LPCM 7.1ch PCM Dolby Digital Dolby AUDIO Dolby...

User manual
Page 20
Bluetooth / Wireless Bluetooth profiles Bluetooth version Bluetooth frequency range / Transmitter power (EIRP) 5.8G wireless frequency range / Transmitter power (EIRP) A2DP, AVRCP V 5.3 2402 ~ 2480MHz < 10dBm 5729 ~ 5849MHz < 10dBm Amplifier Section Output power RMS 370W @THD 5 Product specifications Note • Specifications and design are subject to change without notice.
Bluetooth / Wireless Bluetooth profiles Bluetooth version Bluetooth frequency range / Transmitter power (EIRP) 5.8G wireless frequency range / Transmitter power (EIRP) A2DP, AVRCP V 5.3 2402 ~ 2480MHz < 10dBm 5729 ~ 5849MHz < 10dBm Amplifier Section Output power RMS 370W @THD 5 Product specifications Note • Specifications and design are subject to change without notice.

User manual
Page 21
... the remote control or soundbar to its latest software. You may exist). • If audio is not present or distorted, it would probably help to switch to a different audio output format to the main unit. • Increase the volume. Sound No sound from the soundbar speaker. • Connect the audio cable from the wireless subwoofer. • Manually connect the subwoofer to check whether the issue is generic or a specific incompatibility with the video. 6 Troubleshooting...
... the remote control or soundbar to its latest software. You may exist). • If audio is not present or distorted, it would probably help to switch to a different audio output format to the main unit. • Increase the volume. Sound No sound from the soundbar speaker. • Connect the audio cable from the wireless subwoofer. • Manually connect the subwoofer to check whether the issue is generic or a specific incompatibility with the video. 6 Troubleshooting...

User manual
Page 22
... audio output setting is activated on the front of the unit. Remote control does not work • Before you press any obstacle between the remote control and the unit. • Insert the battery with its polarities (+/-) aligned as use of 'Dolby Atmos' about how to achieve best Dolby Atmos effects. See the section of USB, Bluetooth, Optical or AUDIO IN), limited height surround effects are generated. The subwoofer...
... audio output setting is activated on the front of the unit. Remote control does not work • Before you press any obstacle between the remote control and the unit. • Insert the battery with its polarities (+/-) aligned as use of 'Dolby Atmos' about how to achieve best Dolby Atmos effects. See the section of USB, Bluetooth, Optical or AUDIO IN), limited height surround effects are generated. The subwoofer...

Localized commercial leaflet
Page 1
... • 4 preset EQ modes optimize your sound environment • Backlit button panel lets you in and HDMI out (eARC) • Philips Easylink to bathe you see the controls clearly • Smart, fabric-covered design • Soundbar can be mounted on the wall or table Full connectivity • Connect via Bluetooth, optical in, USB and Aux in • HDMI in waves of exciting sound. One remote. Philips Soundbar 5.1.2 with wireless subwoofer Dolby Atmos...
... • 4 preset EQ modes optimize your sound environment • Backlit button panel lets you in and HDMI out (eARC) • Philips Easylink to bathe you see the controls clearly • Smart, fabric-covered design • Soundbar can be mounted on the wall or table Full connectivity • Connect via Bluetooth, optical in, USB and Aux in • HDMI in waves of exciting sound. One remote. Philips Soundbar 5.1.2 with wireless subwoofer Dolby Atmos...

Localized commercial leaflet
Page 2
... rich surround sound. Be thrilled by the roars of four preset EQ modes to change. This product is Roku TV Ready certified. Whether you 're actually at either end of advanced audio formats like never before. Roku TV Ready™ Dolby Atmos. Wireless subwoofer Wider soundstage and subwoofer. Fill your space with wireless subwoofer Dolby Atmos® DTS Virtual:X, 740W max, 5.1.2 CH wireless subwoofer Highlights TAB7908/37...
... rich surround sound. Be thrilled by the roars of four preset EQ modes to change. This product is Roku TV Ready certified. Whether you 're actually at either end of advanced audio formats like never before. Roku TV Ready™ Dolby Atmos. Wireless subwoofer Wider soundstage and subwoofer. Fill your space with wireless subwoofer Dolby Atmos® DTS Virtual:X, 740W max, 5.1.2 CH wireless subwoofer Highlights TAB7908/37...

Localized commercial leaflet
Page 3
Soundbar 5.1.2 with wireless subwoofer Dolby Atmos® DTS Virtual:X, 740W max, 5.1.2 CH wireless subwoofer Specifications TAB7908/37 Sound • Speaker system output power: 740W max / 370W RMS • Total harmonic distortion:
Soundbar 5.1.2 with wireless subwoofer Dolby Atmos® DTS Virtual:X, 740W max, 5.1.2 CH wireless subwoofer Specifications TAB7908/37 Sound • Speaker system output power: 740W max / 370W RMS • Total harmonic distortion:


