
Leaflet
Page 1
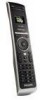
... • Activities to customize programming by user or by viewing category. 10 Device remote controls TV, DVD, Tivo, VCR, satellite, cable, audio, DVR and more. Philips Prestigo Universal remote control SRU8008 Maximum functionality. Icon design allows you to control multiple devices with one button press • Rotary cursor control for fast menu navigation • LCD screen with backlighting for convenience...
... • Activities to customize programming by user or by viewing category. 10 Device remote controls TV, DVD, Tivo, VCR, satellite, cable, audio, DVR and more. Philips Prestigo Universal remote control SRU8008 Maximum functionality. Icon design allows you to control multiple devices with one button press • Rotary cursor control for fast menu navigation • LCD screen with backlighting for convenience...

Leaflet
Page 2
...Philips Electronics N.V. www.philips.com Universal IR code database A universal IR code database refers to a library of infrared codes built-in the database for the devices you to navigate through which a remote control captures and stores infrared signals from the original remote...kg • Nett weight: 0,149 kg • Tare weight: 0,228 kg • SRU8008/27 Highlights 1.4" color display A 1.4" (96 x 67 pixel) color LCD display is a ... (10 m) • Learning IR codes • Number of brands in the on-board database, they can always be learned from other universal remote controls, ...
...Philips Electronics N.V. www.philips.com Universal IR code database A universal IR code database refers to a library of infrared codes built-in the database for the devices you to navigate through which a remote control captures and stores infrared signals from the original remote...kg • Nett weight: 0,149 kg • Tare weight: 0,228 kg • SRU8008/27 Highlights 1.4" color display A 1.4" (96 x 67 pixel) color LCD display is a ... (10 m) • Learning IR codes • Number of brands in the on-board database, they can always be learned from other universal remote controls, ...

User manual
Page 3
ENGLISH SRU8008_IFU_bundel 1 v09.qxd 03-12-2007 11:35 Pagina 3 Contents 1 Your Philips Prestigo SRU8008 4 1.1 What's in the Box 4 1.2 Overview SRU8008 4 2 Getting Started 5 2.1 Prepare 5 2.2 Install 6 3 Using Your SRU8008 7 3.1 Selecting a Device 8 3.2 Selecting an Activity 8 3.3 Selecting More Functions 8 4 Getting the Most out of Your SRU8008 9 4.1 Devices 10 4.2 Activities 12 4.3 More Functions 14 4.4 System Settings 15 4.5 Language 16 5 Frequently Asked Questions 17 6 Need help? 18 Contents 3
ENGLISH SRU8008_IFU_bundel 1 v09.qxd 03-12-2007 11:35 Pagina 3 Contents 1 Your Philips Prestigo SRU8008 4 1.1 What's in the Box 4 1.2 Overview SRU8008 4 2 Getting Started 5 2.1 Prepare 5 2.2 Install 6 3 Using Your SRU8008 7 3.1 Selecting a Device 8 3.2 Selecting an Activity 8 3.3 Selecting More Functions 8 4 Getting the Most out of Your SRU8008 9 4.1 Devices 10 4.2 Activities 12 4.3 More Functions 14 4.4 System Settings 15 4.5 Language 16 5 Frequently Asked Questions 17 6 Need help? 18 Contents 3

User manual
Page 8
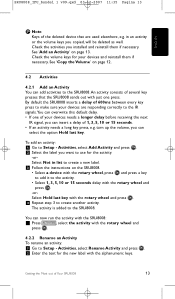
...-12-2007 11:35 Pagina 8 The rotary wheel is an easy-to-use, multifunctional control on your SRU8008: • When turning the rotary wheel, you scroll through the different options on your remote control's display. 7 • When pushing the rotary wheel at the top, at the ...of installed devices To setup your devices, see 'Add a Device' on page 10. 3.2 Selecting an Activity To select your activities, see 'Add an Activity' on the SRU8008. The SRU8008 is set to operate the selected device.You can now control that moment. 7 8 3.1 Selecting a Device To select your installed devices:...
...-12-2007 11:35 Pagina 8 The rotary wheel is an easy-to-use, multifunctional control on your SRU8008: • When turning the rotary wheel, you scroll through the different options on your remote control's display. 7 • When pushing the rotary wheel at the top, at the ...of installed devices To setup your devices, see 'Add a Device' on page 10. 3.2 Selecting an Activity To select your activities, see 'Add an Activity' on the SRU8008. The SRU8008 is set to operate the selected device.You can now control that moment. 7 8 3.1 Selecting a Device To select your installed devices:...

User manual
Page 10
...an installed activity 14 Adds an extra function by learning it from your original remote control 14 Renames a function 14 Deletes an installed function 14 Changes the time-out of the backlight on the SRU8008 15 Turns the key backlight on or off 15 Deletes all your personal settings... on SRU8008 15 Changes the language of the instructions on the SRU8008 16 Leave the Setup menu 9 4.1 Devices 4.1.1 Add a Device To operate your specific devices with the rotary wheel and press . 10 Getting the Most out of all devices, see page...
...an installed activity 14 Adds an extra function by learning it from your original remote control 14 Renames a function 14 Deletes an installed function 14 Changes the time-out of the backlight on the SRU8008 15 Turns the key backlight on or off 15 Deletes all your personal settings... on SRU8008 15 Changes the language of the instructions on the SRU8008 16 Leave the Setup menu 9 4.1 Devices 4.1.1 Add a Device To operate your specific devices with the rotary wheel and press . 10 Getting the Most out of all devices, see page...
User manual
Page 13
... delay before receiving the next IR signal, you can insert a delay of 1, 3, 5, 10 or 15 seconds. • If an activity needs a long key press, e.g. in list to create a new label. 3 Follow the instructions on the SRU8008. • Select a device with the rotary wheel, press and press a key to add... it to the activity. • Select 1, 3, 5, 10 or 15 seconds delay with the rotary wheel and press . -orSelect Hold last key with ...
... delay before receiving the next IR signal, you can insert a delay of 1, 3, 5, 10 or 15 seconds. • If an activity needs a long key press, e.g. in list to create a new label. 3 Follow the instructions on the SRU8008. • Select a device with the rotary wheel, press and press a key to add... it to the activity. • Select 1, 3, 5, 10 or 15 seconds delay with the rotary wheel and press . -orSelect Hold last key with ...
User manual
Page 14
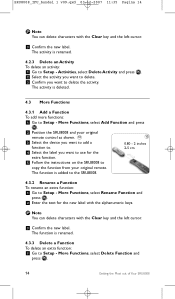
D Note You can delete characters with the Clear key and the left cursor. 3 Confirm the new label. The activity is added to the SRU8008. 4.3.2 Rename a Function To rename an extra function: 1 Go to Setup - Activities, select Delete Activity and press . 2 Select the activity you ... Functions, select Rename Function and press . 2 Enter the text for the extra function. 5 Follow the instructions on the SRU8008 to copy the function from your original remote control as shown. 10 10 3 Select the device you want to add a function to. 0.80 - 2 inches 2-5 cm 4 Select the label you want...
D Note You can delete characters with the Clear key and the left cursor. 3 Confirm the new label. The activity is added to the SRU8008. 4.3.2 Rename a Function To rename an extra function: 1 Go to Setup - Activities, select Delete Activity and press . 2 Select the activity you ... Functions, select Rename Function and press . 2 Enter the text for the extra function. 5 Follow the instructions on the SRU8008 to copy the function from your original remote control as shown. 10 10 3 Select the device you want to add a function to. 0.80 - 2 inches 2-5 cm 4 Select the label you want...

User manual
Page 15
...35 Pagina 15 2 Select the device from which you want to delete a function. 3 Select the function you want to delete. 4 Confirm you use the SRU8008, the backlight turns on. System Settings, select Backlight Time-Out and press . 2 Select the preferred backlight time-out with the rotary wheel. 3 Confirm ... To turn on or off again. System Settings, select Key Backlight and press . 2 Select On or Off with the rotary wheel: 3 seconds, 5 seconds, 10 seconds, 20 seconds. 3 Confirm the new time-out setting. The backlight time-out is turned on and off the key backlight: 1 Go to delete the...
...35 Pagina 15 2 Select the device from which you want to delete a function. 3 Select the function you want to delete. 4 Confirm you use the SRU8008, the backlight turns on. System Settings, select Backlight Time-Out and press . 2 Select the preferred backlight time-out with the rotary wheel. 3 Confirm ... To turn on or off again. System Settings, select Key Backlight and press . 2 Select On or Off with the rotary wheel: 3 seconds, 5 seconds, 10 seconds, 20 seconds. 3 Confirm the new time-out setting. The backlight time-out is turned on and off the key backlight: 1 Go to delete the...