

User Manual
Page 2
EN Contents 3 Important Information 3 Parts Included 4 Installation 5 Connecting to Your TV 6 Warranty 7 Technical Support 2
EN Contents 3 Important Information 3 Parts Included 4 Installation 5 Connecting to Your TV 6 Warranty 7 Technical Support 2

User Manual
Page 3
... . . . . .1 3. Power supply 230V to 'F' Connector 1 Determining signal strength Before Installation determine the best location for proper operation of this aerial system that you are within digital TV coverage check this important notice may result in aiming the aerial here: http://www.dtg.org.uk/retailer/transmitters.html 3 Power Injector 1 12. Important Information EN Philips SDV2940/05 Indoor/Outdoor UHF/VHF Television Aerial Important installation information The SDV2940/05 uses a power injection module to help...
... . . . . .1 3. Power supply 230V to 'F' Connector 1 Determining signal strength Before Installation determine the best location for proper operation of this aerial system that you are within digital TV coverage check this important notice may result in aiming the aerial here: http://www.dtg.org.uk/retailer/transmitters.html 3 Power Injector 1 12. Important Information EN Philips SDV2940/05 Indoor/Outdoor UHF/VHF Television Aerial Important installation information The SDV2940/05 uses a power injection module to help...
User Manual
Page 4
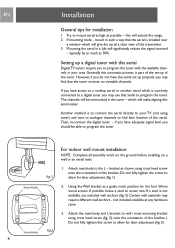
.... 3. EN Installation General tips for the four 50mm wood screws. The channels will significantly reduce the signal received - For indoor wall mount installation: NOTE: Complete all assembly work on the ground before installing on a wall or an aerial mast. 1. Attach main body to mount aerial as high as shown, using cross head screw (fig. 3), note the orientation of the bracket. bracket as possible - Using the Wall bracket as 50%. mount in a loft...
.... 3. EN Installation General tips for the four 50mm wood screws. The channels will significantly reduce the signal received - For indoor wall mount installation: NOTE: Complete all assembly work on the ground before installing on a wall or an aerial mast. 1. Attach main body to mount aerial as high as shown, using cross head screw (fig. 3), note the orientation of the bracket. bracket as possible - Using the Wall bracket as 50%. mount in a loft...
User Manual
Page 5
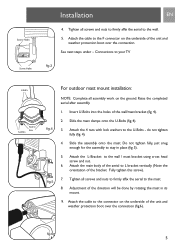
... affix the aerial to your TV fig.3 For outdoor mast mount installation: NOTE: Complete all assembly work on the underside of the unit and weather protection boot over the connection (fig.6). Connections to the mast. Adjustment of the unit and weather protection boot over the connection. Attach the L-Bracket to the U-Bolts - See next steps under - Attach the cable to the wall. 5. Slide the...
... affix the aerial to your TV fig.3 For outdoor mast mount installation: NOTE: Complete all assembly work on the underside of the unit and weather protection boot over the connection (fig.6). Connections to the mast. Adjustment of the unit and weather protection boot over the connection. Attach the L-Bracket to the U-Bolts - See next steps under - Attach the cable to the wall. 5. Slide the...

User Manual
Page 6
some set-top boxes require an "F" type connector - use only! Warranty Warranty information can be placed in-line between the aerial and before any other device. EN Connection to TV Connections to your TV fig.7 As previously noted the amplifier (Power Injector + Power supply) must be found at: www.philips.com/guarantee 6 Connect the Power Supply DC plug to the aerial input on the Power Injector. 2. Note - Both of RG-59 coaxial cable. This will...
some set-top boxes require an "F" type connector - use only! Warranty Warranty information can be placed in-line between the aerial and before any other device. EN Connection to TV Connections to your TV fig.7 As previously noted the amplifier (Power Injector + Power supply) must be found at: www.philips.com/guarantee 6 Connect the Power Supply DC plug to the aerial input on the Power Injector. 2. Note - Both of RG-59 coaxial cable. This will...

User Manual
Page 7
Technical Support EN Technical Support For Technical support send an email with the model number of the product and a detailed description of your problem to: Email: accessorysupport@philips.com Printed in China 7
Technical Support EN Technical Support For Technical support send an email with the model number of the product and a detailed description of your problem to: Email: accessorysupport@philips.com Printed in China 7

User Manual
Page 8
or their respective owners. 2006© Koninklijke Philips Electronics N.V. All rights reserved www.philips.com 8 Specifications are subject to change without notice Trademarks are property of Koninklijke Philips Electronics N.V.
or their respective owners. 2006© Koninklijke Philips Electronics N.V. All rights reserved www.philips.com 8 Specifications are subject to change without notice Trademarks are property of Koninklijke Philips Electronics N.V.


