Leaflet
Page 3
... Hz • Subwoofer impedance: 4 ohm Accessories • Included Accessories: User Manual, Quick start guide, Remote Control, 1x center speaker, 1x subwoofer, 2x front...; Picture Compression Format: JPEG • Picture Enhancement: Slideshow with Neodymium Ribbon Tweeters Specifications HTS9800W/37 Picture/Display • Aspect ratio: 4:3, 16:9 • D/A converter: 12bit,... x 830 x 240 mm • Stand weight: 4.5 kg • Weight incl. All Rights reserved. www.philips.com Specifications are the property of Preset Channels: 20 Dimensions • Set dimensions (W x H x D): 273 ...
... Hz • Subwoofer impedance: 4 ohm Accessories • Included Accessories: User Manual, Quick start guide, Remote Control, 1x center speaker, 1x subwoofer, 2x front...; Picture Compression Format: JPEG • Picture Enhancement: Slideshow with Neodymium Ribbon Tweeters Specifications HTS9800W/37 Picture/Display • Aspect ratio: 4:3, 16:9 • D/A converter: 12bit,... x 830 x 240 mm • Stand weight: 4.5 kg • Weight incl. All Rights reserved. www.philips.com Specifications are the property of Preset Channels: 20 Dimensions • Set dimensions (W x H x D): 273 ...

User manual
Page 1
DVD/ SACD HOME THEATER SYSTEM User Manual 6 Manuel D'utilisation 58 Manual de Instrucciones 110 HTS9800W English
DVD/ SACD HOME THEATER SYSTEM User Manual 6 Manuel D'utilisation 58 Manual de Instrucciones 110 HTS9800W English

User manual
Page 7
...43-45 Radio Tuning Tuner Operations ...46 Tuning to radio stations...46 Presetting radio stations ...46 Using auto install ...46 Using automatic preset...47 Using manual preset ...47 Selecting a preset radio station...47 Deleting a preset radio station...47 Other Information Sound and Volume Controls 48 Selecting surround sound...48 Adjusting...48 Volume control ...48 Other Features ...49 Setting the Sleep timer ...49 Dimming system's display screen...49 Using the remote to operate your 'Philips' television 49 Specifications ...50 Troubleshooting ...51-53 Glossary ...54-55 Language Code...164 7
...43-45 Radio Tuning Tuner Operations ...46 Tuning to radio stations...46 Presetting radio stations ...46 Using auto install ...46 Using automatic preset...47 Using manual preset ...47 Selecting a preset radio station...47 Deleting a preset radio station...47 Other Information Sound and Volume Controls 48 Selecting surround sound...48 Adjusting...48 Volume control ...48 Other Features ...49 Setting the Sleep timer ...49 Dimming system's display screen...49 Using the remote to operate your 'Philips' television 49 Specifications ...50 Troubleshooting ...51-53 Glossary ...54-55 Language Code...164 7
User manual
Page 10
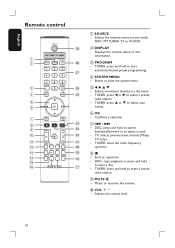
.../forward or to eject a disc. - j VOL +- Displays the current status or disc information. Enters or exits the system menu. TV: selects previous/next channel (Philips TV only.) - Mutes or restores the volume. e W X S T - g . / > - Selects the relevant active source mode: DISC, FM TUNER, ...TV or AUX/DI. TUNER: press S or T to select a preset radio station. - Exits an operation. - TUNER: press and hold to start automatic/manual preset programming. TUNER: press W or X to select auto tuning. h Ç - Confirms a selection. TUNER: tunes the radio frequency up/down. f OK ...
.../forward or to eject a disc. - j VOL +- Displays the current status or disc information. Enters or exits the system menu. TV: selects previous/next channel (Philips TV only.) - Mutes or restores the volume. e W X S T - g . / > - Selects the relevant active source mode: DISC, FM TUNER, ...TV or AUX/DI. TUNER: press S or T to select a preset radio station. - Exits an operation. - TUNER: press and hold to start automatic/manual preset programming. TUNER: press W or X to select auto tuning. h Ç - Confirms a selection. TUNER: tunes the radio frequency up/down. f OK ...
User manual
Page 20
... picture of the TV, and select the correct input channel on a digital audio device. CD recorder) to the Junction Box in order to the user manual of that player to PCM format. - You cannot hear or record the SACD or MP3-CD playback if you use the digital connection. - Helpful Hints...
... picture of the TV, and select the correct input channel on a digital audio device. CD recorder) to the Junction Box in order to the user manual of that player to PCM format. - You cannot hear or record the SACD or MP3-CD playback if you use the digital connection. - Helpful Hints...

User manual
Page 22
... system repeatedly to the correct video-in channel. Press SYSTEM MENU to Channel 1 on your TV, then press the Channel Down button on your TV manual for more details. The message "Standby" will be called FRONT, A/V IN, VIDEO. You may go to exit the menu. 22 Before you have completed all...
... system repeatedly to the correct video-in channel. Press SYSTEM MENU to Channel 1 on your TV, then press the Channel Down button on your TV manual for more details. The message "Standby" will be called FRONT, A/V IN, VIDEO. You may go to exit the menu. 22 Before you have completed all...

User manual
Page 23
... Português C Use ST keys to select a language and press OK to exit the menu. 23 If the selected language is recorded on the user manual. Otherwise, the disc's default language will automatically play the disc in that language. Press SYSTEM MENU to confirm. Preference Page Audio Subtitle Disc Menu Parental...
... Português C Use ST keys to select a language and press OK to exit the menu. 23 If the selected language is recorded on the user manual. Otherwise, the disc's default language will automatically play the disc in that language. Press SYSTEM MENU to confirm. Preference Page Audio Subtitle Disc Menu Parental...

User manual
Page 25
... using Y Pb Pr (see page 19.) A Turn off your TV progressive scan mode or turn on to the interlaced mode (refer to your TV user manual.) B Press the SOURCE button until "DISC" appears on the display panel. B Press X repeatedly to select { Video Setup Page. } C Press T to the previous menu item. Setting...
... using Y Pb Pr (see page 19.) A Turn off your TV progressive scan mode or turn on to the interlaced mode (refer to your TV user manual.) B Press the SOURCE button until "DISC" appears on the display panel. B Press X repeatedly to select { Video Setup Page. } C Press T to the previous menu item. Setting...

User manual
Page 26
... remote OK Cancel If no picture on your TV. C Press SUBTITLE on the front panel. HINTS:(refer to confirm. Confirm again to your TV user manual.) The below will be no picture is a blank screen on the remote control. Helpful Hint: - If there is displayed : Wait for 15 seconds for auto... such a case, turn on the progressive scan mode on your TV at this DVD system, resulting in the menu and press OK to the owner's manual) ACTIVATING PROGRESSIVE: 1. The set . Press SYSTEM MENU to enjoy the high quality picture.
... remote OK Cancel If no picture on your TV. C Press SUBTITLE on the front panel. HINTS:(refer to confirm. Confirm again to your TV user manual.) The below will be no picture is a blank screen on the remote control. Helpful Hint: - If there is displayed : Wait for 15 seconds for auto... such a case, turn on the progressive scan mode on your TV at this DVD system, resulting in the menu and press OK to the owner's manual) ACTIVATING PROGRESSIVE: 1. The set . Press SYSTEM MENU to enjoy the high quality picture.

User manual
Page 46
... the display panel. C Repeat step B if necessary until you access the tuner mode. Presetting radio stations You can store up to select TUNER mode. Using manual preset 2 1 A Press SOURCE on the system panel to 40 FM preset radio stations in the system's memory. Using auto install This feature is found . With...
... the display panel. C Repeat step B if necessary until you access the tuner mode. Presetting radio stations You can store up to select TUNER mode. Using manual preset 2 1 A Press SOURCE on the system panel to 40 FM preset radio stations in the system's memory. Using auto install This feature is found . With...

User manual
Page 47
... the numeric keypad on the display panel. B Press and hold PROGRAM until "AUTO" appears. System's STANDBY display panel ON 1 TUNER FM 3 AUTO 2 02 Using manual preset Use manual presetting to begin from the preset list. 47 A Tune to your favorite radio stations. If a radio station is selected, automatic preset will not store...
... the numeric keypad on the display panel. B Press and hold PROGRAM until "AUTO" appears. System's STANDBY display panel ON 1 TUNER FM 3 AUTO 2 02 Using manual preset Use manual presetting to begin from the preset list. 47 A Tune to your favorite radio stations. If a radio station is selected, automatic preset will not store...
User manual
Page 51
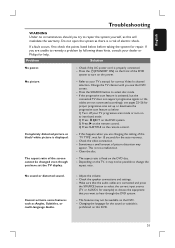
...correct Video In channel selection. Sometimes a small amount of the DVD system to remedy a problem by following these hints, consult your dealer or Philips for proper progressive scan set the TV display. - Clean the disc. Cannot activate some features such as there is activated, but the connected ...may appear. Changing the language for the auto recovery. - If a fault occurs, first check the points listed below : 1) Turn off your TV's manual for repair. Problem Solution No power. - Check if the AC power cord is displayed. - Change the TV channel until you want to your TV ...
...correct Video In channel selection. Sometimes a small amount of the DVD system to remedy a problem by following these hints, consult your dealer or Philips for proper progressive scan set the TV display. - Clean the disc. Cannot activate some features such as there is activated, but the connected ...may appear. Changing the language for the auto recovery. - If a fault occurs, first check the points listed below : 1) Turn off your TV's manual for repair. Problem Solution No power. - Check if the AC power cord is displayed. - Change the TV channel until you want to your TV ...
User manual
Page 56
...below. Some states do not allow limitations on any media contained within the product, or any replacement item becomes your product becomes Philips' property. Philips, P.O. Box 671539, Marietta, GA. 30006-0026 3121 233 48801 56 ment of customer controls on the product, and installation .... • Failure to a product or a part that requires modification or adaptation to enable it to any non-Philips hardware product or any damage to or loss of products damaged by anyone other than Philips or Philips Authorized Service Location, (c) to operate per Owner's Manual.
...below. Some states do not allow limitations on any media contained within the product, or any replacement item becomes your product becomes Philips' property. Philips, P.O. Box 671539, Marietta, GA. 30006-0026 3121 233 48801 56 ment of customer controls on the product, and installation .... • Failure to a product or a part that requires modification or adaptation to enable it to any non-Philips hardware product or any damage to or loss of products damaged by anyone other than Philips or Philips Authorized Service Location, (c) to operate per Owner's Manual.
Quick start guide
Page 1
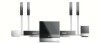
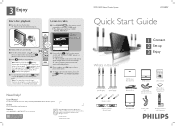
...into the disc slot. D Press (STOP) to AV subwoofer) Micro fibre cleaning cloth (for our operators. 2006 © Philips Consumer Electronics A Division of Philips Electronics North America Corp P.O. Note You may also access the same functions by using the corresponding touch screen buttons on the ...SACD Home Theater System HTS9800W Quick Start Guide What's in the box? 1 Connect 2 Set up 3 Enjoy Front speakers Rear speakers (left & right) (left & right) Speaker cables Center speakers (front & rear) AV Wireless Receiver Box Junction Box DVD system User manual VGA cable (use ST...
...into the disc slot. D Press (STOP) to AV subwoofer) Micro fibre cleaning cloth (for our operators. 2006 © Philips Consumer Electronics A Division of Philips Electronics North America Corp P.O. Note You may also access the same functions by using the corresponding touch screen buttons on the ...SACD Home Theater System HTS9800W Quick Start Guide What's in the box? 1 Connect 2 Set up 3 Enjoy Front speakers Rear speakers (left & right) (left & right) Speaker cables Center speakers (front & rear) AV Wireless Receiver Box Junction Box DVD system User manual VGA cable (use ST...
Quick start guide
Page 2
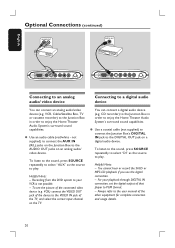
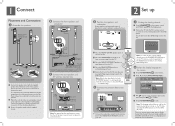
... enclosed area. Refer to the accompanying user manual for the DVD system. Match the color of the speaker wire to the color of the AV Wireless Receiver box (with Philips logo) is important to select the correct ... at equal distances from the Junction box to the AUDIO OUT/ VIDEO IN jacks on your home, see the User Manual - E Connect the Junction Box to the TV OUT IN VIDEO TV AUDIO TV (rear) Junction box TO SUBWOOFER Pr...level. Note If there is best received. B Place the SUBWOOFER on your HTS9800W speakers or existing wireless network in the menu and press OK to exit.
... enclosed area. Refer to the accompanying user manual for the DVD system. Match the color of the speaker wire to the color of the AV Wireless Receiver box (with Philips logo) is important to select the correct ... at equal distances from the Junction box to the AUDIO OUT/ VIDEO IN jacks on your home, see the User Manual - E Connect the Junction Box to the TV OUT IN VIDEO TV AUDIO TV (rear) Junction box TO SUBWOOFER Pr...level. Note If there is best received. B Place the SUBWOOFER on your HTS9800W speakers or existing wireless network in the menu and press OK to exit.


