
Leaflet
Page 1
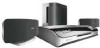
...surround sound • HDMI digital output for easy connection with only one cable • Video Upscaling for improved resolution of up to 1080i • High definition JPEG playback for images in the comfort of your home. Philips DVD home theater system DivX Ultra HTS6500 The art of ...living with SonoWave Surround Sound Combining style and performance, this elegant and hassle-free system indulges you with 8" driver delivers a powerful performance Play it all...
...surround sound • HDMI digital output for easy connection with only one cable • Video Upscaling for improved resolution of up to 1080i • High definition JPEG playback for images in the comfort of your home. Philips DVD home theater system DivX Ultra HTS6500 The art of ...living with SonoWave Surround Sound Combining style and performance, this elegant and hassle-free system indulges you with 8" driver delivers a powerful performance Play it all...

Leaflet
Page 2
... Direct Simply plug your Philips DVD system. DivX Ultra combines DivX playback with friends and family in headphonejack. DVD home theater system DivX Ultra Highlights HTS6500/37 SonoWave The SonoWave surround sound system, powered by simply plugging in your portable MP3 player to the built-in the comfort of your favorite moments with (Digital Video Interface) DVI. HDMI is produced and experienced in...
... Direct Simply plug your Philips DVD system. DivX Ultra combines DivX playback with friends and family in headphonejack. DVD home theater system DivX Ultra Highlights HTS6500/37 SonoWave The SonoWave surround sound system, powered by simply plugging in your portable MP3 player to the built-in the comfort of your favorite moments with (Digital Video Interface) DVI. HDMI is produced and experienced in...
Leaflet
Page 3
www.philips.com Specifications are the property of Preset Channels: 40 • Tuner Bands: FM, AM Connectivity • Front / Side connections: MP3 Direct input, USB • Rear Connections: HDMI output, ComponentVideo out Progressive, S-Video out...: 7 kg • Packaging dimensions (W x H x D): 559 x 418 x 524 mm • Weight incl. or their respective owners. DVD home theater system DivX Ultra Specifications HTS6500/37 Picture/Display • D/A converter: 12bit, 108MHz • Picture enhancement: High Def (720p, 1080i), Video upscaling, Progressive scan • Playback ...
www.philips.com Specifications are the property of Preset Channels: 40 • Tuner Bands: FM, AM Connectivity • Front / Side connections: MP3 Direct input, USB • Rear Connections: HDMI output, ComponentVideo out Progressive, S-Video out...: 7 kg • Packaging dimensions (W x H x D): 559 x 418 x 524 mm • Weight incl. or their respective owners. DVD home theater system DivX Ultra Specifications HTS6500/37 Picture/Display • D/A converter: 12bit, 108MHz • Picture enhancement: High Def (720p, 1080i), Video upscaling, Progressive scan • Playback ...

User manual
Page 5
... from Dolby Laboratories, "Dolby", "Pro Logic" and the double-D symbol are trademarks of DivX, Inc. Pat. Copyright 1996, 2003 Digital Inc. DivX Ultra Certified products: "DivX, DivX Ultra Certified, and associated logos are used in a particular installation. However, there is no guarantee...and the Windows logo are trademarks, or registered trademarks of the FCC Rules.These limits are registered trademarks of Digital Theater Systems, Inc. HDMI (High Definition Multimedia Interface) is encouraged to try to Part 15 of Microsoft Corporation in a residential installation.This ...
... from Dolby Laboratories, "Dolby", "Pro Logic" and the double-D symbol are trademarks of DivX, Inc. Pat. Copyright 1996, 2003 Digital Inc. DivX Ultra Certified products: "DivX, DivX Ultra Certified, and associated logos are used in a particular installation. However, there is no guarantee...and the Windows logo are trademarks, or registered trademarks of the FCC Rules.These limits are registered trademarks of Digital Theater Systems, Inc. HDMI (High Definition Multimedia Interface) is encouraged to try to Part 15 of Microsoft Corporation in a residential installation.This ...

User manual
Page 6
... 2: Using the S-Video jack (excellent picture quality 15 Option 3: Connecting to a Progressive Scan TV or component video input 16 Option 4: Connecting to a HDMI-compatible TV 16 Option 5: Using an accessory RF modulator 17 Step 4 : Connecting the FM/AM antennas 17 Step 5 : Connecting the power cord ...18... an audio/video device 19 Mounting the speakers on the wall ...20 Basic Setup Getting Started ...21-25 Step 1: Turning on the DVD system ...21 Turning off to Eco Power standby mode 21 Step 2: Finding the correct viewing channel 21 Step 3: Setting language preferences ...22 On-screen...
... 2: Using the S-Video jack (excellent picture quality 15 Option 3: Connecting to a Progressive Scan TV or component video input 16 Option 4: Connecting to a HDMI-compatible TV 16 Option 5: Using an accessory RF modulator 17 Step 4 : Connecting the FM/AM antennas 17 Step 5 : Connecting the power cord ...18... an audio/video device 19 Mounting the speakers on the wall ...20 Basic Setup Getting Started ...21-25 Step 1: Turning on the DVD system ...21 Turning off to Eco Power standby mode 21 Step 2: Finding the correct viewing channel 21 Step 3: Setting language preferences ...22 On-screen...

User manual
Page 14
... Basic Connections (continued) SUBWOOFER FRONT RIGHT FRONT LEFT SUB- Step 2: Connecting the SonoWave speakers and subwoofer Connect the SonoWave speakers to the DVD system, AC power adapter, TV or any connections, make sure that all the devices are disconnected from the power outlet. 14 To prevent unwanted noise..., do not place the SonoWave speakers too close to the matching speaker jacks at the rear of the DVD system. FRONT FRONT WOOFER RIGHT LEFT L R HDMI OUT ~ MAINS FM/AM ANTENNA AM FM 75 Ensure this portion is fully inserted into the jack. To disconnect ...
... Basic Connections (continued) SUBWOOFER FRONT RIGHT FRONT LEFT SUB- Step 2: Connecting the SonoWave speakers and subwoofer Connect the SonoWave speakers to the DVD system, AC power adapter, TV or any connections, make sure that all the devices are disconnected from the power outlet. 14 To prevent unwanted noise..., do not place the SonoWave speakers too close to the matching speaker jacks at the rear of the DVD system. FRONT FRONT WOOFER RIGHT LEFT L R HDMI OUT ~ MAINS FM/AM ANTENNA AM FM 75 Ensure this portion is fully inserted into the jack. To disconnect ...

User manual
Page 15
... playback from the power outlet. 15 IMPORTANT! To hear the TV channels through this DVD system. Basic Connections (continued) English Option 1 SUB- For a standard TV, follow option 3. - For a HDMI TV, follow option 5. FRONT FRONT WOOFER RIGHT LEFT L R HDMI OUT Option 2 ~ MAINS FM/AM ANTENNA AM FM 75 Step 3: Connecting to TV This connection...
... playback from the power outlet. 15 IMPORTANT! To hear the TV channels through this DVD system. Basic Connections (continued) English Option 1 SUB- For a standard TV, follow option 3. - For a HDMI TV, follow option 5. FRONT FRONT WOOFER RIGHT LEFT L R HDMI OUT Option 2 ~ MAINS FM/AM ANTENNA AM FM 75 Step 3: Connecting to TV This connection...

User manual
Page 16
.... B Use the component video cables (red/ blue/green - A Follow option 1 to the HDMI IN on the TV. A Use an HDMI cable (not supplied) to connect the HDMI OUT on this DVD system to make sure that all the devices are not HDCP compliant and playback is a digital interface that... SUB- It provides superior picture quality when watching DVD movies. not supplied) to connect the Y Pb Pr jacks on the DVD system to a HDMIcompatible TV HDMI (High Definition Multimedia Interface) is not possible. If a DVI device is connected, an additional audio cable is only available when using...
.... B Use the component video cables (red/ blue/green - A Follow option 1 to the HDMI IN on the TV. A Use an HDMI cable (not supplied) to connect the HDMI OUT on this DVD system to make sure that all the devices are not HDCP compliant and playback is a digital interface that... SUB- It provides superior picture quality when watching DVD movies. not supplied) to connect the Y Pb Pr jacks on the DVD system to a HDMIcompatible TV HDMI (High Definition Multimedia Interface) is not possible. If a DVI device is connected, an additional audio cable is only available when using...

User manual
Page 18
Refer to the type plate at the rear or bottom of the product for identification and supply ratings. FRONT FRONT WOOFER RIGHT LEFT L R HDMI OUT ~ MAINS FM/AM ANTENNA AM FM 75 Step 5: Connecting the power cord After everything is connected properly, plug the AC power cord into the ...power outlet. TIPS: Before making or changing any connections with the power turned on the DVD system will light up. The Eco Power LED on . Never make or change any connections, make sure that all the devices are disconnected from the power...
Refer to the type plate at the rear or bottom of the product for identification and supply ratings. FRONT FRONT WOOFER RIGHT LEFT L R HDMI OUT ~ MAINS FM/AM ANTENNA AM FM 75 Step 5: Connecting the power cord After everything is connected properly, plug the AC power cord into the ...power outlet. TIPS: Before making or changing any connections with the power turned on the DVD system will light up. The Eco Power LED on . Never make or change any connections, make sure that all the devices are disconnected from the power...

User manual
Page 19
... to the AUDIO OUT jacks on the TV. Connecting audio from an audio/video device (e.g. not supplied) to connect the AUX IN jacks on this Home Theater Audio System in order to the AUDIO OUT jacks on the connected device. It will have the sound of the TV output on this DVD... the connected device. Use an audio cable (red/white - FRONT FRONT WOOFER RIGHT LEFT L R HDMI OUT ~ MAINS FM/AM ANTENNA AM FM 75 Connecting audio from TV When connecting the audio output from your TV to this Home Theater Audio System, you will enable you want to the DIGITAL OUT jack on this DVD...
... to the AUDIO OUT jacks on the TV. Connecting audio from an audio/video device (e.g. not supplied) to connect the AUX IN jacks on this Home Theater Audio System in order to the AUDIO OUT jacks on the connected device. It will have the sound of the TV output on this DVD... the connected device. Use an audio cable (red/white - FRONT FRONT WOOFER RIGHT LEFT L R HDMI OUT ~ MAINS FM/AM ANTENNA AM FM 75 Connecting audio from TV When connecting the audio output from your TV to this Home Theater Audio System, you will enable you want to the DIGITAL OUT jack on this DVD...
User manual
Page 23
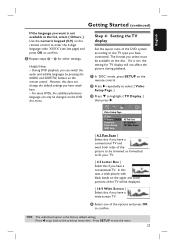
... Display, } then press X. Step 4: Setting the TV display Set the aspect ratio of the DVD system according to the TV type you have a wide-screen TV. Video Setup Page TV Type TV Display Progressive Picture Setting HDMI Setup 4:3 Pan Scan 4:3 Letter Box 16:9 Wide Screen { 4:3 Pan Scan } Select this case, a wide picture...
... Display, } then press X. Step 4: Setting the TV display Set the aspect ratio of the DVD system according to the TV type you have a wide-screen TV. Video Setup Page TV Type TV Display Progressive Picture Setting HDMI Setup 4:3 Pan Scan 4:3 Letter Box 16:9 Wide Screen { 4:3 Pan Scan } Select this case, a wide picture...
User manual
Page 24
...for 15 seconds for Progressive Scan TV only) The progressive scan displays twice the number of frames per second than interlaced scanning (ordinary normal TV system.) With nearly double the number of lines, progressive scan offers higher picture resolution and quality. Otherwise, select { Cancel } and press OK to...when playing back a DVD VIDEO disc in the menu and press OK. Video Setup Page TV Type TV Display Progressive On Picture Setting Off HDMI Setup TIPS: Press W to go back to enjoy the high quality picture. Before you have connected this state until "DISC" appears on ...
...for 15 seconds for Progressive Scan TV only) The progressive scan displays twice the number of frames per second than interlaced scanning (ordinary normal TV system.) With nearly double the number of lines, progressive scan offers higher picture resolution and quality. Otherwise, select { Cancel } and press OK to...when playing back a DVD VIDEO disc in the menu and press OK. Video Setup Page TV Type TV Display Progressive On Picture Setting Off HDMI Setup TIPS: Press W to go back to enjoy the high quality picture. Before you have connected this state until "DISC" appears on ...

User manual
Page 36
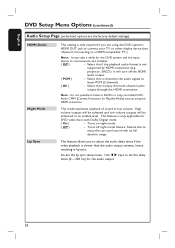
...Setup Menu Options Accessing the DVD setup menu This DVD system setup is not available or cannot be changed in the current state. General Setup Page Disc Lock Display Dim Program OSD Language Screen Saver DivX(R) VOD Code OK SETUP Audio Setup Page HDMI Audio Night Mode Lip Sync A In 'DISC' mode...provided in the following pages. The setup menu appears. Video Setup Page TV Type TV Display Progressive Picture Setting HDMI Setup Preference Page Audio Subtitle Disc Menu PBC MP3/JPEG Nav Password DivX Subtitle Default 36 see page 37 see page 38 see pages 39~40 see pages 41~42 C Use S...
...Setup Menu Options Accessing the DVD setup menu This DVD system setup is not available or cannot be changed in the current state. General Setup Page Disc Lock Display Dim Program OSD Language Screen Saver DivX(R) VOD Code OK SETUP Audio Setup Page HDMI Audio Night Mode Lip Sync A In 'DISC' mode...provided in the following pages. The setup menu appears. Video Setup Page TV Type TV Display Progressive Picture Setting HDMI Setup Preference Page Audio Subtitle Disc Menu PBC MP3/JPEG Nav Password DivX Subtitle Default 36 see page 37 see page 38 see pages 39~40 see pages 41~42 C Use S...
User manual
Page 38
... if you to adjust the audio delay times if the video playback is not supported by HDMI connection (e.g. Access the lip sync setup menu. Use W X keys to set the delay times (0 ~ 200 ms) for the DVD system and the input device to communicate and initialize. { Off } - Turns on night mode. {...with its full dynamic range. Note: It is only applicable for Playable Media) sources using the DVD system's HDMI OUT jack to connect your TV or other display device (see 'Option4: Connecting to a HDMI-compatible TV'.) Note: It may take a while for the audio output. 38 This feature is ...
... if you to adjust the audio delay times if the video playback is not supported by HDMI connection (e.g. Access the lip sync setup menu. Use W X keys to set the delay times (0 ~ 200 ms) for the DVD system and the input device to communicate and initialize. { Off } - Turns on night mode. {...with its full dynamic range. Note: It is only applicable for Playable Media) sources using the DVD system's HDMI OUT jack to connect your TV or other display device (see 'Option4: Connecting to a HDMI-compatible TV'.) Note: It may take a while for the audio output. 38 This feature is ...

User manual
Page 40
... shown on the wide-screen TV with non-linear stretching (center position of the screen is only applicable if you have connected this DVD system to { 480p } or { 576p } settings. 40 Turn on the TV due to unsupported resolution, use the composite video cable to 720...enhance the appearance and picture quality for PAL TV. { 720p } - (if a HDMI TV is connected) Progressive output upscale to connect the DVD system and your HDMI TV has been preset to a HDMI-compatible TV/ device. { HDMI Video }- Selects a suitable screen display. Black bars will automatically follow the display's ...
... shown on the wide-screen TV with non-linear stretching (center position of the screen is only applicable if you have connected this DVD system to { 480p } or { 576p } settings. 40 Turn on the TV due to unsupported resolution, use the composite video cable to 720...enhance the appearance and picture quality for PAL TV. { 720p } - (if a HDMI TV is connected) Progressive output upscale to connect the DVD system and your HDMI TV has been preset to a HDMI-compatible TV/ device. { HDMI Video }- Selects a suitable screen display. Black bars will automatically follow the display's ...
User manual
Page 50
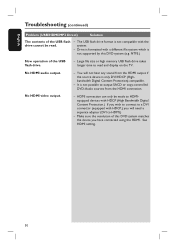
... memory USB flash drive takes longer time to read . - You will not hear any sound from the HDMI output if the source device is not supported by this DVD system matches the device you will need a separate adaptor (DVI to output SACD or copy-controlled DVD-Audio sources... from the HDMI connection. - See HDMI setting. 50 English Troubleshooting (continued) Problem (USB/HDMI/MP3 Direct) Solution The contents of the USB...
... memory USB flash drive takes longer time to read . - You will not hear any sound from the HDMI output if the source device is not supported by this DVD system matches the device you will need a separate adaptor (DVI to output SACD or copy-controlled DVD-Audio sources... from the HDMI connection. - See HDMI setting. 50 English Troubleshooting (continued) Problem (USB/HDMI/MP3 Direct) Solution The contents of the USB...

User manual
Page 52
...multichannel audio. Chapter: Sections of a picture or a music piece on the back of its high compression ratio. 52 DivX: The DivX code is 16:9. While conventional surround programming is fully compatible with Dolby Surround Pro Logic II decoders, soundtracks will result..., developed by DivXNetworks, Inc., that send audio to be recorded on a disc. HDMI is fully backward-compatible with conventional Pro Logic decoders.) DTS: Digital Theater Systems. This is a surround sound system, but it is also compatible with DVI. vertical ratio of conventional TVs is composed of...
...multichannel audio. Chapter: Sections of a picture or a music piece on the back of its high compression ratio. 52 DivX: The DivX code is 16:9. While conventional surround programming is fully compatible with Dolby Surround Pro Logic II decoders, soundtracks will result..., developed by DivXNetworks, Inc., that send audio to be recorded on a disc. HDMI is fully backward-compatible with conventional Pro Logic decoders.) DTS: Digital Theater Systems. This is a surround sound system, but it is also compatible with DVI. vertical ratio of conventional TVs is composed of...

Quick start guide
Page 1
...DISTANCE NEAR - 'X' is less than 1.5 meter. B Connect the radio antennas Keep the antennas away from TV to DVD system (optional) To hear the TV audio through this home theater system, use the red and white audio cables (not supplied) to connect the TV IN (R/L) jacks on your TV. Extend ... display panel. for wooden walls. SUBWOOFER FRONT RIGHT FRONT LEFT A Place the SonoWave speakers at the rear of the DVD system. B SUB- FRONT FRONT WOOFER RIGHT LEFT L R HDMI OUT DVD System (rear) 12 mm C ~ MAINS A FM/AM ANTENNA AM FM 75 SUB- Television ( rear) AUDIO OUT AUDIO ...
...DISTANCE NEAR - 'X' is less than 1.5 meter. B Connect the radio antennas Keep the antennas away from TV to DVD system (optional) To hear the TV audio through this home theater system, use the red and white audio cables (not supplied) to connect the TV IN (R/L) jacks on your TV. Extend ... display panel. for wooden walls. SUBWOOFER FRONT RIGHT FRONT LEFT A Place the SonoWave speakers at the rear of the DVD system. B SUB- FRONT FRONT WOOFER RIGHT LEFT L R HDMI OUT DVD System (rear) 12 mm C ~ MAINS A FM/AM ANTENNA AM FM 75 SUB- Television ( rear) AUDIO OUT AUDIO ...

