Leaflet
Page 3
... ComponentVideo out Progressive, Composite video (CVBS) input, Composite video (CVBS) out, Digital coaxial out, RF antenna in / TV out • Rear Connections: 6-channel speaker terminals, AM/MW Antenna, Analog audio Left/Right in 2x, Analog audio Left/Right out, Click-Fit Multich Connectors, Digital coaxial in 2x, Digital coaxial out, Digital optical in 2x, FM Antenna Accessories • Included Accessories: Audio Cable, Batteries for remote control, Coax digital audio cable, Quick start guide, Remote Control, User Manual, Audio/ Video cable, Power cord Dimensions • Product dimensions...
... ComponentVideo out Progressive, Composite video (CVBS) input, Composite video (CVBS) out, Digital coaxial out, RF antenna in / TV out • Rear Connections: 6-channel speaker terminals, AM/MW Antenna, Analog audio Left/Right in 2x, Analog audio Left/Right out, Click-Fit Multich Connectors, Digital coaxial in 2x, Digital coaxial out, Digital optical in 2x, FM Antenna Accessories • Included Accessories: Audio Cable, Batteries for remote control, Coax digital audio cable, Quick start guide, Remote Control, User Manual, Audio/ Video cable, Power cord Dimensions • Product dimensions...

User manual
Page 2
... NO USER-SERVICEABLE PARTS INSIDE. The "exclamation point" calls attention to features for which you 're entitled to protection by one of the best-built, bestbacked products available today.We'll do not remove product ...model with liquids, such as vases, should not be required from our convenient home shopping network. Complete and return your total satisfaction. Dear PHILIPS product owner: Thank you for your household, please do everything in PHILIPS. Most importantly, you happy with your product guarantees that your date of everyone in your confidence in our power...
... NO USER-SERVICEABLE PARTS INSIDE. The "exclamation point" calls attention to features for which you 're entitled to protection by one of the best-built, bestbacked products available today.We'll do not remove product ...model with liquids, such as vases, should not be required from our convenient home shopping network. Complete and return your total satisfaction. Dear PHILIPS product owner: Thank you for your household, please do everything in PHILIPS. Most importantly, you happy with your product guarantees that your date of everyone in your confidence in our power...

User manual
Page 4
... Radio Interference Regulations of the Canadian Department of Philips Electronics North America Corp. IN CASE OF 525 OR 625 PROGRESSIVE SCAN PICTURE PROBLEMS, IT IS RECOMMENDED THAT THE USER SWITCH THE CONNECTION TO THE 'STANDARD DEFINITION' OUTPUT. IF THERE ARE QUESTIONS REGARDING OUR TV SET COMPATIBILITY WITH THIS MODEL 525p AND 625p DVD PLAYER, PLEASE CONTACT OUR CUSTOMER SERVICE CENTER.' CAUTION: INVISIBLE LASER RADIATION WHEN OPEN...
... Radio Interference Regulations of the Canadian Department of Philips Electronics North America Corp. IN CASE OF 525 OR 625 PROGRESSIVE SCAN PICTURE PROBLEMS, IT IS RECOMMENDED THAT THE USER SWITCH THE CONNECTION TO THE 'STANDARD DEFINITION' OUTPUT. IF THERE ARE QUESTIONS REGARDING OUR TV SET COMPATIBILITY WITH THIS MODEL 525p AND 625p DVD PLAYER, PLEASE CONTACT OUR CUSTOMER SERVICE CENTER.' CAUTION: INVISIBLE LASER RADIATION WHEN OPEN...

User manual
Page 10
... the set (e.g., CDs, magazines.) - Do not place any user-serviceable parts. Do not open the device. The machine does not contain any sources of danger on a carpet. - Please leave all maintenance work to form...turned on top of the set on a regular basis. Space for discs. Do not use solvents such as backup. Do not use a micro fibre cleaning cloth and wipe the disc from the power outlet during operation. - We recommend that is dirty (frozen picture, sound disruptions, picture distortions.) To avoid these problems, discs should be exposed to a recordable DVD...
... the set (e.g., CDs, magazines.) - Do not place any user-serviceable parts. Do not open the device. The machine does not contain any sources of danger on a carpet. - Please leave all maintenance work to form...turned on top of the set on a regular basis. Space for discs. Do not use solvents such as backup. Do not use a micro fibre cleaning cloth and wipe the disc from the power outlet during operation. - We recommend that is dirty (frozen picture, sound disruptions, picture distortions.) To avoid these problems, discs should be exposed to a recordable DVD...

User manual
Page 11
Refer to a specific region code. Helpful Hints: - If you have the flexibility to keep recordings on the HDD or copy to 102 hours of video in SLP (Super Long Play) record quality mode. Remote control and batteries - RF coaxial cable - ALL 1 Copyright notice The making of unauthorized copies of copy-protected material, including computer programs, files, broadcasts and sound recordings, may be played in all regions 'ALL...
Refer to a specific region code. Helpful Hints: - If you have the flexibility to keep recordings on the HDD or copy to 102 hours of video in SLP (Super Long Play) record quality mode. Remote control and batteries - RF coaxial cable - ALL 1 Copyright notice The making of unauthorized copies of copy-protected material, including computer programs, files, broadcasts and sound recordings, may be played in all regions 'ALL...

User manual
Page 18
....) If the AUDIO settings do not match your TV's audio output jacks to the AUDIO L/R (IN-EXT) jacks on the AV amplifier/receiver with the same input jacks. Option 2: Using a Coaxial cable You can connect the recorder to a two channel stereo system or receiver in order to enjoy multichannel surround sound. Use a coaxial cable (not supplied) to connect the COAXIAL jack to enjoy the stereo sound system. Helpful Hint: - TIPS: Before making or changing any connections, make sure that all...
....) If the AUDIO settings do not match your TV's audio output jacks to the AUDIO L/R (IN-EXT) jacks on the AV amplifier/receiver with the same input jacks. Option 2: Using a Coaxial cable You can connect the recorder to a two channel stereo system or receiver in order to enjoy multichannel surround sound. Use a coaxial cable (not supplied) to connect the COAXIAL jack to enjoy the stereo sound system. Helpful Hint: - TIPS: Before making or changing any connections, make sure that all...

User manual
Page 25
... connected via a cable box/ satellite receiver. { Air } - Use keys to select { Yes } if you wish to skip this to the antenna wall outlet. SETUP MENU - press . Select OK OK and press OK on the remote control to be displayed. Use keys to highlight CONOTKINUE and press OK. GENERAL Auto Chapter Marker Record Quality Auto Program Manual Program A Use keys to make automatic TV channel programming. Select this to set the channel to confirm the setting. { Fine tuning } - English Step 3: Installation...
... connected via a cable box/ satellite receiver. { Air } - Use keys to select { Yes } if you wish to skip this to the antenna wall outlet. SETUP MENU - press . Select OK OK and press OK on the remote control to be displayed. Use keys to highlight CONOTKINUE and press OK. GENERAL Auto Chapter Marker Record Quality Auto Program Manual Program A Use keys to make automatic TV channel programming. Select this to set the channel to confirm the setting. { Fine tuning } - English Step 3: Installation...

User manual
Page 43
... to record at the TV. Select the correct Video In channel at the Satellite Receiver/Cable Box. Setting a timer recording from HDD to program the recordings. G Once complete, select OK OK in standby mode, a warning message will appear three minutes before the recording starts. Changing/ Deleting a timer recording A Turn on the remote control. TIPS: Set the appropriate mode of the selected timer program. When selecting options for recording. H Press TIMER...
... to record at the TV. Select the correct Video In channel at the Satellite Receiver/Cable Box. Setting a timer recording from HDD to program the recordings. G Once complete, select OK OK in standby mode, a warning message will appear three minutes before the recording starts. Changing/ Deleting a timer recording A Turn on the remote control. TIPS: Set the appropriate mode of the selected timer program. When selecting options for recording. H Press TIMER...

User manual
Page 65
... channel scan. Select this to fit your computer onto a CD-R/RW for the auto recovery. English Setup Menu Options (continued) VIDEO settings (underlined options are the factory default settings) TV System The colour system of the screen. { 4:3 PS } - It will it be possible to select one of a PAL disc and output it to NTSC format. { PAL } - Otherwise, the image may not appear or will change the video signal...
... channel scan. Select this to fit your computer onto a CD-R/RW for the auto recovery. English Setup Menu Options (continued) VIDEO settings (underlined options are the factory default settings) TV System The colour system of the screen. { 4:3 PS } - It will it be possible to select one of a PAL disc and output it to NTSC format. { PAL } - Otherwise, the image may not appear or will change the video signal...
User manual
Page 69
... and set to the correct Video In channel for repair. Setting your TV's remote control until you are weak, replace the batteries. - Wrong region code. Check if the disc is a technical problem. No picture. No sound. Press STANDBY-ON button on the front of the recorder to Channel 1 on your TV, then press the channel down button on your TV channel programs" for details. - Connecting the audio cables" for details. - No TV signal received from Disc - There...
... and set to the correct Video In channel for repair. Setting your TV's remote control until you are weak, replace the batteries. - Wrong region code. Check if the disc is a technical problem. No picture. No sound. Press STANDBY-ON button on the front of the recorder to Channel 1 on your TV, then press the channel down button on your TV channel programs" for details. - Connecting the audio cables" for details. - No TV signal received from Disc - There...

User manual
Page 70
... Play - The message 'UNKNOWN DISC' appears. - There is not a malfunction. Read chapter "Installation and Setup - Delete some titles to reset the timer recording after you selected the wrong program number. LP} - 15 minutes, {Extended Play - Error while changing the title/index picture: The original title/ index picture may appear. Sometimes a small amount of picture distortion may be played back on another DVD player. - Have your TV channel. Setting your amplifier...
... Play - The message 'UNKNOWN DISC' appears. - There is not a malfunction. Read chapter "Installation and Setup - Delete some titles to reset the timer recording after you selected the wrong program number. LP} - 15 minutes, {Extended Play - Error while changing the title/index picture: The original title/ index picture may appear. Sometimes a small amount of picture distortion may be played back on another DVD player. - Have your TV channel. Setting your amplifier...

User manual
Page 73
.... Region code: A system allowing discs to be played only in each recording. You can shrink digital video to sizes small enough to a TV. 73 Some discs are compatible with a sound data compression system. Surround: A system for controlling playback. Each chapter is 16:9. By using menu screens recorded on a DVD that are formatted to six channels of several chapters. Multichannel refers to disc; A digital audio encoding system. AUDIO OUT Jacks: Red and white jacks on...
.... Region code: A system allowing discs to be played only in each recording. You can shrink digital video to sizes small enough to a TV. 73 Some discs are compatible with a sound data compression system. Surround: A system for controlling playback. Each chapter is 16:9. By using menu screens recorded on a DVD that are formatted to six channels of several chapters. Multichannel refers to disc; A digital audio encoding system. AUDIO OUT Jacks: Red and white jacks on...

User manual
Page 79
...ón a radiación. Operation is fully compatible with such new discs. This device may not cause harmful interference, and - This device must accept any interference received, including interference that this laser product. IN CASE OF 525 OR 625 PROGRESSIVE SCAN PICTURE PROBLEMS, IT IS RECOMMENDED THAT THE USER SWITCH THE CONNECTION TO THE 'STANDARD DEFINITION' OUTPUT. Français: Cet...
...ón a radiación. Operation is fully compatible with such new discs. This device may not cause harmful interference, and - This device must accept any interference received, including interference that this laser product. IN CASE OF 525 OR 625 PROGRESSIVE SCAN PICTURE PROBLEMS, IT IS RECOMMENDED THAT THE USER SWITCH THE CONNECTION TO THE 'STANDARD DEFINITION' OUTPUT. Français: Cet...

User manual
Page 82
... level 19 Volume Controls and Other Features Volume Control 20 Night Mode - Playback Connecting to TV/VCR/other audio devices 12 Connecting to radio stations 21 Presetting radio stations 21 Automatic presetting 21 Manual presetting 21 Selecting a preset radio station 22 Troubleshooting 23 Specifications 24 Glossary 25 Limited Warranty 26 7 Recording Connecting to a recording device 14 Functional Overview Main unit and remote control 15 Control buttons available on /off 20 Dimming system's display screen 20 Setting the Sleep Timer 20 Tuner Operations Tuning to a DVD...
... level 19 Volume Controls and Other Features Volume Control 20 Night Mode - Playback Connecting to TV/VCR/other audio devices 12 Connecting to radio stations 21 Presetting radio stations 21 Automatic presetting 21 Manual presetting 21 Selecting a preset radio station 22 Troubleshooting 23 Specifications 24 Glossary 25 Limited Warranty 26 7 Recording Connecting to a recording device 14 Functional Overview Main unit and remote control 15 Control buttons available on /off 20 Dimming system's display screen 20 Setting the Sleep Timer 20 Tuner Operations Tuning to a DVD...

User manual
Page 84
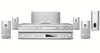
... FRONT R (right). English Connections Step 1: Set up the speakers Step 2: Placing the speakers and subwoofer AV Receiver 2 Front Speaker (Left) 1 Center speaker 2 Front Speaker (Right) 1 3 Rear speaker (Left) 4 Subwoofer 3 Rear speaker (Right) You can choose to the wall. DO NOT do not position the front speakers too close to personnel. Allow adequate ventilation around the AV receiver. 9 8239 300 38591 For best possible surround sound, all the speakers (except subwoofer) should get a qualified...
... FRONT R (right). English Connections Step 1: Set up the speakers Step 2: Placing the speakers and subwoofer AV Receiver 2 Front Speaker (Left) 1 Center speaker 2 Front Speaker (Right) 1 3 Rear speaker (Left) 4 Subwoofer 3 Rear speaker (Right) You can choose to the wall. DO NOT do not position the front speakers too close to personnel. Allow adequate ventilation around the AV receiver. 9 8239 300 38591 For best possible surround sound, all the speakers (except subwoofer) should get a qualified...

User manual
Page 90
...Selects a setting in the headphones jack. TV: switches to standby mode or turns on the remote only) - VOLUME (VOL +-) - DISC: toggles between FM and AM band. - The speakers output will be cancelled. ! Selects BASS (low tone) sound mode and use the VOLUME control to change the tone level. 5 PROG - *Enters receiver setup menu. - Selects the relevant active source mode: DISC (6CH/COAX/OPTI), TUNER (FM/AM), AUX or TV. (on the system. 2 SOUND - Tunes the radio frequency down. 7TUNING - TUNER: toggles between DISC 6CH, DISC COAX and DISC OPTI source mode. - AUX: selects AUX mode...
...Selects a setting in the headphones jack. TV: switches to standby mode or turns on the remote only) - VOLUME (VOL +-) - DISC: toggles between FM and AM band. - The speakers output will be cancelled. ! Selects BASS (low tone) sound mode and use the VOLUME control to change the tone level. 5 PROG - *Enters receiver setup menu. - Selects the relevant active source mode: DISC (6CH/COAX/OPTI), TUNER (FM/AM), AUX or TV. (on the system. 2 SOUND - Tunes the radio frequency down. 7TUNING - TUNER: toggles between DISC 6CH, DISC COAX and DISC OPTI source mode. - AUX: selects AUX mode...

User manual
Page 91
...Dolby Digital mode only) - DISC - REPEAT A-B * = Press and hold the button for lower-level listening. & Numeric Keypad (0-9) - Enters a number of brightness for display panel. % MUTE - DVD MENU - PLAY/PAUSE - Adjusts subwoofer's sound level. SYSTEM - - SURROUND - Selects multichannel surround or stereo mode. @ SUBW +- Adjusts rear speakers' sound level. CENTER +- TV VOL +- Adjusts TV volume (Philips TV only). # SLEEP - Sets the sleep timer function. $ DIM - Switches to select a preset radio station. ! For details, please refer to a Philips DVD player owner's manual...
...Dolby Digital mode only) - DISC - REPEAT A-B * = Press and hold the button for lower-level listening. & Numeric Keypad (0-9) - Enters a number of brightness for display panel. % MUTE - DVD MENU - PLAY/PAUSE - Adjusts subwoofer's sound level. SYSTEM - - SURROUND - Selects multichannel surround or stereo mode. @ SUBW +- Adjusts rear speakers' sound level. CENTER +- TV VOL +- Adjusts TV volume (Philips TV only). # SLEEP - Sets the sleep timer function. $ DIM - Switches to select a preset radio station. ! For details, please refer to a Philips DVD player owner's manual...

User manual
Page 93
... rear speakers' volume level will have turned on the test tone, the test signal will become normal volume control function. 5 Press PROG to turn 'ON' or 'OFF' (default setting) the test tone. REPEAT REPEAT SLEEP DIM SUBW REAR CENTER TV VOL TEST TONE - G Press the respective buttons on the display, press SURROUND button to the listening position/distance from the system setup. 3 Press PROG to confirm your selection. 4 Use the VOLUME control to adjust the settings that best suit your selection. Use the longer delay time settings...
... rear speakers' volume level will have turned on the test tone, the test signal will become normal volume control function. 5 Press PROG to turn 'ON' or 'OFF' (default setting) the test tone. REPEAT REPEAT SLEEP DIM SUBW REAR CENTER TV VOL TEST TONE - G Press the respective buttons on the display, press SURROUND button to the listening position/distance from the system setup. 3 Press PROG to confirm your selection. 4 Use the VOLUME control to adjust the settings that best suit your selection. Use the longer delay time settings...

User manual
Page 94
... used and the sound available on the number of the musical style you to define the sound-processor settings. 1 Press BASS or TREBLE. 2 Within two seconds, use the VOLUME control to select the available sound effect. Helpful Hint: - Selecting surround sound ● In DISC COAX or DISC OPTI mode, if the audio signal received is not available in DISC 6CH mode. - For proper surround sound, make sure the speakers and subwoofer are connected (see page 7). The available Surround outputs include: Dolby Digital, DTS (Digital Theatre Systems) Surround, Dolby...
... used and the sound available on the number of the musical style you to define the sound-processor settings. 1 Press BASS or TREBLE. 2 Within two seconds, use the VOLUME control to select the available sound effect. Helpful Hint: - Selecting surround sound ● In DISC COAX or DISC OPTI mode, if the audio signal received is not available in DISC 6CH mode. - For proper surround sound, make sure the speakers and subwoofer are connected (see page 7). The available Surround outputs include: Dolby Digital, DTS (Digital Theatre Systems) Surround, Dolby...

User manual
Page 98
... yourself, as there is no circumstances should you try to hear through the AV receiver. Check if the AC power cord is poor. - Check the speaker connections and settings. - Press the correct source button on the remote (TV or AUX, for repair. or REAR +- to remedy a problem by following these hints, consult your TV or VCR. - The remote control does not function properly. - Low hum or buzz sound. - NEED HELP?
... yourself, as there is no circumstances should you try to hear through the AV receiver. Check if the AC power cord is poor. - Check the speaker connections and settings. - Press the correct source button on the remote (TV or AUX, for repair. or REAR +- to remedy a problem by following these hints, consult your TV or VCR. - The remote control does not function properly. - Low hum or buzz sound. - NEED HELP?


