User manual
Page 3
... Find the correct viewing channel 19 Select menu display language 19 Turn on Progressive Scan 20 Change speaker settings 21 Use Philips EasyLink 22 Select a play source 24 5 Play 25 Play a disc 25 Play video 25 Play music 28 Play photo 29 Play from USB device 31 Play from portable media player...
... Find the correct viewing channel 19 Select menu display language 19 Turn on Progressive Scan 20 Change speaker settings 21 Use Philips EasyLink 22 Select a play source 24 5 Play 25 Play a disc 25 Play video 25 Play music 28 Play photo 29 Play from USB device 31 Play from portable media player...
User manual
Page 7
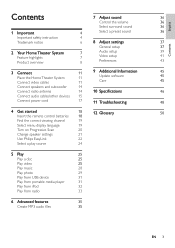
...Theater System supports 5.1 channels of uncompressed audio that delivers a more true-to 1080p Enjoy watching discs in full screen display on your HDTV. Philips EasyLink Your Home Theater System supports Philips EasyLink, which uses the HDMI CEC (Consumer Electronics Control) protocol. Hi speed USB 2.0 ...controlled by delaying the audio output if the video signal sent to enjoy the music play discs with all HDMI CEC devices. DVD region code Countries U.S.A. Note • Philips does not guarantee 100% interoperability with the following region codes. The created MP3 À...
...Theater System supports 5.1 channels of uncompressed audio that delivers a more true-to 1080p Enjoy watching discs in full screen display on your HDTV. Philips EasyLink Your Home Theater System supports Philips EasyLink, which uses the HDMI CEC (Consumer Electronics Control) protocol. Hi speed USB 2.0 ...controlled by delaying the audio output if the video signal sent to enjoy the music play discs with all HDMI CEC devices. DVD region code Countries U.S.A. Note • Philips does not guarantee 100% interoperability with the following region codes. The created MP3 À...
User manual
Page 8
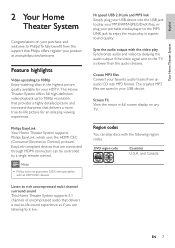
...On) • Turns on the Home Theater System or switches to audio from the remote control. d • • (Play/Pause) Starts, pauses or resumes disc play or listen to standby mode. h IR sensor • Detects signals from the connected device. In radio mode, automatically tunes radio stations during Àrst...-time setup. Point the remote control at the IR sensor. g Display panel • Displays the current status or disc information. e (Stop) • Stops disc play. • In radio mode, erases the current preset radio station.
...On) • Turns on the Home Theater System or switches to audio from the remote control. d • • (Play/Pause) Starts, pauses or resumes disc play or listen to standby mode. h IR sensor • Detects signals from the connected device. In radio mode, automatically tunes radio stations during Àrst...-time setup. Point the remote control at the IR sensor. g Display panel • Displays the current status or disc information. e (Stop) • Stops disc play. • In radio mode, erases the current preset radio station.

User manual
Page 9
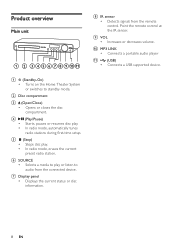
... +/- i SURR (Surround Sound) • Switches to play. k Numeric buttons • Selects an item to supported surround sound or stereo sound. EN 9 to the disc source. Press left or right to start auto search. c Source buttons • AUDIO SOURCE: Selects an audio input source. • RADIO: Switches to FM band.... • USB: Switches to the USB source. • DOCK: Switches to the iPod in the dock. • DISC: Switches to set the audio delay time. In radio mode, press up and down to turn off the Home Theater System and all HDMI CEC...
... +/- i SURR (Surround Sound) • Switches to play. k Numeric buttons • Selects an item to supported surround sound or stereo sound. EN 9 to the disc source. Press left or right to start auto search. c Source buttons • AUDIO SOURCE: Selects an audio input source. • RADIO: Switches to FM band.... • USB: Switches to the USB source. • DOCK: Switches to the iPod in the dock. • DISC: Switches to set the audio delay time. In radio mode, press up and down to turn off the Home Theater System and all HDMI CEC...
User manual
Page 11
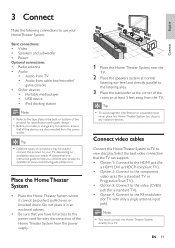
... disconnection of the Home Theater System from the power supply. EN 11 Connect English Connect video cables Connect this Home Theater System directly to view disc play. Note • You must connect this Home Theater System to TV to a TV. Basic connections: • Video • Speakers and ... and supply ratings. • Before you have full access to your TV, depending on availability and your product is available at www.connectivityguide.philips.com. Do not place it cannot be used to connect this Home Theater System near the TV. 2 Place the speakers system at normal...
... disconnection of the Home Theater System from the power supply. EN 11 Connect English Connect video cables Connect this Home Theater System directly to view disc play. Note • You must connect this Home Theater System to TV to a TV. Basic connections: • Video • Speakers and ... and supply ratings. • Before you have full access to your TV, depending on availability and your product is available at www.connectivityguide.philips.com. Do not place it cannot be used to connect this Home Theater System near the TV. 2 Place the speakers system at normal...
User manual
Page 13
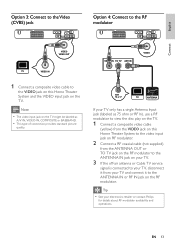
... standard picture quality. If your TV only has a single Antenna Input jack (labeled as 75 ohm or RF In), use a RF modulator to view the disc play on the TV. 1 Connect a composite video cable (yellow) from your electronics retailer or contact Philips for details about RF modulator availability and operations.
... standard picture quality. If your TV only has a single Antenna Input jack (labeled as 75 ohm or RF In), use a RF modulator to view the disc play on the TV. 1 Connect a composite video cable (yellow) from your electronics retailer or contact Philips for details about RF modulator availability and operations.
User manual
Page 18
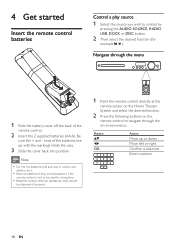
... started Insert the remote control batteries Control a play source 1 Select the source you wish to control by pressing the AUDIO SOURCE, RADIO, USB, DOCK or DISC button. 2 Then select the desired function (for a long time. • Batteries contain chemical substances, they are exhausted or if the remote control is not to...
... started Insert the remote control batteries Control a play source 1 Select the source you wish to control by pressing the AUDIO SOURCE, RADIO, USB, DOCK or DISC button. 2 Then select the desired function (for a long time. • Batteries contain chemical substances, they are exhausted or if the remote control is not to...
User manual
Page 19
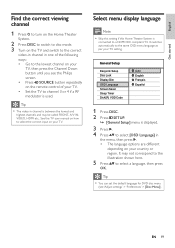
...press . • The language options are different depending on your TV setting. Tip • You can set the default language for DVD disc menu (see the Philips screen. • Press SOURCE button repeatedly on the remote control of your TV. Select menu display language Note • Skip this setting ...ways: • Go to the lowest channel on your TV, then press the Channel Down button until you see 'Adjust settings' > 'Preferences' > [Disc Menu]). Tip • The video-in channel is connected to the same OSD menu language as per your country or region. It switches automatically to...
...press . • The language options are different depending on your TV setting. Tip • You can set the default language for DVD disc menu (see the Philips screen. • Press SOURCE button repeatedly on the remote control of your TV. Select menu display language Note • Skip this setting ...ways: • Go to the lowest channel on your TV, then press the Channel Down button until you see 'Adjust settings' > 'Preferences' > [Disc Menu]). Tip • The video-in channel is connected to the same OSD menu language as per your country or region. It switches automatically to...

User manual
Page 20
Note • During play, when progressive scan mode is on for this Home Theater System. 3 Press DISC. 4 Press SETUP. 5 Press to select [Video Setup] in the menu, then press . 6 Select [Progressive] > [On], then press OK . » A warning message is displayed. 7 To proceed, ... on both this Home Theater System and the TV, distorted picture may display. Turn off the progressive scan mode as follows: 1) Press to open the disc compartment. 2) Press . 3) Press AUDIO SYNC. 8 Press SETUP to exit the menu. 9 You can connect this Home Theater System and the TV using component video connection...
Note • During play, when progressive scan mode is on for this Home Theater System. 3 Press DISC. 4 Press SETUP. 5 Press to select [Video Setup] in the menu, then press . 6 Select [Progressive] > [On], then press OK . » A warning message is displayed. 7 To proceed, ... on both this Home Theater System and the TV, distorted picture may display. Turn off the progressive scan mode as follows: 1) Press to open the disc compartment. 2) Press . 3) Press AUDIO SYNC. 8 Press SETUP to exit the menu. 9 You can connect this Home Theater System and the TV using component video connection...

User manual
Page 21
... output level sounds equally balance. • To exit the menu, press SETUP. Audio Setup Speakers Volume Speakers Delay HDMI Audio CD Upsampling Audio Sync 1 Press DISC. 2 Press SETUP. 3 Press to change the speaker settings based on their distance from different speakers reach the listening position at the same time. • To...
... output level sounds equally balance. • To exit the menu, press SETUP. Audio Setup Speakers Volume Speakers Delay HDMI Audio CD Upsampling Audio Sync 1 Press DISC. 2 Press SETUP. 3 Press to change the speaker settings based on their distance from different speakers reach the listening position at the same time. • To...
User manual
Page 22
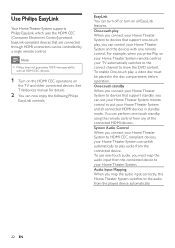
... on the HDMI CEC operations on your Home Theater System remote control, your Home Theater System and all EasyLink features. Note • Philips does not guarantee 100% interoperability with one -touch standby using the remote control from the connected device to devices that are connected through ...HDMI connectors can now enjoy the following Philips EasyLink controls. One-touch play , a video disc must map the audio input from any of the connected HDMI devices. To use your Home Theater System remote...
... on the HDMI CEC operations on your Home Theater System remote control, your Home Theater System and all EasyLink features. Note • Philips does not guarantee 100% interoperability with one -touch standby using the remote control from the connected device to devices that are connected through ...HDMI connectors can now enjoy the following Philips EasyLink controls. One-touch play , a video disc must map the audio input from any of the connected HDMI devices. To use your Home Theater System remote...
User manual
Page 23
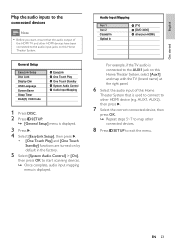
...8226; Before you start scanning devices. » Once complete, audio input mapping menu is displayed. EN 23 General Setup EasyLink Setup Disc Lock Display Dim OSD Language Screen Saver Sleep Timer DivX(R) VOD Code EasyLink One Touch Play One Touch Standby System Audio Control Audio ...Input Mapping 1 Press DISC. 2 Press SETUP. » [General Setup] menu is displayed. 3 Press . 4 Select [EasyLink Setup], then press . • [One Touch Play] and [...
...8226; Before you start scanning devices. » Once complete, audio input mapping menu is displayed. EN 23 General Setup EasyLink Setup Disc Lock Display Dim OSD Language Screen Saver Sleep Timer DivX(R) VOD Code EasyLink One Touch Play One Touch Standby System Audio Control Audio ...Input Mapping 1 Press DISC. 2 Press SETUP. » [General Setup] menu is displayed. 3 Press . 4 Select [EasyLink Setup], then press . • [One Touch Play] and [...

User manual
Page 24
... switch to FM band. • Press USB to switch to USB mode. • Press DOCK to switch to iPod mode. • Press DISC to switch to select: DISC > USB > FM > AUX 1 > AUX 2 > COAX IN > OPTI IN > MP3 LINK > DOCK > DISC ... Select a play source On the main unit • Press SOURCE button repeatedly to...
... switch to FM band. • Press USB to switch to USB mode. • Press DOCK to switch to iPod mode. • Press DISC to switch to select: DISC > USB > FM > AUX 1 > AUX 2 > COAX IN > OPTI IN > MP3 LINK > DOCK > DISC ... Select a play source On the main unit • Press SOURCE button repeatedly to...
User manual
Page 25
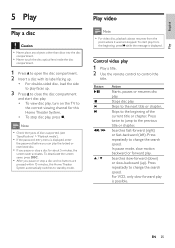
...forward (right) or fast-backward (left). Play video Note • For video disc, playback always resumes from the beginning, press while the message is possible. To start disc play. • To view disc play, turn on the TV to the correct viewing channel for about 5 minutes, ... to control the title. English Play 5 Play Play a disc Caution • Never place any objects other than discs into the disc compar tment. • Never touch the disc optical lens inside the disc compar tment. 1 Press to open the disc compartment. 2 Insert a disc with its label facing up. • For double-sided...
...forward (right) or fast-backward (left). Play video Note • For video disc, playback always resumes from the beginning, press while the message is possible. To start disc play. • To view disc play, turn on the TV to the correct viewing channel for about 5 minutes, ... to control the title. English Play 5 Play Play a disc Caution • Never place any objects other than discs into the disc compar tment. • Never touch the disc optical lens inside the disc compar tment. 1 Press to open the disc compartment. 2 Insert a disc with its label facing up. • For double-sided...
User manual
Page 26
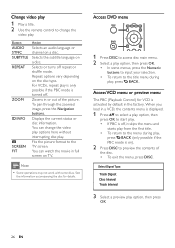
... through the zoomed image, press the Navigation buttons. Access VCD menu or preview menu The PBC (Playback Control) for details. Select Digest Type: Track Digest Disc Interval Track Interval 3 Select a preview play . • If PBC is turned off repeat or shufÁe mode. Change video play 1 Play a title. 2 Use the... remote control to the TV screen. Button AUDIO SYNC SUBTITLE REPEAT ZOOM INFO SCREEN FIT Action Selects an audio language or channel on a disc. For VCDs, repeat play is only possible if the PBC mode is off, it skips the menu and starts play from the Àrst title...
... through the zoomed image, press the Navigation buttons. Access VCD menu or preview menu The PBC (Playback Control) for details. Select Digest Type: Track Digest Disc Interval Track Interval 3 Select a preview play . • If PBC is turned off repeat or shufÁe mode. Change video play 1 Play a title. 2 Use the... remote control to the TV screen. Button AUDIO SYNC SUBTITLE REPEAT ZOOM INFO SCREEN FIT Action Selects an audio language or channel on a disc. For VCDs, repeat play is only possible if the PBC mode is off, it skips the menu and starts play from the Àrst title...
User manual
Page 27
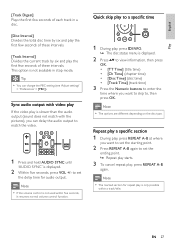
...SYNC' is displayed. 2 Within Àve seconds, press VOL +/- Note • If the volume control is not available in a disc. [Disc Interval] Divides the total disc time by six and play the Àrst few seconds of these intervals. [Track Interval] Divides the current track by six and play... play , press REPEAT A-B again. to view information, then press • [TT Time] (title time) • [Ch Time] (chapter time) • [Disc Time] (disc time) • [Track Time] (track time) 3 Press the Numeric buttons to enter the time where you can change the PBC setting (see 'Adjust settings' >...
...SYNC' is displayed. 2 Within Àve seconds, press VOL +/- Note • If the volume control is not available in a disc. [Disc Interval] Divides the total disc time by six and play the Àrst few seconds of these intervals. [Track Interval] Divides the current track by six and play... play , press REPEAT A-B again. to view information, then press • [TT Time] (title time) • [Ch Time] (chapter time) • [Disc Time] (disc time) • [Track Time] (track time) 3 Press the Numeric buttons to enter the time where you can change the PBC setting (see 'Adjust settings' >...
User manual
Page 28
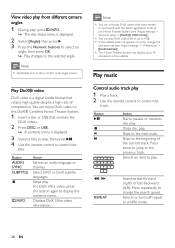
...fast-forward (right) or fast-backward (left). You can display up to 45 characters in the subtitle. Note • You can play . Stops disc play DivX video Àles of compression. Play DivX® video DivX video is displayed. 3 Select a title to play DivX videos that retains... high quality despite a high rate of up to discs contain multi-angle scenes. For DivX Ultra video, press this Home Theater System (see 'Adjust settings' > 'General setup' > [DivX(R) VOD Code]) ....
...fast-forward (right) or fast-backward (left). You can display up to 45 characters in the subtitle. Note • You can play . Stops disc play DivX video Àles of compression. Play DivX® video DivX video is displayed. 3 Select a title to play DivX videos that retains... high quality despite a high rate of up to discs contain multi-angle scenes. For DivX Ultra video, press this Home Theater System (see 'Adjust settings' > 'General setup' > [DivX(R) VOD Code]) ....
User manual
Page 29
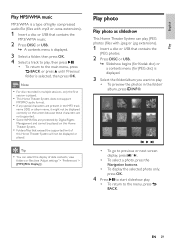
.... English Play Play MP3/WMA music MP3/WMA is a type of highly compressed audio Àle (Àles with .jpeg or .jpg extensions). 1 Insert a disc or USB that exceed the supported limit of data contents, view folders or Àles (see 'Adjust settings' > 'Preferences' > [MP3/JPEG Display]). Play photo... • If any special characters are present in multiple sessions, only the Àrst session is selected, then press OK. Note • For disc recorded in the MP3 track name (ID3) or album name, it might not be displayed correctly on the screen because these characters are not supported...
.... English Play Play MP3/WMA music MP3/WMA is a type of highly compressed audio Àle (Àles with .jpeg or .jpg extensions). 1 Insert a disc or USB that exceed the supported limit of data contents, view folders or Àles (see 'Adjust settings' > 'Preferences' > [MP3/JPEG Display]). Play photo... • If any special characters are present in multiple sessions, only the Àrst session is selected, then press OK. Note • For disc recorded in the MP3 track name (ID3) or album name, it might not be displayed correctly on the screen because these characters are not supported...
User manual
Page 30
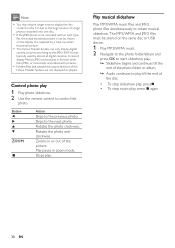
.... Button ZOOM Action Skips to create musical slideshow. Note • You may require longer time to display the disc content on the TV due to the large number of songs/ photos compiled onto one disc. • If the JPEG photo is not recorded with pictures. • Folders/Àles that exceed the... Theater System are not displayed or played. Skips to control the photo. The MP3/WMA and JPEG Àles must be shown on the same disc or USB device. 1 Play MP3/WMA music. 2 Navigate to the photo folder/album and press OK to start slideshow play. » Slideshow begins and continues...
.... Button ZOOM Action Skips to create musical slideshow. Note • You may require longer time to display the disc content on the TV due to the large number of songs/ photos compiled onto one disc. • If the JPEG photo is not recorded with pictures. • Folders/Àles that exceed the... Theater System are not displayed or played. Skips to control the photo. The MP3/WMA and JPEG Àles must be shown on the same disc or USB device. 1 Play MP3/WMA music. 2 Navigate to the photo folder/album and press OK to start slideshow play. » Slideshow begins and continues...
User manual
Page 35
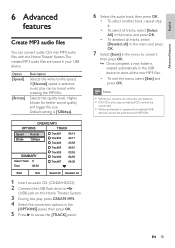
... -Àle speed. If [Normal] speed is selected, music play can convert audio CDs into MP3 audio Àles with this Home Theater System. 3 During disc play, press CREATE MP3. 4 Select the conversion options in the [OPTIONS] panel, then press OK. 5 Press to access the [TRACK] panel. 6 Select the audio track...
... -Àle speed. If [Normal] speed is selected, music play can convert audio CDs into MP3 audio Àles with this Home Theater System. 3 During disc play, press CREATE MP3. 4 Select the conversion options in the [OPTIONS] panel, then press OK. 5 Press to access the [TRACK] panel. 6 Select the audio track...


