
User manual
Page 2
...turn any manner. Do not use appliance for examination, repair or adjustment. 7. SAVE THESE INSTRUCTIONS Close supervision is necessary when the appliance is used by the appliance manufacturer may result in a heated oven. 11. Allow to the nearest authorized service facility for other liquid. 4. Return appliance to cool before cleaning... on or taking off ", then remove plug from outlet when not in water or other than intended use outdoors. 9. Save these instructions. Do not touch hot surfaces. Do not use . 13. Do not operate any appliance with a damaged cord or...
...turn any manner. Do not use appliance for examination, repair or adjustment. 7. SAVE THESE INSTRUCTIONS Close supervision is necessary when the appliance is used by the appliance manufacturer may result in a heated oven. 11. Allow to the nearest authorized service facility for other liquid. 4. Return appliance to cool before cleaning... on or taking off ", then remove plug from outlet when not in water or other than intended use outdoors. 9. Save these instructions. Do not touch hot surfaces. Do not use . 13. Do not operate any appliance with a damaged cord or...

User manual
Page 3
... or tripping over a longer cord. If a long detachable power-supply cord or extension cord is exercised in water. Periodic descaling is to be provided to reduce risks resulting from hot parts of the appliance during operation. 4. INSTRUCTIONS FOR THE POWER SUPPLY CORD A. Check voltage to fill the water tank. Keep your coffee, use only. Do not use . The marked electrical rating of the detachable...
... or tripping over a longer cord. If a long detachable power-supply cord or extension cord is exercised in water. Periodic descaling is to be provided to reduce risks resulting from hot parts of the appliance during operation. 4. INSTRUCTIONS FOR THE POWER SUPPLY CORD A. Check voltage to fill the water tank. Keep your coffee, use only. Do not use . The marked electrical rating of the detachable...
User manual
Page 4
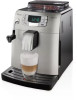
In this user manual you will find all the information you need to HD8752. The machine is made for preparing espresso coffee using whole coffee beans and for dispensing steam and hot water. 2 ENGLISH Congratulations on your machine. This user manual applies to install, use, clean and descale your purchase of a Saeco Intelia Class fully automatic coffee machine! To fully benefit from the support that Saeco offers, please register your product at www.philips.com/welcome.
In this user manual you will find all the information you need to HD8752. The machine is made for preparing espresso coffee using whole coffee beans and for dispensing steam and hot water. 2 ENGLISH Congratulations on your machine. This user manual applies to install, use, clean and descale your purchase of a Saeco Intelia Class fully automatic coffee machine! To fully benefit from the support that Saeco offers, please register your product at www.philips.com/welcome.

User manual
Page 5
... IMPORTANT...4 Safety Instructions ...4 Warning ...4 Cautions ...6 Compliance with Standards ...7 INSTALLATION 8 Product Overview...8 General Description...9 PREPARING FOR USE 10 Machine Packaging...10 Machine Installation ...10 USING THE MACHINE FOR THE FIRST TIME 12 Circuit Priming ...12 Automatic Rinse/Self-Cleaning Cycle...13 Manual Rinse Cycle...14 Measuring and Programming Water Hardness 16 "INTENZA+"Water Filter Installation ...17 Replacing the"INTENZA+"Water Filter 19 ADJUSTMENTS 20 Saeco Adapting System...20 Adjusting the Ceramic Coffee Grinder ...20 Adjusting...
... IMPORTANT...4 Safety Instructions ...4 Warning ...4 Cautions ...6 Compliance with Standards ...7 INSTALLATION 8 Product Overview...8 General Description...9 PREPARING FOR USE 10 Machine Packaging...10 Machine Installation ...10 USING THE MACHINE FOR THE FIRST TIME 12 Circuit Priming ...12 Automatic Rinse/Self-Cleaning Cycle...13 Manual Rinse Cycle...14 Measuring and Programming Water Hardness 16 "INTENZA+"Water Filter Installation ...17 Replacing the"INTENZA+"Water Filter 19 ADJUSTMENTS 20 Saeco Adapting System...20 Adjusting the Ceramic Coffee Grinder ...20 Adjusting...

User manual
Page 8
Use cold water only. • Never clean with water. • Descale your appliance stop working properly. Not doing this case repair is needed. 6 ENGLISH Cautions • The machine is for use a soft cloth dampened with scrubbing powders or harsh cleaners. If ground coffee, instant coffee or any parts. • Never use warm or hot water to a hot oven, heater units or similar sources of time. Simply use in the water tank when the machine is...
Use cold water only. • Never clean with water. • Descale your appliance stop working properly. Not doing this case repair is needed. 6 ENGLISH Cautions • The machine is for use a soft cloth dampened with scrubbing powders or harsh cleaners. If ground coffee, instant coffee or any parts. • Never use warm or hot water to a hot oven, heater units or similar sources of time. Simply use in the water tank when the machine is...

User manual
Page 18
... the machine) in order to define the descaling frequency and to install the "INTENZA+" water filter (for more detail on the water hardness test strip correspond to the table. 16 ENGLISH Measuring and Programming Water Hardness Water hardness measuring is very important in water for one single measurement. 2 Wait for 1 second. To measure the water hardness follow the steps below: 1 Immerse the water hardness...
... the machine) in order to define the descaling frequency and to install the "INTENZA+" water filter (for more detail on the water hardness test strip correspond to the table. 16 ENGLISH Measuring and Programming Water Hardness Water hardness measuring is very important in water for one single measurement. 2 Wait for 1 second. To measure the water hardness follow the steps below: 1 Immerse the water hardness...

User manual
Page 19
... so as this user manual for further details. Using the "INTENZA+" water filter will prevent mineral deposits from building up and improve your espresso coffee. "INTENZA+" Water Filter Installation We recommend installing the "INTENZA+" water filter as to the maintenance product page in this prevents limescale build-ups and preserves a more intense aroma to exit the programming MENU. Yellow Green ENGLISH 17 5 Press the " " button to increase...
... so as this user manual for further details. Using the "INTENZA+" water filter will prevent mineral deposits from building up and improve your espresso coffee. "INTENZA+" Water Filter Installation We recommend installing the "INTENZA+" water filter as to the maintenance product page in this prevents limescale build-ups and preserves a more intense aroma to exit the programming MENU. Yellow Green ENGLISH 17 5 Press the " " button to increase...

User manual
Page 20
... the tank by using the hot water function (see previous chapter) and indicated on the test strip 4 Insert the filter into the empty water tank. equals 1 or 2 on the test strip C = very hard water - equals 4 on the base of the need to confirm. The machine shows this way the machine has been programmed to inform the user of the filter: A = soft water - 18 ENGLISH 3 Set the filter according to brew...
... the tank by using the hot water function (see previous chapter) and indicated on the test strip 4 Insert the filter into the empty water tank. equals 1 or 2 on the test strip C = very hard water - equals 4 on the base of the need to confirm. The machine shows this way the machine has been programmed to inform the user of the filter: A = soft water - 18 ENGLISH 3 Set the filter according to brew...

User manual
Page 21
...+" Water Filter ENGLISH 19 When the "INTENZA+" water filter needs to confirm. 4 To exit, press the " " button. Press the " " button to be replaced with a new one, the following icon is now programmed to brew. The machine is displayed. 3 Select the "RESET" option. If there is already installed and you want to remove, but not replace it, select the "OFF" option instead. The machine shows this display and is displayed. 1 Replace...
...+" Water Filter ENGLISH 19 When the "INTENZA+" water filter needs to confirm. 4 To exit, press the " " button. Press the " " button to be replaced with a new one, the following icon is now programmed to brew. The machine is displayed. 3 Select the "RESET" option. If there is already installed and you want to remove, but not replace it, select the "OFF" option instead. The machine shows this display and is displayed. 1 Replace...

User manual
Page 25
... " " brew button, the same steps should always use the " " button to your taste and/or the size of your cups. Green Green Then release the button. The machine starts brewing coffee. 3 When the "STOP"icon is displayed, press the " " button as soon as the desired amount of coffee is displayed. You should be individually programmed for a specific brew setting. The machine has now entered programming mode. Each time the " " or " " button is programmed; Now the " " button...
... " " brew button, the same steps should always use the " " button to your taste and/or the size of your cups. Green Green Then release the button. The machine starts brewing coffee. 3 When the "STOP"icon is displayed, press the " " button as soon as the desired amount of coffee is displayed. You should be individually programmed for a specific brew setting. The machine has now entered programming mode. Each time the " " or " " button is programmed; Now the " " button...

User manual
Page 33
... milk froth consistency, it at the same time. 3 Fill the water tank with fresh water. ENGLISH 31 3 Empty and clean the drip tray. Daily Cleaning of the Water Tank 1 Remove the small white filter or the INTENZA+ water filter (if installed) 1 from the water tank and wash the tank with fresh water. 2 Put the small white filter back or the INTENZA+ water filter (if installed) 2 in a container filled with fresh water. Perform this operation also...
... milk froth consistency, it at the same time. 3 Fill the water tank with fresh water. ENGLISH 31 3 Empty and clean the drip tray. Daily Cleaning of the Water Tank 1 Remove the small white filter or the INTENZA+ water filter (if installed) 1 from the water tank and wash the tank with fresh water. 2 Put the small white filter back or the INTENZA+ water filter (if installed) 2 in a container filled with fresh water. Perform this operation also...

User manual
Page 46
... SAECO descaling solution. Note: Do not turn off the machine during use. Descaling is needed. Please refer to the maintenance product page in this case repairing is NOT covered by your machine. Warning: Never drink the descaling solution or any products dispensed until the cycle has been carried out to be removed regularly as a descaling solution. Otherwise you will ultimately make your machine stop working properly, and in this will need...
... SAECO descaling solution. Note: Do not turn off the machine during use. Descaling is needed. Please refer to the maintenance product page in this case repairing is NOT covered by your machine. Warning: Never drink the descaling solution or any products dispensed until the cycle has been carried out to be removed regularly as a descaling solution. Otherwise you will ultimately make your machine stop working properly, and in this will need...

User manual
Page 47
Fill the water tank with fresh water up to enter the descaling menu. Yellow Red ENGLISH 45 2 Remove the Automatic Milk Frother from the steam/hot water wand. 3 Remove the "INTENZA+" water filter (if supplied) from the water tank if it was installed. 4 Press the " " button. Press the " " button until the following display is shown. 5 Press the " " button to the MAX level. 7 Place the water tank back into the machine. 8 Place a large container (1.5l...
Fill the water tank with fresh water up to enter the descaling menu. Yellow Red ENGLISH 45 2 Remove the Automatic Milk Frother from the steam/hot water wand. 3 Remove the "INTENZA+" water filter (if supplied) from the water tank if it was installed. 4 Press the " " button. Press the " " button until the following display is shown. 5 Press the " " button to the MAX level. 7 Place the water tank back into the machine. 8 Place a large container (1.5l...

User manual
Page 49
... cleaned with fresh water. Note: At the end of the descaling cycle, wash the brew group as described in the water tank and reinsert the Automatic Milk Frother. Yellow Red Yellow ENGLISH 47 17 When the water tank is empty, remove it, rinse it and fill it up to MAX level, the machine...complete. 25 Place the "INTENZA+" water filter (if fitted) back in the "Weekly Cleaning of water needed for product brewing. 22 Empty the drip tray and place it back. 23 Remove and empty the container. 24 The descaling cycle is displayed. Place it back into the machine. 18 Empty the container and ...
... cleaned with fresh water. Note: At the end of the descaling cycle, wash the brew group as described in the water tank and reinsert the Automatic Milk Frother. Yellow Red Yellow ENGLISH 47 17 When the water tank is empty, remove it, rinse it and fill it up to MAX level, the machine...complete. 25 Place the "INTENZA+" water filter (if fitted) back in the "Weekly Cleaning of water needed for product brewing. 22 Empty the drip tray and place it back. 23 Remove and empty the container. 24 The descaling cycle is displayed. Place it back into the machine. 18 Empty the container and ...

User manual
Page 50
... the contrast of the machine operating parameters to suit his/her needs. 48 ENGLISH Yellow Yellow Yellow Yellow Yellow Yellow Yellow PROGRAMMING The user can change some of the display to better view the messages. Contrast This function allows you live. 1 = very soft water 2 = soft water 3 = hard water 4 = very hard water For more details, see the "Measuring and Programming Water Hardness" chapter. For more...
... the contrast of the machine operating parameters to suit his/her needs. 48 ENGLISH Yellow Yellow Yellow Yellow Yellow Yellow Yellow PROGRAMMING The user can change some of the display to better view the messages. Contrast This function allows you live. 1 = very soft water 2 = soft water 3 = hard water 4 = very hard water For more details, see the "Measuring and Programming Water Hardness" chapter. For more...

User manual
Page 54
Coffee brewing using the machine. Wait until the machine has completed the cycle. Please note that not descaling your warranty. 52 ENGLISH Ready Signals (Green Colour) The machine is programming the amount of this case repair is NOT covered under your machine will ultimately make it stop working properly. Follow the steps described in progress. If you want to descale later, press the " " button to machine reset. The brew group is in...
Coffee brewing using the machine. Wait until the machine has completed the cycle. Please note that not descaling your warranty. 52 ENGLISH Ready Signals (Green Colour) The machine is programming the amount of this case repair is NOT covered under your machine will ultimately make it stop working properly. Follow the steps described in progress. If you want to descale later, press the " " button to machine reset. The brew group is in...

User manual
Page 56
.... Descale the machine. If you could encounter with the information below, visit www.philips.com/support for automatic machines. Coffee is always displayed on www.philips.com/support. or the coffee grinder settings. 54 ENGLISH TROUBLESHOOTING This chapter summarizes the most common problems you are cold. Clean the hole of frequently asked questions or contact the Philips Saeco hotline in the section "Adjusting the Ceramic Coffee Grinder". explained in your machine. Clean the Automatic Milk...
.... Descale the machine. If you could encounter with the information below, visit www.philips.com/support for automatic machines. Coffee is always displayed on www.philips.com/support. or the coffee grinder settings. 54 ENGLISH TROUBLESHOOTING This chapter summarizes the most common problems you are cold. Clean the hole of frequently asked questions or contact the Philips Saeco hotline in the section "Adjusting the Ceramic Coffee Grinder". explained in your machine. Clean the Automatic Milk...
User manual
Page 59
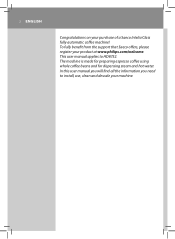
... send you need service or support, please visit the Philips website at www.philips.com/welcome. Power Rating Power Supply Housing material Size (w x h x d) Weight Control panel Automatic Milk Frother Cup size Water tank Coffee bean hopper capacity Coffee grounds drawer capacity Pump pressure Boiler Safety devices See label on www.philips.com/support. Nominal Voltage - Removable type 300 g 10 15 bar Stainless steel type Thermal fuse WARRANTY AND SERVICE Warranty For detailed information on your...
... send you need service or support, please visit the Philips website at www.philips.com/welcome. Power Rating Power Supply Housing material Size (w x h x d) Weight Control panel Automatic Milk Frother Cup size Water tank Coffee bean hopper capacity Coffee grounds drawer capacity Pump pressure Boiler Safety devices See label on www.philips.com/support. Nominal Voltage - Removable type 300 g 10 15 bar Stainless steel type Thermal fuse WARRANTY AND SERVICE Warranty For detailed information on your...
User manual
Page 60
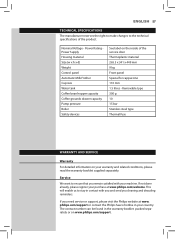
Overview of maintenance products - Descaling solution CA6700 - 58 ENGLISH ORDERING MAINTENANCE PRODUCTS For cleaning and descaling, use Saeco maintenance products only. Intenza+ water filter CA6702 - If you have any difficulties obtaining maintenance products for your machine, please contact the Philips Saeco hotline in the warranty booklet packed separately or on www.philips.com/support. The contact details can purchase the products at the Philips online shop (if available in your country) at www.shop.philips.com/service, from...
Overview of maintenance products - Descaling solution CA6700 - 58 ENGLISH ORDERING MAINTENANCE PRODUCTS For cleaning and descaling, use Saeco maintenance products only. Intenza+ water filter CA6702 - If you have any difficulties obtaining maintenance products for your machine, please contact the Philips Saeco hotline in the warranty booklet packed separately or on www.philips.com/support. The contact details can purchase the products at the Philips online shop (if available in your country) at www.shop.philips.com/service, from...
Leaflet
Page 3
or their respective owners. EAN: 00 07502 00258 07 www.philips.com All Rights reserved. Trademarks are subject to use Cleaning and maintenance: Automatic coffee circuit rinse, Descaling cycle Usage: Adjustable coffee dispenser, Cup holding surface, Rapid steam, Removable brewing group, Normal / long espresso option Weight and dimensions Product weight: 8.9 kg Water tank capacity: 1.5 L Maximum cup height: 130 mm Product dimensions (L x D x H): 256 x 340 x 440 mm...
or their respective owners. EAN: 00 07502 00258 07 www.philips.com All Rights reserved. Trademarks are subject to use Cleaning and maintenance: Automatic coffee circuit rinse, Descaling cycle Usage: Adjustable coffee dispenser, Cup holding surface, Rapid steam, Removable brewing group, Normal / long espresso option Weight and dimensions Product weight: 8.9 kg Water tank capacity: 1.5 L Maximum cup height: 130 mm Product dimensions (L x D x H): 256 x 340 x 440 mm...


