
Leaflet
Page 1
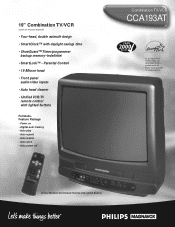
... Control • 19 Micron head • Front panel audio/video inputs • Auto head cleaner • Unified VCR/TV remote control with daylight savings time • ShowGuard™ Timer/programmer backup memory-indefinite! • SmartLock™ - 19" Combination TV/VCR (screen size measured diagonally) • Four-head, double azimuth design • SmartClock™ with lighted buttons Full AutoFeature Package • Power on • Digital auto tracking • Auto play • Auto repeat • Auto rewind • Auto eject • Auto power...
... Control • 19 Micron head • Front panel audio/video inputs • Auto head cleaner • Unified VCR/TV remote control with daylight savings time • ShowGuard™ Timer/programmer backup memory-indefinite! • SmartLock™ - 19" Combination TV/VCR (screen size measured diagonally) • Four-head, double azimuth design • SmartClock™ with lighted buttons Full AutoFeature Package • Power on • Digital auto tracking • Auto play • Auto repeat • Auto rewind • Auto eject • Auto power...
Leaflet
Page 2
...Panel Audio/Video Inputs Enjoy the added convenience of recording tapes directly from a camcorder to 181 channels, including UHF,VHF, and 113 cable channels, without notice. SmartLock™ Protect young children from videotapes. ShowGuard™ Timer/Programmer Backup Memory-Indefinite! Full Auto-Feature Package • Power On • Digital Auto Tracking • Auto Repeat • Auto Rewind • Auto Power Off • Auto Play • Auto Eject UPC: 037849881576 Product Dimensions: 19.4"W x 19.6"H x 18.3"D Product weight: 46.2 lbs. No manual setting, adjusting...
...Panel Audio/Video Inputs Enjoy the added convenience of recording tapes directly from a camcorder to 181 channels, including UHF,VHF, and 113 cable channels, without notice. SmartLock™ Protect young children from videotapes. ShowGuard™ Timer/Programmer Backup Memory-Indefinite! Full Auto-Feature Package • Power On • Digital Auto Tracking • Auto Repeat • Auto Rewind • Auto Power Off • Auto Play • Auto Eject UPC: 037849881576 Product Dimensions: 19.4"W x 19.6"H x 18.3"D Product weight: 46.2 lbs. No manual setting, adjusting...
User manual
Page 3
... else, record the TV/VCR's model and serial numbers in poor picture quality and excessive deposits on the video heads, which are trademarks of as small chemical waste. All rights uct, batteries, manual, and packaging whenever you use of other tapes may not be connected to the grounding system of the building, as possible. Introduction 3 Welcome to the point of Controls; Helpful Hints Philips Consumer...
... else, record the TV/VCR's model and serial numbers in poor picture quality and excessive deposits on the video heads, which are trademarks of as small chemical waste. All rights uct, batteries, manual, and packaging whenever you use of other tapes may not be connected to the grounding system of the building, as possible. Introduction 3 Welcome to the point of Controls; Helpful Hints Philips Consumer...

User manual
Page 4
... Using the TV/VCR 5 Hooking Up the TV/VCR 6-7 Turning On the TV/VCR 8 Language Selection 9 Automatic Channel Setup 10-11 Setting the Clock 12-17 Daylight-Savings Time 18 Time Zone 19 Description of Controls Front Panel 20 Rear Panel 21 Remote Control Buttons 22-23 Adjusting the Picture Controls 24-25 On-Screen Status Displays 26 Reminder 27 Basic Operations Playing 28 Recording 29 Recording Options One-Touch Recording 30 Rerecording (Tape Duplication 31 Timer Recording 32...
... Using the TV/VCR 5 Hooking Up the TV/VCR 6-7 Turning On the TV/VCR 8 Language Selection 9 Automatic Channel Setup 10-11 Setting the Clock 12-17 Daylight-Savings Time 18 Time Zone 19 Description of Controls Front Panel 20 Rear Panel 21 Remote Control Buttons 22-23 Adjusting the Picture Controls 24-25 On-Screen Status Displays 26 Reminder 27 Basic Operations Playing 28 Recording 29 Recording Options One-Touch Recording 30 Rerecording (Tape Duplication 31 Timer Recording 32...

User manual
Page 5
... TV/VCR. However, the video heads will eventually require cleaning or replacement. Helpful Hints • The remote control and its batteries are not accidentally erased. 1 To prevent accidental erasure, break off the tab with a 1 screwdriver. 2 To record again, cover the hole with cellophane tape. 2 Using the Remote Control q Point the remote control at the TV/VCR's remote sensor. ends aligned as indicated. 3 Replace the battery compartment lid. 3 Erasure Prevention Video cassette tapes have record tabs...
... TV/VCR. However, the video heads will eventually require cleaning or replacement. Helpful Hints • The remote control and its batteries are not accidentally erased. 1 To prevent accidental erasure, break off the tab with a 1 screwdriver. 2 To record again, cover the hole with cellophane tape. 2 Using the Remote Control q Point the remote control at the TV/VCR's remote sensor. ends aligned as indicated. 3 Replace the battery compartment lid. 3 Erasure Prevention Video cassette tapes have record tabs...

User manual
Page 7
Hooking Up Your TV/VCR to copy tapes. AUDIO/VIDEO OUT Jacks on VCR Use an Audio cable to connect the AUDIO OUT Jack on the VCR to the AUDIO Jack on the front of the TV/VCR. 2 Plug in the TV/VCR. 3 Before you want to Another Video Source (VCR or Camcorder) You may need this connection if you turn on page 31. Helpful Hints • Before connecting an antenna or cable signal to...
Hooking Up Your TV/VCR to copy tapes. AUDIO/VIDEO OUT Jacks on VCR Use an Audio cable to connect the AUDIO OUT Jack on the VCR to the AUDIO Jack on the front of the TV/VCR. 2 Plug in the TV/VCR. 3 Before you want to Another Video Source (VCR or Camcorder) You may need this connection if you turn on page 31. Helpful Hints • Before connecting an antenna or cable signal to...

User manual
Page 8
... memorize all available channels. Press the CH(annel) m/n button or the Number buttons to adjust the sound. The instructions on this page work only when you still do not see any on-screen displays when you turn on the TV/VCR, make sure batteries are using a Cable Box. • Line Input mode will always be in the remote control and the TV/VCR is no antenna or cable connected to the TV/VCR, programming will be stored...
... memorize all available channels. Press the CH(annel) m/n button or the Number buttons to adjust the sound. The instructions on this page work only when you still do not see any on-screen displays when you turn on the TV/VCR, make sure batteries are using a Cable Box. • Line Input mode will always be in the remote control and the TV/VCR is no antenna or cable connected to the TV/VCR, programming will be stored...
User manual
Page 12
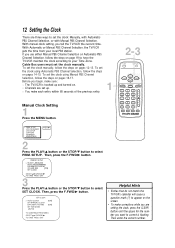
.... REC/OTR TRACKING MUTE > PRIM. SETUP VCR PROGRAM VCR SETUP CAPTION REMINDER BRIGHTNESS PRESS B 2 Press the PLAY/v button or the STOP/w button to select SET CLOCK. 12 Setting the Clock There are set up and turned on the screen. • To make each entry within 60 seconds of the previous entry. 1 Manual Clock Setting 1 Press the MENU button. 2-3 POWER SLEEP/WAKE UP REW PLAY STOP F.FWD MENU STATUS/EXIT CLEAR 1 2 3 4 5 6 CH. 7 8 9 SLOW SPEED 0 ALT. With manual clock setting, you want...
.... REC/OTR TRACKING MUTE > PRIM. SETUP VCR PROGRAM VCR SETUP CAPTION REMINDER BRIGHTNESS PRESS B 2 Press the PLAY/v button or the STOP/w button to select SET CLOCK. 12 Setting the Clock There are set up and turned on the screen. • To make each entry within 60 seconds of the previous entry. 1 Manual Clock Setting 1 Press the MENU button. 2-3 POWER SLEEP/WAKE UP REW PLAY STOP F.FWD MENU STATUS/EXIT CLEAR 1 2 3 4 5 6 CH. 7 8 9 SLOW SPEED 0 ALT. With manual clock setting, you want...

User manual
Page 20
... turned off for EARPHONE AUDIO VIDEO STOP/EJECT REW PLAY F.FWD REC/OTR CHANNEL VOLUME POWER personal listening. When playback is off to rewind the tape while the picture stays on the TV/VCR at high speed. During playback, press to set a timer recording. Press again to adjust the sound level. Press to release Slow, Search or Still mode and return to scan through the TV/VCR channels. CHANNEL o/p Buttons Press to normal playback. VIDEO Jack Connect...
... turned off for EARPHONE AUDIO VIDEO STOP/EJECT REW PLAY F.FWD REC/OTR CHANNEL VOLUME POWER personal listening. When playback is off to rewind the tape while the picture stays on the TV/VCR at high speed. During playback, press to set a timer recording. Press again to adjust the sound level. Press to release Slow, Search or Still mode and return to scan through the TV/VCR channels. CHANNEL o/p Buttons Press to normal playback. VIDEO Jack Connect...

User manual
Page 22
... or Still mode and return to adjust the sound level. For example, to the previous volume level. Press again to return to select channel 6, press 0,6. POWER SLEEP/WAKE UP REW PLAY STOP F.FWD MENU STATUS/EXIT CLEAR 1 2 3 4 5 6 CH. 7 8 9 SLOW SPEED 0 ALT. Also, press to reset the real-time counter to eliminate the TV/VCR's sound. q Antenna Users Enter channel numbers as a three-digit number. Press to set the sleep timer. MUTE Button Press...
... or Still mode and return to adjust the sound level. For example, to the previous volume level. Press again to return to select channel 6, press 0,6. POWER SLEEP/WAKE UP REW PLAY STOP F.FWD MENU STATUS/EXIT CLEAR 1 2 3 4 5 6 CH. 7 8 9 SLOW SPEED 0 ALT. Also, press to reset the real-time counter to eliminate the TV/VCR's sound. q Antenna Users Enter channel numbers as a three-digit number. Press to set the sleep timer. MUTE Button Press...

User manual
Page 29
... below . 3 Use the CH(annel) m/n button or the Number buttons to select the channel to be recorded. (Channels cannot be changed during commercials), press the PAUSE/STILL button. During playback, the VCR selects the tape speed automatically. SLP(Super Long Play) 8 hrs. 6 hrs. 3 hrs. 1 POWER SLEEP/WAKE UP 6 2 4 REW PLAY STOP F.FWD MENU STATUS/EXIT CLEAR 1 2 3 4 5 6 CH. 7 8 9 SLOW SPEED 0 ALT. The power will switch to Stop mode automatically to protect the video cassette tape from...
... below . 3 Use the CH(annel) m/n button or the Number buttons to select the channel to be recorded. (Channels cannot be changed during commercials), press the PAUSE/STILL button. During playback, the VCR selects the tape speed automatically. SLP(Super Long Play) 8 hrs. 6 hrs. 3 hrs. 1 POWER SLEEP/WAKE UP 6 2 4 REW PLAY STOP F.FWD MENU STATUS/EXIT CLEAR 1 2 3 4 5 6 CH. 7 8 9 SLOW SPEED 0 ALT. The power will switch to Stop mode automatically to protect the video cassette tape from...

User manual
Page 31
... television programs, video tapes, or other materials may infringe on the rights of copyright owners and violate copyright laws. • Different brands of equipment may not record both picture and sound. • Audio and video cables are secure. Press Number buttons 0, 0 so that A/V IN appears on the screen. 5 Point the TV/VCR remote control at the same time. AUDIO and VIDEO OUT Jacks on source unit (VCR or Camcorder) Rerecording (Tape Duplication) 31 VIDEO AUDIO OUT IN Audio Cable...
... television programs, video tapes, or other materials may infringe on the rights of copyright owners and violate copyright laws. • Different brands of equipment may not record both picture and sound. • Audio and video cables are secure. Press Number buttons 0, 0 so that A/V IN appears on the screen. 5 Point the TV/VCR remote control at the same time. AUDIO and VIDEO OUT Jacks on source unit (VCR or Camcorder) Rerecording (Tape Duplication) 31 VIDEO AUDIO OUT IN Audio Cable...
User manual
Page 32
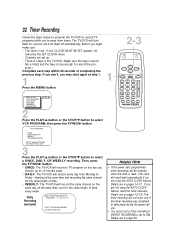
... length of time. q WEEKLY: The TV/VCR will be restored when the clock is set . REC/OTR TRACKING MUTE Helpful Hints • If the power fails, programmed timer recordings will record the same channel on page 36. Details are using the AUTO CLOCK feature, reset the clock manually. q There is a tape in the TV/VCR. (Make sure the tape's record tab is intact and the tape is set to ON. q ONCE: The TV/VCR will record a TV program on...
... length of time. q WEEKLY: The TV/VCR will be restored when the clock is set . REC/OTR TRACKING MUTE Helpful Hints • If the power fails, programmed timer recordings will record the same channel on page 36. Details are using the AUTO CLOCK feature, reset the clock manually. q There is a tape in the TV/VCR. (Make sure the tape's record tab is intact and the tape is set to ON. q ONCE: The TV/VCR will record a TV program on...

User manual
Page 33
... want to change. ONE TIME PROGRAM PROGRAM 1 CHANNEL - - - 4-7 POWER SLEEP/WAKE UP REW PLAY STOP F.FWD MENU STATUS/EXIT CLEAR 1 2 3 4 5 6 CH. 7 8 9 SLOW SPEED 0 ALT. Then information about the program in which to store the timer recording. Then enter the correct information. Then use the Number buttons to select another position. 5 Use the Number buttons to enter the channel of the TV program at the Cable Box and leave the Cable Box on the screen for the...
... want to change. ONE TIME PROGRAM PROGRAM 1 CHANNEL - - - 4-7 POWER SLEEP/WAKE UP REW PLAY STOP F.FWD MENU STATUS/EXIT CLEAR 1 2 3 4 5 6 CH. 7 8 9 SLOW SPEED 0 ALT. Then information about the program in which to store the timer recording. Then enter the correct information. Then use the Number buttons to select another position. 5 Use the Number buttons to enter the channel of the TV program at the Cable Box and leave the Cable Box on the screen for the...

User manual
Page 34
... Cable Box/DBS on the screen. Please see page 54 for the day you finish setting a timer recording. PROGRAM WAS COMPLETED PLEASE TURN OFF FOR TIMER RECORDING will not be displayed automatically. (You cannot program the TV/VCR to turn off the TV/VCR for July 10, 1999, press 07, 10. You cannot use the SPEED button at step 1. 11 Press the POWER button to record more Helpful Hints. q If there is a tape...
... Cable Box/DBS on the screen. Please see page 54 for the day you finish setting a timer recording. PROGRAM WAS COMPLETED PLEASE TURN OFF FOR TIMER RECORDING will not be displayed automatically. (You cannot program the TV/VCR to turn off the TV/VCR for July 10, 1999, press 07, 10. You cannot use the SPEED button at step 1. 11 Press the POWER button to record more Helpful Hints. q If there is a tape...

User manual
Page 53
... Channel Setup: process in the TV/VCR circuitry which you to record video from another source. channels 2-13) and UHF (ultra high frequency; channels 14-69). • Cable - Dubbing: copying a tape using a VCR. Line Input: The channel to which provides enhanced picture detail. The line input channel is approximately two hours); a timed recording that allow you set your TV/VCR during playback or recording. • SP (standard play) - average tape speed; playback only. • SLP (super long play ) - slowest tape speed (recording time for a T120 tape...
... Channel Setup: process in the TV/VCR circuitry which you to record video from another source. channels 2-13) and UHF (ultra high frequency; channels 14-69). • Cable - Dubbing: copying a tape using a VCR. Line Input: The channel to which provides enhanced picture detail. The line input channel is approximately two hours); a timed recording that allow you set your TV/VCR during playback or recording. • SP (standard play) - average tape speed; playback only. • SLP (super long play ) - slowest tape speed (recording time for a T120 tape...
User manual
Page 54
... ventilation openings at least two hours. If you try to play a tape) for at the top and bottom of the TV/VCR. 54 Helpful Hints If you are having , and be prepared to explain this list of problems and possible solutions before you call a customer service representative, please know the model number and serial number of your hookups (pages six-seven). • Set up the channels...
... ventilation openings at least two hours. If you try to play a tape) for at the top and bottom of the TV/VCR. 54 Helpful Hints If you are having , and be prepared to explain this list of problems and possible solutions before you call a customer service representative, please know the model number and serial number of your hookups (pages six-seven). • Set up the channels...

User manual
Page 55
... the timer recording. The cylinder rotates when tape playback is stopped. • To enable the quick play mechanism switches the tape mechanism from the TV/VCR. • Make sure the power plug is programmed, turn off , the TV/VCR will eject the tape if the record tab is missing. Helpful Hints (cont'd) 55 The remote control is not available, or the remote control will not access the pop up menu. • Use the buttons...
... the timer recording. The cylinder rotates when tape playback is stopped. • To enable the quick play mechanism switches the tape mechanism from the TV/VCR. • Make sure the power plug is programmed, turn off , the TV/VCR will eject the tape if the record tab is missing. Helpful Hints (cont'd) 55 The remote control is not available, or the remote control will not access the pop up menu. • Use the buttons...
User manual
Page 57
... used for all labor charges. tribute the product, the local Philips service organization will be a delay if the appropriate spare parts and technical manual(s) are covered only for repair. MAKE SURE YOU KEEP... Please keep the original box and packing material in for the original warranty period. Also keep your product. Adjustments of such damages.) REMEMBER... When the product has been repaired, you buy your sales...
... used for all labor charges. tribute the product, the local Philips service organization will be a delay if the appropriate spare parts and technical manual(s) are covered only for repair. MAKE SURE YOU KEEP... Please keep the original box and packing material in for the original warranty period. Also keep your product. Adjustments of such damages.) REMEMBER... When the product has been repaired, you buy your sales...

User manual
Page 58
...-40 real-time counter 40 rewind, power off 51 menu button 23 front panel button access . .20 mute button 22 number buttons 22 one-touch recording 30 pause/still button 23, 41 picture, adjusting 24-25 play button 20, 22 playback options 41 playing 28 power button 20, 22 cord 7, 21 real-time counter memory . . .40 rear panel 21 rec/otr button 20, 23 record light 20 recording 29 reminder 27 remote control buttons 22-23 using 5 sensor 20 repeat play 37...
...-40 real-time counter 40 rewind, power off 51 menu button 23 front panel button access . .20 mute button 22 number buttons 22 one-touch recording 30 pause/still button 23, 41 picture, adjusting 24-25 play button 20, 22 playback options 41 playing 28 power button 20, 22 cord 7, 21 real-time counter memory . . .40 rear panel 21 rec/otr button 20, 23 record light 20 recording 29 reminder 27 remote control buttons 22-23 using 5 sensor 20 repeat play 37...


