
Leaflet
Page 1
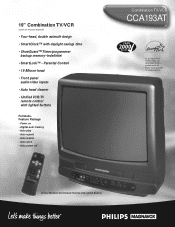
... lighted buttons Full AutoFeature Package • Power on • Digital auto tracking • Auto play • Auto repeat • Auto rewind • Auto eject • Auto power off Combination TV/VCR CCA193AT As an ENERGY STAR® Partner, Philips has determined that this product meets the ENERGY STAR® guidelines for energy efficiency. Parental Control • 19 Micron head • Front panel audio/video inputs • Auto head cleaner • Unified VCR/TV remote control with daylight savings time...
... lighted buttons Full AutoFeature Package • Power on • Digital auto tracking • Auto play • Auto repeat • Auto rewind • Auto eject • Auto power off Combination TV/VCR CCA193AT As an ENERGY STAR® Partner, Philips has determined that this product meets the ENERGY STAR® guidelines for energy efficiency. Parental Control • 19 Micron head • Front panel audio/video inputs • Auto head cleaner • Unified VCR/TV remote control with daylight savings time...
Leaflet
Page 2
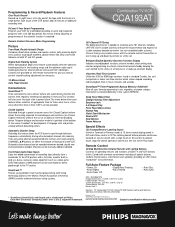
...: 19" Combination TV/VCR, Unified TV/VCR Remote Control with the touch of the screen. Combination TV/VCR CCA193AT 8-Event/1-Year Smart Programming Program your timer/programming is required. Digital Auto Tracking System When tape playback begins, this menu-driven feature will automatically maintain the correct time, regularly checking and updating if necessary.This function will also reset the clock after a power failure.The menu-driven time zone feature allows selection of appropriate time for direct playthrough to the...
...: 19" Combination TV/VCR, Unified TV/VCR Remote Control with the touch of the screen. Combination TV/VCR CCA193AT 8-Event/1-Year Smart Programming Program your timer/programming is required. Digital Auto Tracking System When tape playback begins, this menu-driven feature will automatically maintain the correct time, regularly checking and updating if necessary.This function will also reset the clock after a power failure.The menu-driven time zone feature allows selection of appropriate time for direct playthrough to the...
User manual
Page 3
... video cassette tapes that are labeled with remote control or front panel buttons • One-Touch Recording • Real-Time Counter • Remote Control • Repeat Play • Sleep Timer • SmartClockTM • SmartLockTM • Special Effects Playback: Forward and Reverse Searching; Your product uses batteries that can save energy. SmartClockTM and SmartLockTM are listed below. Additional Features; Features • A-B Repeat Play • Automatic Channel Setup • Automatic Head Cleaner • Automatic Operation Features • Automatic Tracking...
... video cassette tapes that are labeled with remote control or front panel buttons • One-Touch Recording • Real-Time Counter • Remote Control • Repeat Play • Sleep Timer • SmartClockTM • SmartLockTM • Special Effects Playback: Forward and Reverse Searching; Your product uses batteries that can save energy. SmartClockTM and SmartLockTM are listed below. Additional Features; Features • A-B Repeat Play • Automatic Channel Setup • Automatic Head Cleaner • Automatic Operation Features • Automatic Tracking...

User manual
Page 4
... Using the TV/VCR 5 Hooking Up the TV/VCR 6-7 Turning On the TV/VCR 8 Language Selection 9 Automatic Channel Setup 10-11 Setting the Clock 12-17 Daylight-Savings Time 18 Time Zone 19 Description of Controls Front Panel 20 Rear Panel 21 Remote Control Buttons 22-23 Adjusting the Picture Controls 24-25 On-Screen Status Displays 26 Reminder 27 Basic Operations Playing 28 Recording 29 Recording Options One-Touch Recording 30 Rerecording (Tape Duplication 31 Timer Recording 32...
... Using the TV/VCR 5 Hooking Up the TV/VCR 6-7 Turning On the TV/VCR 8 Language Selection 9 Automatic Channel Setup 10-11 Setting the Clock 12-17 Daylight-Savings Time 18 Time Zone 19 Description of Controls Front Panel 20 Rear Panel 21 Remote Control Buttons 22-23 Adjusting the Picture Controls 24-25 On-Screen Status Displays 26 Reminder 27 Basic Operations Playing 28 Recording 29 Recording Options One-Touch Recording 30 Rerecording (Tape Duplication 31 Timer Recording 32...

User manual
Page 5
... direction of the arrow. 2 Place two AA batteries inside the battery compartment 2 with the mark. TV/VCR Maintenance q In this service. ends aligned as indicated. 3 Replace the battery compartment lid. 3 Erasure Prevention Video cassette tapes have record tabs to maintain your TV/VCR's excellent performance. However, the video heads will eventually require cleaning or replacement. Removable labels like these can jam the TV/VCR. Helpful Hints • The remote control and its batteries...
... direction of the arrow. 2 Place two AA batteries inside the battery compartment 2 with the mark. TV/VCR Maintenance q In this service. ends aligned as indicated. 3 Replace the battery compartment lid. 3 Erasure Prevention Video cassette tapes have record tabs to maintain your TV/VCR's excellent performance. However, the video heads will eventually require cleaning or replacement. Removable labels like these can jam the TV/VCR. Helpful Hints • The remote control and its batteries...

User manual
Page 8
.../OTR TRACKING MUTE 4 THEN PRESS B TO END PRESS EXIT 4 Press the F.FWD/B button to adjust the sound. Helpful Hints • If you turn on -screen displays will be stored in the remote control and the TV/VCR is hooked up channels when there is no antenna or cable connected to the TV/VCR, programming will appear to select a TV/VCR channel. When channels are set up channels if you try again. Use the...
.../OTR TRACKING MUTE 4 THEN PRESS B TO END PRESS EXIT 4 Press the F.FWD/B button to adjust the sound. Helpful Hints • If you turn on -screen displays will be stored in the remote control and the TV/VCR is hooked up channels when there is no antenna or cable connected to the TV/VCR, programming will appear to select a TV/VCR channel. When channels are set up channels if you try again. Use the...
User manual
Page 12
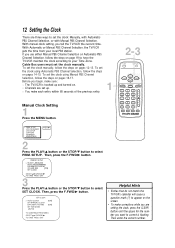
... REW PLAY STOP F.FWD MENU STATUS/EXIT CLEAR 1 2 3 4 5 6 CH. 7 8 9 SLOW SPEED 0 ALT. With Automatic or Manual PBS Channel Selection, the TV/VCR gets the time from your Time Zone. Cable Box users must set the clock manually, follow the steps on . To set the clock using Manual PBS Channel Selection, follow the steps on pages 16-17. To set the clock using Automatic PBS Channel Selection, follow the steps on pages 14-15. SETUP VCR PROGRAM VCR SETUP...
... REW PLAY STOP F.FWD MENU STATUS/EXIT CLEAR 1 2 3 4 5 6 CH. 7 8 9 SLOW SPEED 0 ALT. With Automatic or Manual PBS Channel Selection, the TV/VCR gets the time from your Time Zone. Cable Box users must set the clock manually, follow the steps on . To set the clock using Manual PBS Channel Selection, follow the steps on pages 16-17. To set the clock using Automatic PBS Channel Selection, follow the steps on pages 14-15. SETUP VCR PROGRAM VCR SETUP...

User manual
Page 20
... Panel Cassette Compartment Insert a video cassette tape here. STOP/EJECT Button Press once to normal playback. EARPHONE Jack Connect earphones (not supplied) here for a timer recording, but there is stopped, press to remove the pop up menu. Press to change a setting of a pop up menu item (for example, to adjust the BRIGHTNESS) or to advance to the previous menu. Press to release Slow, Search or Still mode and return...
... Panel Cassette Compartment Insert a video cassette tape here. STOP/EJECT Button Press once to normal playback. EARPHONE Jack Connect earphones (not supplied) here for a timer recording, but there is stopped, press to remove the pop up menu. Press to change a setting of a pop up menu item (for example, to adjust the BRIGHTNESS) or to advance to the previous menu. Press to release Slow, Search or Still mode and return...

User manual
Page 22
... channel you were viewing immediately before switching to play a tape. Details are on page 47. POWER Button Press to select channels 100 and above, enter channel numbers as a two-digit number for the quickest results. SPEED Button Press to select channel 6, press 0,6. POWER SLEEP/WAKE UP REW PLAY STOP F.FWD MENU STATUS/EXIT CLEAR 1 2 3 4 5 6 CH. 7 8 9 SLOW SPEED 0 ALT. For example, to select the recording speed (SP or SLP). 22 Remote Control Buttons F.FWD/B Button When tape playback...
... channel you were viewing immediately before switching to play a tape. Details are on page 47. POWER Button Press to select channels 100 and above, enter channel numbers as a two-digit number for the quickest results. SPEED Button Press to select channel 6, press 0,6. POWER SLEEP/WAKE UP REW PLAY STOP F.FWD MENU STATUS/EXIT CLEAR 1 2 3 4 5 6 CH. 7 8 9 SLOW SPEED 0 ALT. For example, to select the recording speed (SP or SLP). 22 Remote Control Buttons F.FWD/B Button When tape playback...

User manual
Page 29
... TV/VCR screen. The RECORD light will eject the tape. When recording, you pause a recording for more than five minutes, the TV/VCR will glow. Cassette type / Playback Time Tape Speed T160 T120 T60 SP(Standard Play) 2 hrs. 40 mins. 2 hrs. 1 hr. To resume recording, press the PAUSE/STILL button again or the REC(ord)/OTR button. There are on the screen briefly. The RECORD light will switch to Stop mode automatically...
... TV/VCR screen. The RECORD light will eject the tape. When recording, you pause a recording for more than five minutes, the TV/VCR will glow. Cassette type / Playback Time Tape Speed T160 T120 T60 SP(Standard Play) 2 hrs. 40 mins. 2 hrs. 1 hr. To resume recording, press the PAUSE/STILL button again or the REC(ord)/OTR button. There are on the screen briefly. The RECORD light will switch to Stop mode automatically...

User manual
Page 31
.... • Different brands of copyrighted television programs, video tapes, or other materials may not record both picture and sound. • Audio and video cables are secure. Press the SPEED button until the desired tape speed (SP or SLP) appears on the screen. 6 Press the PLAY button on the source unit and the REC(ord)/OTR button on automatically. 4 Point the TV/VCR remote control at the TV/VCR. AUDIO and VIDEO Jacks on TV/VCR Helpful Hints •...
.... • Different brands of copyrighted television programs, video tapes, or other materials may not record both picture and sound. • Audio and video cables are secure. Press the SPEED button until the desired tape speed (SP or SLP) appears on the screen. 6 Press the PLAY button on the source unit and the REC(ord)/OTR button on automatically. 4 Point the TV/VCR remote control at the TV/VCR. AUDIO and VIDEO Jacks on TV/VCR Helpful Hints •...
User manual
Page 32
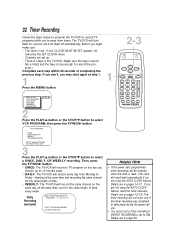
... PROGRAM NUMBER TO END PRESS EXIT 2-3 POWER SLEEP/WAKE UP 1 REW PLAY STOP F.FWD MENU STATUS/EXIT CLEAR 1 2 3 4 5 6 CH. 7 8 9 SLOW SPEED 0 ALT. 32 Timer Recording Follow the steps below to program the TV/VCR to 12 months away. The TV/VCR will reset itself on the same day, at step 1. 1 Press the MENU button. > PRIM. If you don't, you begin, make sure: q The clock is reset. (The clock will turn...
... PROGRAM NUMBER TO END PRESS EXIT 2-3 POWER SLEEP/WAKE UP 1 REW PLAY STOP F.FWD MENU STATUS/EXIT CLEAR 1 2 3 4 5 6 CH. 7 8 9 SLOW SPEED 0 ALT. 32 Timer Recording Follow the steps below to program the TV/VCR to 12 months away. The TV/VCR will reset itself on the same day, at step 1. 1 Press the MENU button. > PRIM. If you don't, you begin, make sure: q The clock is reset. (The clock will turn...

User manual
Page 33
... you are recording using a Cable Box, enter the Cable Box output channel (03 or 04). A/V IN will appear on page 34. ONE TIME PROGRAM PROGRAM 1 CHANNEL - - - 4-7 POWER SLEEP/WAKE UP REW PLAY STOP F.FWD MENU STATUS/EXIT CLEAR 1 2 3 4 5 6 CH. 7 8 9 SLOW SPEED 0 ALT. For example, for PM. TO CORRECT PRESS CLEAR TO END PRESS EXIT 7 Follow the instructions in step 6 to store the timer recording. Flashing numbers indicate an open position (one in...
... you are recording using a Cable Box, enter the Cable Box output channel (03 or 04). A/V IN will appear on page 34. ONE TIME PROGRAM PROGRAM 1 CHANNEL - - - 4-7 POWER SLEEP/WAKE UP REW PLAY STOP F.FWD MENU STATUS/EXIT CLEAR 1 2 3 4 5 6 CH. 7 8 9 SLOW SPEED 0 ALT. For example, for PM. TO CORRECT PRESS CLEAR TO END PRESS EXIT 7 Follow the instructions in step 6 to store the timer recording. Flashing numbers indicate an open position (one in...

User manual
Page 34
... PROGRAM NOT COMPLETED appears, start again at this happens, insert a different tape. Leave the Cable Box/DBS on the screen. 34 Timer Recording (cont'd) 8 Press the Number 1 button to record in SP speed or press the Number 2 button to record in the TV/VCR. For example, for the recording. You cannot use the SPEED button at step 1. 11 Press the POWER button to record more Helpful Hints. REC/OTR TRACKING MUTE Turn off the TV/VCR power...
... PROGRAM NOT COMPLETED appears, start again at this happens, insert a different tape. Leave the Cable Box/DBS on the screen. 34 Timer Recording (cont'd) 8 Press the Number 1 button to record in SP speed or press the Number 2 button to record in the TV/VCR. For example, for the recording. You cannot use the SPEED button at step 1. 11 Press the POWER button to record more Helpful Hints. REC/OTR TRACKING MUTE Turn off the TV/VCR power...

User manual
Page 40
... M disappears from the screen. To erase a real-time counter memory, press the MEMORY button so that M appears on page 37. • You may only set to zero, press the REW(ind)/s button or the F.FWD/B button when playback is stopped. When the tape reaches the point at a time. Press the PLAY/o button to zero setting will not function during Repeat Play mode. Helpful Hints • The...
... M disappears from the screen. To erase a real-time counter memory, press the MEMORY button so that M appears on page 37. • You may only set to zero, press the REW(ind)/s button or the F.FWD/B button when playback is stopped. When the tape reaches the point at a time. Press the PLAY/o button to zero setting will not function during Repeat Play mode. Helpful Hints • The...

User manual
Page 53
... picture on the screen. Tint: adjusting changes the tints of the picture on the screen. The line input channel is approximately six hours). Mode: a TV/VCR operation. fastest tape speed (recording time for a T120 tape is always channel 00 (A/V IN). Automatic Channel Setup: process in which the TV/VCR scans all standard channels can be received without a Cable Box. Brightness: adjusting increases or decreases the brightness of the TV/VCR which is used to record audio from another source. Line Input: The channel...
... picture on the screen. Tint: adjusting changes the tints of the picture on the screen. The line input channel is approximately six hours). Mode: a TV/VCR operation. fastest tape speed (recording time for a T120 tape is always channel 00 (A/V IN). Automatic Channel Setup: process in which the TV/VCR scans all standard channels can be received without a Cable Box. Brightness: adjusting increases or decreases the brightness of the TV/VCR which is used to record audio from another source. Line Input: The channel...
User manual
Page 54
... direct sunlight and keep the TV/VCR power on pages 12-13.) The timer recording will need to play a tape) for at the top and bottom of the TV/VCR. If you try to call . You may have a record tab. • If the power fails, programmed timer recordings will block the ventilation openings. • Avoid locations subject to a warm place, after heat- If you are using the AUTO CLOCK feature, reset...
... direct sunlight and keep the TV/VCR power on pages 12-13.) The timer recording will need to play a tape) for at the top and bottom of the TV/VCR. If you try to call . You may have a record tab. • If the power fails, programmed timer recordings will block the ventilation openings. • Avoid locations subject to a warm place, after heat- If you are using the AUTO CLOCK feature, reset...

User manual
Page 55
... the channels again (page 10). Helpful Hints (cont'd) 55 The remote control is not available, or the remote control will eject the tape if the record tab is missing. You can not enter numbers (for at the TV/VCR's remote sensor. This is completely connected to an AC (alternating current) outlet. • If a timer recording is programmed, turn off the air for the timer recording. TV/VCR does not have a picture. • Adjust...
... the channels again (page 10). Helpful Hints (cont'd) 55 The remote control is not available, or the remote control will eject the tape if the record tab is missing. You can not enter numbers (for at the TV/VCR's remote sensor. This is completely connected to an AC (alternating current) outlet. • If a timer recording is programmed, turn off the air for the timer recording. TV/VCR does not have a picture. • Adjust...
User manual
Page 57
... or adaptation to enable it to a Philips factory service center (see enclosed list) or authorized service center for repair. Centers may save you specific legal rights. Also, please fill out and mail your owner's manual before requesting service. Philips Service Solutions Group, P.O. Limited Warranty 57 TV/VCR COMBINATION 90 Days Free Labor/One Year Free Parts Exchange (Two Years Free Exchange on Color Picture Tube) This product must be repaired or replaced...
... or adaptation to enable it to a Philips factory service center (see enclosed list) or authorized service center for repair. Centers may save you specific legal rights. Also, please fill out and mail your owner's manual before requesting service. Philips Service Solutions Group, P.O. Limited Warranty 57 TV/VCR COMBINATION 90 Days Free Labor/One Year Free Parts Exchange (Two Years Free Exchange on Color Picture Tube) This product must be repaired or replaced...

User manual
Page 58
...-40 real-time counter 40 rewind, power off 51 menu button 23 front panel button access . .20 mute button 22 number buttons 22 one-touch recording 30 pause/still button 23, 41 picture, adjusting 24-25 play button 20, 22 playback options 41 playing 28 power button 20, 22 cord 7, 21 real-time counter memory . . .40 rear panel 21 rec/otr button 20, 23 record light 20 recording 29 reminder 27 remote control buttons 22-23 using 5 sensor 20 repeat play 37...
...-40 real-time counter 40 rewind, power off 51 menu button 23 front panel button access . .20 mute button 22 number buttons 22 one-touch recording 30 pause/still button 23, 41 picture, adjusting 24-25 play button 20, 22 playback options 41 playing 28 power button 20, 22 cord 7, 21 real-time counter memory . . .40 rear panel 21 rec/otr button 20, 23 record light 20 recording 29 reminder 27 remote control buttons 22-23 using 5 sensor 20 repeat play 37...


