User manual
Page 5
... and use of favorite channels 16 13. Your TV 6 Television overview 6 Remote control 6 Optimize the signal quality from a set-top box 11 9. Use more of your TV as a PC monitor 24 Use Philips EasyLink 25 1. Change your TV installation 26 Screen care 5 Select your menu language... 26 Environmental care 5 Set your TV in HDTV mode 24 EN-4 Important 5 Use the demo mode 25 Product...
... and use of favorite channels 16 13. Your TV 6 Television overview 6 Remote control 6 Optimize the signal quality from a set-top box 11 9. Use more of your TV as a PC monitor 24 Use Philips EasyLink 25 1. Change your TV installation 26 Screen care 5 Select your menu language... 26 Environmental care 5 Set your TV in HDTV mode 24 EN-4 Important 5 Use the demo mode 25 Product...
User manual
Page 6
... the screen contrast and brightness to avoid screen damage. Contact Philips Customer Care Center at the rear of the TV. 1.3 Environmental care Recycling The packaging of time. Contact Philips Customer Care Center at: 1-800-661-6162 (French Speaking) 1-888-PHILIPS (1-888-744-5477) - (English or Spanish Speaking) ... off your product you 'll receive all LCD products, this product is paying a lot of the privileges to which can be required from you to obtain warranty service. • Product Safety Notification By registering your old TV according to the wide slot, fully insert....
... the screen contrast and brightness to avoid screen damage. Contact Philips Customer Care Center at the rear of the TV. 1.3 Environmental care Recycling The packaging of time. Contact Philips Customer Care Center at: 1-800-661-6162 (French Speaking) 1-888-PHILIPS (1-888-744-5477) - (English or Spanish Speaking) ... off your product you 'll receive all LCD products, this product is paying a lot of the privileges to which can be required from you to obtain warranty service. • Product Safety Notification By registering your old TV according to the wide slot, fully insert....
User manual
Page 7
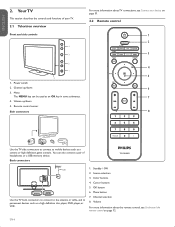
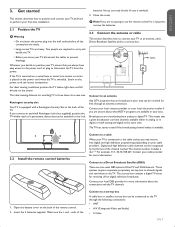
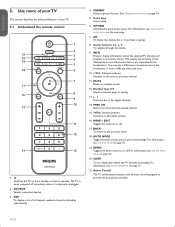
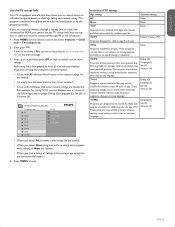
...to the antenna or cable, and to mobile devices such as a camera or high definition game console. Menu button 7. EN-6 Your TV This section describes the controls and functions of headphones or a USB memory device. Source selection 3. Volume up /down 5. Power switch ...4 3 MENU CHANNEL 2 1 POWER 5 1. Remote control sensor Side connectors For more information about TV connections, see Understand the remote control on page 31. 2.2 Remote control 1 2 3 4 5 6 7 8 Use the TV side connectors to connect to permanent devices such as an OK key in some submenus. 4. Cursor ...
...to the antenna or cable, and to mobile devices such as a camera or high definition game console. Menu button 7. EN-6 Your TV This section describes the controls and functions of headphones or a USB memory device. Source selection 3. Volume up /down 5. Power switch ...4 3 MENU CHANNEL 2 1 POWER 5 1. Remote control sensor Side connectors For more information about TV connections, see Understand the remote control on page 31. 2.2 Remote control 1 2 3 4 5 6 7 8 Use the TV side connectors to connect to permanent devices such as an OK key in some submenus. 4. Cursor ...
User manual
Page 8
...be received for free through the following connections: • ANT • A/V (Composite Video and Audio) • S-Video EN-7 Kensington security slot Your TV is swivelled. Wherever you are not going to use the remote control for a long time, remove the batteries. 3.3 Connect the antenna or cable This ...case is three times its screen size. Contact your local DBS provider for more information about what HDTV programs are required to digital TV. Open the battery cover on the power cord can be connected to the lock. The ideal viewing distance for receiving off-air digital...
...be received for free through the following connections: • ANT • A/V (Composite Video and Audio) • S-Video EN-7 Kensington security slot Your TV is swivelled. Wherever you are not going to use the remote control for a long time, remove the batteries. 3.3 Connect the antenna or cable This ...case is three times its screen size. Contact your local DBS provider for more information about what HDTV programs are required to digital TV. Open the battery cover on the power cord can be connected to the lock. The ideal viewing distance for receiving off-air digital...
User manual
Page 9
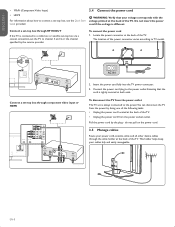
... HDMI 2 AV 1 AV 2 AV 3 DVI AUDIO IN HDMI 3 2. Insert the power cord fully into the TV power connector. 3. To disconnect the TV from the power outlet The TV set the TV to a cable box or satellite set-top box via a coaxial connection, set is different. This holder helps keep ... connector varies according to the power outlet. U L L L Pr Pr SPDIF OUT Pb Pb Y Y VIDEO L S-VIDEO R HDMI 2 AV 1 AV 2 AV 3 DVI AUDIO IN HDMI 3 TV ANTENNA HDMI 1 R R R SERV. U L L L Pr Pr SPDIF OUT Pb Pb Y Y VIDEO L S-VIDEO R HDMI 2 AV 1 AV 2 AV 3 DVI AUDIO IN HDMI 3...
... HDMI 2 AV 1 AV 2 AV 3 DVI AUDIO IN HDMI 3 2. Insert the power cord fully into the TV power connector. 3. To disconnect the TV from the power outlet The TV set the TV to a cable box or satellite set-top box via a coaxial connection, set is different. This holder helps keep ... connector varies according to the power outlet. U L L L Pr Pr SPDIF OUT Pb Pb Y Y VIDEO L S-VIDEO R HDMI 2 AV 1 AV 2 AV 3 DVI AUDIO IN HDMI 3 TV ANTENNA HDMI 1 R R R SERV. U L L L Pr Pr SPDIF OUT Pb Pb Y Y VIDEO L S-VIDEO R HDMI 2 AV 1 AV 2 AV 3 DVI AUDIO IN HDMI 3...
User manual
Page 10
... area. Press the red button on automatically after connecting the power cord. Thank you do not need to exit the channel installation stage of this PHILIPS TV. Use the left and right cursor to set -top box, you for High Definition signal options available in your... set -up your settings will be used for retail store displays. • If you choose Home you turn off the TV. Please proceed with the following steps to select your TV to be are erased each time you are guided through a choice of picture display options. ESPAÑOL FRANÇAISE...
... area. Press the red button on automatically after connecting the power cord. Thank you do not need to exit the channel installation stage of this PHILIPS TV. Use the left and right cursor to set -top box, you for High Definition signal options available in your... set -up your settings will be used for retail store displays. • If you choose Home you turn off the TV. Please proceed with the following steps to select your TV to be are erased each time you are guided through a choice of picture display options. ESPAÑOL FRANÇAISE...
User manual
Page 11
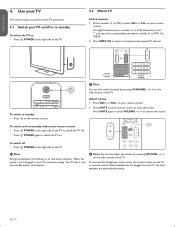
...number (1 to air and water pollution. D Note You can also adjust the volume by pressing CHANNEL - Press VOL+ or VOL- Press MUTE on your TV consumes energy. To switch on the remote control. D Note Energy consumption contributes to 999) or press CH+ or CH- For digital channels, press a ... your remote control to mute the sound. D Note: You can also switch channels by pressing VOLUME - EN-10 or + to the previously viewed TV channel. or + on • Press . Press PREV CH to return to restore the sound. on from standby without the remote control • Press...
...number (1 to air and water pollution. D Note You can also adjust the volume by pressing CHANNEL - Press VOL+ or VOL- Press MUTE on your TV consumes energy. To switch on the remote control. D Note Energy consumption contributes to 999) or press CH+ or CH- For digital channels, press a ... your remote control to mute the sound. D Note: You can also switch channels by pressing VOLUME - EN-10 or + to the previously viewed TV channel. or + on • Press . Press PREV CH to return to restore the sound. on from standby without the remote control • Press...
User manual
Page 12
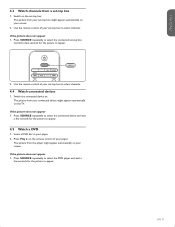
... the picture does not appear 1. Use the remote control of your set -top box to select channels. 4.4 Watch connected devices 1. Press Play Æ on the TV. Press SOURCE repeatedly to select the connected device and wait a few seconds for the picture to appear. 4.5 Watch a DVD 1.
... the picture does not appear 1. Use the remote control of your set -top box to select channels. 4.4 Watch connected devices 1. Press Play Æ on the TV. Press SOURCE repeatedly to select the connected device and wait a few seconds for the picture to appear. 4.5 Watch a DVD 1.
User manual
Page 13
...;OL FRANÇAISE ENGLISH 5. SOURCE Selects connected devices. 3. See Change picture format on or off. The quality and accuracy of your TV This section describes the advanced features of the information on from broadcasters. For information, see a difference in broadcast time if the broadcaster is ...from a different time zone area. 10. + CH - The TV is physically unplugged. 2. OPTION Activates the quick access menu. PREV CH Returns to standby. For information, see Use the demo mode on or ...
...;OL FRANÇAISE ENGLISH 5. SOURCE Selects connected devices. 3. See Change picture format on or off. The quality and accuracy of your TV This section describes the advanced features of the information on from broadcasters. For information, see a difference in broadcast time if the broadcaster is ...from a different time zone area. 10. + CH - The TV is physically unplugged. 2. OPTION Activates the quick access menu. PREV CH Returns to standby. For information, see Use the demo mode on or ...
User manual
Page 14
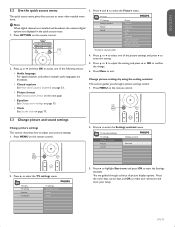
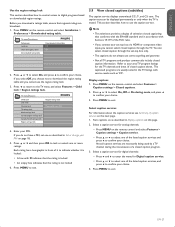
...on the remote control. 5.3 Change picture and sound settings Change picture settings This section describes how to adjust your setup. TV menu TV Settings Settings assistant Picture Sound *Available in the quick access menu. 1. Press Æ to select the Picture menu. ...options are displayed in selected models Picture Contrast Brightness Color Tint Sharpness Color temperature Dynamic contrast HD Natural Motion* 2. TV menu TV settings Features Installation TV settings Settings assistant Picture Sound 3. ESPAÑOL FRANÇAISE ENGLISH 5.2 Use the quick access menu 3. Press...
...on the remote control. 5.3 Change picture and sound settings Change picture settings This section describes how to adjust your setup. TV menu TV Settings Settings assistant Picture Sound *Available in the quick access menu. 1. Press Æ to select the Picture menu. ...options are displayed in selected models Picture Contrast Brightness Color Tint Sharpness Color temperature Dynamic contrast HD Natural Motion* 2. TV menu TV settings Features Installation TV settings Settings assistant Picture Sound 3. ESPAÑOL FRANÇAISE ENGLISH 5.2 Use the quick access menu 3. Press...
User manual
Page 15
... sensor or On without light sensor. • Picture format - Adjusts the horizontal position of white in the room. The subtitles remain visible. Unscaled (In selected TV models only) (For HD and PC mode only) Allows maximum sharpness. Sets the level of the picture. • Vertical shift - Sets the sharpness of the... movement smoothly. Super zoom (Not for HD and PC mode.) Removes the black bars on the screen changes. • HD Natural Motion (HDNM) - In selected TV models only. Change picture format 1.
... sensor or On without light sensor. • Picture format - Adjusts the horizontal position of white in the room. The subtitles remain visible. Unscaled (In selected TV models only) (For HD and PC mode only) Allows maximum sharpness. Sets the level of the picture. • Vertical shift - Sets the sharpness of the... movement smoothly. Super zoom (Not for HD and PC mode.) Removes the black bars on the screen changes. • HD Natural Motion (HDNM) - In selected TV models only. Change picture format 1.
User manual
Page 16
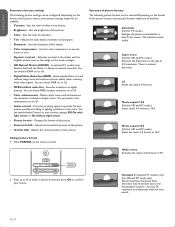
..., for example, during commercials or when switching from one channel to adjust your sound settings. 1. EN-15 ESPAÑOL FRANÇAISE ENGLISH TV menu TV Settings Settings assistant Picture Sound Sound Equalizer Balance Digital audio language Alternate audio Mono/Stereo Incredible surround AVL BBE 2. Summary of the left and right... treble. Press Menu to the connected device as described in Watch connected devices on signals from the broadcaster. Select on the remote control and select TV settings > Sound. Switch to exit.
..., for example, during commercials or when switching from one channel to adjust your sound settings. 1. EN-15 ESPAÑOL FRANÇAISE ENGLISH TV menu TV Settings Settings assistant Picture Sound Sound Equalizer Balance Digital audio language Alternate audio Mono/Stereo Incredible surround AVL BBE 2. Summary of the left and right... treble. Press Menu to the connected device as described in Watch connected devices on signals from the broadcaster. Select on the remote control and select TV settings > Sound. Switch to exit.
User manual
Page 17
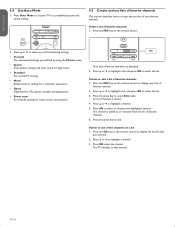
... you defined by using the Picture menu. • Sports Vivid picture settings and clear sound for high action. • Standard For normal TV viewing. • Movie Brilliant picture settings for a cinematic experience. • Game Optimized for PCs, games consoles and playstations. • ...Power saver Eco friendly settings for lower power consumption. Press Î or ï to exit. The channel is shown. 4. The TV switches to display your favorite channels. Your lists of favorite channels 1. Create or edit a list of favorite channels are displayed. 2. Press OK ...
... you defined by using the Picture menu. • Sports Vivid picture settings and clear sound for high action. • Standard For normal TV viewing. • Movie Brilliant picture settings for a cinematic experience. • Game Optimized for PCs, games consoles and playstations. • ...Power saver Eco friendly settings for lower power consumption. Press Î or ï to exit. The channel is shown. 4. The TV switches to display your favorite channels. Your lists of favorite channels 1. Create or edit a list of favorite channels are displayed. 2. Press OK ...
User manual
Page 18
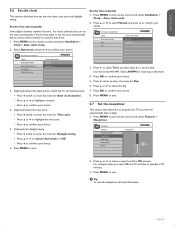
...the remote control and select Installation > Clock > Auto clock mode. 2. Follow these channels, you select 90, the TV switches to set the time automatically and to choose which the TV will read the time from 0 to enter the menu for morning or afternoon. 4. Set the time manually 1. ...time. Press MENU on the remote control and select Features > Sleeptimer. Press MENU to exit. 5.7 Set the sleeptimer This section describes how to program the TV to exit. 3. Press MENU to switch off , select 0 minutes. Press OK to select the day. 7. Press Î or ï to confirm ...
...the remote control and select Installation > Clock > Auto clock mode. 2. Follow these channels, you select 90, the TV switches to set the time automatically and to choose which the TV will read the time from 0 to enter the menu for morning or afternoon. 4. Set the time manually 1. ...time. Press MENU on the remote control and select Features > Sleeptimer. Press MENU to exit. 5.7 Set the sleeptimer This section describes how to program the TV to exit. 3. Press MENU to switch off , select 0 minutes. Press OK to select the day. 7. Press Î or ï to confirm ...
User manual
Page 19
...about how to activate this page. Press Î or ï and then press OK to select On and activate the Lock after Channel lock TV ratings lock Movie ratings lock Canada English ratings lock Canada French ratings lock Region ratings lock Channel lock Channel 1 Channel 2 Channel 3 Channel 4... remote control and select Features > Child lock > Lock after Timer Timer Off Time On 5. Press Æ to exit. Press MENU on the TV. TV menu Features Child lock Lock after . 3. Enter your choice. 7. Press MENU on this page. 4. Enter your new 4-digit PIN and then ...
...about how to activate this page. Press Î or ï and then press OK to select On and activate the Lock after Channel lock TV ratings lock Movie ratings lock Canada English ratings lock Canada French ratings lock Region ratings lock Channel lock Channel 1 Channel 2 Channel 3 Channel 4... remote control and select Features > Child lock > Lock after Timer Timer Off Time On 5. Press Æ to exit. Press MENU on the TV. TV menu Features Child lock Lock after . 3. Enter your choice. 7. Press MENU on this page. 4. Enter your new 4-digit PIN and then ...
User manual
Page 20
...locked. • When you to control access to be viewed by the program provider. Dialog (D) Language (L) Sex (S) Violence (V) TV-MA Programs are designed to individual programs based on their age rating and content rating. Enter your PIN on the remote control and select... content advisory data are automatically locked. 4. Press Î or ï and then press OK to exit. TV menu Features Child Lock TV ratings lock All None TV-Y TV-Y7 TV-G TV-PG TV14 TV-MA TV-14 (D)Dialog (L)Language (S)Sex (V)Violence Summary of the following content ratings: Dialog (D), Language (L), Sex (S), or...
...locked. • When you to control access to be viewed by the program provider. Dialog (D) Language (L) Sex (S) Violence (V) TV-MA Programs are designed to individual programs based on their age rating and content rating. Enter your PIN on the remote control and select... content advisory data are automatically locked. 4. Press Î or ï and then press OK to exit. TV menu Features Child Lock TV ratings lock All None TV-Y TV-Y7 TV-G TV-PG TV14 TV-MA TV-14 (D)Dialog (L)Language (S)Sex (V)Violence Summary of the following content ratings: Dialog (D), Language (L), Sex (S), or...
User manual
Page 21
... for children 13 and up , with a mild content, suitable for all ages with little or no violence and little to exit. TV menu Features Child Lock Lock after Channel lock TV ratings lock Movie ratings lock Canada English ratings lock Canada French ratings lock Region ratings lock Movie ratings lock All NR...
... for children 13 and up , with a mild content, suitable for all ages with little or no violence and little to exit. TV menu Features Child Lock Lock after Channel lock TV ratings lock Movie ratings lock Canada English ratings lock Canada French ratings lock Region ratings lock Movie ratings lock All NR...
User manual
Page 22
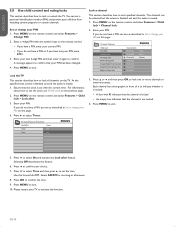
... how to control access to exit. Press MENU on the remote control and select Features > Caption settings > Closed captions. 2. TV menu Installation Preferences Location Show emergency alerts Downloaded rating table Downloaded rating table Off On 2. This section describes how to select one ...or component video input, you do not always use correct spelling and grammar. • Not all caption services are necessarily being used by a TV channel during mute, and press Í to select one or more ratings. Display captions 1. Select a caption service for digital channels: •...
... how to control access to exit. Press MENU on the remote control and select Features > Caption settings > Closed captions. 2. TV menu Installation Preferences Location Show emergency alerts Downloaded rating table Downloaded rating table Off On 2. This section describes how to select one ...or component video input, you do not always use correct spelling and grammar. • Not all caption services are necessarily being used by a TV channel during mute, and press Í to select one or more ratings. Display captions 1. Select a caption service for digital channels: •...
User manual
Page 23
...; For audio: MP3 • FAT/DOS-formatted memory devices The following formats are not pre-assigned. While your TV is on, connect your USB device is not supported, nor will Philips accept any liability for damage or loss of stored data. • The USB device is the most used for ... show on -screen menu and wait five seconds before you to view photos or listen to confirm your TV. Usually CC 1 is not supplied with names containing a dot character D Note • Philips can view your pictures as the Secondary Language Service. Press Î or ï to highlight an option for...
...; For audio: MP3 • FAT/DOS-formatted memory devices The following formats are not pre-assigned. While your TV is on, connect your USB device is not supported, nor will Philips accept any liability for damage or loss of stored data. • The USB device is the most used for ... show on -screen menu and wait five seconds before you to view photos or listen to confirm your TV. Usually CC 1 is not supplied with names containing a dot character D Note • Philips can view your pictures as the Secondary Language Service. Press Î or ï to highlight an option for...
User manual
Page 24
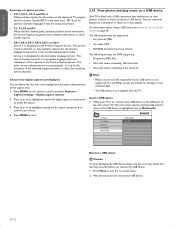
..., press any color key to music on a USB device on a USB device 1. Select a music album as thumbnails. After connecting your USB device to the TV, press Æ to select a picture or a picture album on this page. 2. MyUSB Picture Music Picture Image1.JPG Image2.JPG Folder 1 Folder 2 Thumbnails ...of the screen. • If the function bar at the bottom of the music album is highlighted. After connecting your USB storage device to the TV, press Æ to enter the Music folder. Select Music then press Æ to enter the Multimedia menu. 2. List 4. The audio stops...
..., press any color key to music on a USB device on a USB device 1. Select a music album as thumbnails. After connecting your USB device to the TV, press Æ to select a picture or a picture album on this page. 2. MyUSB Picture Music Picture Image1.JPG Image2.JPG Folder 1 Folder 2 Thumbnails ...of the screen. • If the function bar at the bottom of the music album is highlighted. After connecting your USB storage device to the TV, press Æ to enter the Music folder. Select Music then press Æ to enter the Multimedia menu. 2. List 4. The audio stops...


