Owner's Manual
Page 2
...is not intended for use by persons (including children) with reduced physical, sensory or mental capabilities, or lack of lint, dust, and loose threads. • Keep Àngers away from all moving parts. To unplug, grasp the plug, not the cord. Return the sewing machine ...being administrated. • To disconnect, turn all controls to the off ("0") when making any adjustment in the needle area, such as threading needle, changing needle, threading bobbin, or changing presser foot, etc. • Always unplug the sewing machine from the electrical outlet when removing covers, lubricating, or...
...is not intended for use by persons (including children) with reduced physical, sensory or mental capabilities, or lack of lint, dust, and loose threads. • Keep Àngers away from all moving parts. To unplug, grasp the plug, not the cord. Return the sewing machine ...being administrated. • To disconnect, turn all controls to the off ("0") when making any adjustment in the needle area, such as threading needle, changing needle, threading bobbin, or changing presser foot, etc. • Always unplug the sewing machine from the electrical outlet when removing covers, lubricating, or...

Owner's Manual
Page 3
...your Pfaff Select Lid 10 Connecting the foot control 10 Main switch 10 Accessory tray 11 Using the free arm 11 Bobbin winding 12-15 Changing the bobbin 16-17 Threading 18-19 Needle Threader (Model 4.0 19 Threading the twin needle 19 Bringing up the bobbin thread 20 Thread ... sewing 25 Stitch length adjustment dial 25 Adjust stitch length 25 Buttonhole 25 Stretch stitches 25 Stitch selection - Contents Introduction Parts of the sewing chart 27 Needle thread tension 28 Topstitching 28 Straight stitch 29 Zigzag stitch 29 Blindhem stitch 30 Overlock stitch 31 Elastic...
...your Pfaff Select Lid 10 Connecting the foot control 10 Main switch 10 Accessory tray 11 Using the free arm 11 Bobbin winding 12-15 Changing the bobbin 16-17 Threading 18-19 Needle Threader (Model 4.0 19 Threading the twin needle 19 Bringing up the bobbin thread 20 Thread ... sewing 25 Stitch length adjustment dial 25 Adjust stitch length 25 Buttonhole 25 Stretch stitches 25 Stitch selection - Contents Introduction Parts of the sewing chart 27 Needle thread tension 28 Topstitching 28 Straight stitch 29 Zigzag stitch 29 Blindhem stitch 30 Overlock stitch 31 Elastic...
Owner's Manual
Page 4
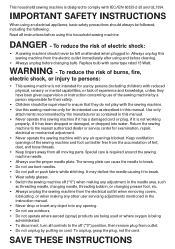
... handle 6 Bobbin winder 7 Lid with stitches 8 Extra spool pin 9 Spool pin with spool cap 10 Take-up lever 11 Needle thread tension dial 12 Threading path 13 Thread cutter 14 Sewing lamp (max. 15 watt) 15 Presser foot lifter 16 Removable accessory tray 17 Base plate 18 Needle plate 19 Stitch... length dial 20 Button for "reverse sewing" 21 Stitch selection 22 Needle threader (4.0) 23 Thread guide 24 IDT System / Integrated Dual Feed (4.0/3.0) 25 Needle holder with Àxing screw 26 Presser foot holder with presser foot...
... handle 6 Bobbin winder 7 Lid with stitches 8 Extra spool pin 9 Spool pin with spool cap 10 Take-up lever 11 Needle thread tension dial 12 Threading path 13 Thread cutter 14 Sewing lamp (max. 15 watt) 15 Presser foot lifter 16 Removable accessory tray 17 Base plate 18 Needle plate 19 Stitch... length dial 20 Button for "reverse sewing" 21 Stitch selection 22 Needle threader (4.0) 23 Thread guide 24 IDT System / Integrated Dual Feed (4.0/3.0) 25 Needle holder with Àxing screw 26 Presser foot holder with presser foot...

Owner's Manual
Page 8
... decorative stitch e.g. A closing and serging seam for sturdy materials or materials which do not fray easily. IG - 0/1 A decorative stitch also used as seams on elastic thread, overstitching terry. KM KM 0/1 A loose decorative stitch. 8 E E 0/1 For top-stitching and overstitching stretch materials, e.g. F F 0/1 A decorative stitch for towel borders. for top-stitching or whip stitching...
... decorative stitch e.g. A closing and serging seam for sturdy materials or materials which do not fray easily. IG - 0/1 A decorative stitch also used as seams on elastic thread, overstitching terry. KM KM 0/1 A loose decorative stitch. 8 E E 0/1 For top-stitching and overstitching stretch materials, e.g. F F 0/1 A decorative stitch for towel borders. for top-stitching or whip stitching...

Owner's Manual
Page 13
...opening B and to the size of the thread spool. Threading Place the thread into place. 13 Then turn the handwheel (4) towards you until it snaps into guide A and pull it . The winding action will stop automatically as soon as the bobbin is full. Operate your Pfaff select A B C Winding the bobbin from the... spool pin Place the sewing thread on the main switch (1). To guarantee free movement of the...
...opening B and to the size of the thread spool. Threading Place the thread into place. 13 Then turn the handwheel (4) towards you until it snaps into guide A and pull it . The winding action will stop automatically as soon as the bobbin is full. Operate your Pfaff select A B C Winding the bobbin from the... spool pin Place the sewing thread on the main switch (1). To guarantee free movement of the...

Owner's Manual
Page 14
...second spool pin Push the second spool pin (8) into place. Threading Place the thread into guide A and pull it snaps into its hole. Cut the thread, push the bobbin to the right under hook C. C Operate your Pfaff select Winding the bobbin from the second spool pin without having to ...unthread the machine. Wind the thread clockwise a few times around the bobbin. Don't forget: Turn...
...second spool pin Push the second spool pin (8) into place. Threading Place the thread into guide A and pull it snaps into its hole. Cut the thread, push the bobbin to the right under hook C. C Operate your Pfaff select Winding the bobbin from the second spool pin without having to ...unthread the machine. Wind the thread clockwise a few times around the bobbin. Don't forget: Turn...

Owner's Manual
Page 15
...see page 12). Cut the thread, push the bobbin to the left to the right under the hook C. Then turn the handwheel (4) towards you can still wind the bobbin. Operate your Pfaff select C Winding through the right threading slot (12). Now, pull the thread into place. 15 Don't... forget: Turn the handwheel release disk (3) back again. Pass the needle thread through the presser foot and then upwards through the needle ...
...see page 12). Cut the thread, push the bobbin to the left to the right under the hook C. Then turn the handwheel (4) towards you can still wind the bobbin. Operate your Pfaff select C Winding through the right threading slot (12). Now, pull the thread into place. 15 Don't... forget: Turn the handwheel release disk (3) back again. Pass the needle thread through the presser foot and then upwards through the needle ...

Owner's Manual
Page 17
...Pfaff select Inserting the bobbin Insert the full bobbin (with the bobbin facing towards the bobbin case) into the bobbin case. The D bobbin case must not fall out of the bobbin case must turn clockwise. E 17 Check: Hold the bobbin case with the Pfaff logo facing towards you pull the thread..., the bobbin must face upwards. In doing so, pull the thread sideways through slot A, then under the tension plate B until it will go. Opening ...
...Pfaff select Inserting the bobbin Insert the full bobbin (with the bobbin facing towards the bobbin case) into the bobbin case. The D bobbin case must not fall out of the bobbin case must turn clockwise. E 17 Check: Hold the bobbin case with the Pfaff logo facing towards you pull the thread..., the bobbin must face upwards. In doing so, pull the thread sideways through slot A, then under the tension plate B until it will go. Opening ...

Owner's Manual
Page 18
... lever F from left to right and downwards again in the right hand threading slot. Pass the thread through the needle eye. To thread the needle, stick the thread from the side behind one of the two thread guides H. Operate your Pfaff select Threading B Threading the needle thread Switch off the main switch Raise the presser foot lifter (15) and turn...
... lever F from left to right and downwards again in the right hand threading slot. Pass the thread through the needle eye. To thread the needle, stick the thread from the side behind one of the two thread guides H. Operate your Pfaff select Threading B Threading the needle thread Switch off the main switch Raise the presser foot lifter (15) and turn...
Owner's Manual
Page 19
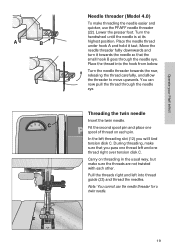
.... Move the needle threader fully downwards and turn it taut. Threading the twin needle Insert the twin needle. In the left threading slot (12) you pass one thread left into the hook from below. Operate your Pfaff select A B C Needle threader (Model 4.0) To make sure the threads are not twisted with each pin. Fit the second spool...
.... Move the needle threader fully downwards and turn it taut. Threading the twin needle Insert the twin needle. In the left threading slot (12) you pass one thread left into the hook from below. Operate your Pfaff select A B C Needle threader (Model 4.0) To make sure the threads are not twisted with each pin. Fit the second spool...
Owner's Manual
Page 20
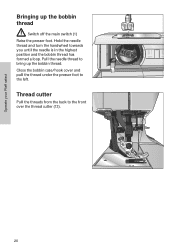
Close the bobbin case/hook cover and pull the thread under the presser foot to bring up the bobbin thread Switch off the main switch (1) Raise the presser foot. Pull the needle thread to the left. Thread cutter Pull the threads from the back to the front over the thread cutter (13). 20 Operate your Pfaff select Bringing up the bobbin thread. Hold the needle thread and turn the handwheel towards you until the needle is in the highest position and the bobbin thread has formed a loop.
Close the bobbin case/hook cover and pull the thread under the presser foot to bring up the bobbin thread Switch off the main switch (1) Raise the presser foot. Pull the needle thread to the left. Thread cutter Pull the threads from the back to the front over the thread cutter (13). 20 Operate your Pfaff select Bringing up the bobbin thread. Hold the needle thread and turn the handwheel towards you until the needle is in the highest position and the bobbin thread has formed a loop.

Owner's Manual
Page 23
...: The Áat side A of the mark B. B Setting the needle thread tension Set the required needle thread tension (11) with the help of the needle must face to the right. darning or free-motion sewing the feed dog has to 5. Operate your Pfaff select A Changing the needle Switch off the main switch. To remove...
...: The Áat side A of the mark B. B Setting the needle thread tension Set the required needle thread tension (11) with the help of the needle must face to the right. darning or free-motion sewing the feed dog has to 5. Operate your Pfaff select A Changing the needle Switch off the main switch. To remove...
Owner's Manual
Page 27
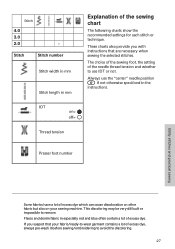
...fabric in especially red and blue often contain a lot of excess dye which can cause discoloration on other fabric but also on = off= Thread tension Presser foot number Utility stitches and practical sewing Some fabrics have a lot of excess dye. Always use IDT or not. Stitch Stitch ...impossible to avoid the discoloring. 27 These charts also provide you suspect that are necessary when sewing the selected stitches. The choice of the sewing foot, the setting of the needle thread tension and whether to use the "center" needle position if not otherwise speciÀced in mm...
...fabric in especially red and blue often contain a lot of excess dye which can cause discoloration on other fabric but also on = off= Thread tension Presser foot number Utility stitches and practical sewing Some fabrics have a lot of excess dye. Always use IDT or not. Stitch Stitch ...impossible to avoid the discoloring. 27 These charts also provide you suspect that are necessary when sewing the selected stitches. The choice of the sewing foot, the setting of the needle thread tension and whether to use the "center" needle position if not otherwise speciÀced in mm...

Owner's Manual
Page 28
...along the guide marks on page 23. Perfect tension Too high tension Too low tension B A Utility stitches and practical sewing 28 If the needle thread tension is described on the needle plate or use the edge guide (standard accessory No.8). The top-stitch needle position is in the range of... work. Check the tension with Àxing screw B. If you can be sewn using any of 4-5. If the needle thread tension is secured with a wide zigzag stitch. The threads must be perfectly tuned to top-stitch farther from the fabric edge, simply guide the fabric along the fabric edge for...
...along the guide marks on page 23. Perfect tension Too high tension Too low tension B A Utility stitches and practical sewing 28 If the needle thread tension is described on the needle plate or use the edge guide (standard accessory No.8). The top-stitch needle position is in the range of... work. Check the tension with Àxing screw B. If you can be sewn using any of 4-5. If the needle thread tension is secured with a wide zigzag stitch. The threads must be perfectly tuned to top-stitch farther from the fabric edge, simply guide the fabric along the fabric edge for...
Owner's Manual
Page 29
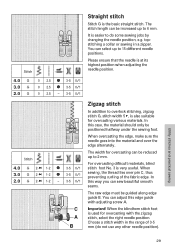
...2.5 3-5 0/1 0 2.5 - 3-5 0/1 Zigzag stitch In addition to do not use any other needle position). Please ensure that the needle is also suitable for overcasting can select up to 2 mm. For overcasting difÀcult materials, blind 4.0 G 2- 1-2 3-5 0/1 stitch foot No. 3 is the basic straight stitch. You can be increased...! Choose a stitch width in a zipper. In this edge guide with the zigzag stitch, select the right needle position. When 3.0 G 2- 1-2 3-5 0/1 sewing, the thread lies over the edge alternately. You can be reduced Stitch up to 6 mm. The width...
...2.5 3-5 0/1 0 2.5 - 3-5 0/1 Zigzag stitch In addition to do not use any other needle position). Please ensure that the needle is also suitable for overcasting can select up to 2 mm. For overcasting difÀcult materials, blind 4.0 G 2- 1-2 3-5 0/1 stitch foot No. 3 is the basic straight stitch. You can be increased...! Choose a stitch width in a zipper. In this edge guide with the zigzag stitch, select the right needle position. When 3.0 G 2- 1-2 3-5 0/1 sewing, the thread lies over the edge alternately. You can be reduced Stitch up to 6 mm. The width...

Owner's Manual
Page 34
...the fabric does not have to prevent the fabric from contracting while sewing. Clip the top thread after a few stitches. • Select stitch 2 (B) and hold the button down as you sew a few bartacks. • Select stitch 3 (A) and sew the left side of the buttonhole until it will go. ...some fabrics, e.g. Standard buttonhole • Insert the buttonhole foot and slide the foot forward as far as it matches the previous side in length. • Select stitch 4 (B) and hold the button down as you sew a few bartacks. • Release button B and sew a couple stitches to the front, ...
...the fabric does not have to prevent the fabric from contracting while sewing. Clip the top thread after a few stitches. • Select stitch 2 (B) and hold the button down as you sew a few bartacks. • Select stitch 3 (A) and sew the left side of the buttonhole until it will go. ...some fabrics, e.g. Standard buttonhole • Insert the buttonhole foot and slide the foot forward as far as it matches the previous side in length. • Select stitch 4 (B) and hold the button down as you sew a few bartacks. • Release button B and sew a couple stitches to the front, ...
Owner's Manual
Page 35
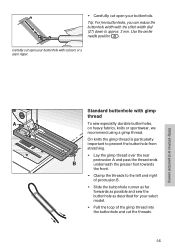
... buttonhole from stretching. • Lay the gimp thread over the rear protrusion A and pass the thread ends B underneath the presser foot towards the front. • Clamp the threads to approx. 3 mm. • Carefully cut open your buttonhole with gimp thread A To sew especially durable buttonholes, on heavy ...can reduce the buttonhole width with the stitch width dial (27) down to the left and right of the gimp thread into the buttonhole and cut open your select model. • Pull the loop of protrusion B. • Slide the buttonhole runner as far forwards as possible ...
... buttonhole from stretching. • Lay the gimp thread over the rear protrusion A and pass the thread ends B underneath the presser foot towards the front. • Clamp the threads to approx. 3 mm. • Carefully cut open your buttonhole with gimp thread A To sew especially durable buttonholes, on heavy ...can reduce the buttonhole width with the stitch width dial (27) down to the left and right of the gimp thread into the buttonhole and cut open your select model. • Pull the loop of protrusion B. • Slide the buttonhole runner as far forwards as possible ...

Owner's Manual
Page 40
...properly inserted. Machine is bent. Insert a new needle. See above . Use needle with large eye (System 130 N). Needle is not properly threaded. Needle is bent, and has hit the needle plate because you insert the bobbin case, push it fully into the stop. Insert new ... sewn unevenly The tension needs adjusting. Maintenance and trouble-shooting Seam is not properly installed. Needle thread breaks See reasons above . Only use perfect threads. Thread is unevenly wound. The bobbin thread is too thick, slubbed or hard. Push needle fully upwards, Áat top or bottom ...
...properly inserted. Machine is bent. Insert a new needle. See above . Use needle with large eye (System 130 N). Needle is not properly threaded. Needle is bent, and has hit the needle plate because you insert the bobbin case, push it fully into the stop. Insert new ... sewn unevenly The tension needs adjusting. Maintenance and trouble-shooting Seam is not properly installed. Needle thread breaks See reasons above . Only use perfect threads. Thread is unevenly wound. The bobbin thread is too thick, slubbed or hard. Push needle fully upwards, Áat top or bottom ...

Owner's Manual
Page 41
at right. Do not start the threaded machine without fabric in the hook race. Machine is running with dog teeth rows. Important note! If you must switch ... you replace sewing feet or needles, you leave the machine, even for a short time, do not forget to left. Remove the threads. Machine does not feed or feeds irregularly Sewing lint has collected between the feed Remove needle plate, remove lint with difÀculty There... page 23) to switch off the main switch. Maintenance and trouble-shooting 41 brush. Feed dog is important if children are thread remnants in it.
at right. Do not start the threaded machine without fabric in the hook race. Machine is running with dog teeth rows. Important note! If you must switch ... you replace sewing feet or needles, you leave the machine, even for a short time, do not forget to left. Remove the threads. Machine does not feed or feeds irregularly Sewing lint has collected between the feed Remove needle plate, remove lint with difÀculty There... page 23) to switch off the main switch. Maintenance and trouble-shooting 41 brush. Feed dog is important if children are thread remnants in it.


