Owner's Manual
Page 2
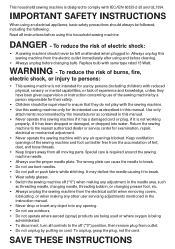
...; Do not use the proper needle plate. To reduce the risk of lint, dust, and loose threads. • Keep Àngers away from all moving parts. This household sewing machine is being administrated. • To disconnect, turn all controls to the off ("0") when making any other user servicing adjustments mentioned in...
...; Do not use the proper needle plate. To reduce the risk of lint, dust, and loose threads. • Keep Àngers away from all moving parts. This household sewing machine is being administrated. • To disconnect, turn all controls to the off ("0") when making any other user servicing adjustments mentioned in...

Owner's Manual
Page 3
Contents Introduction Parts of the sewing chart 27 Needle thread tension 28 Topstitching 28 Straight stitch 29 Zigzag stitch 29 Blindhem stitch 30 Overlock stitch 31 Elastic stitch ... .......26 Utility stitches 26 Stretch stitches 26 Utility and stretch stitch combinations..26 Utility stitches and practical sewing Explanation of your Pfaff Select Lid 10 Connecting the foot control 10 Main switch 10 Accessory tray 11 Using the free arm 11 Bobbin winding 12-15 Changing the bobbin ...
Contents Introduction Parts of the sewing chart 27 Needle thread tension 28 Topstitching 28 Straight stitch 29 Zigzag stitch 29 Blindhem stitch 30 Overlock stitch 31 Elastic stitch ... .......26 Utility stitches 26 Stretch stitches 26 Utility and stretch stitch combinations..26 Utility stitches and practical sewing Explanation of your Pfaff Select Lid 10 Connecting the foot control 10 Main switch 10 Accessory tray 11 Using the free arm 11 Bobbin winding 12-15 Changing the bobbin ...
Owner's Manual
Page 4
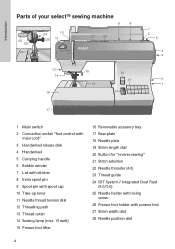
Introduction Parts of your select™ sewing machine 9 8 22 23 26 24 25 10 11 12 27 28 13 14 16 15 18 20 21 19 7 6 5 4 3 2 1 17 1 Main switch 2 Connection ...) 15 Presser foot lifter 16 Removable accessory tray 17 Base plate 18 Needle plate 19 Stitch length dial 20 Button for "reverse sewing" 21 Stitch selection 22 Needle threader (4.0) 23 Thread guide 24 IDT System / Integrated Dual Feed (4.0/3.0) 25 Needle holder with Àxing screw 26 Presser foot holder with presser...
Introduction Parts of your select™ sewing machine 9 8 22 23 26 24 25 10 11 12 27 28 13 14 16 15 18 20 21 19 7 6 5 4 3 2 1 17 1 Main switch 2 Connection ...) 15 Presser foot lifter 16 Removable accessory tray 17 Base plate 18 Needle plate 19 Stitch length dial 20 Button for "reverse sewing" 21 Stitch selection 22 Needle threader (4.0) 23 Thread guide 24 IDT System / Integrated Dual Feed (4.0/3.0) 25 Needle holder with Àxing screw 26 Presser foot holder with presser...

Owner's Manual
Page 10
... inside of electric shock, this plug is switched on, the sewing bulb lights up. The stitches of the sewing machine are illustrated on the front part of the sewing machine and to install the proper outlet. Lid Open the folding lid (7) upwards. For the USA and Canada This appliance has a polarized... = full speed AE023 - 120V, USA and Canada AE020 - 230V, Europe AE024 - 240V, Australia Main switch When the main switch (1) is intended to use. Operate your Pfaff select Connecting the foot control Connect the plug of the foot control to the connecting socket (2) of the foot control.
... inside of electric shock, this plug is switched on, the sewing bulb lights up. The stitches of the sewing machine are illustrated on the front part of the sewing machine and to install the proper outlet. Lid Open the folding lid (7) upwards. For the USA and Canada This appliance has a polarized... = full speed AE023 - 120V, USA and Canada AE020 - 230V, Europe AE024 - 240V, Australia Main switch When the main switch (1) is intended to use. Operate your Pfaff select Connecting the foot control Connect the plug of the foot control to the connecting socket (2) of the foot control.


