
Owner's Manual
Page 3
... stitches 26 Stretch stitches 26 Utility and stretch stitch combinations..26 Utility stitches and practical sewing Explanation of your Pfaff Select Lid 10 Connecting the foot control 10 Main switch 10 Accessory tray 11 Using the free arm 11 Bobbin ...position dial 24 Reverse sewing 25 Stitch length adjustment dial 25 Adjust stitch length 25 Buttonhole 25 Stretch stitches 25 Stitch selection - Stretch stitches 8-9 Operate your select sewing machine .........4 Standard accessories 5 Stitch overview 6 Stitch table - Contents Introduction Parts of the sewing chart 27 Needle...
... stitches 26 Stretch stitches 26 Utility and stretch stitch combinations..26 Utility stitches and practical sewing Explanation of your Pfaff Select Lid 10 Connecting the foot control 10 Main switch 10 Accessory tray 11 Using the free arm 11 Bobbin ...position dial 24 Reverse sewing 25 Stitch length adjustment dial 25 Adjust stitch length 25 Buttonhole 25 Stretch stitches 25 Stitch selection - Stretch stitches 8-9 Operate your select sewing machine .........4 Standard accessories 5 Stitch overview 6 Stitch table - Contents Introduction Parts of the sewing chart 27 Needle...

Owner's Manual
Page 5
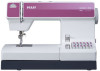
... 3 Blindhem/Overlock Foot With IDT (pictured) select 4.0 and 3.0 Without IDT select 2.0 4 Zipper Foot With IDT (pictured) select 4.0 and 3.0 Without IDT select 2.0 9 8 11 10 12 13 14 15 5 Buttonhole Foot 6 Darning Foot select 4.0 7 Rolled Hem Foot, 3 mm With IDT select 4.0 8 Edge Guide/Quilting Guide 9 Felt ...pad 10 Spool caps, small/medium/large 11 Needles 12 Extra spool pin 13 Seam ripper 14 Brush 15 Bobbins 5 Standard accessories For more information about accessories, please contact your PFAFF&#...
... 3 Blindhem/Overlock Foot With IDT (pictured) select 4.0 and 3.0 Without IDT select 2.0 4 Zipper Foot With IDT (pictured) select 4.0 and 3.0 Without IDT select 2.0 9 8 11 10 12 13 14 15 5 Buttonhole Foot 6 Darning Foot select 4.0 7 Rolled Hem Foot, 3 mm With IDT select 4.0 8 Edge Guide/Quilting Guide 9 Felt ...pad 10 Spool caps, small/medium/large 11 Needles 12 Extra spool pin 13 Seam ripper 14 Brush 15 Bobbins 5 Standard accessories For more information about accessories, please contact your PFAFF&#...

Owner's Manual
Page 10
Lid Open the folding lid (7) upwards. Operate your Pfaff select Connecting the foot control Connect the plug of the foot control to the connecting socket (2) of the lid. If it still does not Àt, contact a ...
Lid Open the folding lid (7) upwards. Operate your Pfaff select Connecting the foot control Connect the plug of the foot control to the connecting socket (2) of the lid. If it still does not Àt, contact a ...
Owner's Manual
Page 11
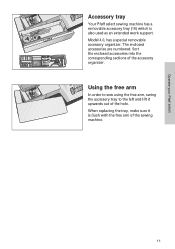
Using the free arm In order to sew using the free arm, swing the accessory tray to the left and lift it is also used as an extended work support. Sort the enclosed accessories into the corresponding sections of the hole. When replacing the tray, make sure it upwards out of the accessory organizer. Operate your Pfaff select Accessory tray Your Pfaff select sewing machine has a removable accessory tray (16) which is Áush with the free arm of the sewing machine. 11 Model 4.0, has a special removable accessory organizer. The enclosed accessories are numbered.
Using the free arm In order to sew using the free arm, swing the accessory tray to the left and lift it is also used as an extended work support. Sort the enclosed accessories into the corresponding sections of the hole. When replacing the tray, make sure it upwards out of the accessory organizer. Operate your Pfaff select Accessory tray Your Pfaff select sewing machine has a removable accessory tray (16) which is Áush with the free arm of the sewing machine. 11 Model 4.0, has a special removable accessory organizer. The enclosed accessories are numbered.

Owner's Manual
Page 12
A Push the bobbin to the right Note: The bobbin can only be wound when it stops in the direction of the bobbin. This stops the needle from moving while the machine is moved fully to the right. 12 Operate your Pfaff select Bobbin winding Preparing the machine for bobbin winding Hold the handwheel (4) Àrmly and turn the handwheel release disc (3) until it is winding the bobbin. The Pfaff logo is facing up. Placing the bobbin Switch off the main switch (1) Place the empty bobbin so that the small pin (A) of the bobbin winder (6) snaps into the slot of the arrow.
A Push the bobbin to the right Note: The bobbin can only be wound when it stops in the direction of the bobbin. This stops the needle from moving while the machine is moved fully to the right. 12 Operate your Pfaff select Bobbin winding Preparing the machine for bobbin winding Hold the handwheel (4) Àrmly and turn the handwheel release disc (3) until it is winding the bobbin. The Pfaff logo is facing up. Placing the bobbin Switch off the main switch (1) Place the empty bobbin so that the small pin (A) of the bobbin winder (6) snaps into the slot of the arrow.

Owner's Manual
Page 13
Winding Switch on the spool A pin (9). The winding action will stop automatically as soon as the bobbin is full. Operate your Pfaff select A B C Winding the bobbin from the spool pin Place the sewing thread on the main switch (1). Threading Place the thread into place. 13 Hold the end ...
Winding Switch on the spool A pin (9). The winding action will stop automatically as soon as the bobbin is full. Operate your Pfaff select A B C Winding the bobbin from the spool pin Place the sewing thread on the main switch (1). Threading Place the thread into place. 13 Hold the end ...

Owner's Manual
Page 14
... around the bobbin. Hold the end of thread Àrmly and press the the foot control. Winding Switch on the spool pin. B A 14 C Operate your Pfaff select Winding the bobbin from the second spool pin without having to unthread the machine. The winding action will stop automatically as soon as the bobbin...
... around the bobbin. Hold the end of thread Àrmly and press the the foot control. Winding Switch on the spool pin. B A 14 C Operate your Pfaff select Winding the bobbin from the second spool pin without having to unthread the machine. The winding action will stop automatically as soon as the bobbin...

Owner's Manual
Page 15
... needle Even if the machine has been completely threaded, you until it . The take -up lever must be positioned at its very top. Operate your Pfaff select C Winding through the right threading slot (12). First make sure to the right under the hook C. Winding Switch on the main switch (1) and press the...
... needle Even if the machine has been completely threaded, you until it . The take -up lever must be positioned at its very top. Operate your Pfaff select C Winding through the right threading slot (12). First make sure to the right under the hook C. Winding Switch on the main switch (1) and press the...
Owner's Manual
Page 16
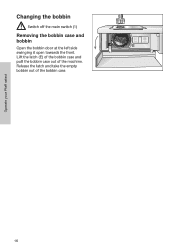
Lift the latch (E) of the bobbin case and pull the bobbin case out of the bobbin case. Operate your Pfaff select 16 Release the latch and take the empty bobbin out of the machine. Changing the bobbin Switch off the main switch (1) Removing the bobbin case and bobbin Open the bobbin door at the left side E swinging it open towards the front.
Lift the latch (E) of the bobbin case and pull the bobbin case out of the bobbin case. Operate your Pfaff select 16 Release the latch and take the empty bobbin out of the machine. Changing the bobbin Switch off the main switch (1) Removing the bobbin case and bobbin Open the bobbin door at the left side E swinging it open towards the front.

Owner's Manual
Page 17
... facing towards you pull the thread, the bobbin must turn clockwise. Opening D of the bobbin case must not fall out of the hook. Operate your Pfaff select Inserting the bobbin Insert the full bobbin (with the bobbin facing towards the bobbin case) into the bobbin case. In doing so, pull the thread...
... facing towards you pull the thread, the bobbin must turn clockwise. Opening D of the bobbin case must not fall out of the hook. Operate your Pfaff select Inserting the bobbin Insert the full bobbin (with the bobbin facing towards the bobbin case) into the bobbin case. In doing so, pull the thread...

Owner's Manual
Page 18
... from the side behind one of the two thread guides H. Now, using the needle threader, please refer to the next page. A F CEG D H 18 Operate your Pfaff select Threading B Threading the needle thread Switch off the main switch Raise the presser foot lifter (15) and turn the handwheel until the take -up lever...
... from the side behind one of the two thread guides H. Now, using the needle threader, please refer to the next page. A F CEG D H 18 Operate your Pfaff select Threading B Threading the needle thread Switch off the main switch Raise the presser foot lifter (15) and turn the handwheel until the take -up lever...
Owner's Manual
Page 19
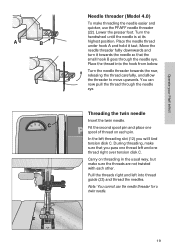
...) you pass one thread left into the hook from below. Threading the twin needle Insert the twin needle. Note: You cannot use the PFAFF needle threader (22). Place the needle thread under hook A and hold it towards the rear, releasing the thread carefully, and allow the ...threader to move upwards. Turn the needle threader towards the needle so that you will Ànd tension disk C. Operate your Pfaff select A B C Needle threader (Model 4.0) To make threading the needle easier and quicker, use the needle threader for a twin needle. 19 Fit the...
...) you pass one thread left into the hook from below. Threading the twin needle Insert the twin needle. Note: You cannot use the PFAFF needle threader (22). Place the needle thread under hook A and hold it towards the rear, releasing the thread carefully, and allow the ...threader to move upwards. Turn the needle threader towards the needle so that you will Ànd tension disk C. Operate your Pfaff select A B C Needle threader (Model 4.0) To make threading the needle easier and quicker, use the needle threader for a twin needle. 19 Fit the...
Owner's Manual
Page 20
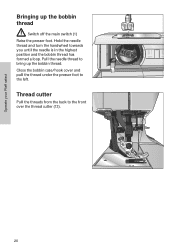
Thread cutter Pull the threads from the back to the left. Close the bobbin case/hook cover and pull the thread under the presser foot to the front over the thread cutter (13). 20 Operate your Pfaff select Bringing up the bobbin thread. Hold the needle thread and turn the handwheel towards you until the needle is in the highest position and the bobbin thread has formed a loop. Pull the needle thread to bring up the bobbin thread Switch off the main switch (1) Raise the presser foot.
Thread cutter Pull the threads from the back to the left. Close the bobbin case/hook cover and pull the thread under the presser foot to the front over the thread cutter (13). 20 Operate your Pfaff select Bringing up the bobbin thread. Hold the needle thread and turn the handwheel towards you until the needle is in the highest position and the bobbin thread has formed a loop. Pull the needle thread to bring up the bobbin thread Switch off the main switch (1) Raise the presser foot.
Owner's Manual
Page 21
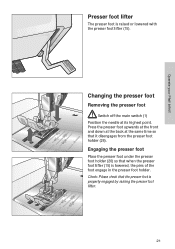
... engage in the presser foot holder. Press the presser foot upwards at the front and down at the back at its highest point. Operate your Pfaff select Presser foot lifter The presser foot is raised or lowered with the presser foot lifter (15).
... engage in the presser foot holder. Press the presser foot upwards at the front and down at the back at its highest point. Operate your Pfaff select Presser foot lifter The presser foot is raised or lowered with the presser foot lifter (15).

Owner's Manual
Page 22
... all layers of quilt projects aligned to prevent stretching of the top layers. The fabric is fed precisely. Operate your Pfaff select The IDT (Integrated Dual Feed) For sewing any fabric precisely Pfaff provides the ideal solution: the Integrated Dual Feed, IDT system. As on industrial machines, the IDT feeds the fabric from...
... all layers of quilt projects aligned to prevent stretching of the top layers. The fabric is fed precisely. Operate your Pfaff select The IDT (Integrated Dual Feed) For sewing any fabric precisely Pfaff provides the ideal solution: the Integrated Dual Feed, IDT system. As on industrial machines, the IDT feeds the fabric from...

Owner's Manual
Page 23
... the needle and tighten the needle screw (25) Àrmly. darning or free-motion sewing the feed dog has to its highest point. Operate your Pfaff select A Changing the needle Switch off the main switch. Lower the presser foot and insert the needle, pushing it up as far as it goes. For...
... the needle and tighten the needle screw (25) Àrmly. darning or free-motion sewing the feed dog has to its highest point. Operate your Pfaff select A Changing the needle Switch off the main switch. Lower the presser foot and insert the needle, pushing it up as far as it goes. For...

Owner's Manual
Page 24
...as it will go the left or right. When the position of individual stitches. The furthest needle position to the right. Operate your Pfaff select Stitch width dial The stitch width can be adjusted with stitch width 0. Utility stitches and practical sewing", you can now use the width... dial (27) to the symbol (maximum stitch width). When selecting the width, the needle must not be in the material. Exception: Straight stitch is being changed, the needle must not be in the ...
...as it will go the left or right. When the position of individual stitches. The furthest needle position to the right. Operate your Pfaff select Stitch width dial The stitch width can be adjusted with stitch width 0. Utility stitches and practical sewing", you can now use the width... dial (27) to the symbol (maximum stitch width). When selecting the width, the needle must not be in the material. Exception: Straight stitch is being changed, the needle must not be in the ...

Owner's Manual
Page 25
...) is the optimum stitch density for sewing buttonholes and embroidering. 20 19 A 19 Reverse sewing The machine sews in the grey area. 25 Operate your Pfaff select Stitch length adjustment dial Adjust stitch length With the stitch length adjustment dial (19) you will go in reverse only as long as it will...
...) is the optimum stitch density for sewing buttonholes and embroidering. 20 19 A 19 Reverse sewing The machine sews in the grey area. 25 Operate your Pfaff select Stitch length adjustment dial Adjust stitch length With the stitch length adjustment dial (19) you will go in reverse only as long as it will...

Owner's Manual
Page 26
Operate your Pfaff select Stitch selection Easy Select System Utility stitches Each stitch has been given a letter that have already been selected. Under the lid (7) you will go in the lid. they are illustrated on the push button controls. Button B releases the buttons that you can &#...192;nd on the stitch table in the grey area (A). By pressing the correct button, the stitch is selected and the machine is ready to sew. Stretch stitches All the stitches with all the utility stitches and stitch combinations. Press the...
Operate your Pfaff select Stitch selection Easy Select System Utility stitches Each stitch has been given a letter that have already been selected. Under the lid (7) you will go in the lid. they are illustrated on the push button controls. Button B releases the buttons that you can &#...192;nd on the stitch table in the grey area (A). By pressing the correct button, the stitch is selected and the machine is ready to sew. Stretch stitches All the stitches with all the utility stitches and stitch combinations. Press the...

Owner's Manual
Page 43
Please note that on disposal, this product must be to the beneÀt of the user and the product. We reserve the right to change the machine equipment and the assortment of accessories without prior notice, or make modiÀcations to electrical/electronic products. If in accordance with relevant National legislation relating to the performance or design. Such modiÀcations, however, will always be safely recycled in doubt please contact your retailer for guidance Intellectual property PFAFF, SELECT and IDT (image) are trademarks of KSIN Luxembourg II, S.ar.l.
Please note that on disposal, this product must be to the beneÀt of the user and the product. We reserve the right to change the machine equipment and the assortment of accessories without prior notice, or make modiÀcations to electrical/electronic products. If in accordance with relevant National legislation relating to the performance or design. Such modiÀcations, however, will always be safely recycled in doubt please contact your retailer for guidance Intellectual property PFAFF, SELECT and IDT (image) are trademarks of KSIN Luxembourg II, S.ar.l.


