Owner's Manual
Page 5
...sewing 2:10 Hemming with the twin needle 2:11 Free Motion Sewing 2:12 Sewing on zippers 2:13 Stabilizing edges 2:15 3. Maintenance and trouble-shooting Changing the needle plate 3:2 Cleaning 3:2 Replacing the sewing blub 3:3 Trouble-shooting 3:4 Introduction IIIIII Contents Introduction Stitch table V 1. Operate your Pfaff select Electrical connection 1:2 Removable accessory tray 1:3 Bobbins 1:4 Bobbin...15 Lowering the feed dog 1:15 Stitch width dial 1:16 Needle position dial 1:16 Reverse sewing 1:17 Stitch length dial 1:17 Stitch selection 1:18 2.
...sewing 2:10 Hemming with the twin needle 2:11 Free Motion Sewing 2:12 Sewing on zippers 2:13 Stabilizing edges 2:15 3. Maintenance and trouble-shooting Changing the needle plate 3:2 Cleaning 3:2 Replacing the sewing blub 3:3 Trouble-shooting 3:4 Introduction IIIIII Contents Introduction Stitch table V 1. Operate your Pfaff select Electrical connection 1:2 Removable accessory tray 1:3 Bobbins 1:4 Bobbin...15 Lowering the feed dog 1:15 Stitch width dial 1:16 Needle position dial 1:16 Reverse sewing 1:17 Stitch length dial 1:17 Stitch selection 1:18 2.
Owner's Manual
Page 25
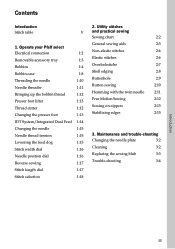
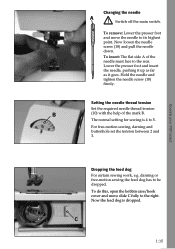
...side A of the mark B. Hold the needle and tighten the needle screw (18) firmly. Operate your Pfaff select Dropping the feed dog For certain sewing work, e.g. Now loosen the needle screw (18) and pull the needle..., pushing it up as far as it goes. darning or free-motion sewing the feed dog has to its highest point. Changing the needle A Switch off the main switch. For ...free-motion sewing, darning and buttonhole set the tension between 2 and 3. To remove: Lower the presser foot...
...side A of the mark B. Hold the needle and tighten the needle screw (18) firmly. Operate your Pfaff select Dropping the feed dog For certain sewing work, e.g. Now loosen the needle screw (18) and pull the needle..., pushing it up as far as it goes. darning or free-motion sewing the feed dog has to its highest point. Changing the needle A Switch off the main switch. For ...free-motion sewing, darning and buttonhole set the tension between 2 and 3. To remove: Lower the presser foot...
Owner's Manual
Page 40
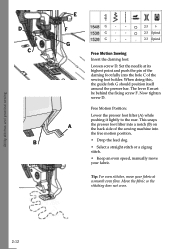
...machine into a notch (B) on the back side of the sewing foot holder. G - - 2-3 6 2-3 Optional 2-3 Optional Free Motion Sewing Insert the darning foot: Loosen screw D. Now tighten screw D. When doing this, the guide fork G should position itself around the... presser bar. This snaps the presser foot lifter into the free motion position. • Drop the feed dog. • Select a straight stitch or a zigzag stitch. • Keep an even speed, manually move your fabric. Utility stitches and practical sewing ...
...machine into a notch (B) on the back side of the sewing foot holder. G - - 2-3 6 2-3 Optional 2-3 Optional Free Motion Sewing Insert the darning foot: Loosen screw D. Now tighten screw D. When doing this, the guide fork G should position itself around the... presser bar. This snaps the presser foot lifter into the free motion position. • Drop the feed dog. • Select a straight stitch or a zigzag stitch. • Keep an even speed, manually move your fabric. Utility stitches and practical sewing ...


