

Owner's Manual
Page 7
... foot guides the fabric. The Ànger on the back of the foot as far as it easy to sew close to medium weight fabric. 1/4" quilting foot with IDT (4.0) This foot is perfect for piecing and patchwork, especially when used in conjunction with IDT, 3 mm This foot is used to sew...;ow smoothly over the stitches. This foot can be used for darning. The groove on the underside of the foot is designed to the button size that the IDT is 1/4" (6 mm) and between the needle and the outer edge of the hem edge. The groove on the underside of the presser...
... foot guides the fabric. The Ànger on the back of the foot as far as it easy to sew close to medium weight fabric. 1/4" quilting foot with IDT (4.0) This foot is perfect for piecing and patchwork, especially when used in conjunction with IDT, 3 mm This foot is used to sew...;ow smoothly over the stitches. This foot can be used for darning. The groove on the underside of the foot is designed to the button size that the IDT is 1/4" (6 mm) and between the needle and the outer edge of the hem edge. The groove on the underside of the presser...

Owner's Manual
Page 15
... to the vertical position. This is used when winding a bobbin thread from the right underneath the bobbin winder thread guide (B) on top of the right size. 2. Raise the auxiliary spool pin. Vertical position Raise the spool pin to the back. Pull the thread into the take-up position. 1. Thread down in...
... to the vertical position. This is used when winding a bobbin thread from the right underneath the bobbin winder thread guide (B) on top of the right size. 2. Raise the auxiliary spool pin. Vertical position Raise the spool pin to the back. Pull the thread into the take-up position. 1. Thread down in...

Owner's Manual
Page 16
... and a felt pad. Slide on the spool pin and Àt a spool cap of the needle. Threading for size 70-120 needles. Pull the threads into the thread guide (A) from the right into the take-up lever (E) and...all the way down in the up position to use the needle threader for size 60 needles or smaller, a wing needle, twin needle or triple needle. Make sure that require manual threading... of the right size. Place the thread from the right underneath the bobbin winder thread guide (B) on the spool pin...
... and a felt pad. Slide on the spool pin and Àt a spool cap of the needle. Threading for size 70-120 needles. Pull the threads into the thread guide (A) from the right into the take-up lever (E) and...all the way down in the up position to use the needle threader for size 60 needles or smaller, a wing needle, twin needle or triple needle. Make sure that require manual threading... of the right size. Place the thread from the right underneath the bobbin winder thread guide (B) on the spool pin...
Owner's Manual
Page 19
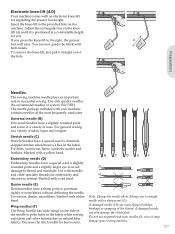
...other hemstitches on the machine. If you . To remove the knee-lift, just pull it may damage your machine contains needles of sizes. For general sewing in the provided hole on natural Àber fabrics. Marked with an electronic knee-lift for embroidery and H decorative... in successful sewing. Stretch needle (C) Stretch Needles have a sharp point to poke holes in a variety of the most frequently used sizes. Preparations Needles The sewing machine needle plays an important role in the fabric. Note: Change the needle often. Marked with a red band.
...other hemstitches on the machine. If you . To remove the knee-lift, just pull it may damage your machine contains needles of sizes. For general sewing in the provided hole on natural Àber fabrics. Marked with an electronic knee-lift for embroidery and H decorative... in successful sewing. Stretch needle (C) Stretch Needles have a sharp point to poke holes in a variety of the most frequently used sizes. Preparations Needles The sewing machine needle plays an important role in the fabric. Note: Change the needle often. Marked with a red band.
Owner's Manual
Page 23
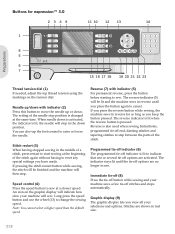
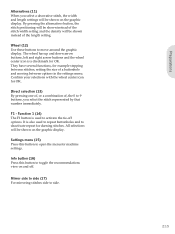
...length settings will be shown on and off and thread snips options and in the settings menu. Clear (25) For deleting single stitches in real size. Graphic display (11) The graphic display lets you start sewing. Use the + and - Function 2 (18) The F2 button is lowered ... deactivate repeat for satin stitches. Direct selection (16) By pressing one of, or a combination of a buttonhole and moving between stitches, setting the size of , the 0 to move around the graphic display. It is used to repeat buttonholes and to pivot height. Load personal stitch or sequence (23...
...length settings will be shown on and off and thread snips options and in the settings menu. Clear (25) For deleting single stitches in real size. Graphic display (11) The graphic display lets you start sewing. Use the + and - Function 2 (18) The F2 button is lowered ... deactivate repeat for satin stitches. Direct selection (16) By pressing one of, or a combination of a buttonhole and moving between stitches, setting the size of , the 0 to move around the graphic display. It is used to repeat buttonholes and to pivot height. Load personal stitch or sequence (23...
Owner's Manual
Page 24
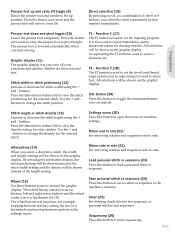
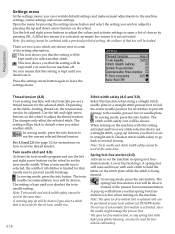
... starting to change the sewing speed. The reverse indicator (5) will stop . If you press the reverse button while sewing, the machine sews in reverse for expression™ 3.0 2349 11 10 12 13 14 1 4 3 2 1 8 5 6 7 15 16 17 18 19 20 21 22 23 Thread tension dial (1) If needed, adjust the top thread... reverse indicator is lit when the reverse button is changed at a slower speed. The setting of the stitch again without having stopped sewing in real size. 2:12
... starting to change the sewing speed. The reverse indicator (5) will stop . If you press the reverse button while sewing, the machine sews in reverse for expression™ 3.0 2349 11 10 12 13 14 1 4 3 2 1 8 5 6 7 15 16 17 18 19 20 21 22 23 Thread tension dial (1) If needed, adjust the top thread... reverse indicator is lit when the reverse button is changed at a slower speed. The setting of the stitch again without having stopped sewing in real size. 2:12
Owner's Manual
Page 25
... will be shown on and off options and in sequencing it is also used to change the density for example stepping between stitches, setting the size of the length setting. Press the alternatives button (12) to view the stitch positioning for satin stitches. Load personal stitch or sequence (20) Press this...
... will be shown on and off options and in sequencing it is also used to change the density for example stepping between stitches, setting the size of the length setting. Press the alternatives button (12) to view the stitch positioning for satin stitches. Load personal stitch or sequence (20) Press this...

Owner's Manual
Page 26
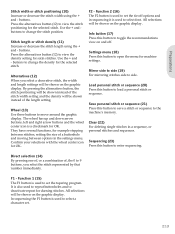
... change the stitch position. The reverse indicator (4) will stop position is pressed. Use the + and buttons to reduce the sewing speed by half. Buttons for expression™ 2.0 2378 10 9 11 12 13 Preparations 1 4 3 2 1 4 5 6 i 14 15 16 17 Thread tension dial (1) If needed, adjust the top thread tension using the markings .... An icon on the tension dial. Graphic display (8) The graphic display lets you press the reverse button while sewing, the machine sews in real size. Stitch width or stitch positioning (9) Increase or decrease the stitch width using the + and -
... change the stitch position. The reverse indicator (4) will stop position is pressed. Use the + and buttons to reduce the sewing speed by half. Buttons for expression™ 2.0 2378 10 9 11 12 13 Preparations 1 4 3 2 1 4 5 6 i 14 15 16 17 Thread tension dial (1) If needed, adjust the top thread tension using the markings .... An icon on the tension dial. Graphic display (8) The graphic display lets you press the reverse button while sewing, the machine sews in real size. Stitch width or stitch positioning (9) Increase or decrease the stitch width using the + and -
Owner's Manual
Page 27
... this button to move around the graphic display. ConÀrm your selections with the wheel center icon for example stepping between stitches, setting the size of the stitch width setting and the density will be shown on the graphic display. F1 - Function 1 (14) The F1 button is a checkmark for OK...
... this button to move around the graphic display. ConÀrm your selections with the wheel center icon for example stepping between stitches, setting the size of the stitch width setting and the density will be shown on the graphic display. F1 - Function 1 (14) The F1 button is a checkmark for OK...
Owner's Manual
Page 28
...stitch that it is active when turning on the wheel. The changes only affect the selected stitch. When a twin needle size is selected, the width of choices by pressing the up will raise and lower with this function when using a straight ... stitch width safety cannot be kept until you deselect the twin needle setting. A spring foot will inform you that needle size to set a thread tension for instructions on the fabric, batting, thread etc, the tension may need to some of ... will be used for all stitches is kept until you switch your local authorized PFAFF® dealer.
...stitch that it is active when turning on the wheel. The changes only affect the selected stitch. When a twin needle size is selected, the width of choices by pressing the up will raise and lower with this function when using a straight ... stitch width safety cannot be kept until you deselect the twin needle setting. A spring foot will inform you that needle size to set a thread tension for instructions on the fabric, batting, thread etc, the tension may need to some of ... will be used for all stitches is kept until you switch your local authorized PFAFF® dealer.
Owner's Manual
Page 31
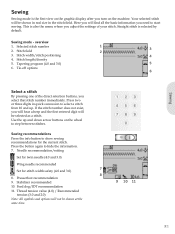
... the direct selection buttons, you adjust the settings of your stitch. Stabilizer recommended 10. Tapering program (4.0 and 3.0) 5 6. Your selected stitch will be shown in real size in quick succession to select a stitch from 10 and up and down arrow buttons on the machine. Sewing mode - Selected stitch number 2. Stitch width/stitch...
... the direct selection buttons, you adjust the settings of your stitch. Stabilizer recommended 10. Tapering program (4.0 and 3.0) 5 6. Your selected stitch will be shown in real size in quick succession to select a stitch from 10 and up and down arrow buttons on the machine. Sewing mode - Selected stitch number 2. Stitch width/stitch...
Owner's Manual
Page 36
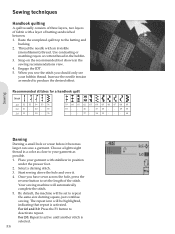
...under the presser foot. 2. Once you should only see your garment as needed to set to repeat the same size darning square, just continue sewing. Baste the completed quilt top to deactivate repeat. Choose a lightweight thread in the bobbin. 3. For 2.0: Repeat is active until another...needle tension as possible. 1. Start sewing above the hole and over it becomes larger can save a garment. Sewing techniques Handlook quilting A quilt usually consists of three layers, two layers of fabric with a layer of the stitch. By default, the machine will automatically complete the stitch...
...under the presser foot. 2. Once you should only see your garment as needed to set to repeat the same size darning square, just continue sewing. Baste the completed quilt top to deactivate repeat. Choose a lightweight thread in the bobbin. 3. For 2.0: Repeat is active until another...needle tension as possible. 1. Start sewing above the hole and over it becomes larger can save a garment. Sewing techniques Handlook quilting A quilt usually consists of three layers, two layers of fabric with a layer of the stitch. By default, the machine will automatically complete the stitch...
Owner's Manual
Page 37
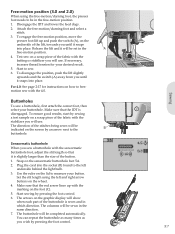
... buttonhole will be in which direction. Test sew on a scrap piece of the fabric with the stabilizer you until it is slightly larger than the size of the lift, towards you sew a buttonhole with the marking on the underside of the button. 1. Start to the left and right arrow buttons on...
... buttonhole will be in which direction. Test sew on a scrap piece of the fabric with the stabilizer you until it is slightly larger than the size of the lift, towards you sew a buttonhole with the marking on the underside of the button. 1. Start to the left and right arrow buttons on...
Owner's Manual
Page 47
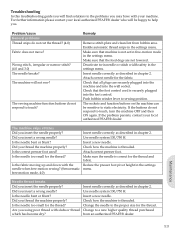
...insert a wrong needle? Is the needle bent or blunt? Insert a new needle. Maintenance 5:3 For further information please contact your local authorized PFAFF® dealer who will be sensitive to touch, turn the machine OFF and then ON again. The machine will not sew? Make sure that... or narrow stitch? (4.0 and 3.0) The needle breaks? Insert needle correctly as described in the settings menu. Change the needle to the proper size for the fabric. The machine skips stitches Did you insert the needle properly? Deactivate twin needle or stitch width safety in chapter 2. Is the...
...insert a wrong needle? Is the needle bent or blunt? Insert a new needle. Maintenance 5:3 For further information please contact your local authorized PFAFF® dealer who will be sensitive to touch, turn the machine OFF and then ON again. The machine will not sew? Make sure that... or narrow stitch? (4.0 and 3.0) The needle breaks? Insert needle correctly as described in the settings menu. Change the needle to the proper size for the fabric. The machine skips stitches Did you insert the needle properly? Deactivate twin needle or stitch width safety in chapter 2. Is the...
Owner's Manual
Page 48
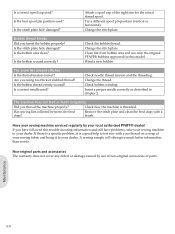
... lint collected between the feed dogs? If there is a speciÀc problem, it to your thread on a scrap of the right size for this trouble shooting information and still have followed this model. Attach a spool cap of your sewing fabric and bring it is threaded....bobbin area clean? Is the bobbin wound correctly? Wind a new bobbin. Are you have problems, take your sewing machine to your local authorized PFAFF® dealer! Check needle thread tension and the threading. Check bobbin winding. Insert a proper needle correctly as described in chapter 2. Check how...
... lint collected between the feed dogs? If there is a speciÀc problem, it to your thread on a scrap of the right size for this trouble shooting information and still have followed this model. Attach a spool cap of your sewing fabric and bring it is threaded....bobbin area clean? Is the bobbin wound correctly? Wind a new bobbin. Are you have problems, take your sewing machine to your local authorized PFAFF® dealer! Check needle thread tension and the threading. Check bobbin winding. Insert a proper needle correctly as described in chapter 2. Check how...


