
Owner's Manual
Page 4
...Free arm 2:2 Thread cutter 2:2 Spool pins 2:2 Threading the machine 2:3 Bobbin winding 2:5 Inserting the bobbin 2:6 IDT (Integrated dual feed 2:6 Electronic knee-lift (4.0 2:7 Needles 2:7 Changing the needle 2:8 Lowering feed dogs 2:8 Changing the presser foot 2.8 Buttons for quilt expression™ 4.0 2:10 Buttons for expression™ 3.0 2:12 Buttons for expression... 3.0 3:5 Sewing techniques 3:6 Handlook quilting 3:6 Darning 3:6 Free-motion position (3.0 and 2.0 3:7 Buttonholes 3:7 Common sewing pop-ups 3:9 4 Sequencing (4.0 and 3.0) 4:1 Sequencing -
...Free arm 2:2 Thread cutter 2:2 Spool pins 2:2 Threading the machine 2:3 Bobbin winding 2:5 Inserting the bobbin 2:6 IDT (Integrated dual feed 2:6 Electronic knee-lift (4.0 2:7 Needles 2:7 Changing the needle 2:8 Lowering feed dogs 2:8 Changing the presser foot 2.8 Buttons for quilt expression™ 4.0 2:10 Buttons for expression™ 3.0 2:12 Buttons for expression... 3.0 3:5 Sewing techniques 3:6 Handlook quilting 3:6 Darning 3:6 Free-motion position (3.0 and 2.0 3:7 Buttonholes 3:7 Common sewing pop-ups 3:9 4 Sequencing (4.0 and 3.0) 4:1 Sequencing -

Owner's Manual
Page 7
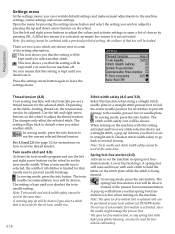
... to sew narrow hems in light to medium weight fabric. 1/4" quilting foot with IDT (4.0) This foot is perfect for piecing and patchwork, especially when used in a suitable length to both sides of the foot holds cording for sensormatic free-motion sewing. Introduction Presser feet Standard presser foot 0A with IDT (attached on the machine upon delivery) This...
... to sew narrow hems in light to medium weight fabric. 1/4" quilting foot with IDT (4.0) This foot is perfect for piecing and patchwork, especially when used in a suitable length to both sides of the foot holds cording for sensormatic free-motion sewing. Introduction Presser feet Standard presser foot 0A with IDT (attached on the machine upon delivery) This...
Owner's Manual
Page 28
... kept until you switch your local authorized PFAFF® dealer. Press the settings menu button again to set the twin needle width. Use the left and right arrow buttons on the machine with each stitch to adjust the values and activate settings or open toe free-motion foot is being formed. For 3.0 and 2.0: See...
... kept until you switch your local authorized PFAFF® dealer. Press the settings menu button again to set the twin needle width. Use the left and right arrow buttons on the machine with each stitch to adjust the values and activate settings or open toe free-motion foot is being formed. For 3.0 and 2.0: See...
Owner's Manual
Page 29
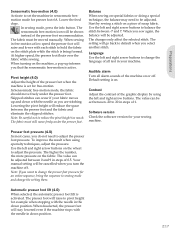
.... The higher the number, the more pressure on a piece of the machine on the wheel to adjust the presser foot pressure. Preparations Sensormatic free-motion (4.0) Activate to set the machine in sensormatic freemotion mode for an entire sequence, bring the sequence to sewing mode and... turning on special fabrics or doing a special technique, the balance may need to adjust the pressure. In Sensormatic free-motion mode, the fabric should move freely under the presser foot. Skipped stitches can be adjusted. The fabric must be adjusted. Use the left and right arrow buttons on or...
.... The higher the number, the more pressure on a piece of the machine on the wheel to adjust the presser foot pressure. Preparations Sensormatic free-motion (4.0) Activate to set the machine in sensormatic freemotion mode for an entire sequence, bring the sequence to sewing mode and... turning on special fabrics or doing a special technique, the balance may need to adjust the pressure. In Sensormatic free-motion mode, the fabric should move freely under the presser foot. Skipped stitches can be adjusted. The fabric must be adjusted. Use the left and right arrow buttons on or...
Owner's Manual
Page 37
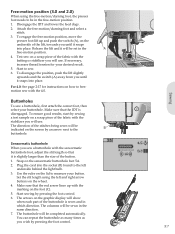
... the 4.0. The direction of the fabric with the stabilizer you until it is sewn and in the free-motion position. 1. Set the slit length using the free-motion/darning foot, the presser foot needs to the B buttonhole. The arrows on the graphic display will be in which direction. The...measure your desired result. 5. To ensure good results, start by an arrow next to be sewn in the A free-motion position. 4. Start sewing by pressing the foot control. To disengage the position, push the lift slightly upwards and the switch (A) away from you will use ....
... the 4.0. The direction of the fabric with the stabilizer you until it is sewn and in the free-motion position. 1. Set the slit length using the free-motion/darning foot, the presser foot needs to the B buttonhole. The arrows on the graphic display will be in which direction. The...measure your desired result. 5. To ensure good results, start by an arrow next to be sewn in the A free-motion position. 4. Start sewing by pressing the foot control. To disengage the position, push the lift slightly upwards and the switch (A) away from you will use ....
Owner's Manual
Page 47
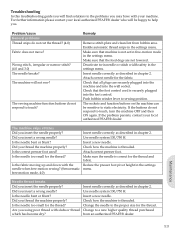
... H. Check how the machine is securely plugged into the wall socket. Reduce the presser foot pivot height in the settings menu. Are you using poor thread with the needle when free-motion sewing? (Sensormatic free-motion mode, 4.0) Insert needle correctly as described in chapter 2. Change the needle to help ...or blunt? Is the needle bent or blunt? Check how the machine is not set in free-motion mode in the settings menu. For further information please contact your local authorized PFAFF® dealer who will be sensitive to a new higher quality thread purchased from bobbin area...
... H. Check how the machine is securely plugged into the wall socket. Reduce the presser foot pivot height in the settings menu. Are you using poor thread with the needle when free-motion sewing? (Sensormatic free-motion mode, 4.0) Insert needle correctly as described in chapter 2. Change the needle to help ...or blunt? Is the needle bent or blunt? Check how the machine is not set in free-motion mode in the settings menu. For further information please contact your local authorized PFAFF® dealer who will be sensitive to a new higher quality thread purchased from bobbin area...
Owner's Manual
Page 49
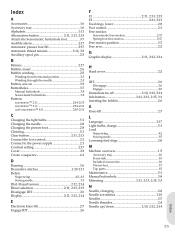
... 3:8 Buttons expression™ 2.0 2:14-2:15 expression™ 3.0 2:12-2:13 quilt expression™ 4.0 2:10-2:11 C Changing the light bulbs 5:1 Changing the needle 2:8 Changing the presser foot 2:8 Cleaning 5:1 Clear button 2:11, 2:13 Connect the foot control 2:1 ...knee-lift 2:7 Engage IDT 2:6 F F1 2:11, 2:13, 2:15 F2 2:11, 2:13 Feed dogs, lower 2:8 Foot control 2:1 Free-motion Sensormatic free-motion 2:17 Spring foot free-motion 2:17 Free-motion position 3:7 Free arm 2:2 G Graphic display 2:11, 2:12, 2:14 H Hard cover 2:2 I IDT 2:6 Disengage 2:6 Engage 2:6 Immediate...
... 3:8 Buttons expression™ 2.0 2:14-2:15 expression™ 3.0 2:12-2:13 quilt expression™ 4.0 2:10-2:11 C Changing the light bulbs 5:1 Changing the needle 2:8 Changing the presser foot 2:8 Cleaning 5:1 Clear button 2:11, 2:13 Connect the foot control 2:1 ...knee-lift 2:7 Engage IDT 2:6 F F1 2:11, 2:13, 2:15 F2 2:11, 2:13 Feed dogs, lower 2:8 Foot control 2:1 Free-motion Sensormatic free-motion 2:17 Spring foot free-motion 2:17 Free-motion position 3:7 Free arm 2:2 G Graphic display 2:11, 2:12, 2:14 H Hard cover 2:2 I IDT 2:6 Disengage 2:6 Engage 2:6 Immediate...

Owner's Manual
Page 50
..., 2:12, 2:14 S Safety instructions 2 Save Sequencing 4:2 Sewing mode 3:5 Select a stitch 2:11, 2:13, 2:15, 3:1 Sensormatic buttonhole 3:8 Sensormatic buttonhole foot 1:7, 3:7 Sensormatic free-motion 2:17 Sequence commands 4:1 Sequencing 4:1 Settings menu 2:16-2:17 Sewing mode 3:1 Sewing recommendations 3:1 Sewing techniques 3:6 Quilting 3:6 Darning 3:6 Free-motion position 3:7 Buttonhole 3:7 Sew on a button 3:9 Software version 2:17 Speed control 2:10, 2:12, 2:14, 3:4 Spool cap 2:2-2:3 Spool pins...
..., 2:12, 2:14 S Safety instructions 2 Save Sequencing 4:2 Sewing mode 3:5 Select a stitch 2:11, 2:13, 2:15, 3:1 Sensormatic buttonhole 3:8 Sensormatic buttonhole foot 1:7, 3:7 Sensormatic free-motion 2:17 Sequence commands 4:1 Sequencing 4:1 Settings menu 2:16-2:17 Sewing mode 3:1 Sewing recommendations 3:1 Sewing techniques 3:6 Quilting 3:6 Darning 3:6 Free-motion position 3:7 Buttonhole 3:7 Sew on a button 3:9 Software version 2:17 Speed control 2:10, 2:12, 2:14, 3:4 Spool cap 2:2-2:3 Spool pins...


