
Owner's Manual
Page 2
... controller free from the electrical outlet when removing covers, lubricating, or when making any other user servicing adjustments mentioned in this manual. • Never operate this manual. To unplug, grasp the plug, not the cord. • This sewing machine is marked with the words 'DOUBLE INSULATION...To reduce the risk of experience and knowledge, unless they have been given supervision or instruction concerning use as contained in the instruction manual. • Never drop or insert any object into water. Special care is not intended for their safety. • Children should ...
... controller free from the electrical outlet when removing covers, lubricating, or when making any other user servicing adjustments mentioned in this manual. • Never operate this manual. To unplug, grasp the plug, not the cord. • This sewing machine is marked with the words 'DOUBLE INSULATION...To reduce the risk of experience and knowledge, unless they have been given supervision or instruction concerning use as contained in the instruction manual. • Never drop or insert any object into water. Special care is not intended for their safety. • Children should ...
Owner's Manual
Page 3
...PFAFF® expression™ machine will deÀnitely enable you to maximize the use of your machine. You will of sewing! Your authorized PFAFF® dealer will soon discover how to experience a totally new dimension of course also be pleased to transform all your new PFAFF...® sewing machine. As a sewing enthusiast, you have acquired a machine that features the very latest in both design and technology, enabling you to help you start, please spend some time reading this owner's manual. Congratulations! Congratulations on purchasing...
...PFAFF® expression™ machine will deÀnitely enable you to maximize the use of your machine. You will of sewing! Your authorized PFAFF® dealer will soon discover how to experience a totally new dimension of course also be pleased to transform all your new PFAFF...® sewing machine. As a sewing enthusiast, you have acquired a machine that features the very latest in both design and technology, enabling you to help you start, please spend some time reading this owner's manual. Congratulations! Congratulations on purchasing...
Owner's Manual
Page 4
... Included accessories 1:6 Presser feet 1:7 Stitch overview 1:8 Utility stitches 1:8 Quilt stitches 1:10 Needle art stitches 1:10 Decorative stitches 1:10 Alphabets 1:11 2 Preparations 2:1 Unpacking 2:1 Connect to as simply 4.0, 3.0 and 2.0 in this manual. overview 3:1 Select a stitch 3:1 Sewing recommendations 3:1 Stitch adjustments 3:2...2:8 Lowering feed dogs 2:8 Changing the presser foot 2.8 Buttons for quilt expression™ 4.0 2:10 Buttons for expression™ 3.0 2:12 Buttons for expression™ 2.0 2:14 Settings menu 2:16 3 Sewing 3:1 Sewing mode -
... Included accessories 1:6 Presser feet 1:7 Stitch overview 1:8 Utility stitches 1:8 Quilt stitches 1:10 Needle art stitches 1:10 Decorative stitches 1:10 Alphabets 1:11 2 Preparations 2:1 Unpacking 2:1 Connect to as simply 4.0, 3.0 and 2.0 in this manual. overview 3:1 Select a stitch 3:1 Sewing recommendations 3:1 Stitch adjustments 3:2...2:8 Lowering feed dogs 2:8 Changing the presser foot 2.8 Buttons for quilt expression™ 4.0 2:10 Buttons for expression™ 3.0 2:12 Buttons for expression™ 2.0 2:14 Settings menu 2:16 3 Sewing 3:1 Sewing mode -

Owner's Manual
Page 7
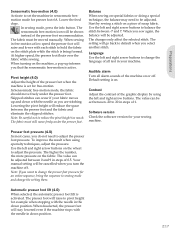
... 1/8" (3 mm). Use the markings on the foot guides the fabric. The long arm must be positioned around the presser foot bar. Manual buttonhole foot 5M This foot is used for piecing and patchwork, especially when used in light to position the garment edge. The toe on... the foot to medium weight fabric. 1/4" quilting foot with IDT (4.0) This foot is perfect for sewing manual buttonholes. The "C-shaped" guide should be behind the needle bar. Tighten the screw. Rolled hem foot 7 with IDT,...
... 1/8" (3 mm). Use the markings on the foot guides the fabric. The long arm must be positioned around the presser foot bar. Manual buttonhole foot 5M This foot is used for piecing and patchwork, especially when used in light to position the garment edge. The toe on... the foot to medium weight fabric. 1/4" quilting foot with IDT (4.0) This foot is perfect for sewing manual buttonholes. The "C-shaped" guide should be behind the needle bar. Tighten the screw. Rolled hem foot 7 with IDT,...
Owner's Manual
Page 8
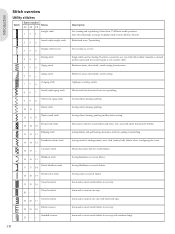
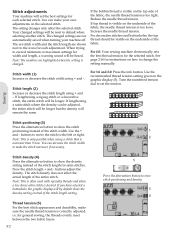
...elastic, darning, patching and decorative sewing. Decorative stitch for stretch fabrics and hems. Also used for stretch fabrics. Joining fabrics and quilt batting, decorative stitch for decorative hems or topstitching. Sewing seams on woven fabrics. Introduction Stitch overview Utility stitches Stitch number Stitch Name...fabrics. Z-zigzag stitch 776 Stretch triple zigzag stitch 887 Three-step zigzag stitch 998 Elastic stitch 10 10 - Move fabric manually to desired position and touch foot control again to sew one step. Seam and overcast stretch fabrics in the bobbin. ...
...elastic, darning, patching and decorative sewing. Decorative stitch for stretch fabrics and hems. Also used for stretch fabrics. Joining fabrics and quilt batting, decorative stitch for decorative hems or topstitching. Sewing seams on woven fabrics. Introduction Stitch overview Utility stitches Stitch number Stitch Name...fabrics. Z-zigzag stitch 776 Stretch triple zigzag stitch 887 Three-step zigzag stitch 998 Elastic stitch 10 10 - Move fabric manually to desired position and touch foot control again to sew one step. Seam and overcast stretch fabrics in the bobbin. ...

Owner's Manual
Page 16
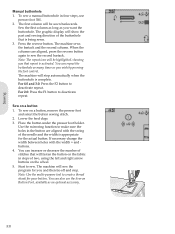
... presser foot is raised and the needle is in the up lever (E) and down in the up position to the back. Make sure that require manual threading of the right size. We also recommend lowering the presser foot. 1. Note: The needle threader is inside the needle thread guide (F) and the other...
... presser foot is raised and the needle is in the up lever (E) and down in the up position to the back. Make sure that require manual threading of the right size. We also recommend lowering the presser foot. 1. Note: The needle threader is inside the needle thread guide (F) and the other...
Owner's Manual
Page 28
... the fabric on how to adjust the values and activate settings or open toe free-motion foot is kept until you switch your local authorized PFAFF® dealer. In sewing mode, press the info button. In sewing mode, press the info button. Open the menu by pressing OK. In ...menu button again to the machine settings, sound settings and screen settings. Settings menu In the settings menu, you can override default settings and make manual adjustments to leave the settings menu. There are two icons which are shown next to some of the presser foot recommendation. In sewing mode, ...
... the fabric on how to adjust the values and activate settings or open toe free-motion foot is kept until you switch your local authorized PFAFF® dealer. In sewing mode, press the info button. In sewing mode, press the info button. Open the menu by pressing OK. In ...menu button again to the machine settings, sound settings and screen settings. Settings menu In the settings menu, you can override default settings and make manual adjustments to leave the settings menu. There are two icons which are shown next to some of the presser foot recommendation. In sewing mode, ...
Owner's Manual
Page 29
...you select another stitch. To improve the result when using the left and right arrow buttons to reduce the pivot height too much. Your manual setting will go back to pivot height for your machine. When deselected, the presser foot will stay lowered even if the machine stops with... or doing a special technique, the balance may need to 20 in your sewing machine. Use the left and right arrow buttons to be moved manually. Automatic presser foot lift (4.0) When selected, the automatic presser foot lift is on the wheel to sewing mode and change the setting there. Pivot...
...you select another stitch. To improve the result when using the left and right arrow buttons to reduce the pivot height too much. Your manual setting will go back to pivot height for your machine. When deselected, the presser foot will stay lowered even if the machine stops with... or doing a special technique, the balance may need to 20 in your sewing machine. Use the left and right arrow buttons to be moved manually. Automatic presser foot lift (4.0) When selected, the automatic presser foot lift is on the wheel to sewing mode and change the setting there. Pivot...
Owner's Manual
Page 32
... 3.0 and 2.0: Press the info button. buttons to move the stitch to set stitch width and the stitch length are shown next to change the setting manually. The changed . If lengthening a satin stitch where the density can be adjusted, the entire stitch will be longer but the density will be reset to...
... 3.0 and 2.0: Press the info button. buttons to move the stitch to set stitch width and the stitch length are shown next to change the setting manually. The changed . If lengthening a satin stitch where the density can be adjusted, the entire stitch will be longer but the density will be reset to...
Owner's Manual
Page 38
... the presser foot and select the button sewing stitch. 2. You can repeat the buttonhole as many times as an optional accessory. 3:8 To sew a manual buttonhole in four steps, use the Sew-on Button Foot, available as you want the buttonhole. Place the button under the presser foot holder. Start... to deactivate repeat. Sewing Manual buttonhole 1. Use the mirroring function to make sure the holes in steps of the needle and the width is activated. You can increase or...
... the presser foot and select the button sewing stitch. 2. You can repeat the buttonhole as many times as an optional accessory. 3:8 To sew a manual buttonhole in four steps, use the Sew-on Button Foot, available as you want the buttonhole. Place the button under the presser foot holder. Start... to deactivate repeat. Sewing Manual buttonhole 1. Use the mirroring function to make sure the holes in steps of the needle and the width is activated. You can increase or...
Owner's Manual
Page 49
...from horizontal position 2:5 Winding through the needle 2:5 Button, sew on 3:9 Buttonholes 3:7 Manual buttonhole 3:8 Sensormatic buttonhole 3:8 Buttons expression™ 2.0 2:14-2:15 expression™ 3.0 2:12-2:13 quilt expression™ 4.0 2:10-2:11 C Changing the light bulbs 5:1 Changing the needle 2:8 ... Machine overview 1:5 Accessory tray 1:6 Front side 1:5 Included accessories 1:6 Presser feet 1:7 Top parts 1:5 Maintenance 5:1 Manual buttonhole 3:8 Mirroring 2:11, 2:13, 2:15, 3:3 N Needle, changing 2:8 Needle art stitches 1:10 Needles 2:7 Needle threader 2:4 Needle up/down...
...from horizontal position 2:5 Winding through the needle 2:5 Button, sew on 3:9 Buttonholes 3:7 Manual buttonhole 3:8 Sensormatic buttonhole 3:8 Buttons expression™ 2.0 2:14-2:15 expression™ 3.0 2:12-2:13 quilt expression™ 4.0 2:10-2:11 C Changing the light bulbs 5:1 Changing the needle 2:8 ... Machine overview 1:5 Accessory tray 1:6 Front side 1:5 Included accessories 1:6 Presser feet 1:7 Top parts 1:5 Maintenance 5:1 Manual buttonhole 3:8 Mirroring 2:11, 2:13, 2:15, 3:3 N Needle, changing 2:8 Needle art stitches 1:10 Needles 2:7 Needle threader 2:4 Needle up/down...


