
Owner's Manual
Page 2
... plate. To reduce the risk of lint, dust, and loose cloth. • Keep Àngers away from the electric outlet immediately after using and before cleaning. • Always unplug before using an electrical appliance, basic safety precautions should always be identical to break. • Wear safety glasses. • Switch the sewing...
... plate. To reduce the risk of lint, dust, and loose cloth. • Keep Àngers away from the electric outlet immediately after using and before cleaning. • Always unplug before using an electrical appliance, basic safety precautions should always be identical to break. • Wear safety glasses. • Switch the sewing...
Owner's Manual
Page 4
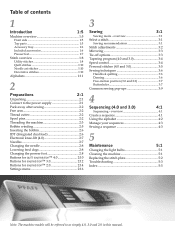
...the alphabet 4:2 Manage your sequences 4:3 Sewing a sequence 4:3 5 Maintenance 5:1 Changing the light bulbs 5:1 Cleaning the machine 5:1 Replacing the stitch plate 5:2 Troubleshooting 5:3 Index 5:5 Note: The machine models will be...knee-lift (4.0 2:7 Needles 2:7 Changing the needle 2:8 Lowering feed dogs 2:8 Changing the presser foot 2.8 Buttons for quilt expression™ 4.0 2:10 Buttons for expression™ 3.0 2:12 Buttons for expression™ 2.0 2:14 Settings menu 2:16 3 Sewing 3:1 Sewing mode - overview 3:1 Select a stitch 3:1 Sewing ...
...the alphabet 4:2 Manage your sequences 4:3 Sewing a sequence 4:3 5 Maintenance 5:1 Changing the light bulbs 5:1 Cleaning the machine 5:1 Replacing the stitch plate 5:2 Troubleshooting 5:3 Index 5:5 Note: The machine models will be...knee-lift (4.0 2:7 Needles 2:7 Changing the needle 2:8 Lowering feed dogs 2:8 Changing the presser foot 2.8 Buttons for quilt expression™ 4.0 2:10 Buttons for expression™ 3.0 2:12 Buttons for expression™ 2.0 2:14 Settings menu 2:16 3 Sewing 3:1 Sewing mode - overview 3:1 Select a stitch 3:1 Sewing ...
Owner's Manual
Page 8
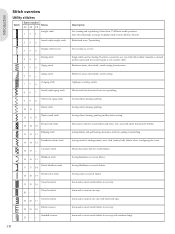
... decorative sewing. Joining stitch for undergarments, terry cloth, leather, bulky fabrics where overlapping the seams. Elastic decorative hem for quilting, hemstitching. Reinforced seam. Single stitch used with elastic thread in one step. Sewing elastic, darning, patching. Sewing blindhems ...-off than stitch 51 (4.0) / 40 (3.0) / 32 (2.0). Sew continuous reverse. Select from 37 different needle positions. Reinforce seams, clean Ànish, stretch sewing. Touch foot control to sew another stitch. Appliqué, couching, eyelets. Seam and overcast in one step...
... decorative sewing. Joining stitch for undergarments, terry cloth, leather, bulky fabrics where overlapping the seams. Elastic decorative hem for quilting, hemstitching. Reinforced seam. Single stitch used with elastic thread in one step. Sewing elastic, darning, patching. Sewing blindhems ...-off than stitch 51 (4.0) / 40 (3.0) / 32 (2.0). Sew continuous reverse. Select from 37 different needle positions. Reinforce seams, clean Ànish, stretch sewing. Touch foot control to sew another stitch. Appliqué, couching, eyelets. Seam and overcast in one step...

Owner's Manual
Page 39
... machine is almost empty, the machine stops automatically and a pop-up appears on the screen. The pop-up message will stop sewing. Remove thread jam (4.0) Clean the area under the stitch plate from thread and lint. Replace the empty bobbin with a full one and press OK on the wheel to con...
... machine is almost empty, the machine stops automatically and a pop-up appears on the screen. The pop-up message will stop sewing. Remove thread jam (4.0) Clean the area under the stitch plate from thread and lint. Replace the empty bobbin with a full one and press OK on the wheel to con...
Owner's Manual
Page 45
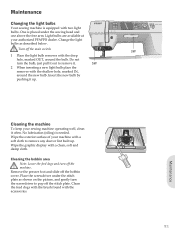
... turn the bulb, just pull it out to remove any dust or lint built up . 123 456 789 0 3W Maintenance Cleaning the machine To keep your authorized PFAFF® dealer. Maintenance Changing the light bulbs Your sewing machine is equipped with the accessories. 5:1 Do not turn off the ... and slide off the machine. One is needed. Light bulbs are available at your sewing machine operating well, clean it . 5W 2 When inserting a new light bulb place the remover with a clean, soft and damp cloth. No lubrication (oiling) is placed under the stitch plate as described below. Place...
... turn the bulb, just pull it out to remove any dust or lint built up . 123 456 789 0 3W Maintenance Cleaning the machine To keep your authorized PFAFF® dealer. Maintenance Changing the light bulbs Your sewing machine is equipped with the accessories. 5:1 Do not turn off the ... and slide off the machine. One is needed. Light bulbs are available at your sewing machine operating well, clean it . 5W 2 When inserting a new light bulb place the remover with a clean, soft and damp cloth. No lubrication (oiling) is placed under the stitch plate as described below. Place...
Owner's Manual
Page 46
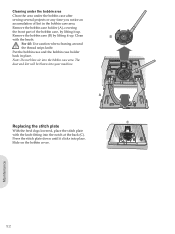
... in the bobbin case area. Note: Do not blow air into your machine. The dust and lint will be blown into the bobbin case area. Clean B with the knob Àtting into place. Slide on the bobbin cover. Remove the bobbin case (B) by lifting it up . Remove the bobbin... case holder (A), covering the front part of lint in place. Cleaning under the bobbin area Clean the area under the bobbin case after sewing several projects or any time you notice an accumulation of the bobbin case, by lifting...
... in the bobbin case area. Note: Do not blow air into your machine. The dust and lint will be blown into the bobbin case area. Clean B with the knob Àtting into place. Slide on the bobbin cover. Remove the bobbin case (B) by lifting it up . Remove the bobbin... case holder (A), covering the front part of lint in place. Cleaning under the bobbin area Clean the area under the bobbin case after sewing several projects or any time you notice an accumulation of the bobbin case, by lifting...
Owner's Manual
Page 47
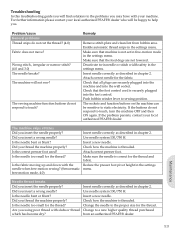
...machine properly? Is the needle too small for the thread. Use needle system 130/750 H. For further information please contact your local authorized PFAFF® dealer who will be sensitive to static electricity. Attach correct presser foot. Are you . Check how the machine is threaded. Problem.../cause General problems Thread snips do not respond to touch? Remedy Remove stitch plate and clean lint from an authorized PFAFF® dealer. Enable automatic thread snips in the settings menu. Make sure that all plugs are not lowered. Is the ...
...machine properly? Is the needle too small for the thread. Use needle system 130/750 H. For further information please contact your local authorized PFAFF® dealer who will be sensitive to static electricity. Attach correct presser foot. Are you . Check how the machine is threaded. Problem.../cause General problems Thread snips do not respond to touch? Remedy Remove stitch plate and clean lint from an authorized PFAFF® dealer. Enable automatic thread snips in the settings menu. Make sure that all plugs are not lowered. Is the ...
Owner's Manual
Page 48
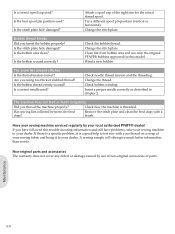
...described in chapter 2. A sewing sample will often give much better information than words. Try a different spool pin position (vertical or horizontal). Clean lint from bobbin area and use of non-original accessories or parts. Is a correct needle used ? Check needle thread tension and the threading...Bobbin thread breaks Did you thread the machine properly? Is the bobbin area clean? Has sewing lint collected between the feed dogs? Have your sewing machine serviced regularly by use only the original PFAFF® bobbins approved for the actual thread spool. Wind a new bobbin....
...described in chapter 2. A sewing sample will often give much better information than words. Try a different spool pin position (vertical or horizontal). Clean lint from bobbin area and use of non-original accessories or parts. Is a correct needle used ? Check needle thread tension and the threading...Bobbin thread breaks Did you thread the machine properly? Is the bobbin area clean? Has sewing lint collected between the feed dogs? Have your sewing machine serviced regularly by use only the original PFAFF® bobbins approved for the actual thread spool. Wind a new bobbin....
Owner's Manual
Page 49
... horizontal position 2:5 Winding through the needle 2:5 Button, sew on 3:9 Buttonholes 3:7 Manual buttonhole 3:8 Sensormatic buttonhole 3:8 Buttons expression™ 2.0 2:14-2:15 expression™ 3.0 2:12-2:13 quilt expression™ 4.0 2:10-2:11 C Changing the light bulbs 5:1 Changing the needle 2:8 Changing the presser foot 2:8 Cleaning 5:1 Clear button 2:11, 2:13 Connect the foot control 2:1 Connect to the power supply 2:1 Contrast setting...
... horizontal position 2:5 Winding through the needle 2:5 Button, sew on 3:9 Buttonholes 3:7 Manual buttonhole 3:8 Sensormatic buttonhole 3:8 Buttons expression™ 2.0 2:14-2:15 expression™ 3.0 2:12-2:13 quilt expression™ 4.0 2:10-2:11 C Changing the light bulbs 5:1 Changing the needle 2:8 Changing the presser foot 2:8 Cleaning 5:1 Clear button 2:11, 2:13 Connect the foot control 2:1 Connect to the power supply 2:1 Contrast setting...


